Hubby How To: DIY Trundle Bed
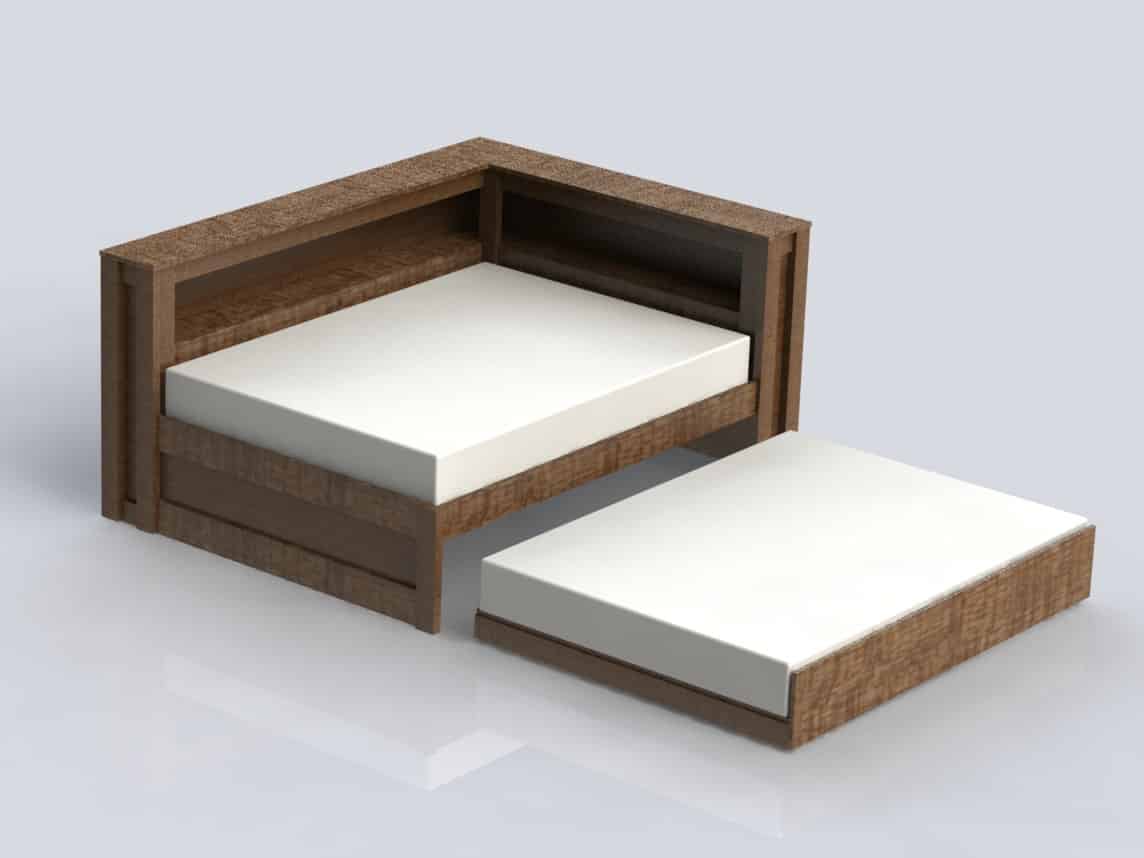
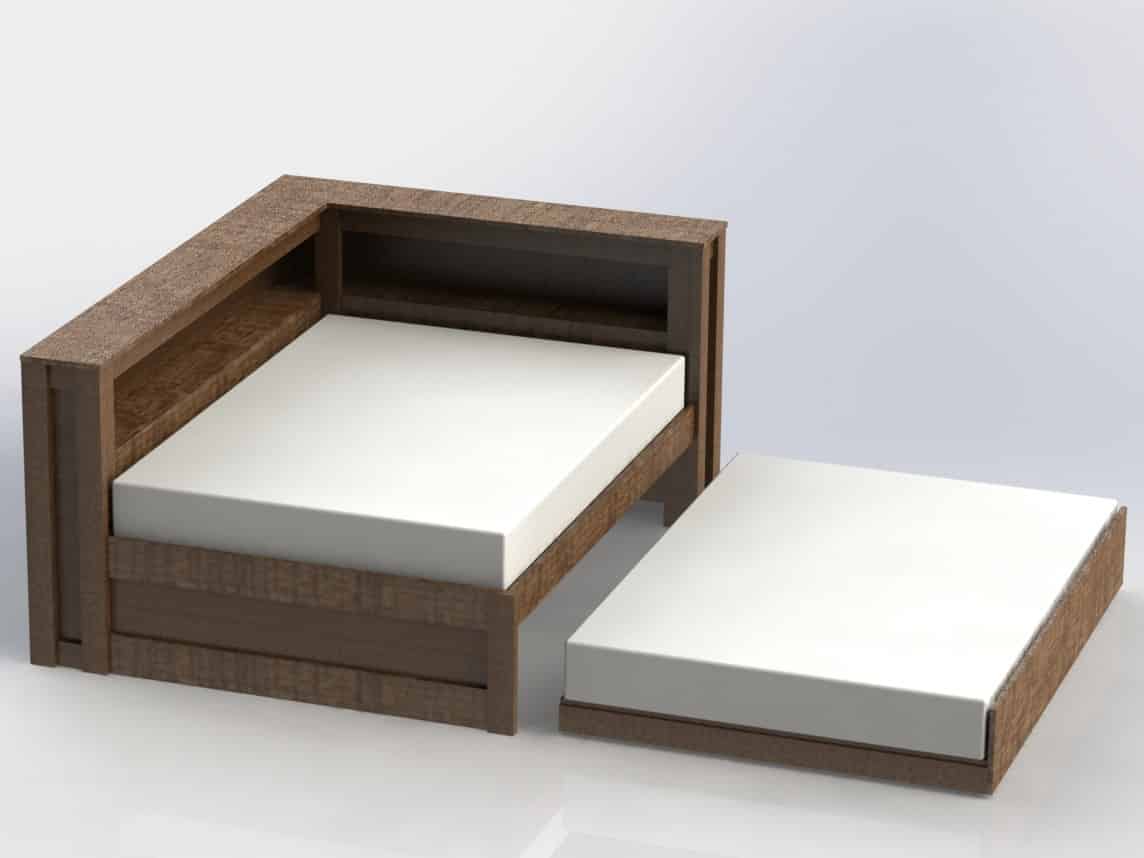
Looking to build a DIY Trundle Bed with two full sized mattresses to maximize your space? Also, need some shelving and storage? Well, this Hubby How To covers a DIY trundle bed with a bookcase. Read on for the plans, tools, materials, and instructions.
Updated 3/17/2024

This post may contain affiliate links. Read about our privacy policy.
This is a bit of a unique project for all of you! As you may know, we love doing DIY projects around our home. Over the years we have gotten better and better at these projects, but we’ve always wanted to encourage entry level individuals to experience the joy of a DIY project.
It’s with this goal in mind we decided to start producing detailed plans and instructions for our projects. This way our fellow DIY’ers can build beautiful pieces with limited prior experience or tools.
A customer on Etsy saw some of our plans and reached out to us with a unique proposal. They asked if we could make them plans for a Full trundle bed with a bookcase. After a little research to see what’s out there, we were sure we could. In fact, we put together our most detailed set of plans yet, and have it available in three sizes.
But our plans always come with instructions and so here we are! Hop on over to our Shop or Etsy and grab yourself a set of plans for this DIY bookcase trundle bed and then let’s dive in!
DIY Full Trundle Bed – Tools
- Tape Measure
- Drill
- Framing Square
- Jig Saw
OR Miter Saw (Preferred) AND/OR Table Saw (Preferred)
Materials Required
- (4) – 1 x 2 x 96 Board
- (44) – 1 x 4 x 96 Board
- (5) – 1 x 6 x 96 Board
- (2) – 1 x 8 x 96 Board
- (3) – 1 x 12 x 96 Board
- (14) – 2 x 4 x 96 Board
- (3) – 1/4 x 48 x 96 Sheet
- (2) – 2″ Swivel Caster
- (2) – 2″ Fixed Caster
- 2.5″ Screws
- 2″ Screws
- 0.5-0.75″ Screws
DIY Plans
Yup. You read that right. This whole build can be done with nothing other than a jigsaw and a drill. A miter saw or a table saw can make your cuts more accurate and easier. However, we wanted this project to be able to be done by anyone with nothing other than a cheap, simple tool.
Moreover, the way these boards fit together, there will be some small clearance gaps built-in so that nothing is ever over-constrained. If your cuts aren’t perfect, that’s okay. Just do your best to measure them and mark them with your framing square, then try to follow the line as best you can. You got this!
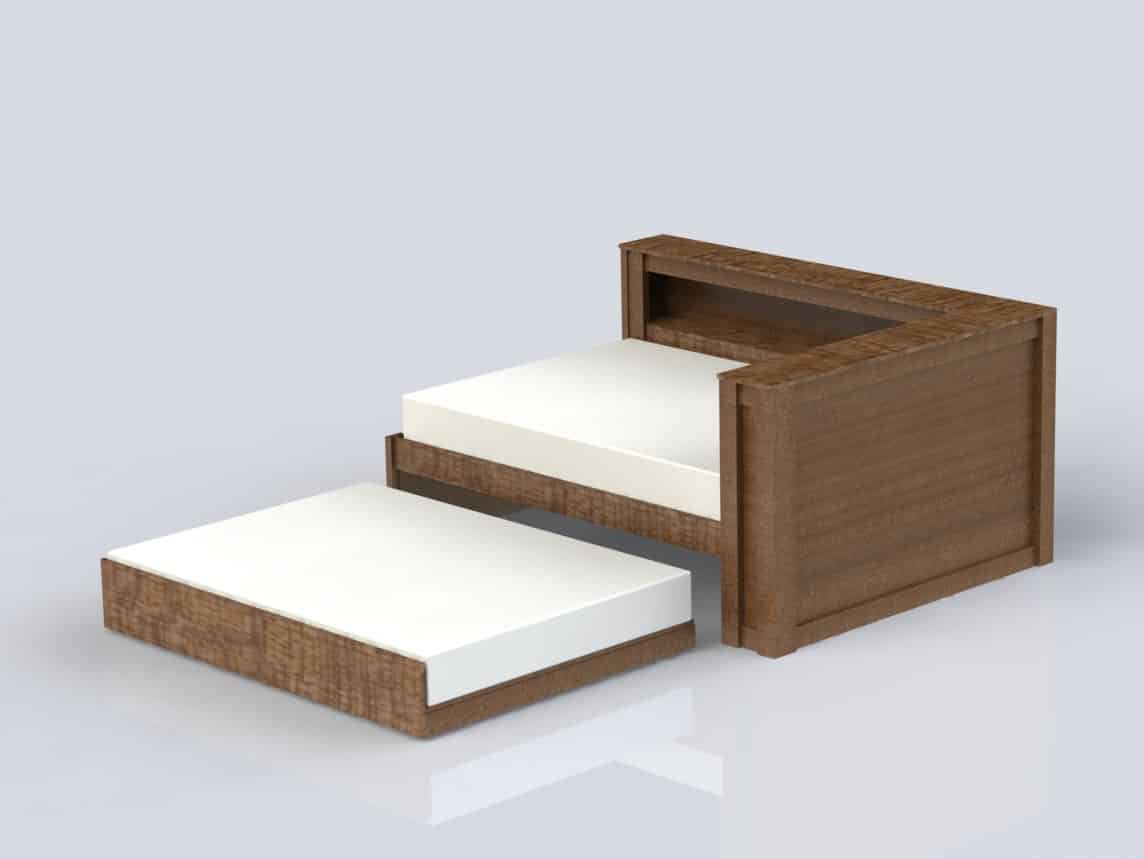
Another important thing to note. Since this build was requested by a customer, we have never built it. So you won’t see actual wood or final built product in the images below. Everything you see is only a computer-generated rendering.
But we have set up these plans to show you the step-by-step assembly process, and are confident in the design. If you have ever put together a kit of Legos, or a piece of IKEA furniture then you can do this too! And if you haven’t, then I suppose this is as good a time as any to learn!
- Full Trundle Bed with Bookcase
- Full Trundle Bed Assembled
DIY Full Trundle Bed – Instructions
Step 1: Gather Materials
Alrighty! First things first. You are going to want to pick up a set of the plans for this build. This will cover all of the cut dimensions for every board and how many you will need and then will show you where they go during assembly. Swing on over to our Shop or Etsy to get your plans! They’re available in three sizes.
Next up, you are going to need to gather our materials. You can find the list above. Now, if your local store offers boards in shorter lengths, then you may be able to save a few dollars here and there by buying some shorter boards. This is especially true on the boards that make up the platform since it uses so many. However, since that is not an option for everybody, we specified standard length boards to be sure.
Wood Selection
The wood you choose is primarily determined by the finish you want to apply. If you want a natural finish with just an oil and/or clear coat, then you’ll want to pick a nicer variety of wood. Think Oak, Maple, Cherry.
If you want to stain the boards, then going with a premium “white wood” will give you a decent grain pattern and will take the stain rather well. Since they are so pale naturally, they will take on the color of the stain reliably.
If you are planning on painting the boards, you can choose the cheaper white wood that most stores offer. Stores generally call this common board. Your paint will hide most defects, but you’ll want to watch out for bow, twist, or other deformations. Especially try to avoid large rough knots that could show through the paint. It may still be better to choose the premium board for this project instead.
For the plywood, there is generally a sanded plywood variety with a nice finish and few to no defects on the surface of the board. I would gravitate to these rather than trying to get by with a cheaper sheet.
Screws, Casters, & Mattress
Recommended screw lengths are called out above. I recommend buying the self drilling torx head variety (also called star drive head). You may still want to pre-drill the holes near the edge of boards, but just let the screw do the work on the rest of them. If you haven’t tried torx head screws yet, then this is a great time to give them a shot. Once you do, you’ll never want to use Philips heads again!
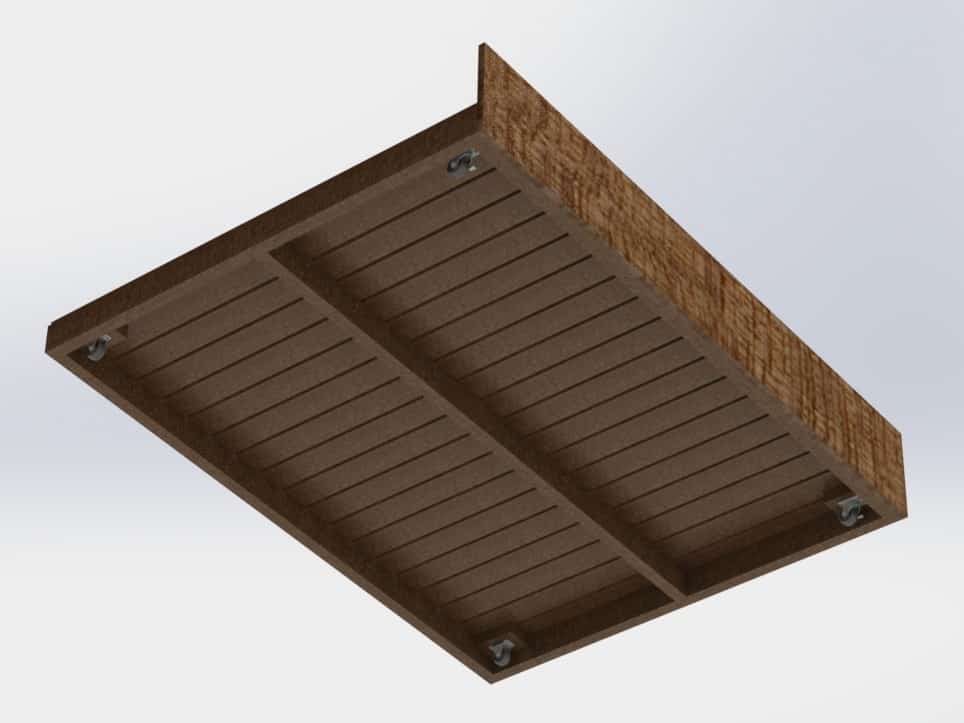
The DIY full size trundle bed will require a couple of casters to help the trundle roll in and out. Make sure the casters are the right height or it won’t fit. Be sure to check and measure them. Some adjustment can be made to the block’s position that holds these, but it’s better if you can have the right height to start with.
Don’t forget the mattress! These plans are designed for two full size mattresses. The trundle mattress needs to be 8” tall or shorter and the top mattress can be either 8 or 10” tall. Any taller than that and it will start to cover the shelf and will be difficult for a child to climb into. Please verify that your mattresses are actually 75” long. If they are longer than that, then you may need to lengthen several boards to make everything fit.
Step 2: Cut The Boards
Alright, now with all of our materials gathered, it’s time to start cutting our boards. Start by taking your set of plans and flipping to the cut board pages. Here you’ll find the quantity of each board needed along with its finished dimensions. Go ahead and sort your boards in piles and put the drawing with each pile.
Try to pick the prettiest boards to be the boards that are visible. If you have any boards with defects in them like knots or a hooked end, try to associate them with the drawing that will cut those ends off. If you have any boards that are bowed, associate them with the shortest finish board length possible. This way the bow gets cut into smaller pieces and has less impact on your assembly. A few of the smallest boards can be made from the off cuts of longer boards, so keep that in mind as you are planning out your cuts.
Mark the Cuts
With all of the boards sorted out, it’s time to start marking your cuts. Grab your tape measure, framing square, and a pencil and mark each board. If you are using a jigsaw, make sure to mark the whole width of the board so that you have a straight line to follow.
If using a miter saw or table saw, then you only need to mark one of each of the platform boards. You can set up a stop block to make the rest of the cuts repeatedly.

For the plywood pieces, a layout guide is included in the drawing plans. Use a tape measure and a straightedge to mark out the pieces of plywood. If you don’t have a straight edge long enough, use the edge of another sheet of plywood. Plywood is much straighter than most boards are.
HUBBY TIP – There are a lot of similar boards in the build, so label each board. I recommend writing the name on a piece of masking tape or painters tape. Using tape means you don’t have writing on the board itself to sand off later.

Make the Cuts
With everything marked, it’s time to cut your boards. Grab your chosen tool, put on your safety glasses and hearing protection and get to work.
All of the cuts are straight, simple cuts. If you are using a jigsaw and having a hard time keeping it straight, then try this helpful tip. Line up your jigsaw at the cut line and then hold or clamp your square to the board so it’s up against the edge of the jigsaw. This way the jigsaw can follow the straight edge of the square.

Take your time to make these cuts, and double check measurements as you go. This is especially true on the 1×6 “Bed Frame Long” board. If this board is too short, then you’ll have trouble getting your full trundle bed to fit. Try to cut just to the side of your line so that the material removed by the saw blade leaves you with an exactly the right size board.
It’s always better to be a little long and have to shave material back off than to be too short and have a gap you can’t fill. Before long you’ll have a pile of cut lumber and you’ll be ready to move on to the next step.
Step 3: Prep and Finish The Boards
Now it’s time to prep and finish all the boards. If you are going to stain them, then you will want to sand the boards completely with 60-80 grit paper followed by 120-180 grit. This will give you the most consistent finish.
If you plan to paint them, then you only need the coarser grit sandpaper. Give the surface a quick once over and smooth the edges to prevent splinters. This is especially important on the cut edges of most visible boards, but isn’t necessary on the hidden boards like the platform boards.
With the boards sanded, I recommend you go ahead and finish them now. Doing this before assembly ensures there won’t be any gaps or cracks you weren’t able to stain or get paint in. No one wants an obvious error showing on your final product.
Paint or stain each board one side at a time. If you choose to paint, then be sure to clean up or clear out any dust in the area from sanding ,then give the air a chance to settle before you start painting.
If you are staining, then remember to wipe off excess stain with a rag so your boards don’t end up being tacky. It can also be beneficial to apply a protective clear coat to the boards. We generally don’t because we don’t like the look and feel of this coating. However, it means we have to be careful with our wood and not leave any cold beverages sitting on them.

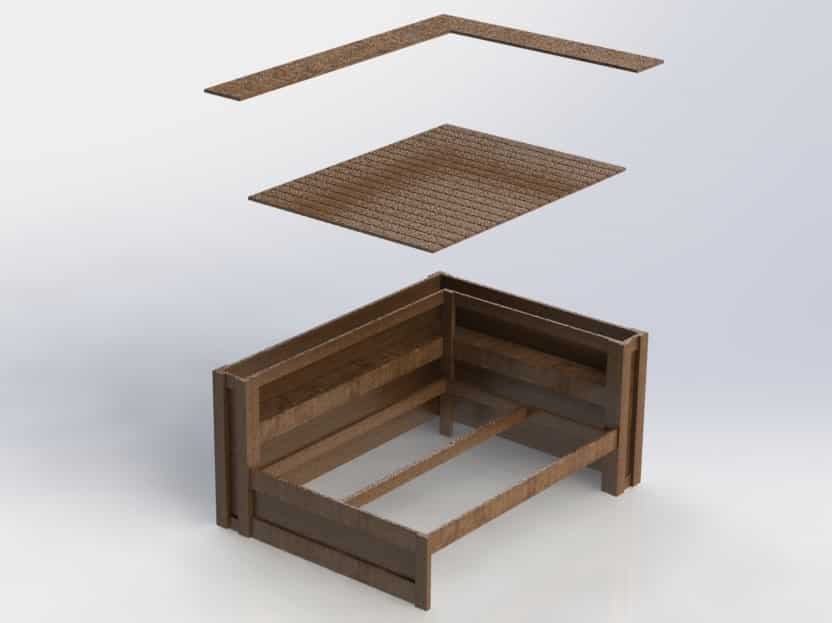
Step 4: Assemble The Platform
The first thing to do is assemble the frame of our platform bed. Start by laying out your 2×4’s in the arrangement shown in Step 1 of your plans. Using long screws, screw together each of the butt joints. Be sure to do this on a level surface and keep the faces of the boards aligned. Simply drive two screws through the face of one board and into the length of the other.
Remember when driving screws near the cut edge of boards, it can be helpful to pre-drill an ⅛” pilot hole to help prevent the boards from splitting.
Attaching Bed Frame Legs
Once the frame is assembled, attach the legs as shown in Step 2 of your plans. Start by raising the platform 14” off the ground. Use cardboard boxes, a storage tote, scrap wood, or a helper to support the frame and keep it at 14”. It is also helpful to mark each of your legs with a line 14” from the bottom edge so you can align the frame correctly before securing it with screws.
For the 3 longer legs, start by aligning the boards as shown in the plans with the edges of the frame. Then drive 2 long screws through the face of each board and into the frame to secure these 3 legs.
For the shorter leg, you’ll want to hide the screws. I recommend running two long screws at an angle from the inside of the frame and into the back side of the short board. This will secure it without any visible screw heads.
HUBBY TIP – When making pocket screws, it is best to pre-drill your holes. Start with an ⅛” drill bit. Hold it perpendicular to the wood, and drill in about ¼”. While still running your drill, rotate the drill to a steep angle so the drill bit is pointed toward the back of the board you want to drill into. Then push forwards to continue drilling until you make contact with the piece that you want to attach.
Swap out the small drill bit with one close to or bigger than the size of your screw head. Drill slightly into the wood. This will help sink the screw head to give you a better finish. Finally, drive the screw through the finished pilot hole and into the board you wish to secure. This process is pretty straightforward once you get the hang of it, but I recommend practicing on some scrap pieces first.
Step 5: Attach your Decorative Framing Boards
Next, it’s time to start framing out the four legs on the bed frame. Start by adding two more of the Long Legs to two of the corners. Looking at Step 3 on your plans, there are dimensions for the positioning of these boards. This dimension makes the board overlap the other 2×4 slightly to create a reveal.
The reveal is so you don’t have to be perfect about getting everything aligned. These dimensions also correspond to the 1×6 boards “Bed Frame Short” and “Bed Frame Long”. Use these boards as spacers to help you position these long leg pieces and adjust as necessary in order to minimize gaps. I recommend securing these legs by pocket screwing 4 long screws through the hidden side of the existing legs and into the back of the new legs.
Adding Decorative Frame Boards
Once you have the legs attached, add the decorative trim boards as shown in Step 4 of your plans. You’ll need the 1×6’s mentioned above along with the 1×4 and 1×6 “Mattress Short” and “Mattress Long” boards.
Starting with the Mattress boards, put 2 pocket screws into the back face at each end. Using these screws, secure them to the leg boards. If the leg boards are not perfectly plumb, you may find your boards don’t fit or there is a gap.
First, make sure the 1×6 and 1×4 pairs are the same length and correct dimension. If they are, then you can rely on them to force your legs to be plumb. Remove all but one screw from the troublesome leg, then twist it into alignment and drive a screw into a new hole to secure it.
If your boards are slightly too short, then cut yourself a scrap piece of plywood and use it to secure the boards. But this will leave you with a slight gap. I recommend securing the top board first. Then measure from the top edge of each leg and mark the position of the lower board as shown in the plans. Position the lower board to this mark and secure it as well.
With the Mattress boards secure, install the 1×6 Bed Frame boards. Note these boards do sit above the 2×4 bed frame in order to hide the platform boards added later.
Mark this distance on the 1×6 boards’ back face at both ends and use this mark to help you position the boards. These boards will go on easily by running several medium length screws through the back face of the 2×4 Bed Frame and into the back face of the 1×6 Boards. Adjust the position of the additional 2×4 board from earlier, if necessary.
With that, all of the legs should now be plumb and properly positioned. Everything after this should go together pretty smoothly. So congratulations, you completed the hard part!
Step 6: Add MORE Decorative Framing
With the first bit of decorative framing finished off, it’s time to frame out the rest of the bed. To save us some hassle later, pre-assemble the leg pieces for the next three corners to form L-shapes. This is shown in Step 5 of your plans. Pay attention to the positioning of the pieces, align the edges, and use long screws in pocket screws to secure the boards together. Now, you’re ready to start assembling the rest of the frame.
Referring to Step 6 of your plans, you’ll see two pages. The first is an exploded view to help reference where every piece goes. The second gives the top down and assembled views. The dimensions here are for reference. You may not hit those dimensions exactly if your boards aren’t cut precisely, but you should be reasonably close.
Assemble Mattress Trim
To assemble this, start with the Short Mattress side. Start by placing the sheet of plywood behind the 2×4 legs and 1×6 trim board so it is underneath the bed frame. Secure it by driving several short screws through the back side of the plywood and into the back side of the legs and trim.
Now bring in the second 1×6 Trim Board. Attach it to the plywood by screwing several short screws through the back of the plywood and into the back of the trim board. This board should fit since we adjusted the legs for plumb earlier. However if it doesn’t fit, then you will need to adjust the legs slightly until it fits, or trim the board if it isn’t quite the right dimension.
Repeat The Process
Now repeat this process of installing plywood then attaching trim and work your way around the bed. Start with the “Skinny Side” Plywood pieces and the “Shelving Depth” 1×4 pieces.
First place the piece of plywood against the back face of the Long Leg 2×4 and make sure it is touching the corner between the two long legs. Using short screws, secure it in place from its back face. Now position the trim 1×4 pieces on the front face of the plywood and align them with the top and bottom edges of the legs. Make sure the pieces are touching the edge of the leg. Then secure them with short screws through the back face of the plywood and into the back face of the trim.
Finally, bring in the corresponding pair of legs that you pre-assembled. Align this leg pair with the top and bottom edge of the trim. Secure it by screwing through the back face of the plywood and into the back face of the leg with short screws.
Repeat this exact same process with the other two pieces of plywood and their corresponding trim pieces along with your final pre-assembled leg. The plywood is slightly undersized here so that the length of the trim pieces drives the fit of the assembly. If anything doesn’t go together right, then it is likely due to the trim pieces, so check them first.
Step 7: Install The Shelf
Now with all of the trim pieces installed, the bed frame will be looking pretty complete. But you may notice the back face isn’t very rigid yet. This is because there is some flex to the plywood back joints. This will all tighten up once the shelves are installed.
To do this, start by installing support strips for the shelf. These will help carry the weight of anything put on the shelf. These strips will be installed below the edge of the trim board in order to ensure the shelf is aligned with the edge of the trim. This can be seen on Step 7 of your plans.
Transferring Trim Measurements
- Mark ¾” down from the back side’s top edge of your lower trim board.
- Measure how far the mark is from the top edge of the top trim board.
- Measure this same distance from the top of the back wall and make a mark on the plywood.
By transferring this measurement, you can account for any variance in the positioning of the shelf trim board.
Attach Trim Board Strips
Start with the strips that connect to the two trim boards. Align the strips with your marks. Secure them with medium screws through their back face and into the back face of the trim board.
If these strips don’t align with each other at the corner, then your trim boards may not be installed at the same height. This will cause a mismatch in the height of your shelves. I suggest you adjust the trim boards as needed to correct this difference.
It may be a bit tricky to get in here to get your drill positioned. Drive these screws at an angle, if needed, in order to get your drill to fit. If the angle gets too steep, you may switch to long screws so you still get good engagement.
Attach Plywood Strips
Next, install the strips that connect to the plywood side. Since the majority of the pieces’ length will only be up against plywood, you don’t want to drive screws through the middle of the plywood. They will punch through. You don’t want to come from the backside and have a screw head in the middle of the plywood either.
I recommend running a bead of glue along the length of the strip. Then put two screws in each end where you can run the screw through the strip and into the trim behind the plywood. This will hide the screw, and once the glue dries, it will help to support any load.
Drop In Shelves
With the strips in place, go ahead and drop in the shelves. If your plywood joints have flexed, then the shelves might not fit as the frame will not be square. Simply push and pull on your frame to flex the plywood until the shelves drop in.
You can either secure the shelves by screwing them from the top down into the support strips, or by coming from underneath and screwing through the support strip and into the underside of the shelf. Given the angle of approach, you may need to pocket hole these screws. So choose your screw size carefully. Once these are screwed in, the whole back of your frame should feel considerably more rigid!
Install Top Shelf
Next, install the top shelf. The boards will simply lay on top. You can overhang them slightly all the way around. Or align the back edge so they fit against a wall and have a slightly larger overhang on the front faces.
Position the boards to fit your space and then secure them. Either screw down through the top and into the trim board, or pocket hole up from the bottom in order to hide your screw heads. I highly recommend sticking with pocket holes at this point!
Step 8: Add The Platform Boards
Now time to drop in all of the platform boards. I recommend putting at least one screw into the center of each board to secure them. Screwing each end and the center will provide your frame with the strength it needs for a bouncy kid. These screws will be hidden by the mattress, so just use medium screws to screw down through the top face of the platform board and into the frame below. It couldn’t be easier!
Tada! Your main bed frame is now fully assembled!!
Step 9: Assemble The Full Trundle Bed
The trundle bed is fit in the opening underneath the main mattress. Since both mattresses are full size, there isn’t a lot of wiggle room here. What’s important is to verify the 1×12 “Trundle Face” board fits in the opening with a reasonable gap on either side of it. If the 1×6 trim board was cut short or this board was cut long, then it may get tight. But there should be enough wiggle room in the measurements that everything will still fit.
The second thing to check is if the 1×12 is the same length or slightly longer than the 2×4 “Trundle Side” board. If the 2×4 is slightly longer, then it may be visible or it may not fit the opening. Trim it slightly, if needed. Both of these boards are 75” long, which is the same length as a standard full size mattress. If they fit the opening, then your mattress should fit too.
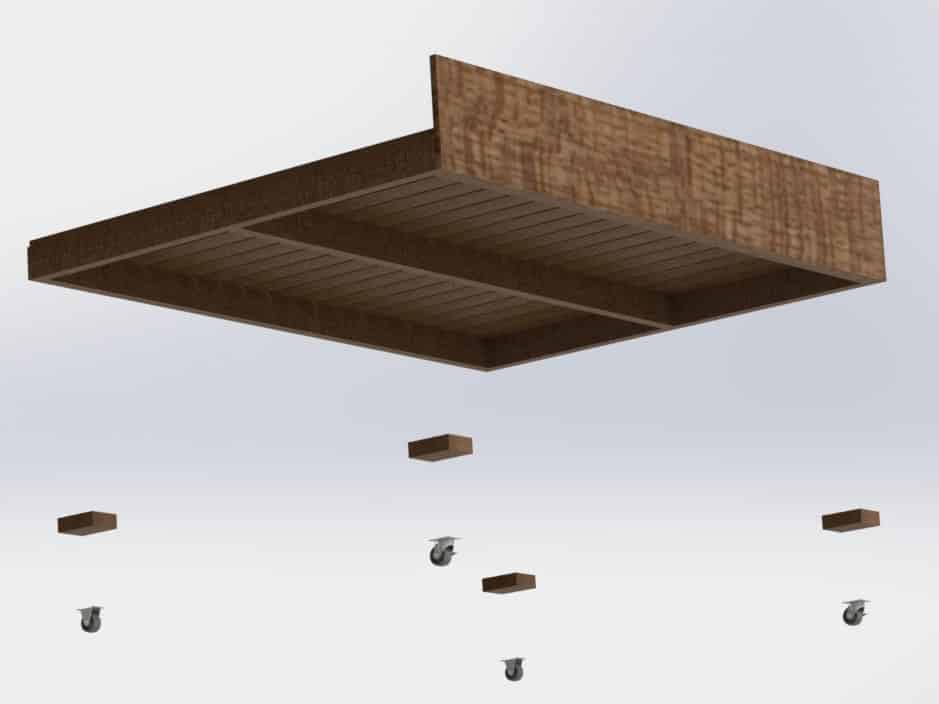
Assemble Trundle Frame & Platform
Start by screwing together the 2×4 Frame just like in the first step of the Main Bed Frame. Then, go ahead and add the platform boards. Secure the butt joints with 2 long screws in each joint. Space them out a little bit and make sure they don’t overhang on the side the Trundle Face board will be secured to. Screw them down in 2 or 3 places with medium screws.
Stand the frame up on its side to make this next step easier. Bring in the 1×12 Trundle Face board and align its bottom edge with the bottom edge of the 2×4. Then secure it with medium screws by screwing through the back of the 2×4 and into the back face of the 1×12. Try to place screws near the top and bottom edges of the 2×4 to really strengthen the connection. Additionally, place several along the length.
Attach The Trundle Wheels
With the frame still standing up on its side, attach the wheels. Start with the Wheel Spacer Blocks. Place the blocks in each corner of the frame so they touch the platform boards. Then secure them with a couple of long screws through the board face and into the blocks. You can also do pocket hole screws from the block’s side, if that is easier for you. We aren’t so worried about hiding screws here since the trundle bed will be hidden most of the time.
Finally, attach the wheels to the spacer blocks. I recommend two fixed and two pivoting casters in order to make it easier to steer the bed into its opening. Make sure the fixed casters are pointing straight forward in the direction it will roll. Line the casters up with an edge if you need to, then screw them to the spacer block with short screws.
The wheels should stick just past the bottom of the 2×4 frame. If they don’t, then reposition your spacer block lower. Using scrap pieces of plywood as shims can be very helpful here to keep their height consistent.
Step 10: Put The Full Trundle Bed Together!
Congratulations! You did it! All that’s left now is to bring in your mattresses and drop them on the platforms. Then you’re full size daybed with trundle and bookcase will be complete.
The top one should fit into its recess with a little bit of gap around the side so that you have room to tuck in comforters, if you wish. The bottom one will simply rest on its platform and should be just as long as the face board and platform.
Now just align the trundle bed with its opening and roll it into place. If everything has gone together alright so far and you double checked the opening earlier, then the full size trundle bed should slide right in.
If it does, breathe a sigh of relief and give yourself a pat on the back. You just completed your DIY full trundle bed project! Make sure to check out our other Hubby How To’s and DIY projects!
- Final Full Trundle Bed
- Final Full Trundle Bed with Mattresses
More DIY Projects
Now you have a guide on how to build playroom, so make sure to check out these 15 DIY projects at home you can do or our DIY project archives! Whether you’re looking to DIY furniture like a hanging bed or for the perfect balance of DIY and sustainable living with a stacked rain barrel system, we’ve got a ton of resources for you.
Hope this helps you build an awesome DIY trundle bed! Let us know what you think and share with us pictures in the comments below!


Disclaimer: This post includes affiliate links, and I will earn a commission if you purchase through these links. Please note that I’ve linked to these products purely because I recommend them and they are from companies I trust. There is no additional cost to you.

