How To Build A Wood Retaining Wall On A Slope
Thinking about leveling off a slope to create more space, reduce erosion, or just retain some dirt? This is a common occurrence, but retaining walls can get expensive. Here’s how to build a wood retaining wall yourself with a full How-To guide from planning and design to the construction of the wall.
Updated 6/23/2023

Disclaimer: This post includes affiliate links, and I will earn a commission if you purchase through these links. Read about our privacy policy.
There are so many ways to build a retaining wall, but some of the most common ways are either a block retaining wall or a wood retaining wall. We had a block retaining wall built to terrace our sloped backyard. But when other people do the work, retaining walls can get expensive quickly.
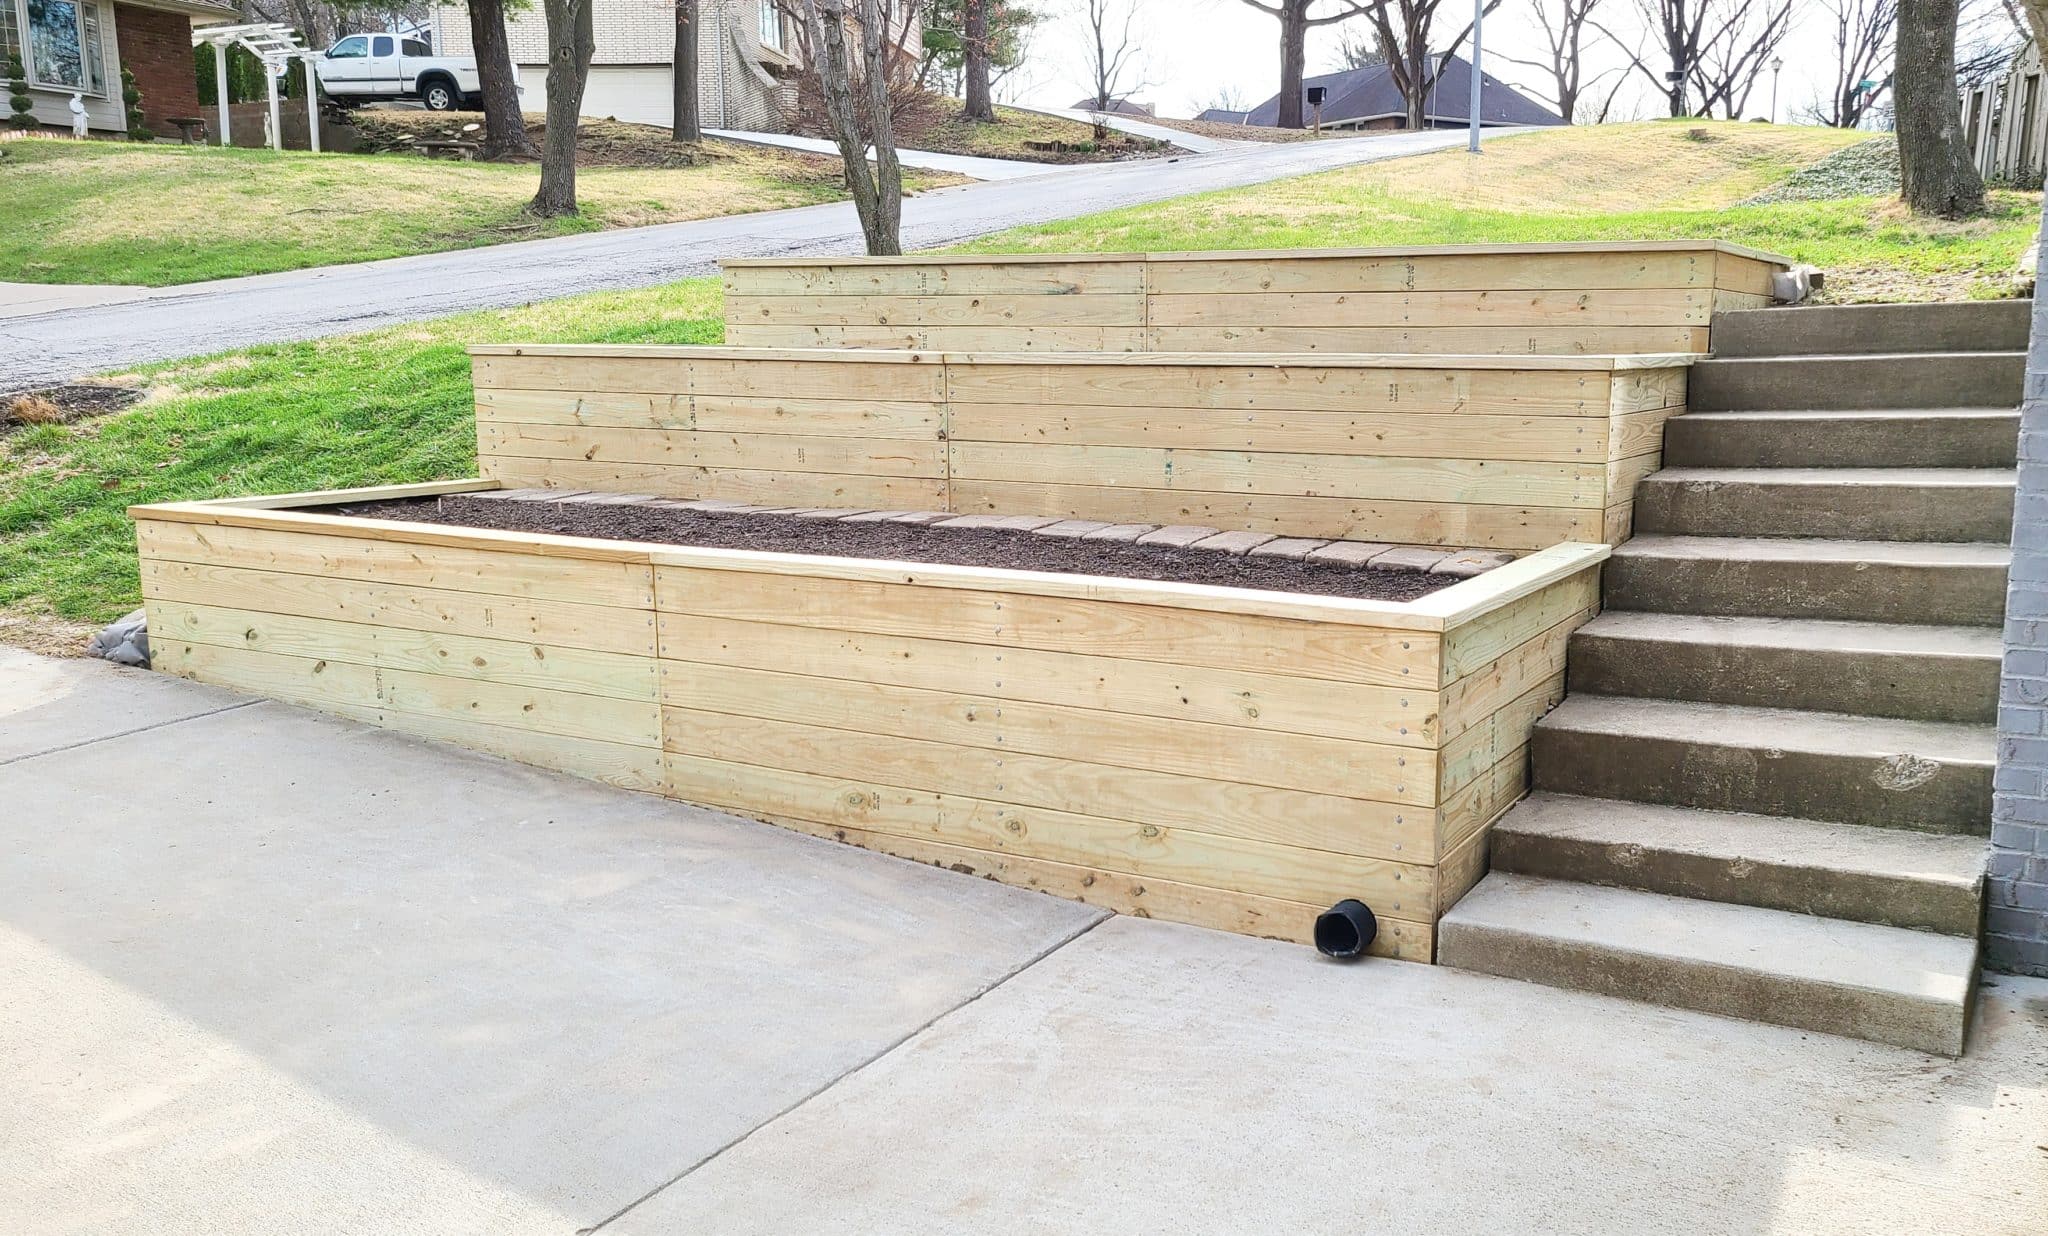
As a trained landscape architect and mechanical engineer, we knew how to build a retaining wall, but hadn’t built one in our own yard. So with knowledge, planning, and a lot of physical labor, we DIYed a wood retaining wall to become a terraced vegetable garden in our front yard.
In this post, we’ll cover the planning and wall design basics and then dive into a step-by-step how to build a retaining wall. Let’s get started!
Planning Prior To Build A Wood Retaining Wall


Design Basics of A Low Wood Retaining Wall
There’s a lot that goes into a wood retaining wall before you start building. Below are some design basics and planning you’ll need to do prior to starting.
Sketch Out The Design
The place to begin is sketching out a design specific to the site. Take some measurements of the existing conditions and then plan out where you want the wall. Consider the existing grade (aka the slope’s angle) and how tall the wall will need to be where it’s located.
You can simply sketch out the design on paper or even try modeling it up in a free 3D software like Sketchup. I personally need to model in 3D to see how everything works and comes together.

While the construction basics of a low retaining wall are the same on any site, the actual material quantities, drainage, and other components will be site-specific. There are always bound to be site-specific conditions you’ll need to consider in the design. The following are items to consider.
- Material Quantities – every wall will vary in the amount of materials needed due to height, length, depth, etc.
- Load Considerations – wall height will determine whether you need additional reinforcement to support the soil pressure behind the wall.
- Footings – the depth and quantity of footings for the wood posts supporting the wall will be determined by the area’s frost line and the wall’s height.
- Drainage – Every site drains differently and you will need to consider how water moves around the retaining wall.
Wood For In-ground Walls
Wood is a great and budget-friendly material to build a retaining wall with compared to other materials. But like any building material, there are different types of wood and durability considerations.
If building a wood retaining wall, then you will need to use pressure-treated wood. This wood has been treated to be rot-resistant when in contact with the ground. Now, it won’t last forever, and there’s a lot of debate on how long it’ll actually last. On average, most agree it will be around 10 years, unlike regular wood which will begin to decompose within a year. But like most things, the rate of decay will depend on the conditions it is under. Like how much it is exposed to water, how deep is it buried, sun exposure, how well it’s maintained and cared for, etc.
Like most wood, there are ways to make pressure-treated wood last even longer. Staining wood adds a protective sealant that penetrates the wood and protects it from weather damage. However, pressure-treated wood cannot be stained for 6 months to up to 1 year as it’s not fully dried typically when bought. If wood is stained prior to it being fully dry, then the stain won’t fully penetrate the wood and the stain’s protective sealant won’t be as effective.
All this is just to say, know the material you’re building with and know how to care and maintain it.
Consider Load & Number of Posts
As a landscape architect, I’ve detailed many wall designs on projects and worked with engineers to ensure they were stable. If you’re building a retaining wall yourself, I highly recommend you keep the wall and the soil behind it low. Heights over 30-36 inches will result in more pressure against the back of the wall. Specific engineering or structural reinforcement is usually required to ensure it doesn’t fail. This is especially true with wood retaining walls.
Moreover, do a quick load calculation for the number of posts you need for the height and distance spanned. A good rule of thumb would be to overdesign your wall. For a 20”-30” wall, make sure to at least have a post at both ends of a board and one in the middle. We used 8’ boards, which meant we had a post about every 4’ with one on each end and one centered. If you have a longer board, I’d recommend adding another post to help spread the load and pressure from the soil behind the wall. Shorter walls can have fewer posts because they have less load to hold back, while taller walls will need to include tie-backs and more posts.
It’s also important to consider the post depth. Ideally, you want your post to go at least as deep into the ground as it protrudes from it. This way, when the load is trying to push the post over, you have good resistance from the soil below.

Consider Frost Depth In Your Area
Make sure you consider your area’s frost line depth when you begin designing the wood retaining wall. There are many frost line depth maps by state out there, and you can use this to determine your region’s specific depth. Also, you can check your local building code as it will tell you the approved depth in your specific area.
While frost depth doesn’t really affect the exterior look of the wood retaining wall design, it will affect the materials needed. If you have a deeper frost line, then you’ll need a longer post. In the Midwest where we live, the frost depth is between 30”-36”. This means the base of the post needs to measure down to that depth below the ground level.
Why is frost line depth important for retaining walls?
The frost line is the deepest depth at which moisture in the soil is expected to freeze. It’s important to be below this line with posts and footings as any structures above the frost line can become vulnerable to damage due to frost heave. Frost heave happens when water in the soil freezes, expands, and pushes soil upwards leading to shift. If this occurs, then it can lead to significant movement in the wall, which can then become unstable when the frost melts, and may eventually lead to the wall failing.
Consider Drainage Options
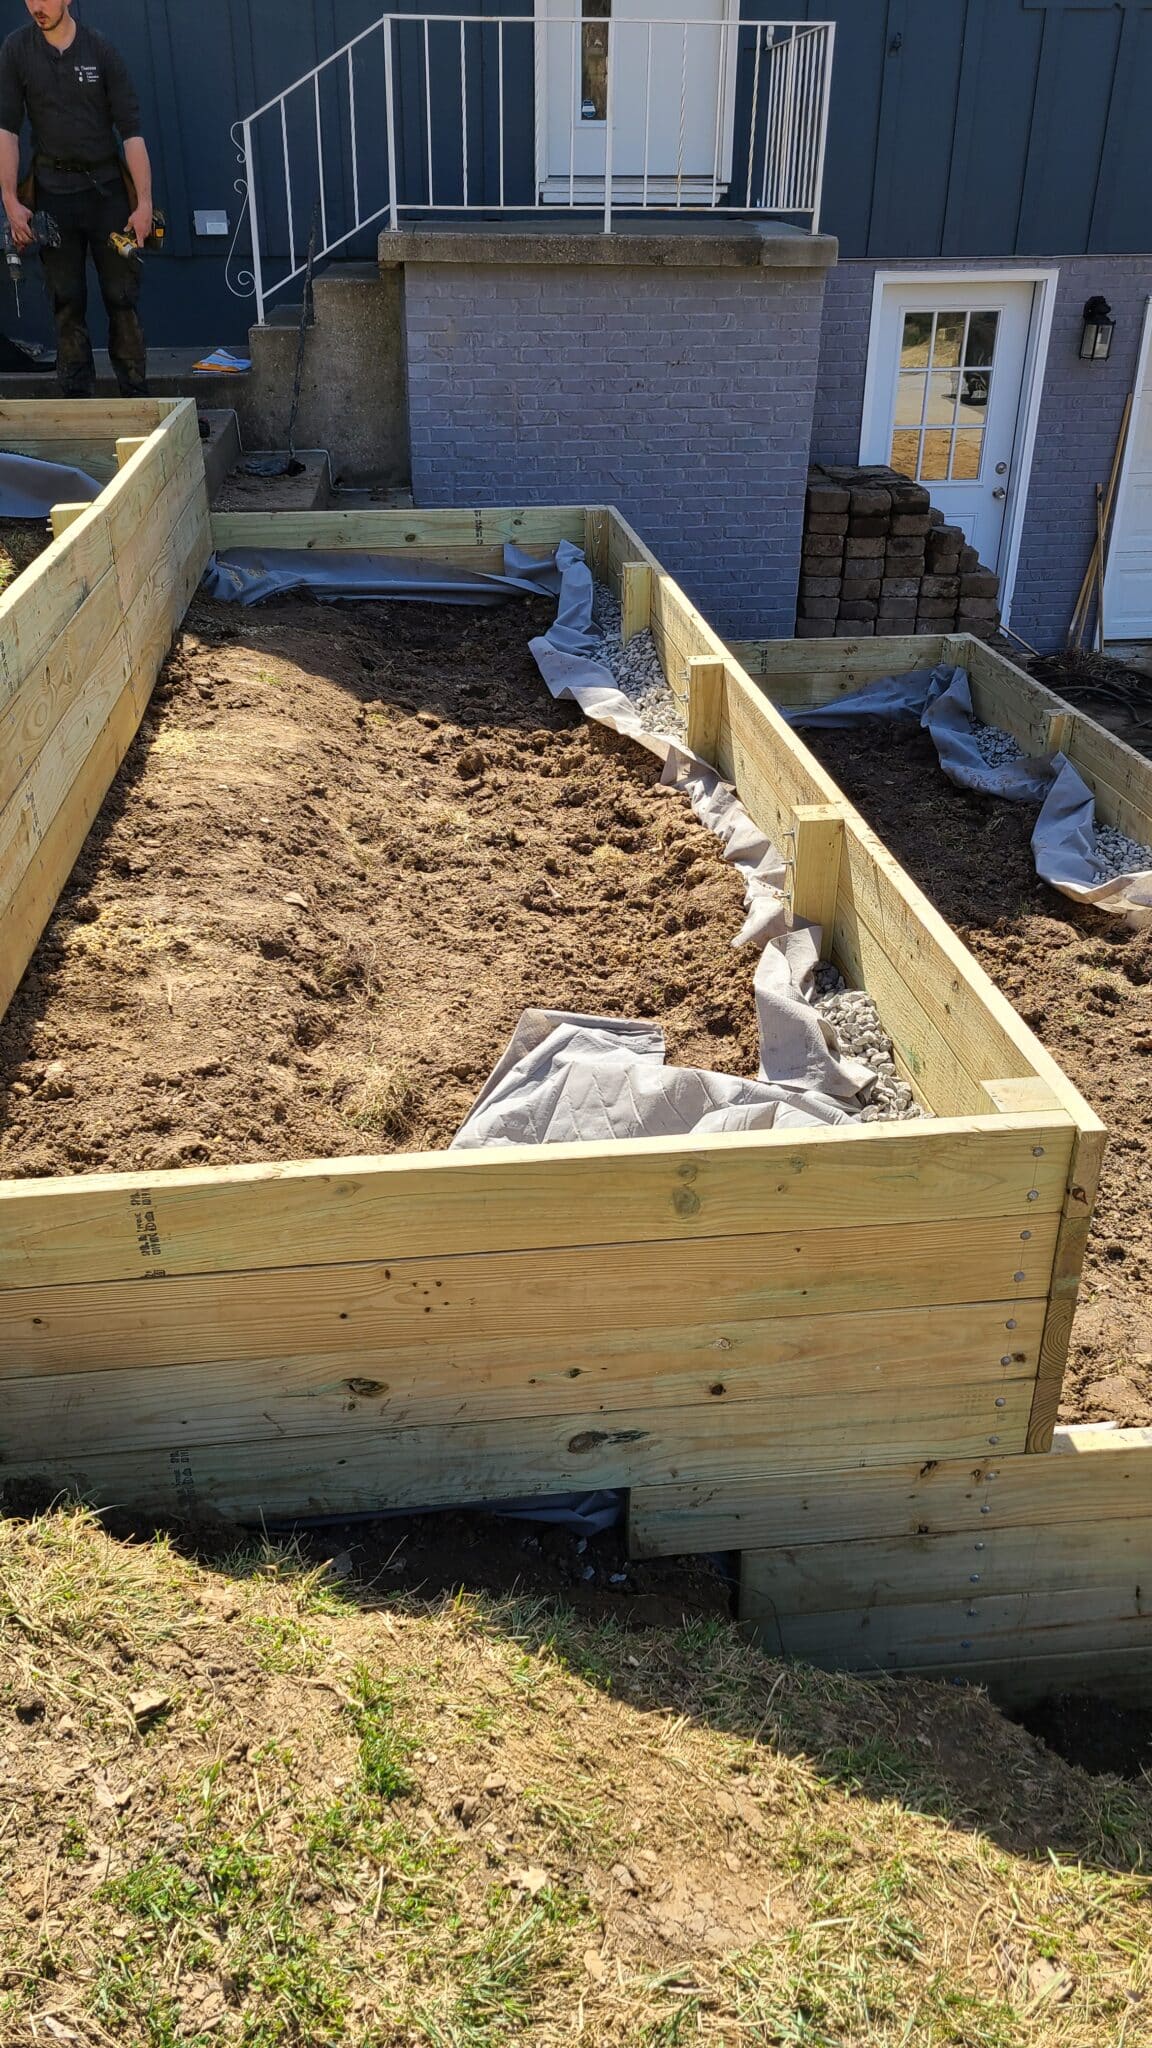
We wanted our wood retaining wall to last a long time, so we opted for a conservative approach using both drainage rock and drainage pipe to keep water from sitting around the wood. This lets the wood breath and slows down the natural decay process so the walls last for many many years.
Mockup The Design
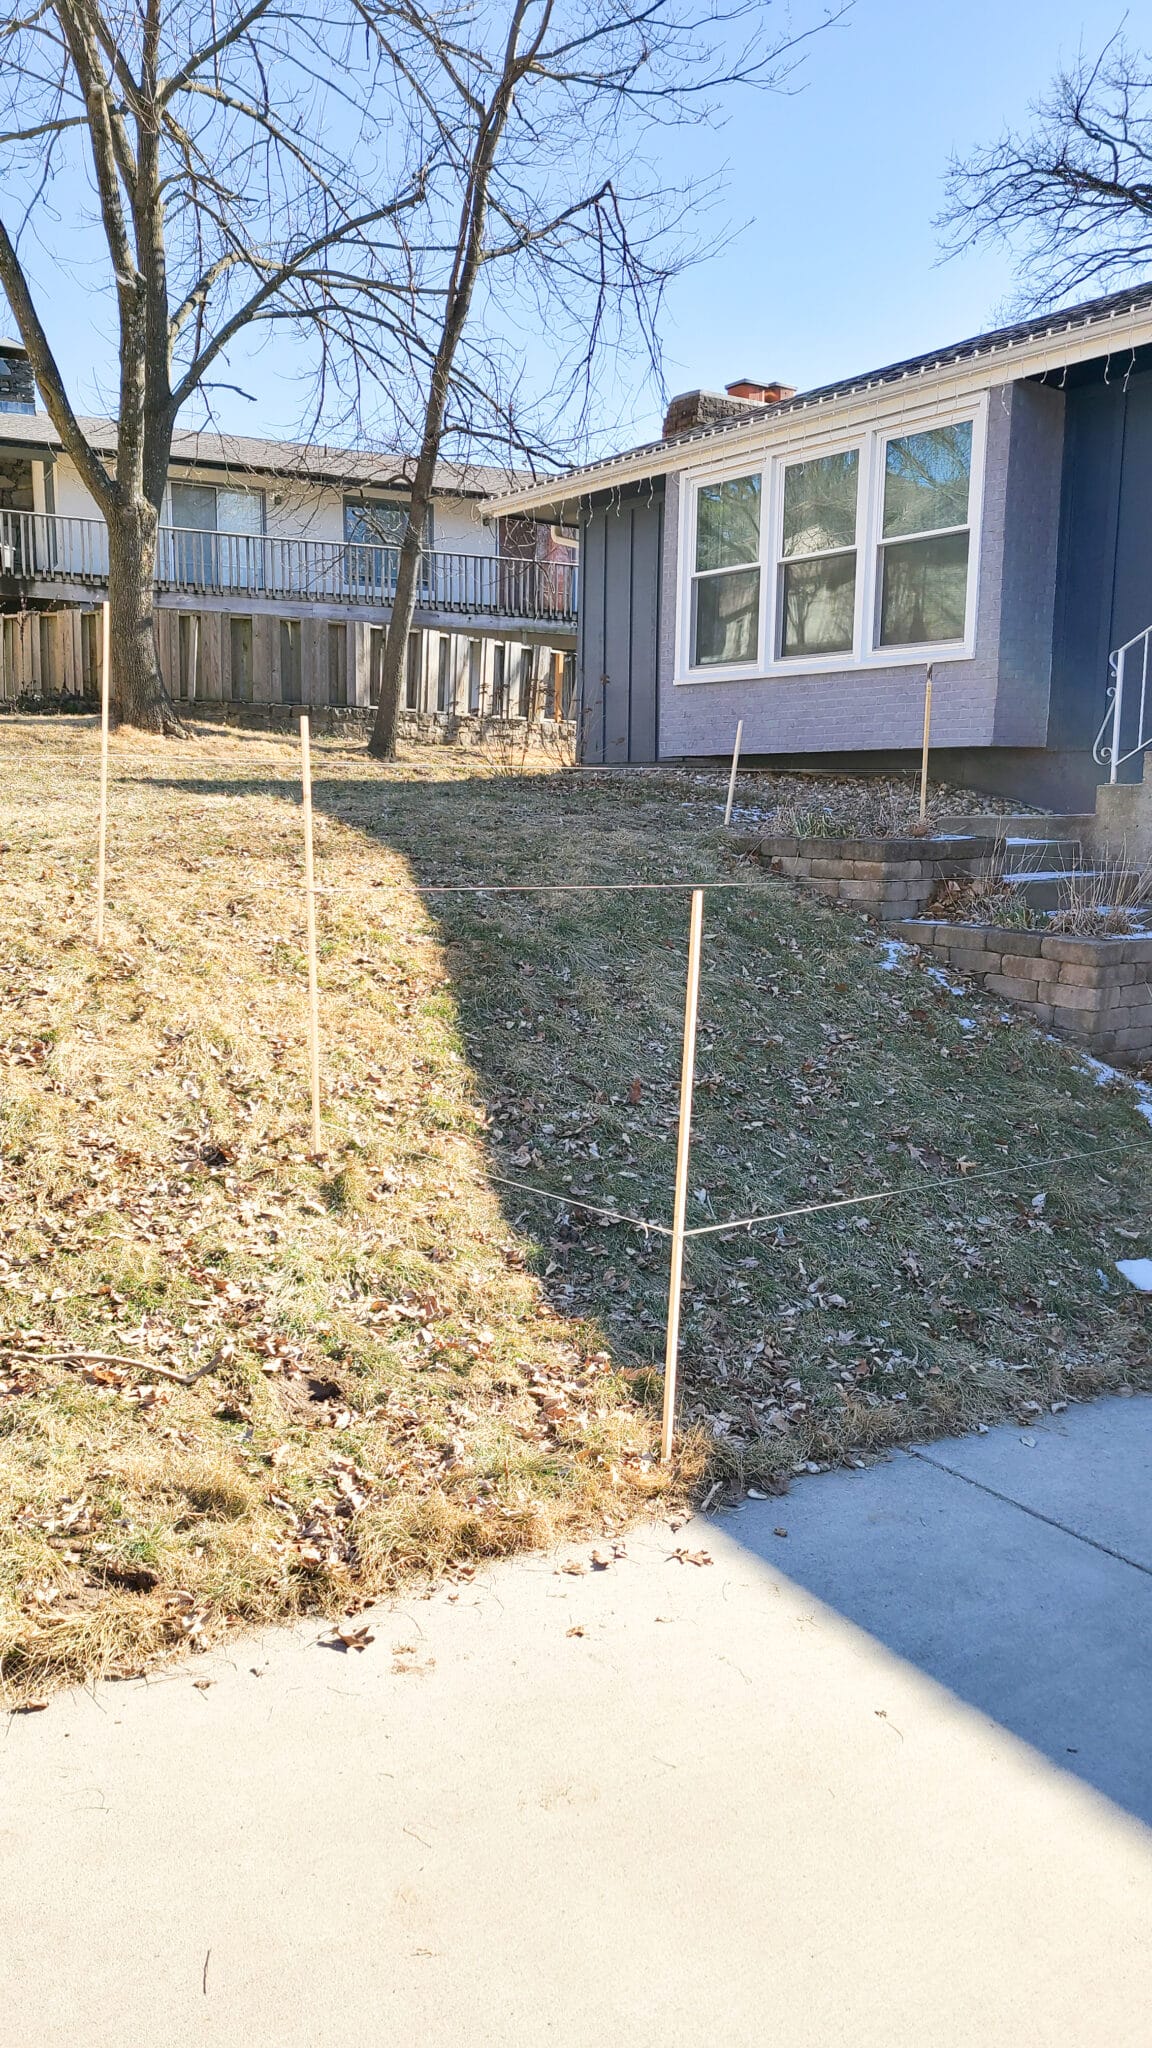
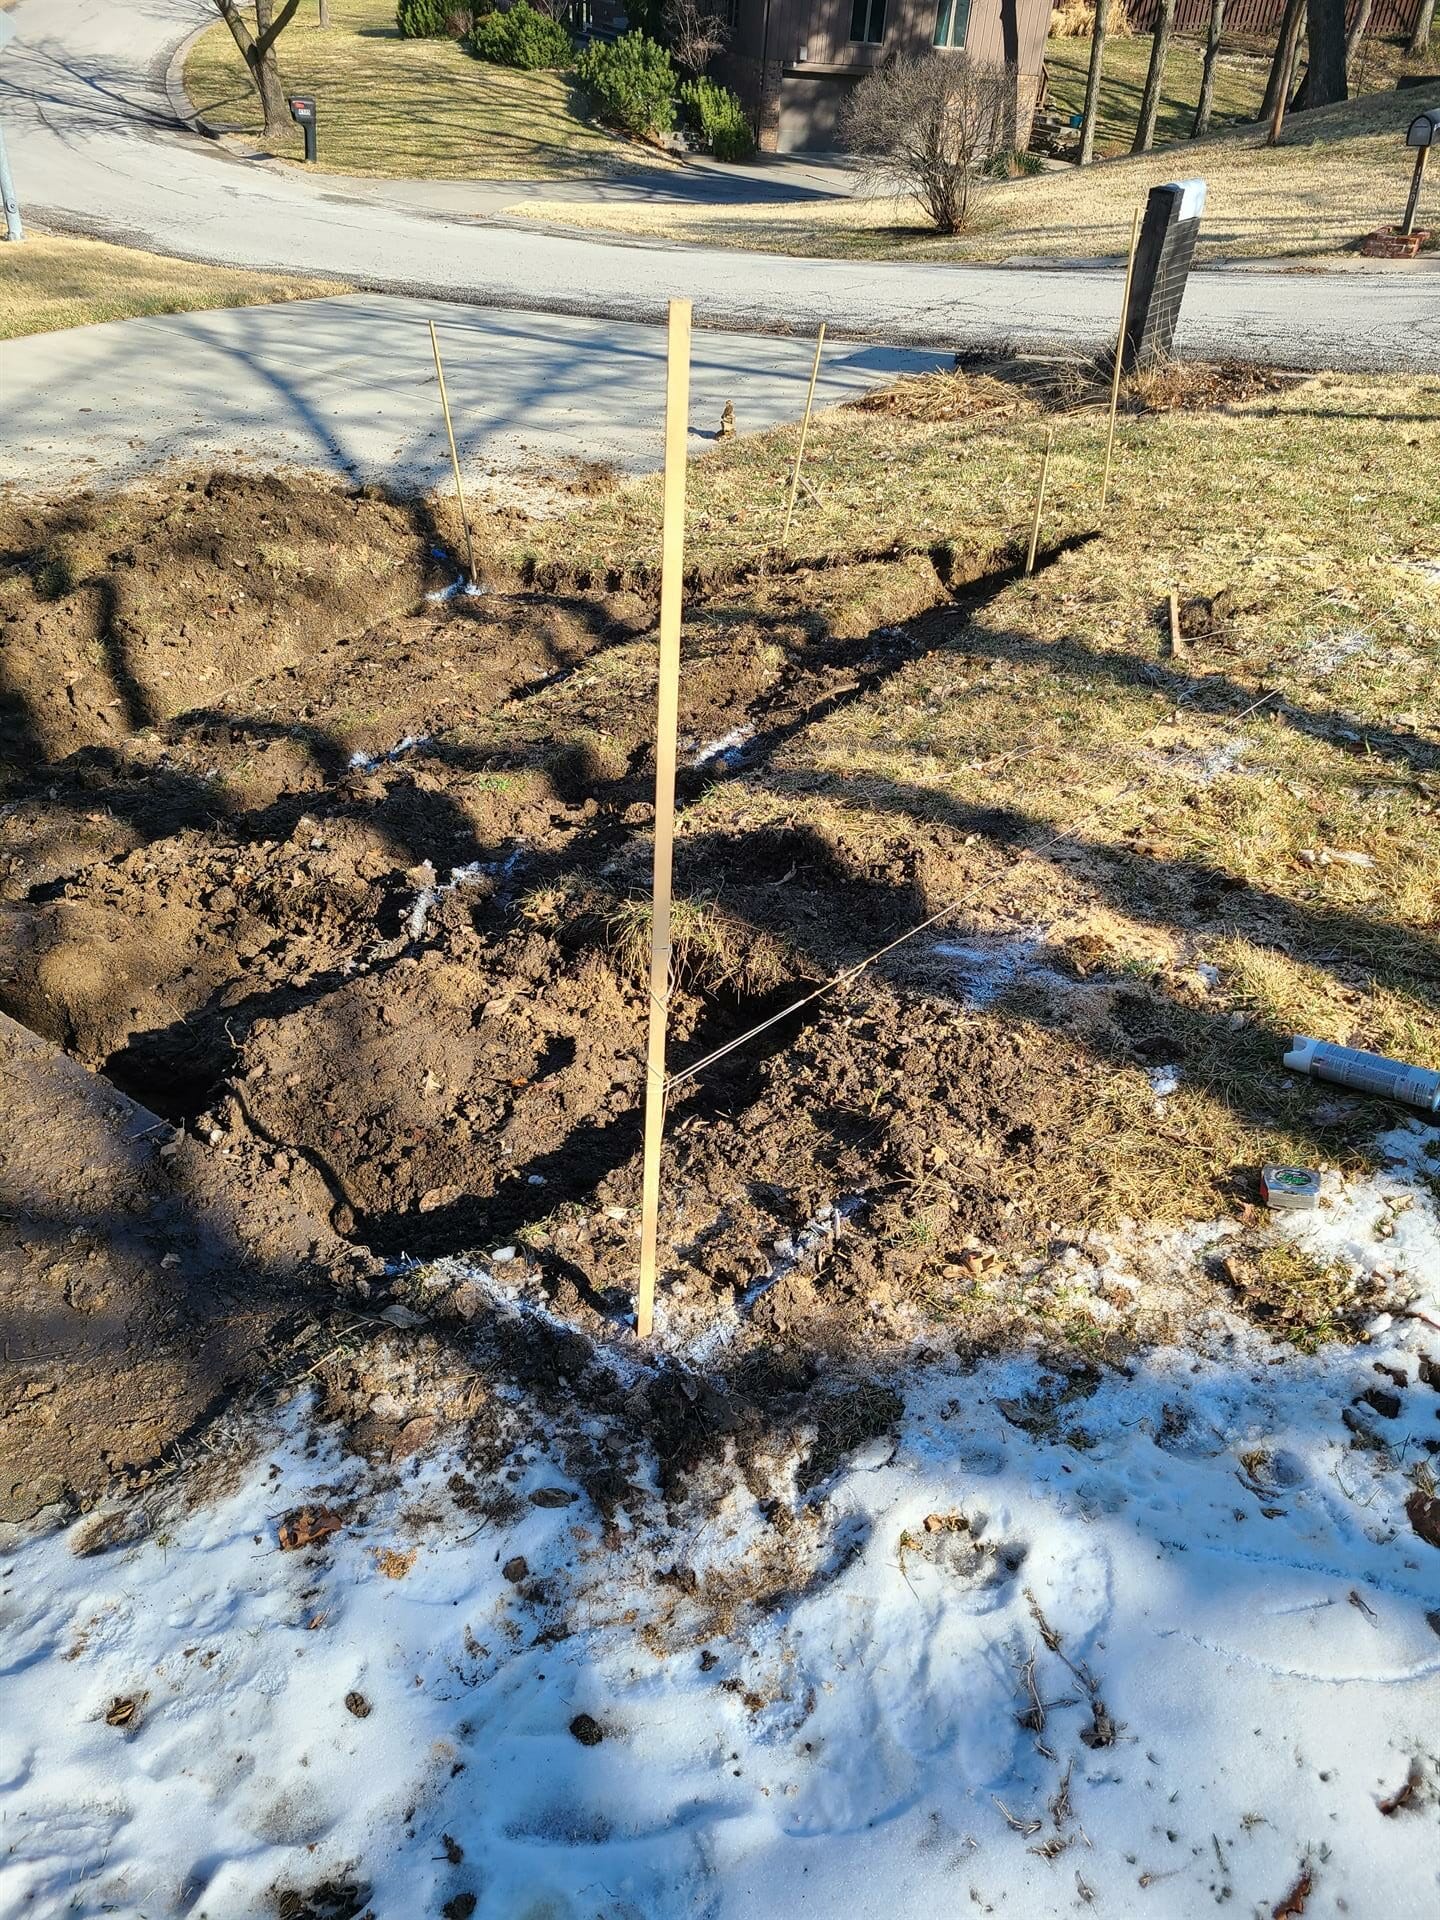
Some people can visualize a wall design by simply drawing it out. While others, like ourselves, need something more tangible and physical. A mockup is a great way to test out the scale and layout of the design to see if it feels right. It might also help you notice weird alignments or potential issues prior to starting.
For example, we were staking out the mockup and found on the top terrace there was a portion of our foundation (an anchor) that would impede where a post footing would have gone. So we adjusted the retaining wall design to work with this. Another example is we could visually see how critical it was to align each terrace with a stair step to make it easy to access each terrace and not create tripping hazards. This mockup process was also extremely helpful to allow us to know how tall the front terrace wall would actually be and what it would feel like to be standing next to it.
So grab some leftover scrap wood or tall stakes and some twine to help visualize the retaining wall design prior to starting the build.
Safety Considerations & Permits
It’s a good idea to always check with your local codes and permitting office for information about recommended retaining wall dimensions. Some municipalities require a permit for walls over a certain height. Also, if you live in a place with a Homeowner’s Association (HOA), then make sure they don’t have requirements/processes you need to go through to install a retaining wall in your yard.
Call Utilities Before You Dig
Make sure to call your utility companies and have them come mark anything in the area you plan to build the retaining wall. Hopefully, there is nothing in the way, but you will want to confirm this before you start digging. And honestly, you’ll want to do this even in the design phase as you don’t want to have bought materials and then have to pivot. Most cities have a general number you can call to have them mark, and 811 is the National Call Before You Dig number.
Check out our 7 steps to plan and design a terraced garden if you want to understand more of the pre-planning before that’s needed before constructing a retaining wall.
How To Build A Wood Retaining Wall On Slope
Now that you have a wall design, it’s time to start the step-by-step build process!
What You’ll Need to Build A Wood Retaining Wall
Tools
- Post Hole Digger or Post Hole Auger
- Miter Saw or Jig Saw
- Shovel
- Post Level or Laser Level
- Drill and Drill Bits (including this Long 1/4″ Drill Bit for Carriage Bolts)
- Impact Driver and Sockets
- Tape Measure – best one out there!
- Safety Glasses and Mask or Full-face Respirator
Optional Tools:

Materials
The quantities of material will vary depending on the length and design of the wood retaining wall. Below is a general list of all the items you will need.
- Pressure-treated Lumber Boards
- Pressure-treated 4×4 Posts
- Fast-setting Concrete Mix
- 1/2″ -1″ Drainage Rock (Clean Gravel)
- 4″ Perforated Drainage Pipe
- Landscape Fabric (Permeable)
- Attachment Hardware – Carriage bolts, lag screws, etc.
- Some scrap wood bracing and stakes for layout
Below is an example of the materials list (with links!) we used for our terraced vegetable garden, which is 16’ long and has three 4’ wide terraces at various heights.
| Materials | Quantity |
| Pressure-treated 4×4 Posts | 16 |
| Pressure-treated 2x6x8 Boards | 75 |
| 1/4×6 Carriage Bolt | 268 |
| 1/4 Fender Washer | 268 |
| 1/4 Nut | 268 |
| 1/4 x 5″ Lag Screw | 22 |
| 50 lb Fast Set Quickrete | 29 |
| 48″+ Landscape Fabric (Permeable) | 90 ft |
| 1/2″ -1″ Drainage Rock (Clean Gravel) | 52 cu ft |
| Raised Bed Mix Soil (Compost, Sand, & Topsoil) | 176 cu ft |
| 4″ Perforated Drain Pipe | 62 ft |
| 4″ Pipe Tee | 2 |
| Auger Rental | 1 |
Step 1: Demo Existing Items & Stake Out Design
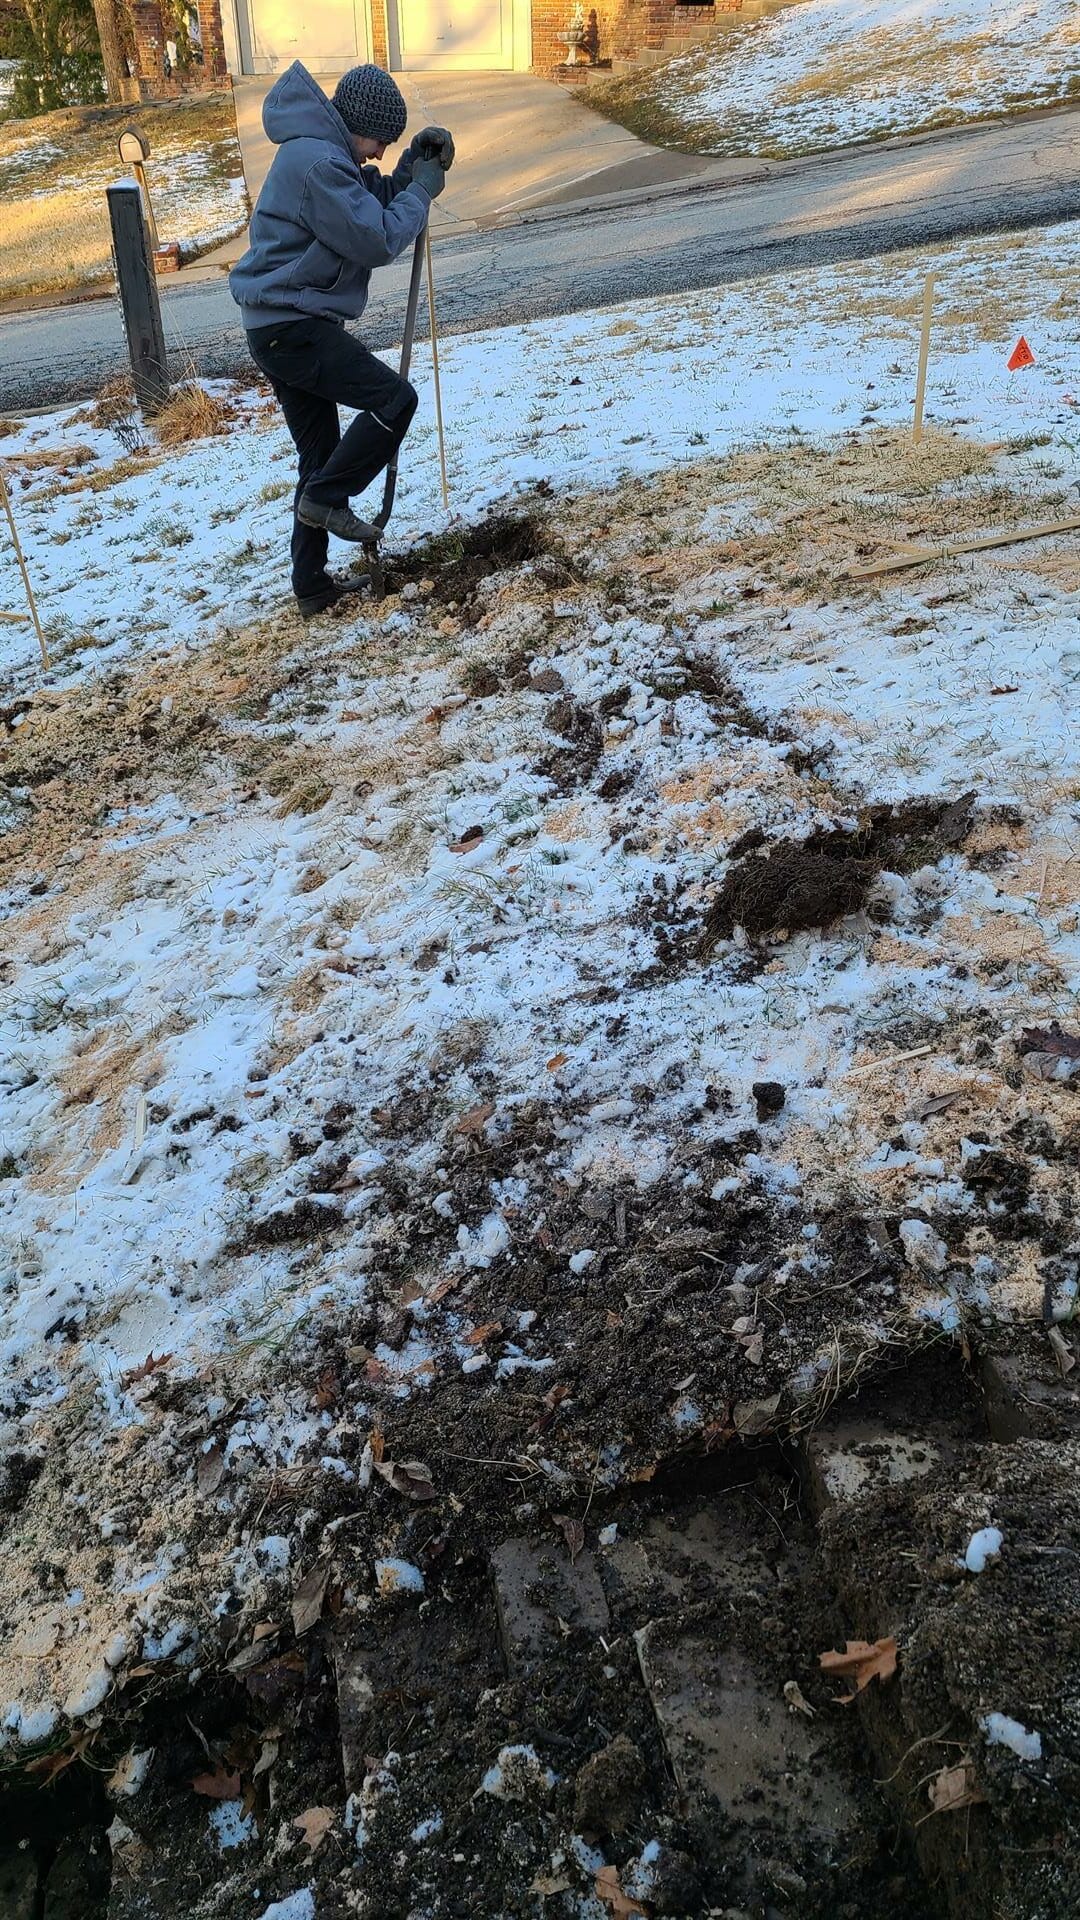
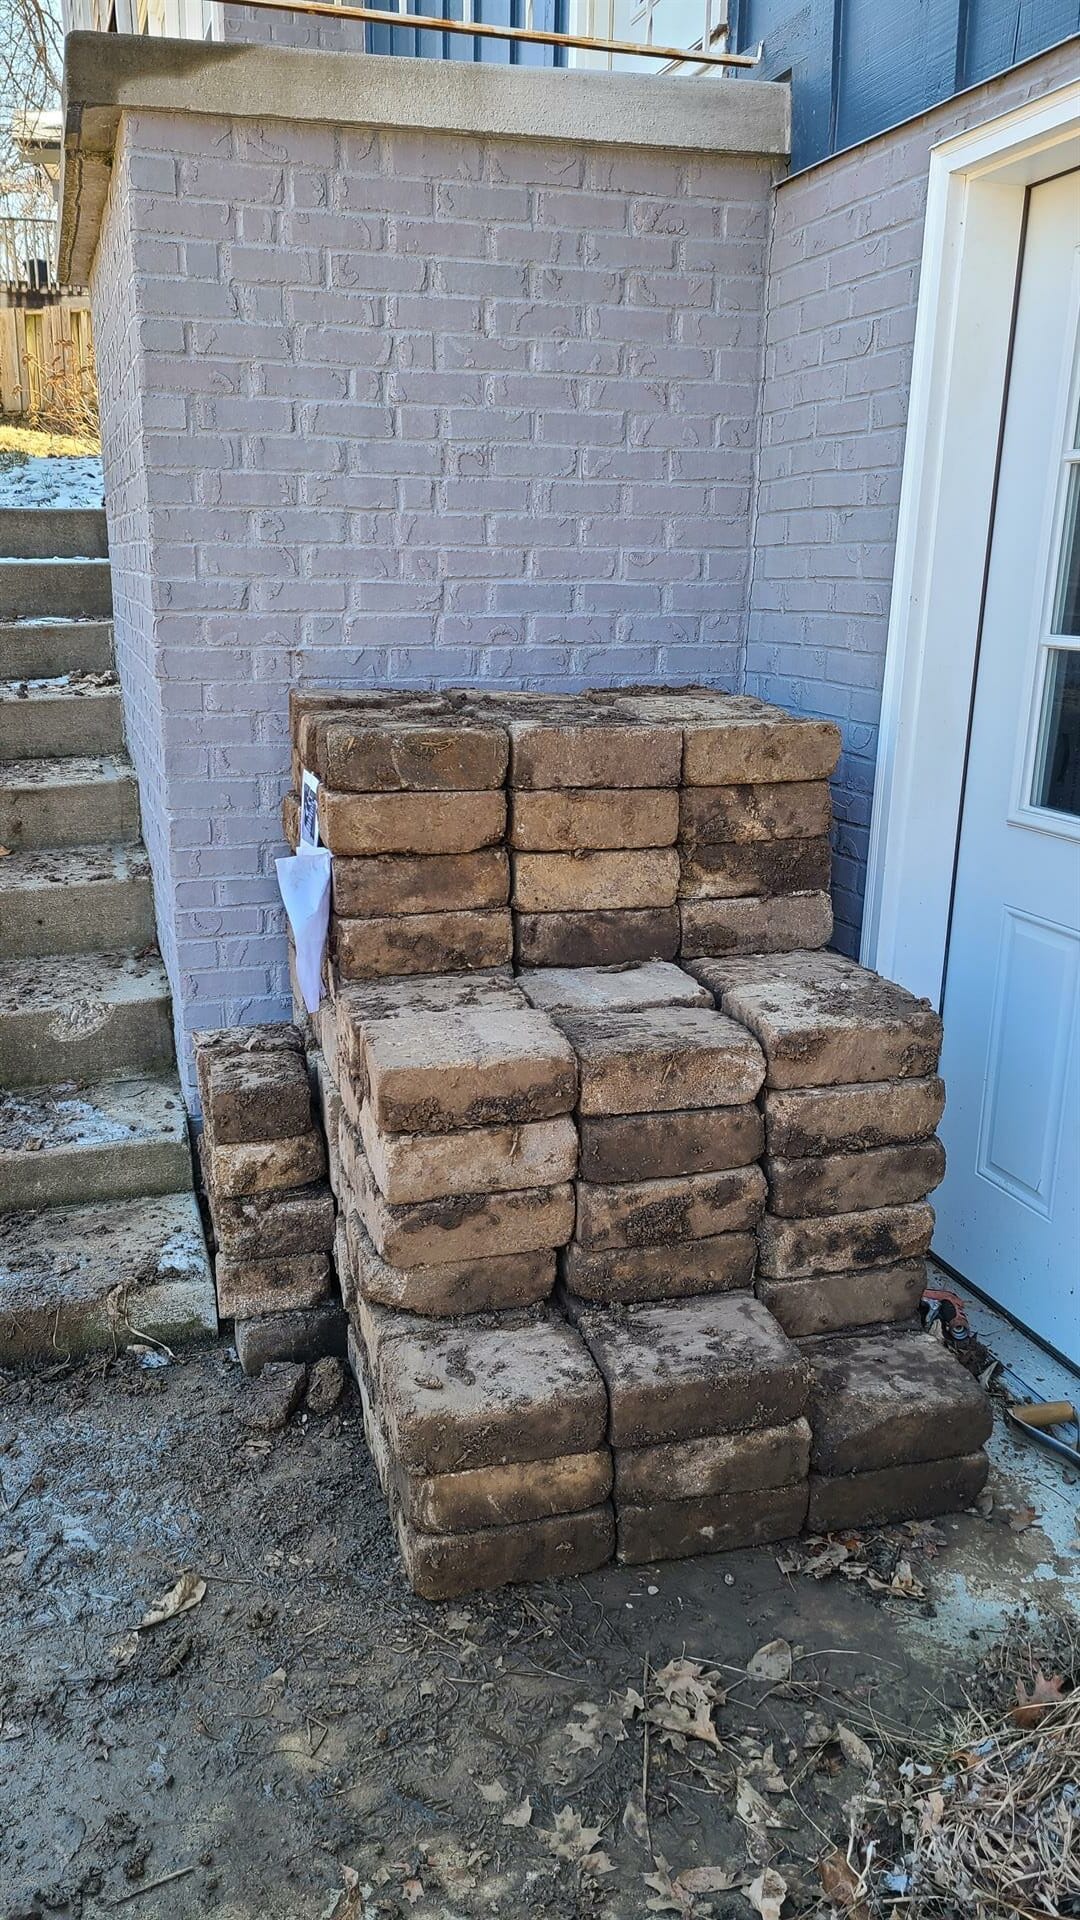
The first step is to remove and demolish anything that will be in the way. For us, we had to remove an old block retaining wall, which we then saved to reuse in the terraced garden beds as walking paths. It’s always great to try and DIY in a sustainable way, which can mean saving old materials and repurposing. It’s also a budget-friendly way to keep costs down.
Next, if you haven’t already when mocking up the design, measure, and layout your wood retaining wall design on the slope. You can use some leftover scrap wood as stakes to mark out the perimeter of the wall. Make sure it’s something that can withstand some weather. If you’re like us, digging took a few days for us as we had to dig out an old retaining wall.
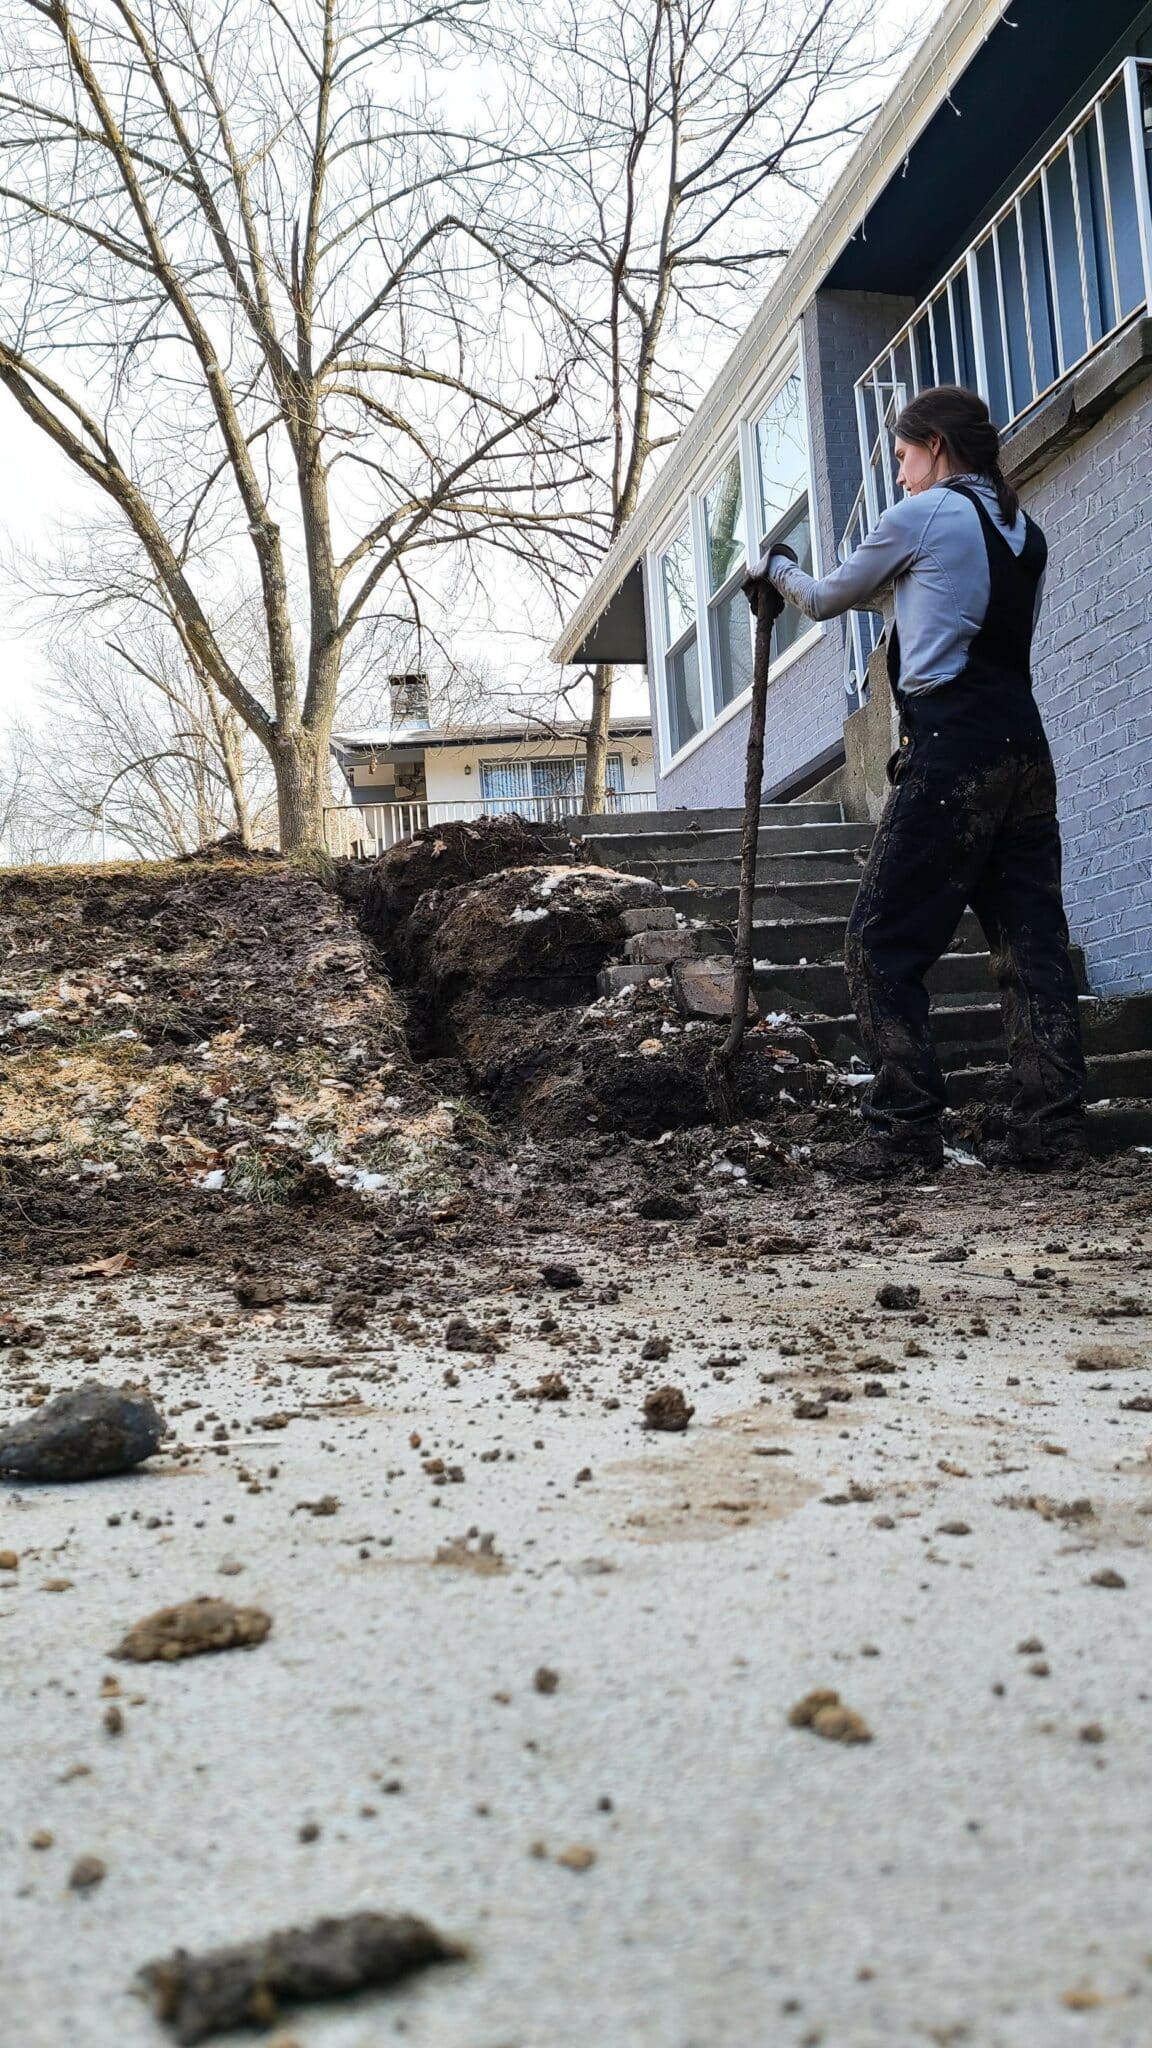
Step 2: Excavate Soil & Create Level Base
Next, you’ll begin any excavation of the soil needed to build the retaining wall. Depending on the design and the slope, the amount you dig will vary on if you need to cut into a slope or will be filling on top.
Cutting Into A Slope Vs. Filling On A Slope
If the design cuts into the slope, you’ll want to dig back about 24” into the slope with a shovel. This is so you have room to work behind where the wall will be. Any soil you remove when you cut into the slope will have to be backfilled with drainage rock and/or soil, so only dig out as much as you truly need.
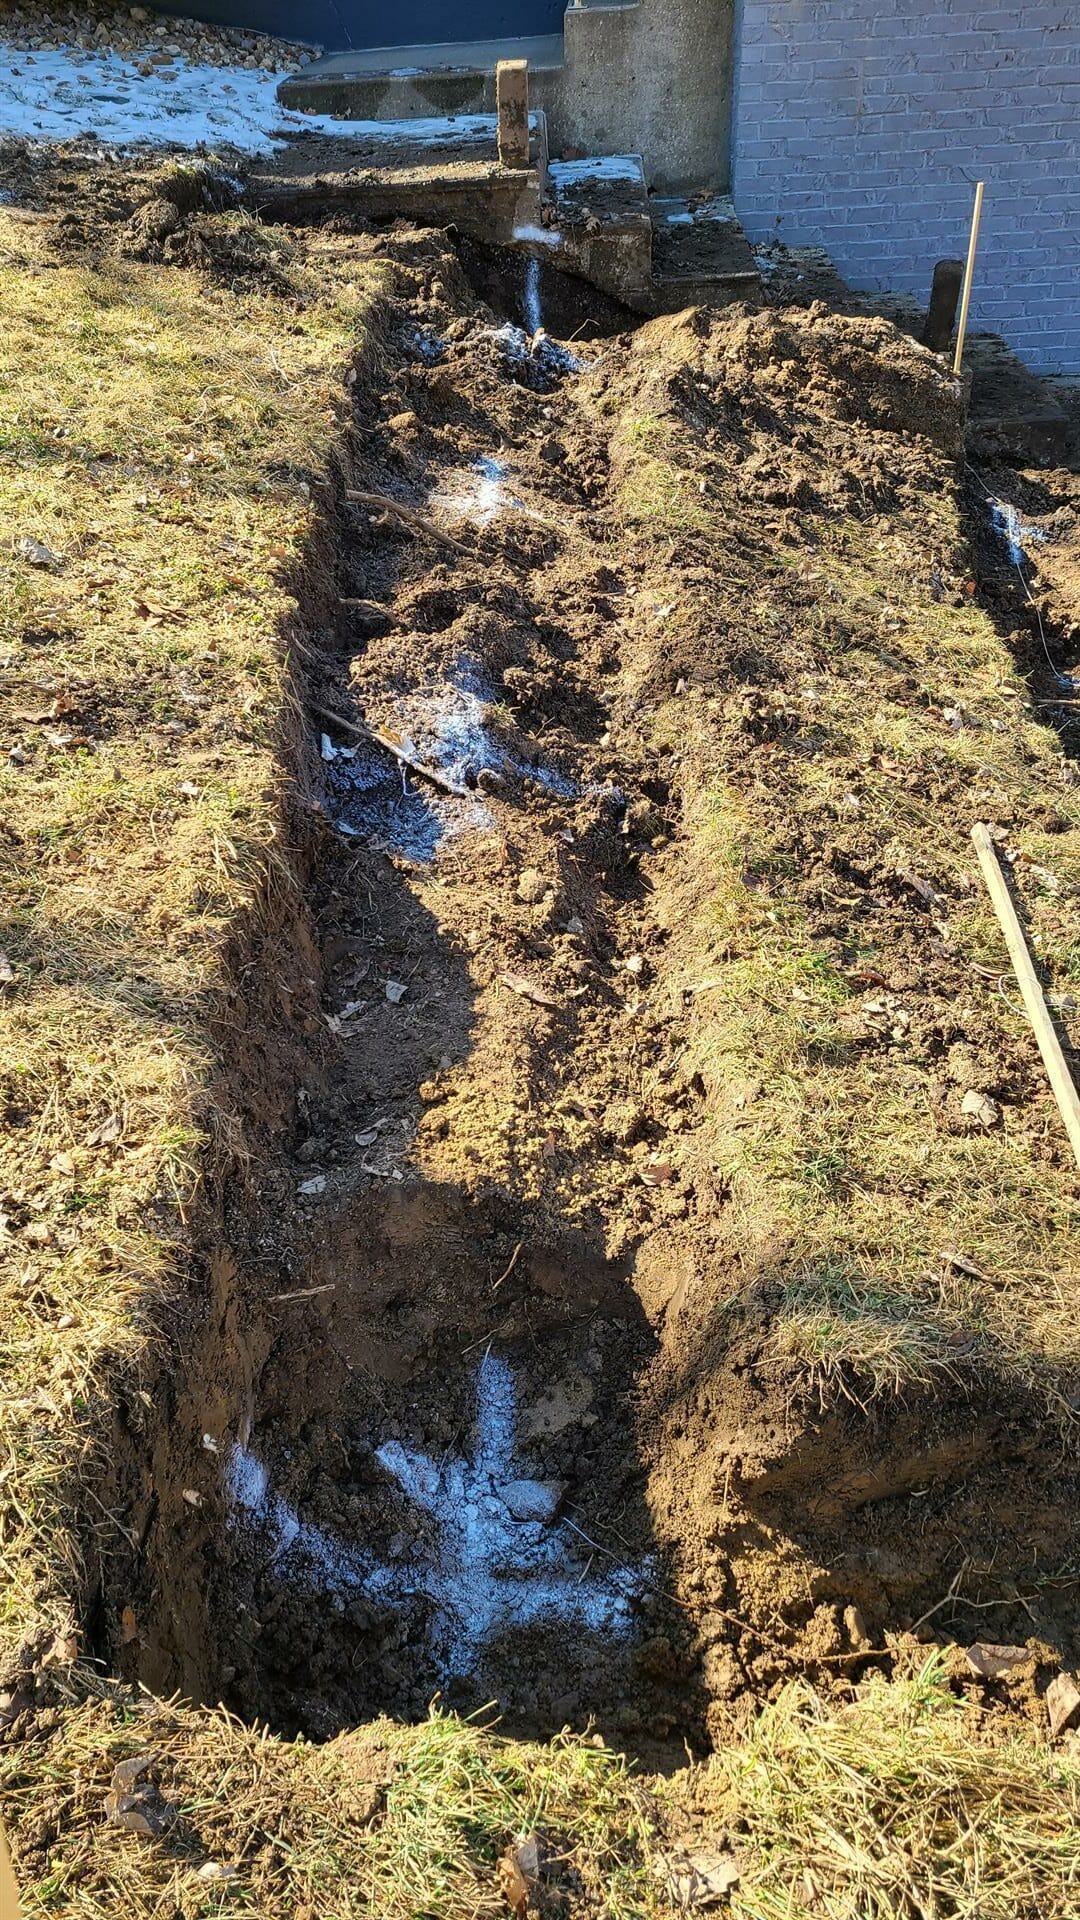
It was a little different for our conditions as we weren’t cutting too much into the slope but rather building and filling on top of the slope. In this case, it only requires digging small trenches to get down to the elevation needed for the wall base.
Repeat this work as needed until all your soil is excavated for any wood retaining wall.
Make A Level Base
In either situation, you’ll want to create a level base for the retaining wall. Following where the front of the wall will be located, dig out a groove several inches deep and flatten the bottom. Lay down a board in the trench and use a bubble level to continually test if it’s level. You can use a shovel or small trowel to remove or add dirt as needed.
This can take some time to get level, but remember this is the foundation of your build. So if it’s not level now, then the issue will compound and make everything else on the wall not level. This can end up leading to misalignments of boards and a lot of frustration.
Step 3: Mark Post Locations
Using some stakes, measure and lay out the post locations for the wall. You’ll want the posts to be equally spaced, so measure to what would be the center of the post. Mark it and then begin digging.

Step 4: Dig or Auger Post Holes
Now, it’s time to start digging post holes. You can do this manually with a post hole (clamshell) digger or rent an auger from a local home improvement store. We definitely just rented an auger because we had so many holes to dig, and we were working with clay soils. If you do rent an auger, then make sure you get one that can go the full depth you need as it varies from auger to auger.
The depth you dig down depends on the retaining wall design and your area’s frost line. Check your area’s frost line depth as I mentioned above in the design basics. For our Midwest conditions, we dug 36” down from what would be top of the soil.
If you are renting an auger and you have compacted, clay, or rocky soil, then it is worth spending the extra money to rent a two-person auger. We tried to save some money to rent a single-person auger and it was incredibly difficult to resist the sudden torque every time the auger hit a rock. Having the extended handlebars and a second person would have made the process a lot less painful…
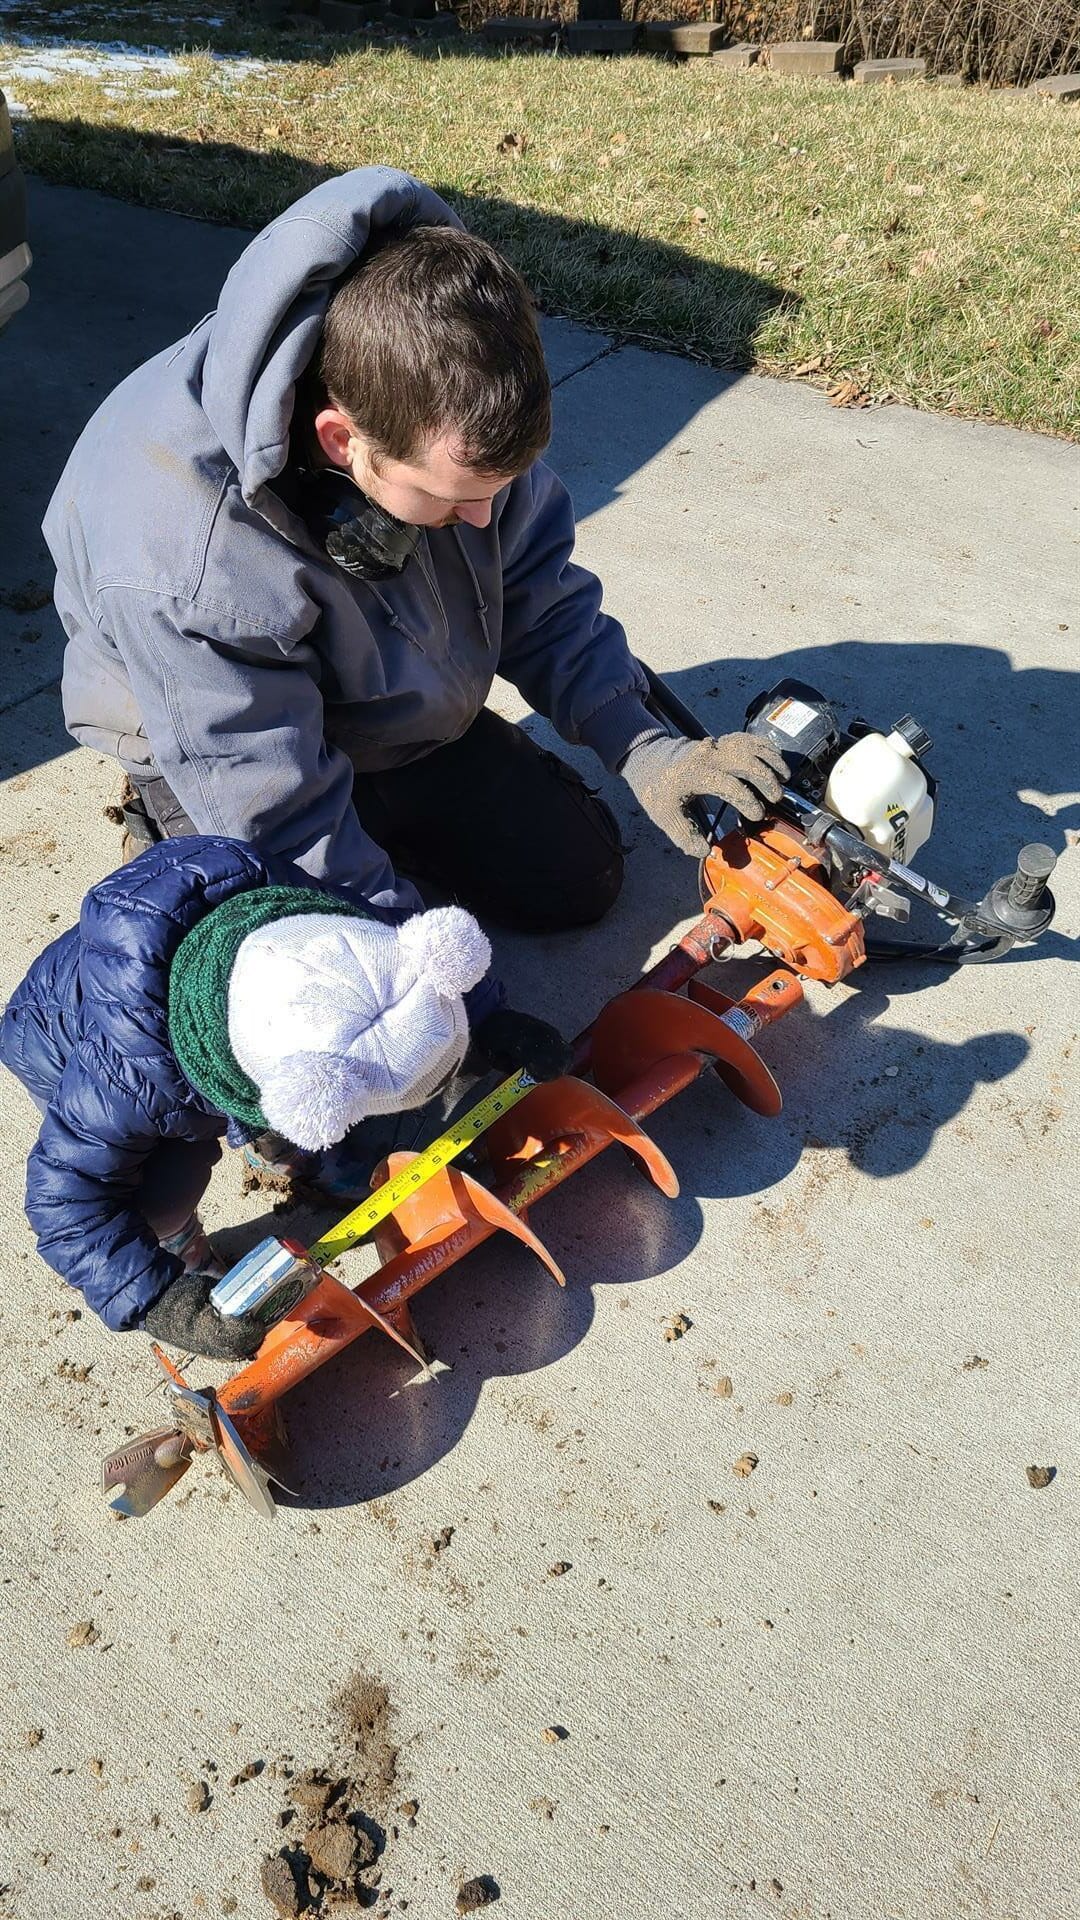

Make A Large Enough Hole
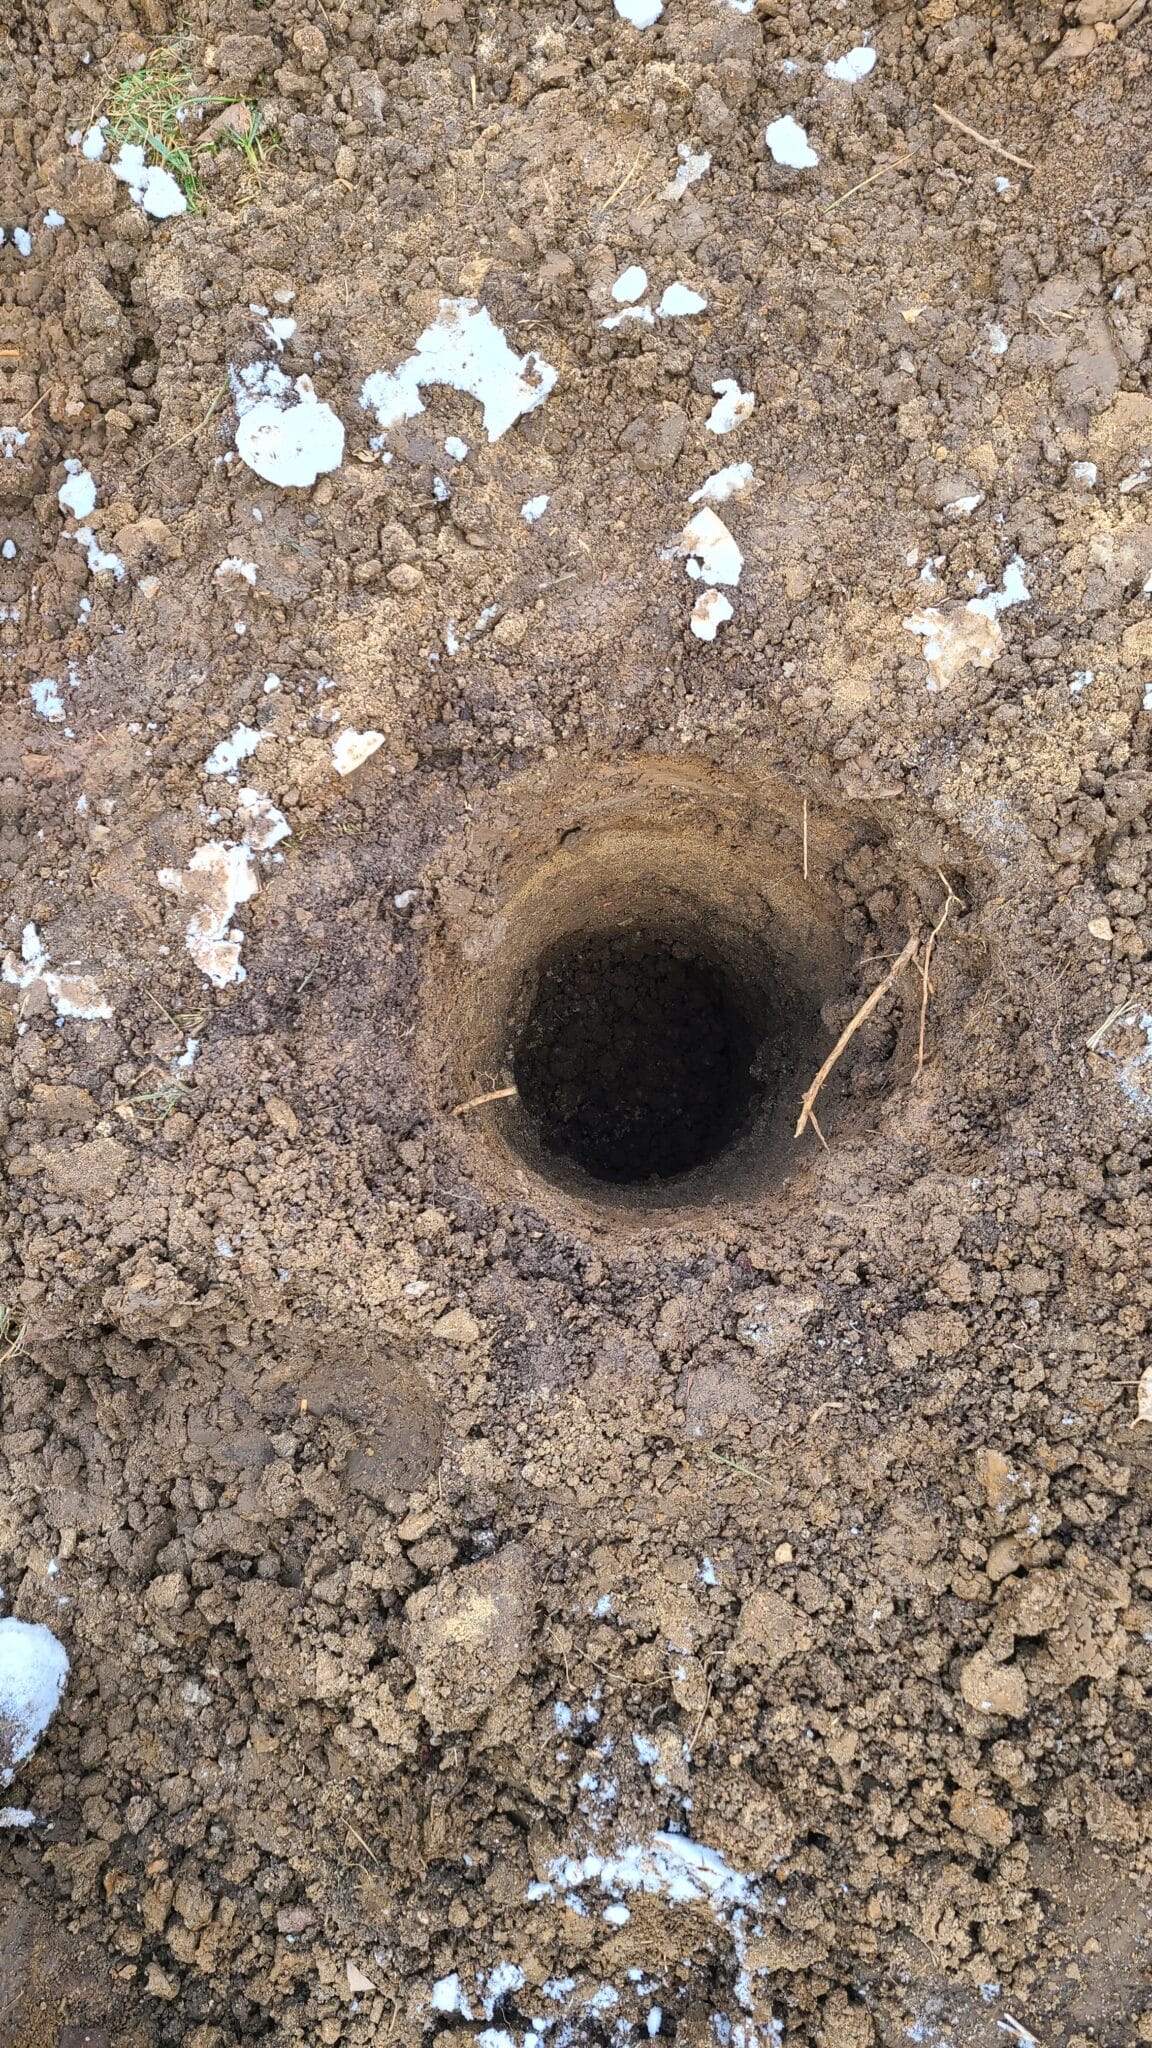
Standard practice is to dig between an 8”-12” diameter hole for a 4×4 post. Most augers will make that size hole automatically, but if digging manually, you’ll need to double-check the sizing of each. It’s critical to have a large enough hole as the entire 4×4 post needs to be encompassed by concrete to provide stability and durability.
Since the single-person auger only dug 8” holes, we came back with a shovel and made our post holes slightly larger to ensure we’d get concrete around every side of them. You can always make the hole a little bigger if you’re worried and like to over-engineer a little bit as we do. Just take into account that it will take more concrete to fill.
Step 5: Place Posts In Holes
With the holes dug, it’s time to set the posts in the holes. If you need to you can cut the 4×4 posts down to a more manageable size. Just leave extra length as a contingency for any adjustments that may need to be made. You can cut off the extra length using a handy tool we share below after the wall boards are installed.
Add Gravel To Holes
Prior to placing the post, add 3”-4” of gravel in each hole. This separates the end-grain wood of the post from touching the soil directly, gives the concrete room to fill in, and creates a stable base.
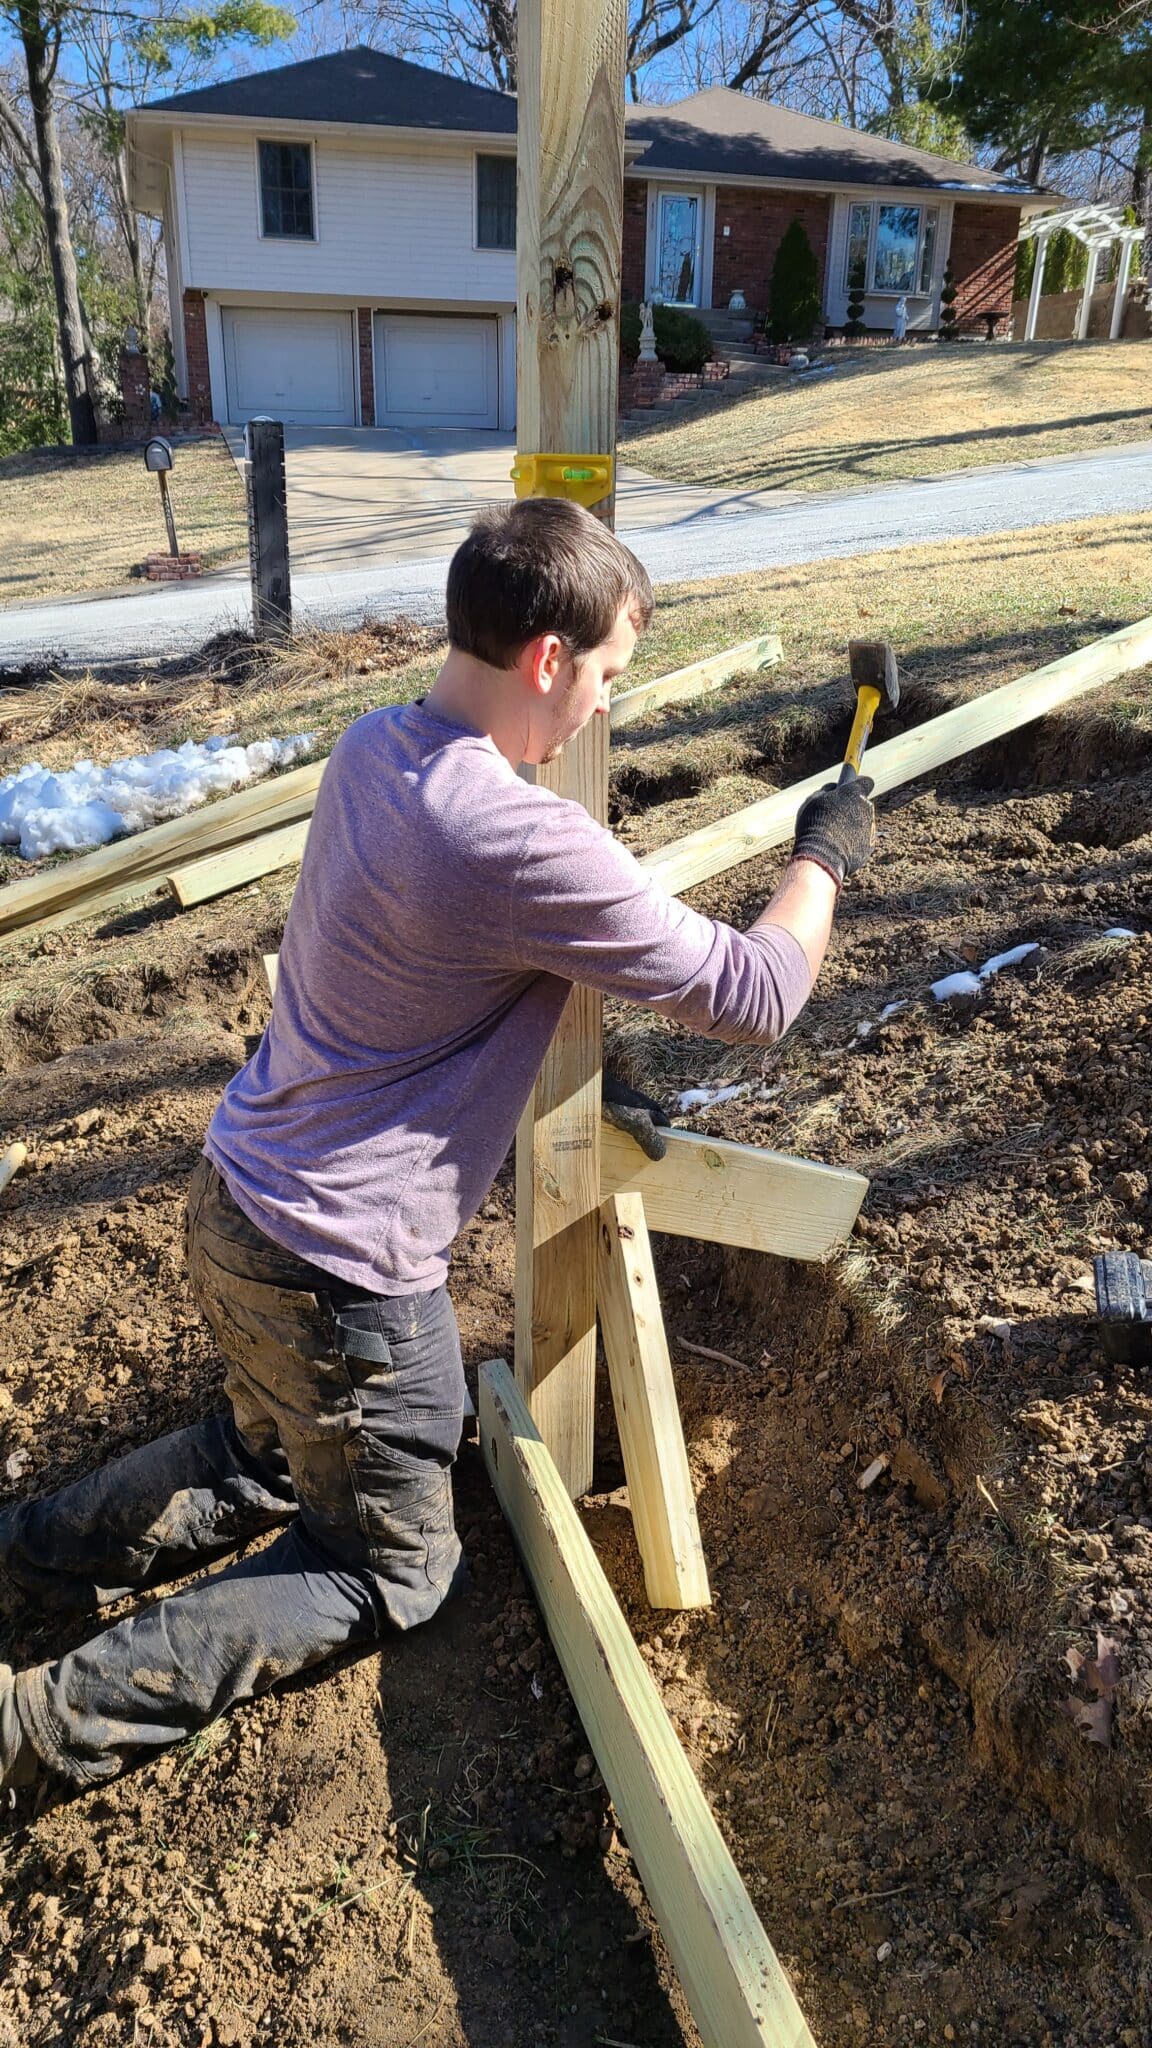
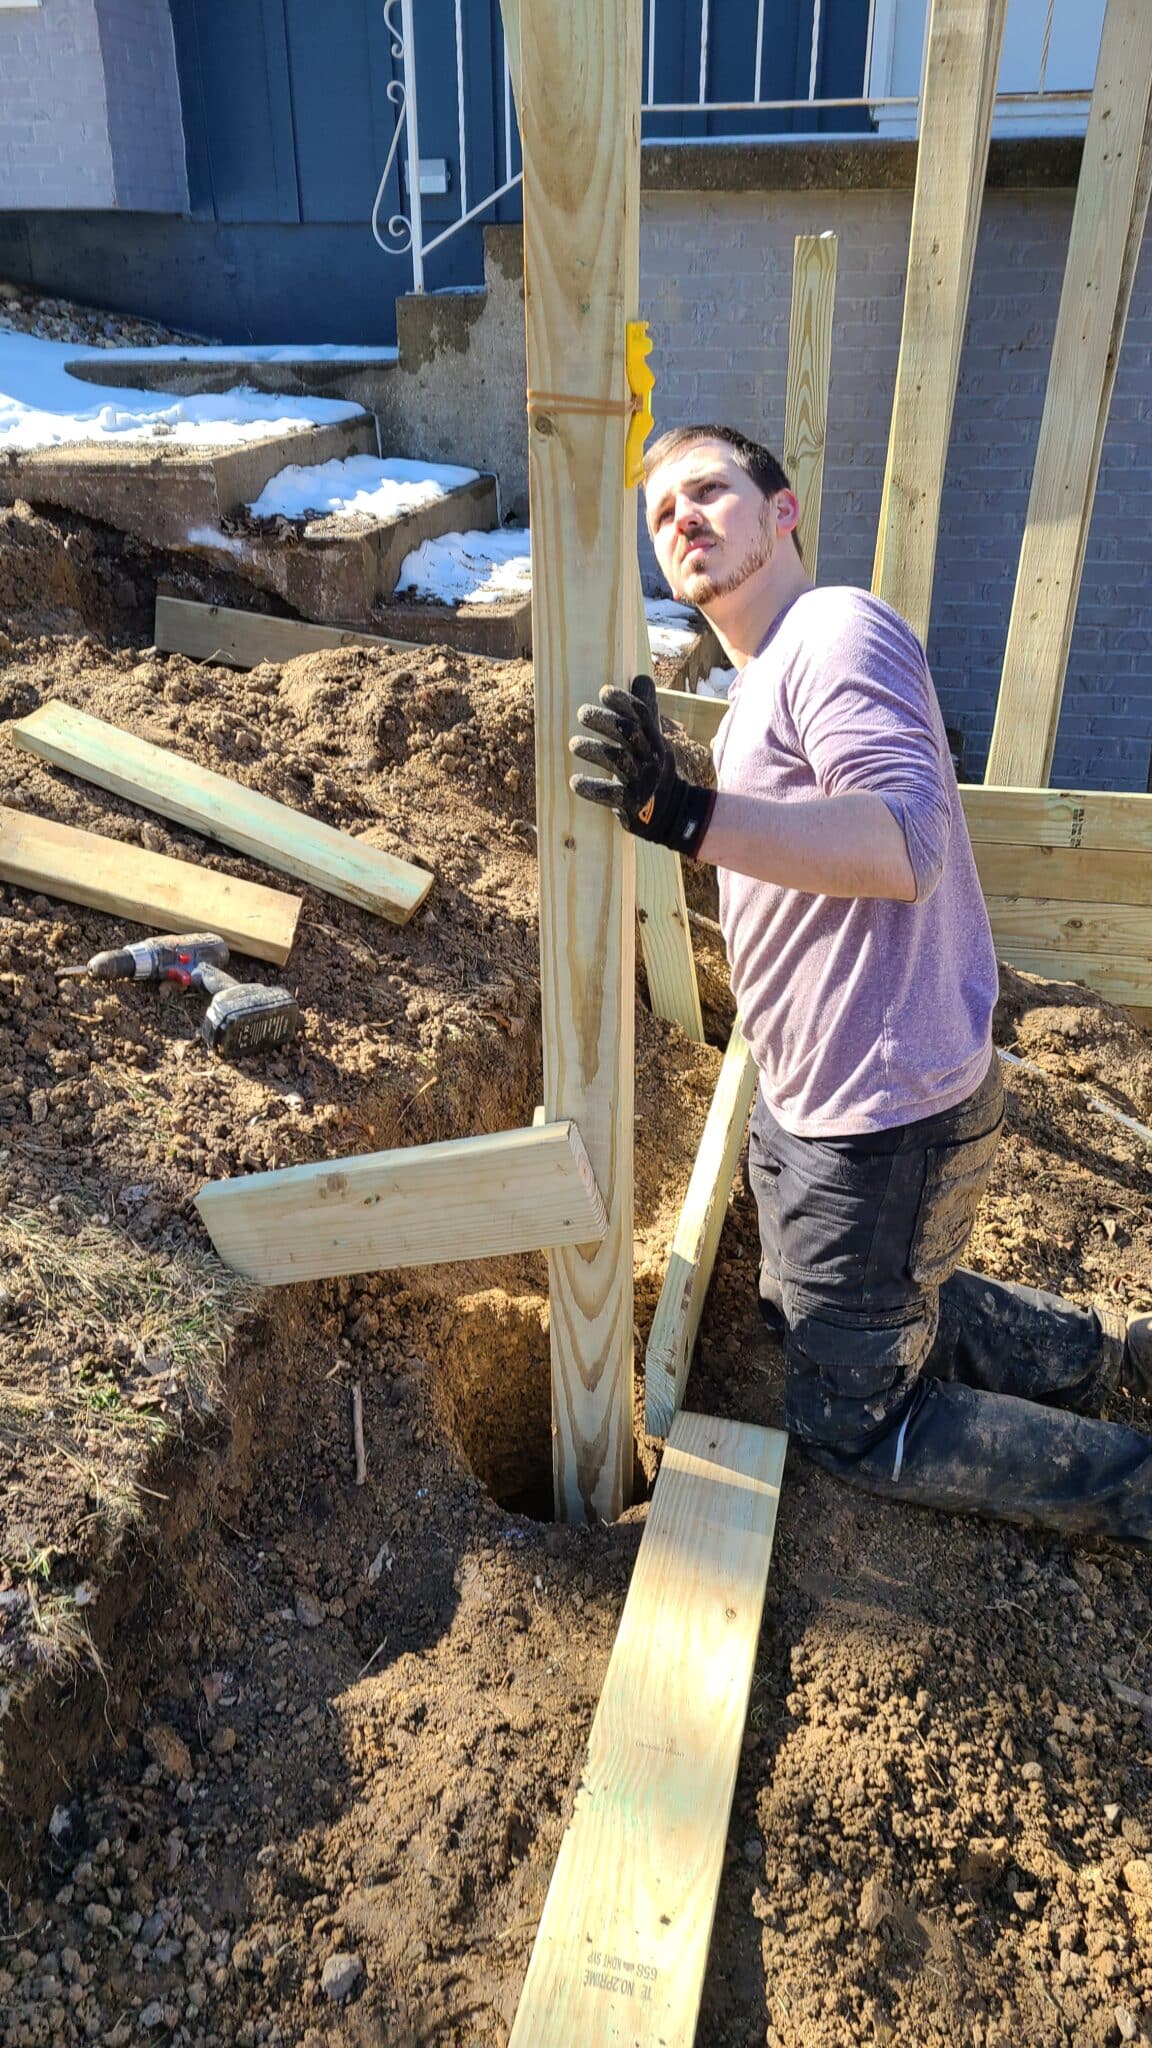
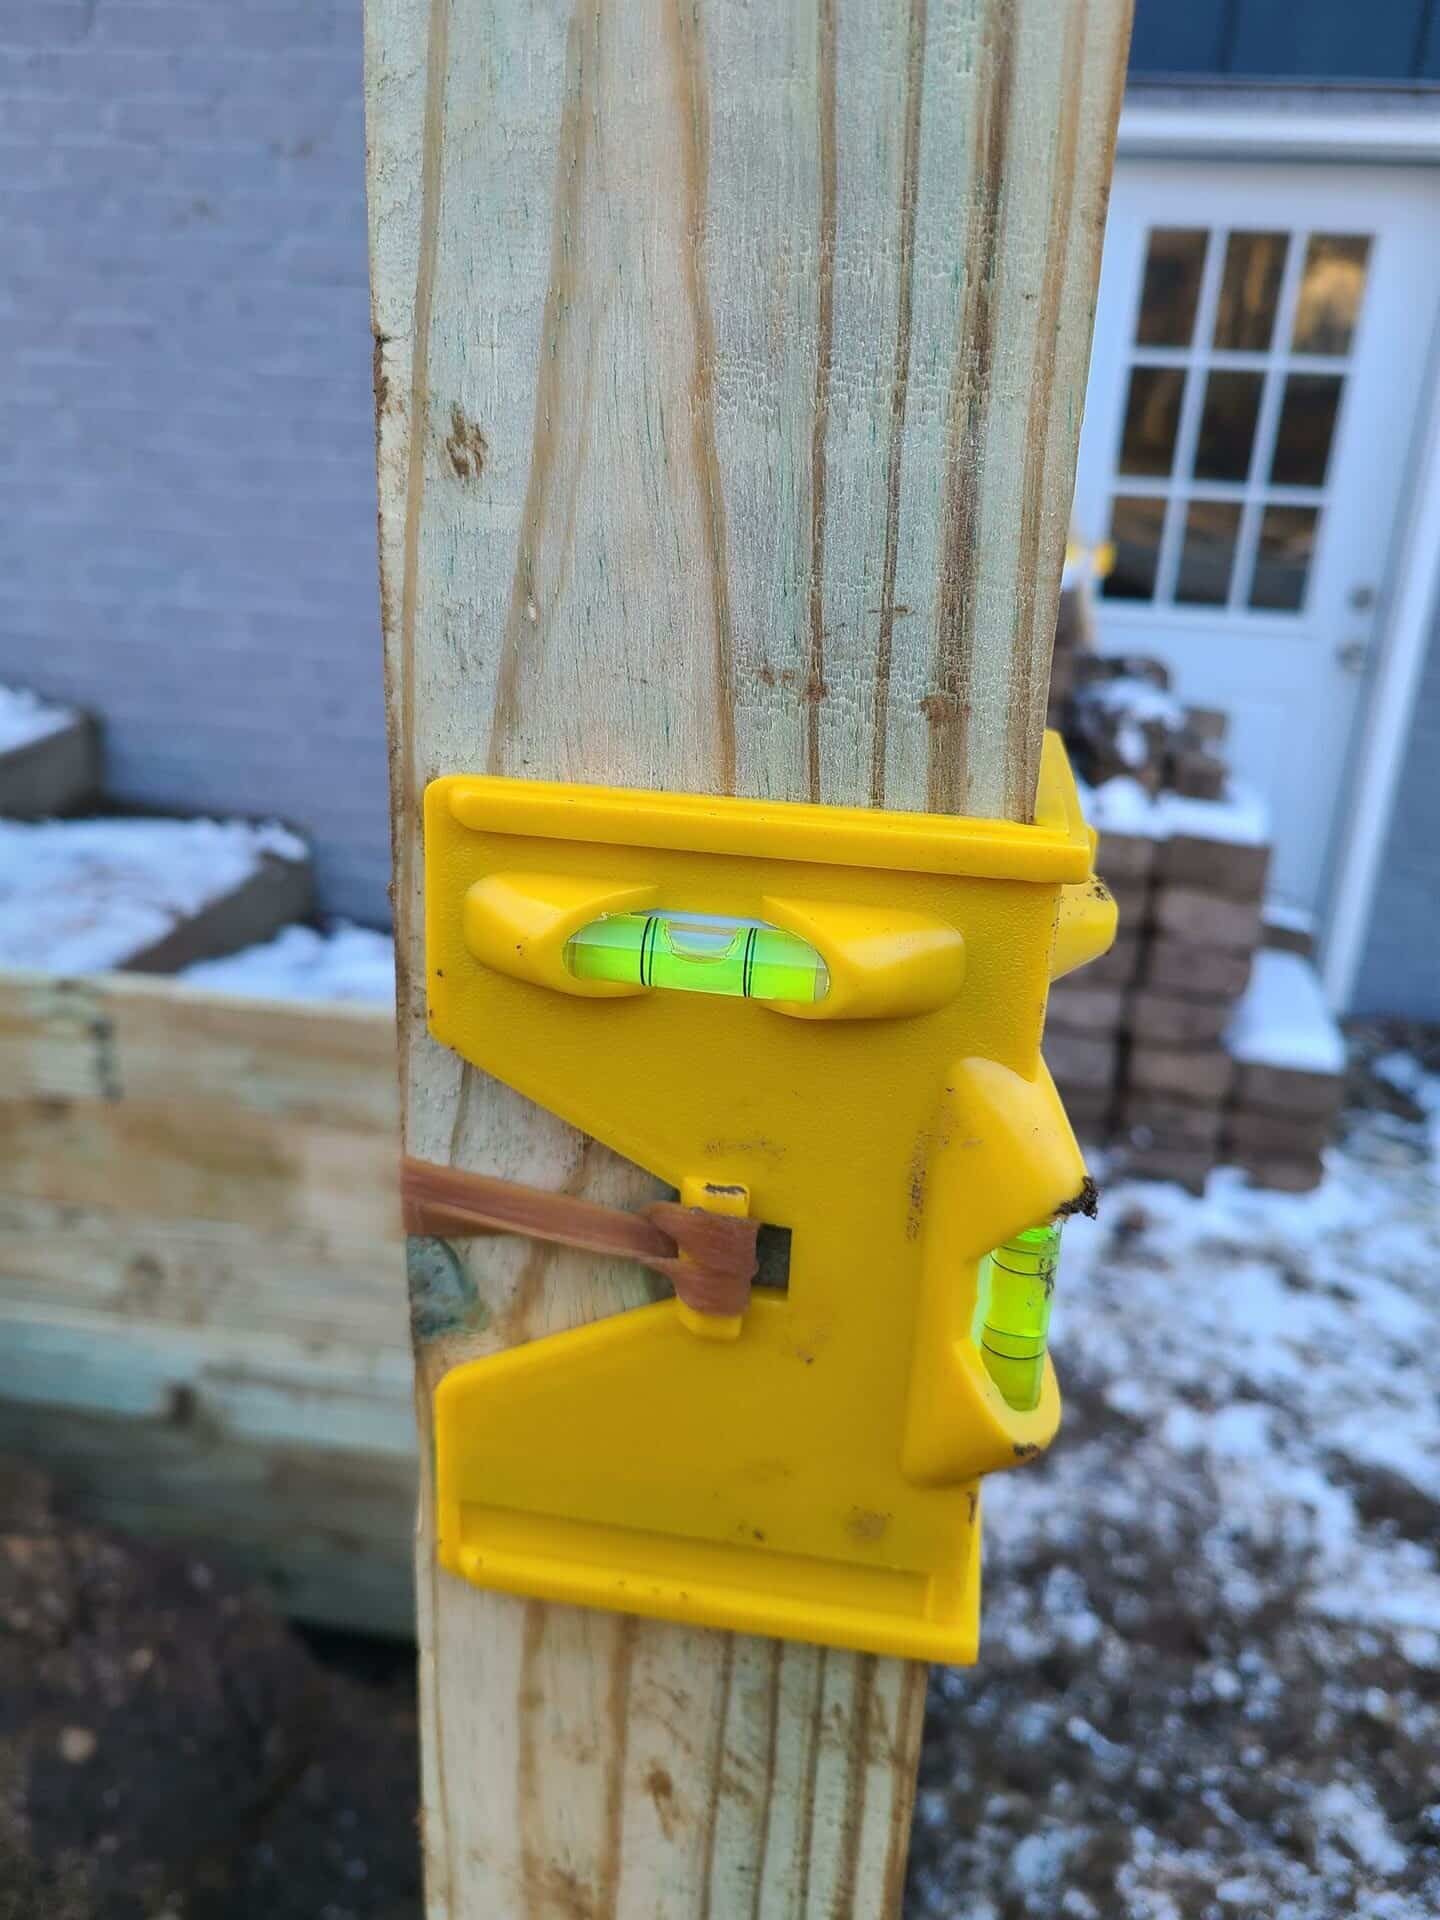
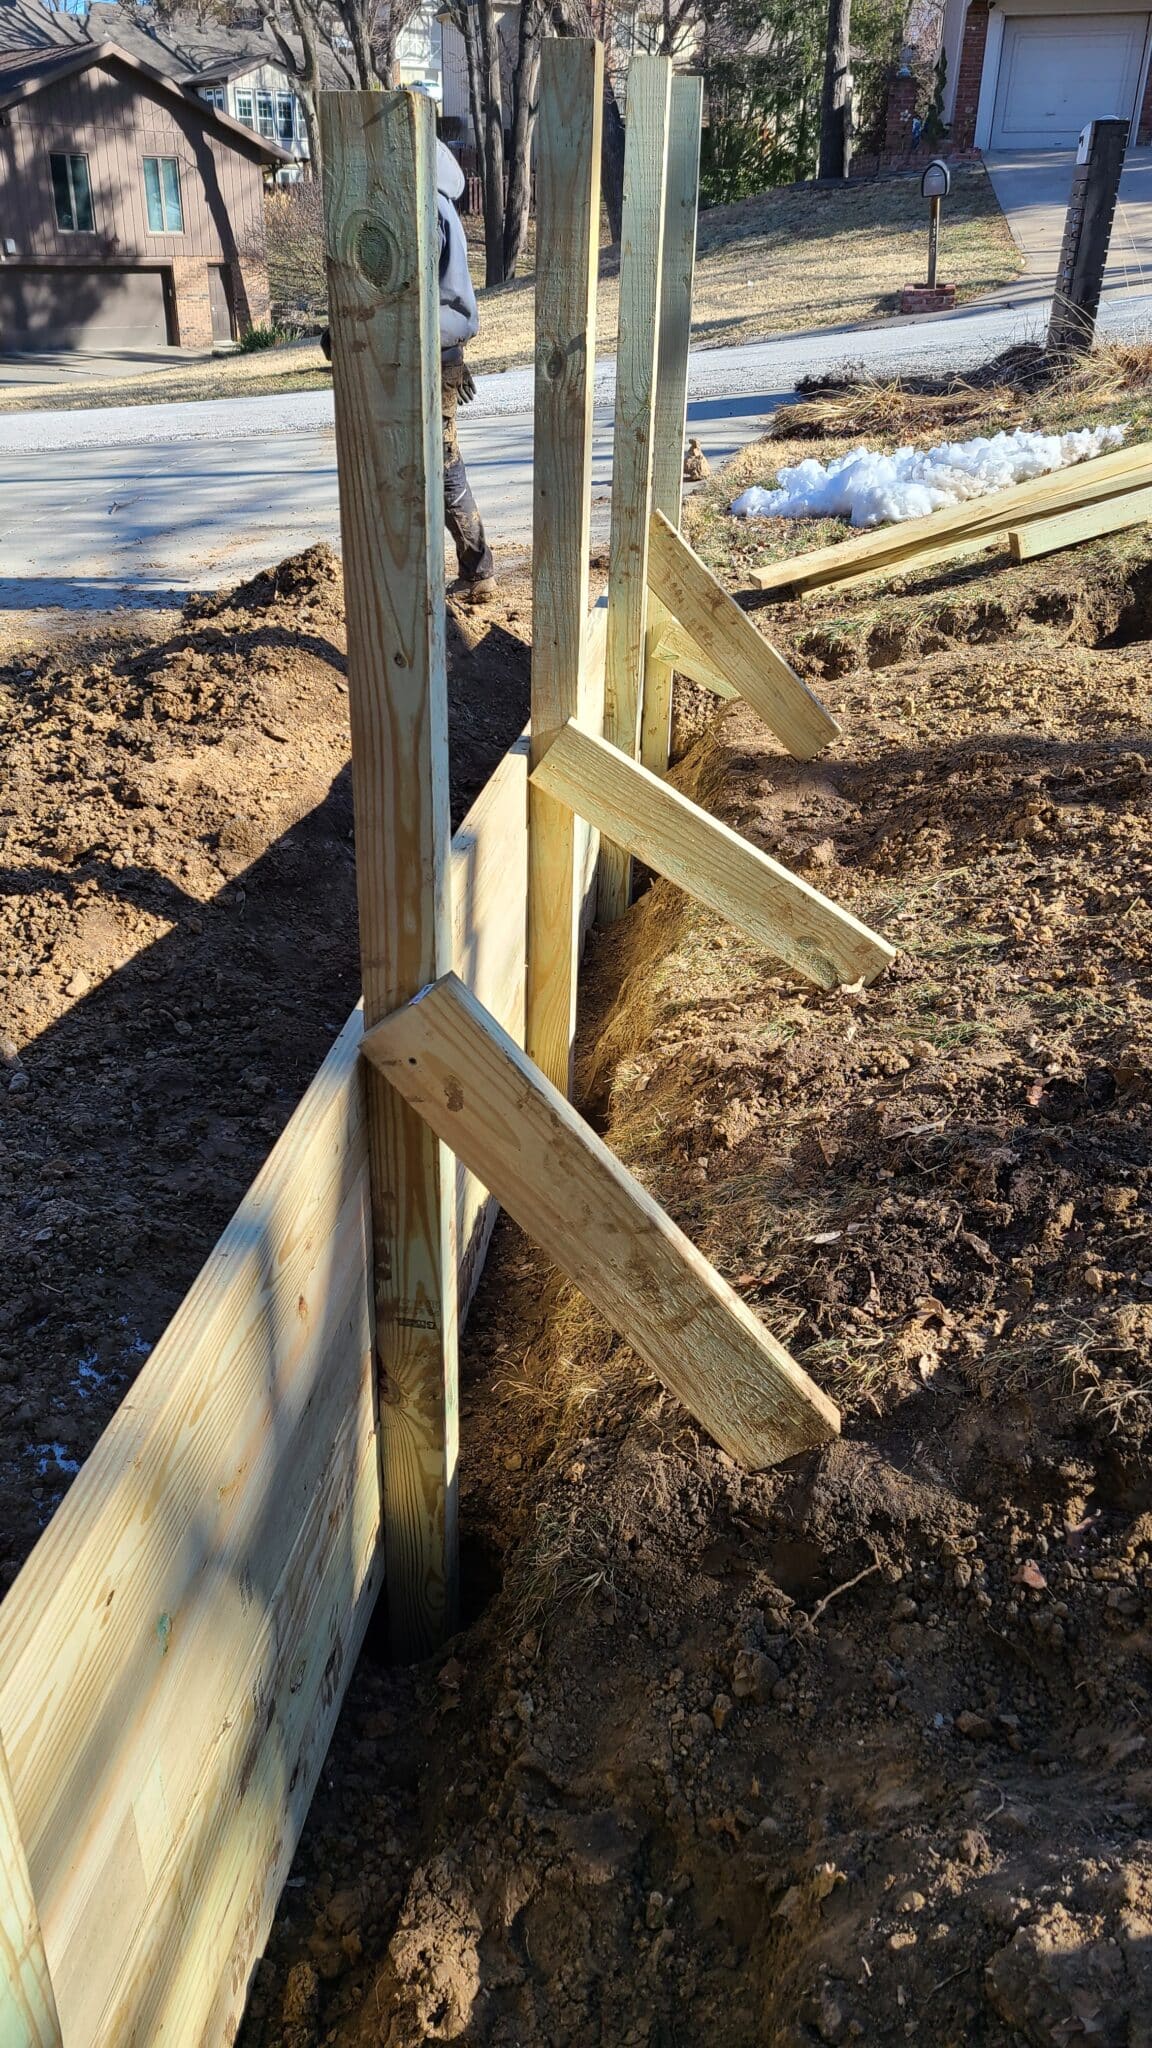
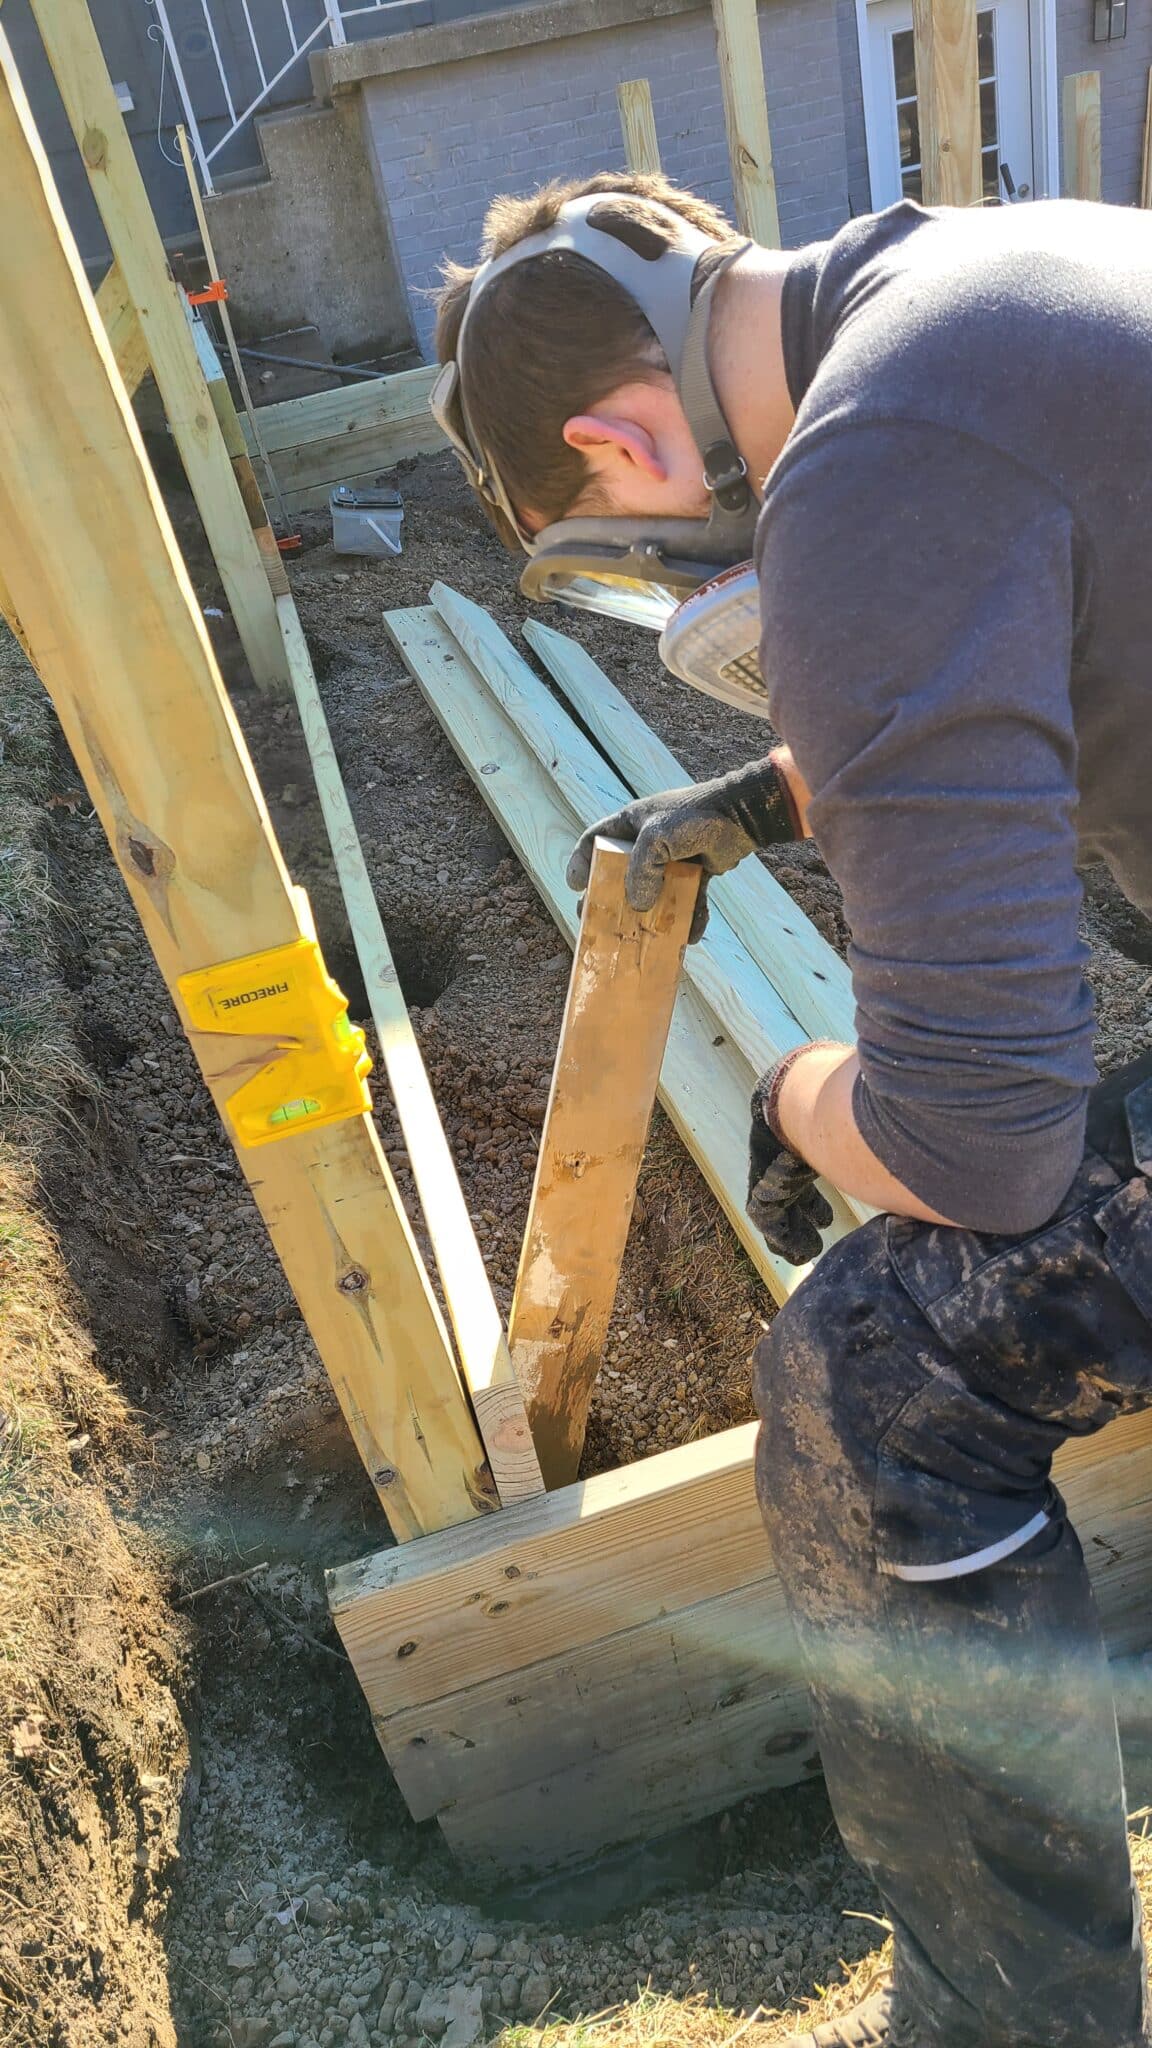
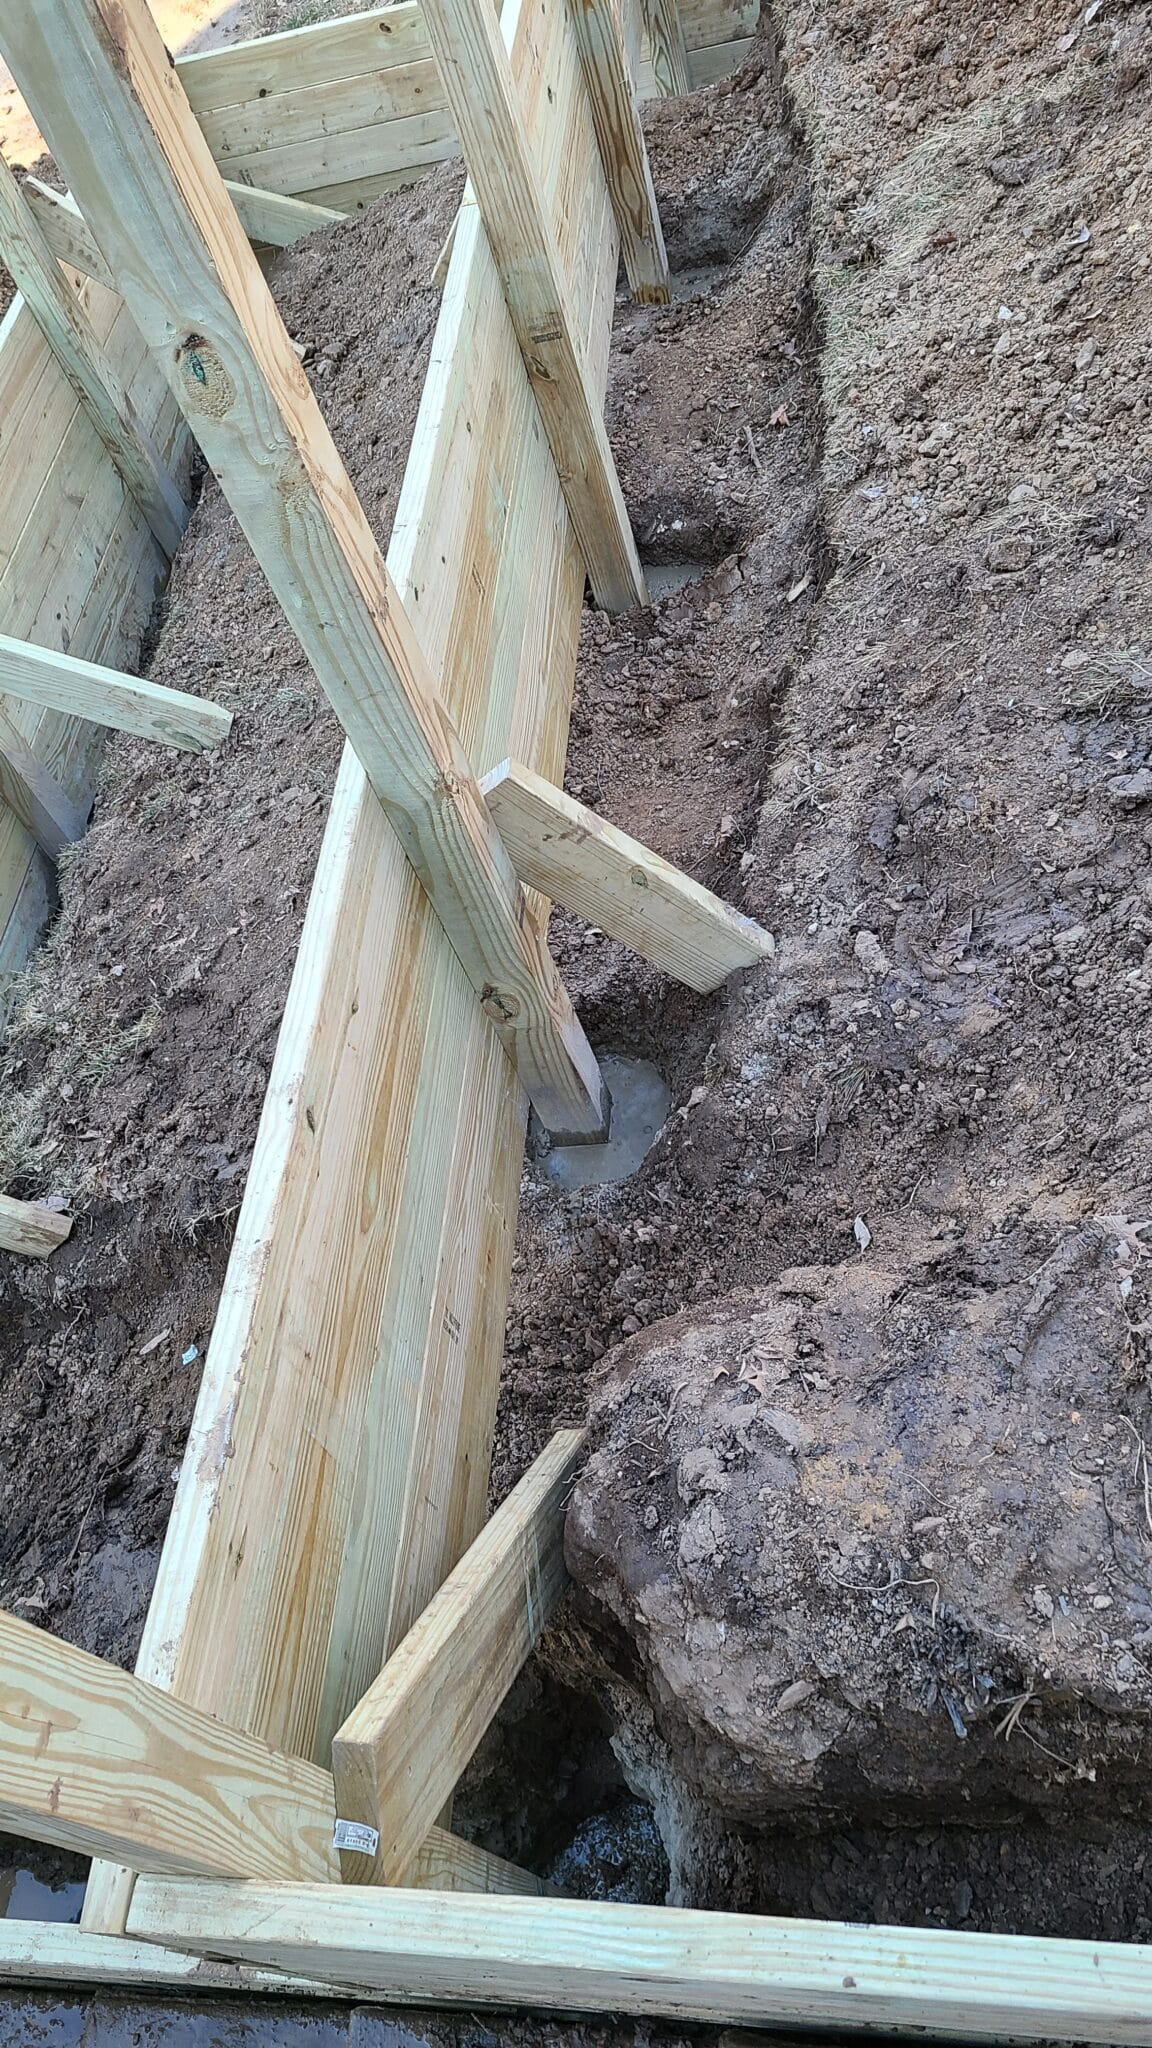
Brace Posts & Make Level
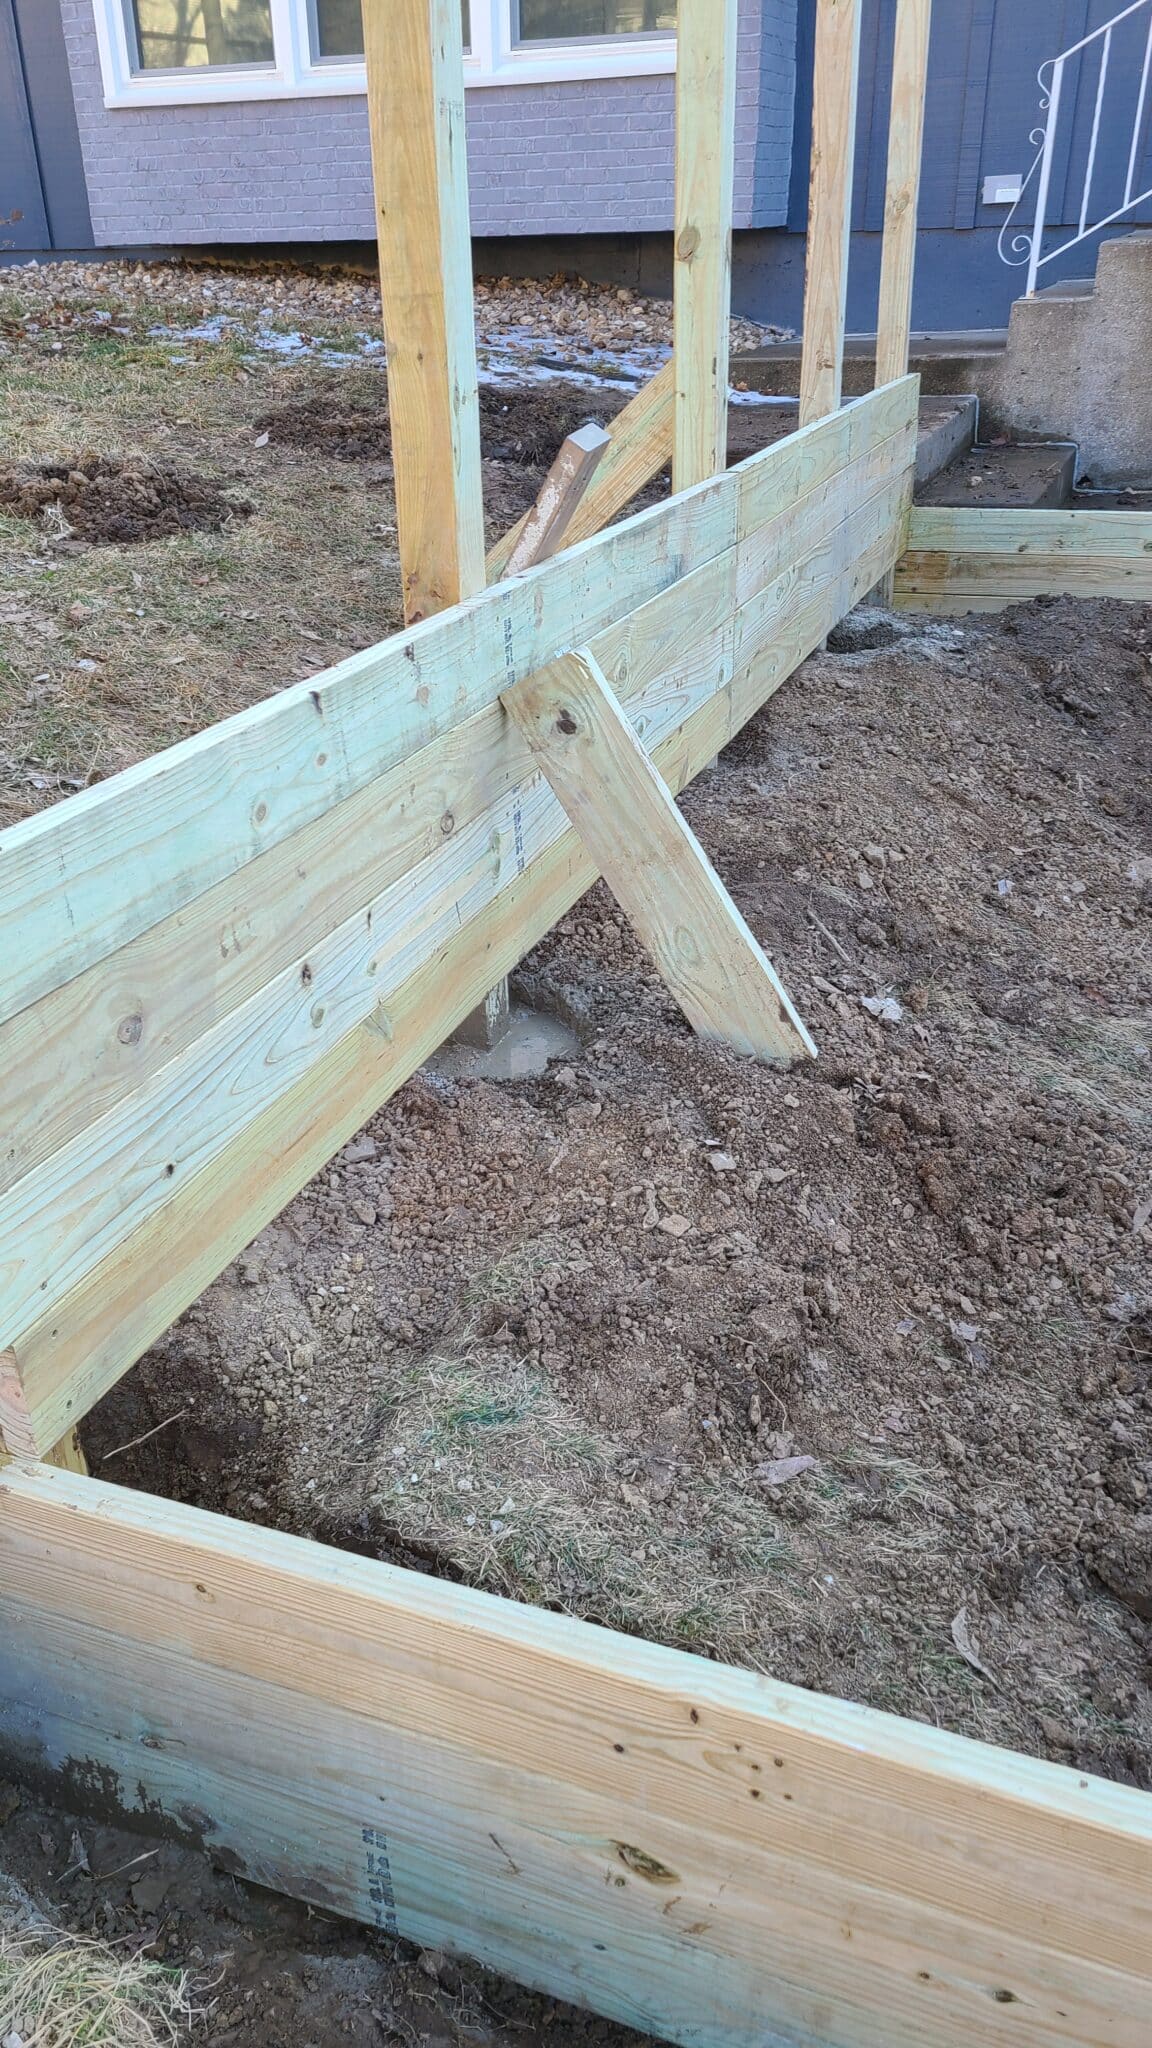
After the gravel is in, place each post in the hole. Use a post level or laser level to ensure each post is sitting level in the ground. When you’ve got it adjusted, use some scrap wood and screws to brace each post until the concrete is poured. It usually requires a couple of boards per post.
We also used the bottommost 2×6 board of the wall as a spacer to ensure all the posts were in alignment with each other across the 16’ span. We simply used screws to hold it all in place for now and went back later with the heavy-duty attachments.
Repeat this process for every terrace on the slope.


Step 6: Mix & Pour Concrete For Posts
With the posts prepped, you can move on to securing them with concrete. Start by reading your fast-setting concrete’s instructions to understand the ratio of concrete mix to water you’ll need and when to add the water. Each brand is slightly different and the last thing you want is to have half-cured concrete at the bottom of the post. Then grab a bucket or pitcher you know the measurement of for the water and begin pouring a bag of concrete into the post hole. Some brands say you can pour the entire hole full of concrete mix and then add water at the end, but it still may be better to add some water as you go just to be safe.
Pour, Mix, & Tap
As you pour, you want to use a scrap piece of wood to mix in the water and tap down the concrete to remove any air bubbles. You’ll want the concrete to surround the entire post and fill the hole until it is just 2”-3” just below the top. In our case, we ended up with about one and a half bags per hole.
Reminder, fast-setting concrete will set in about 20-40 minutes and fully harden after about an hour. So you have time for a little adjustment but will still need to work quickly.
Also, keep an eye on the moisture content of the concrete. If you have very dry or rocky soil, it may suck out a lot of the water you pour in, so you may need to add additional water to ensure your concrete is properly saturated.
If your mix is dry and crumbly, then you need to add more water or it won’t cure into a solid mass. Adding too much water can create a soupy consistency then it won’t be as strong, but at least it will be solid. You want to aim for somewhere between oatmeal and peanut butter.
Is anybody else getting hungry?

Safety First
We highly recommend having protective gear when pouring concrete. Inhaling the dust is toxic and getting it in your eyes is no fun either. After all, this stuff forms concrete when it contacts water, so you don’t want that in your eyes or lungs! Although you can wear safety goggles and a mask, we love this full-face mask respirator as it doesn’t fog up, has a filter, and kept all that dust off our faces. Protect your body so you can DIY for years to come!
Step 7: Install Retaining Wall Boards
After the concrete is fully cured, remove the braces and you can move on to installing the wood retaining wall’s boards. If you need your boards at a specific height, then start with your top layer and work your way down. Otherwise, it is generally easier to work from the bottom up so that you can rest each board on the previous layer. To secure the boards, we recommend the following procedure.
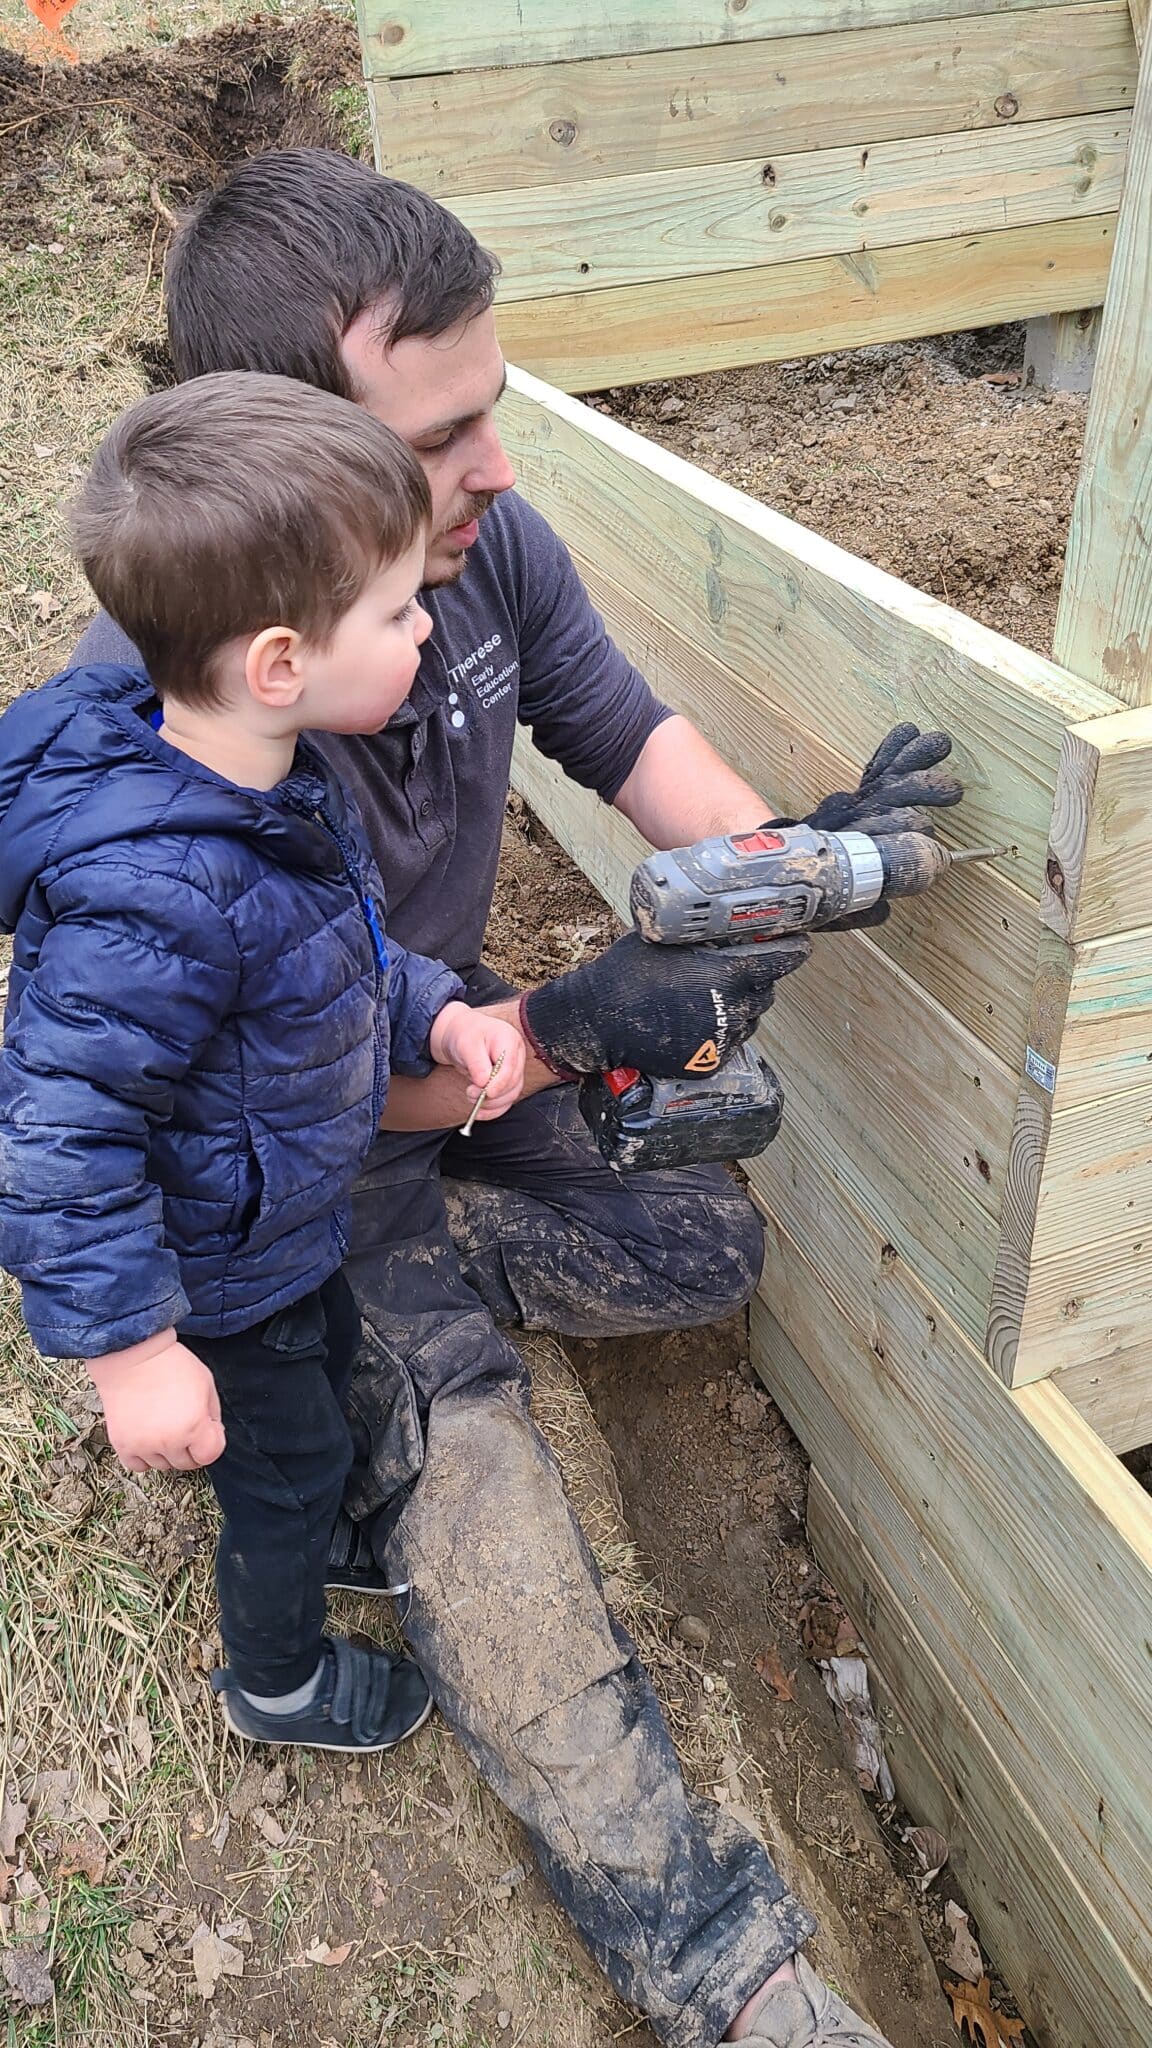
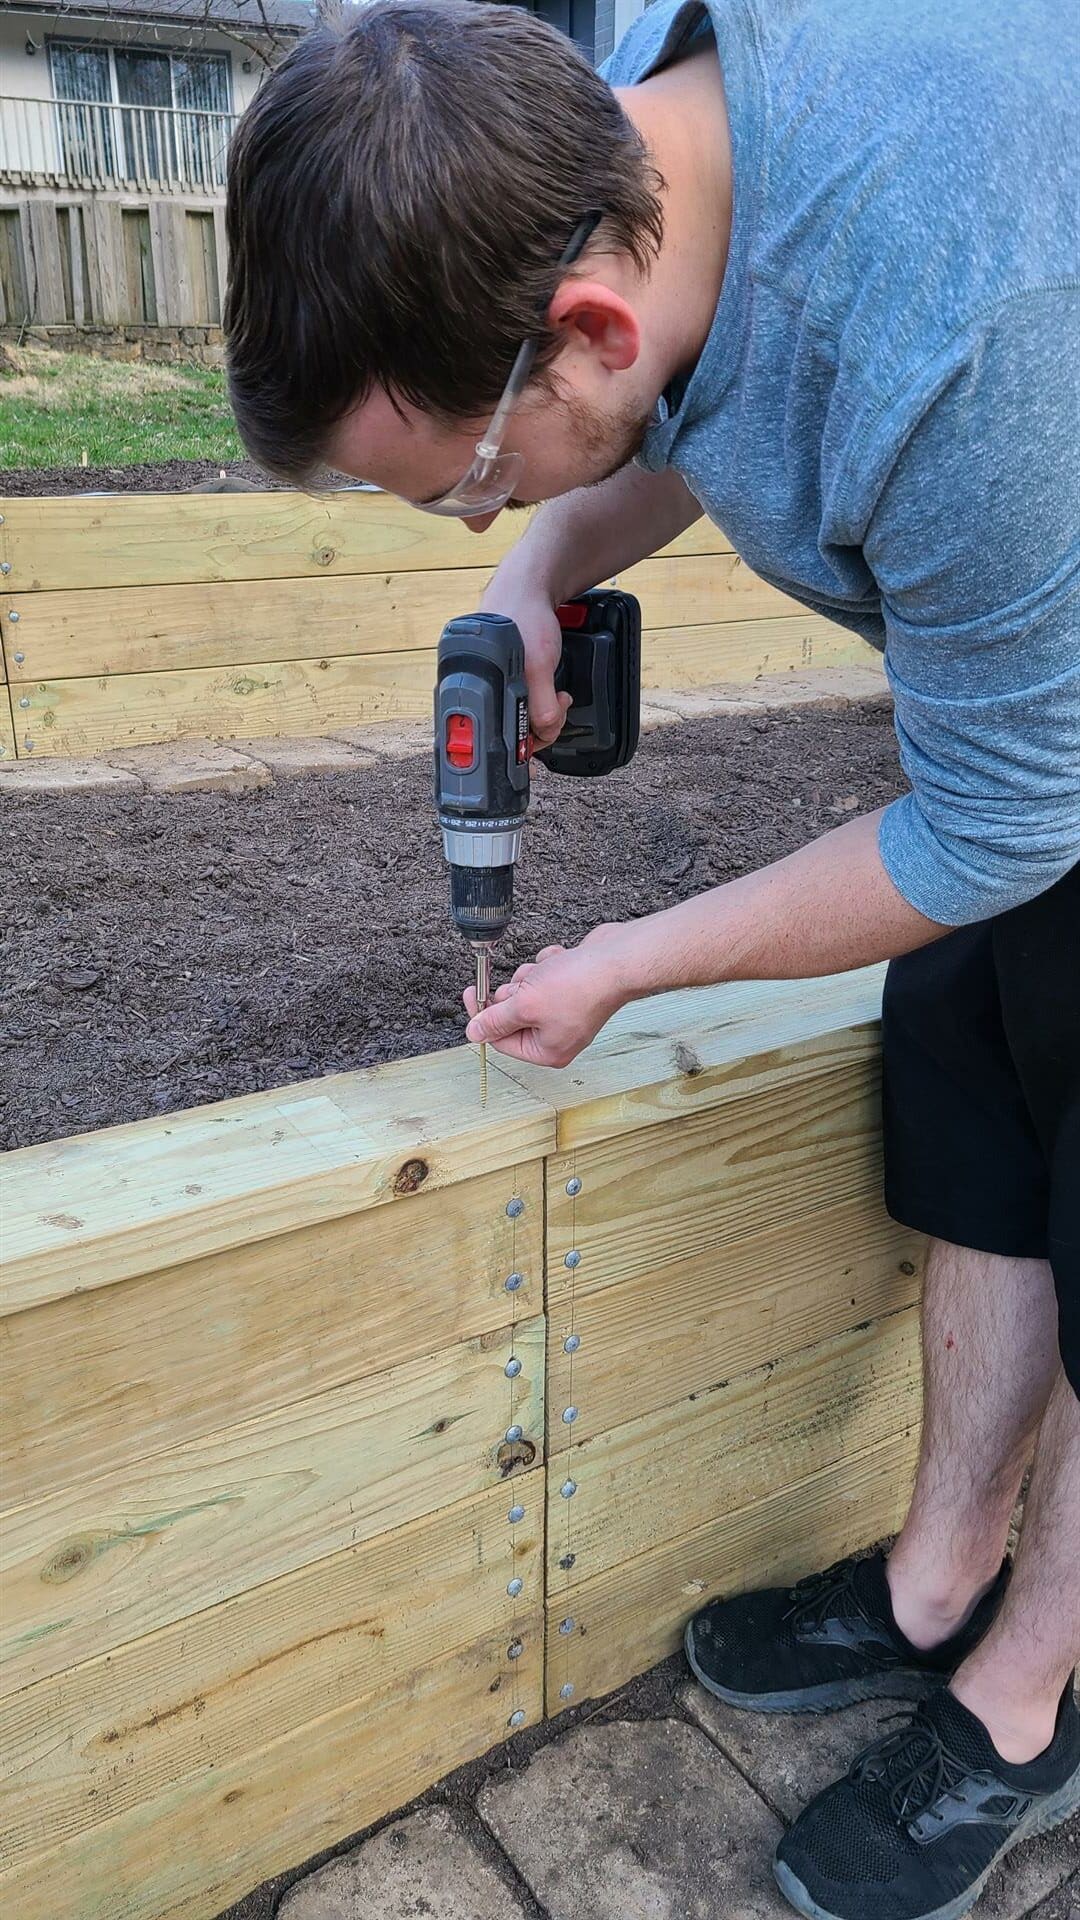
Temporarily Screw Boards
First, you need to get all the wall boards attached to the post, so you can measure and pre-drill out the locations for the carriage bolt attachments. We found the best method is to temporarily screw the boards to the posts. This allows you to attach all the boards and get them aligned prior to drilling the final holes for the carriage bolts.
Screws alone will not be strong enough over time due to the pressure from the soil the wall is retaining. So this is only a temporary condition to make the next part easier. Try to keep the screws centered on the post about where you think you’ll be adding the bolts later.
You wouldn’t necessarily have to temporarily use screws and could utilize clamps to hold all the boards together in place. But you would likely need a lot of clamps!
Pre-drill Holes
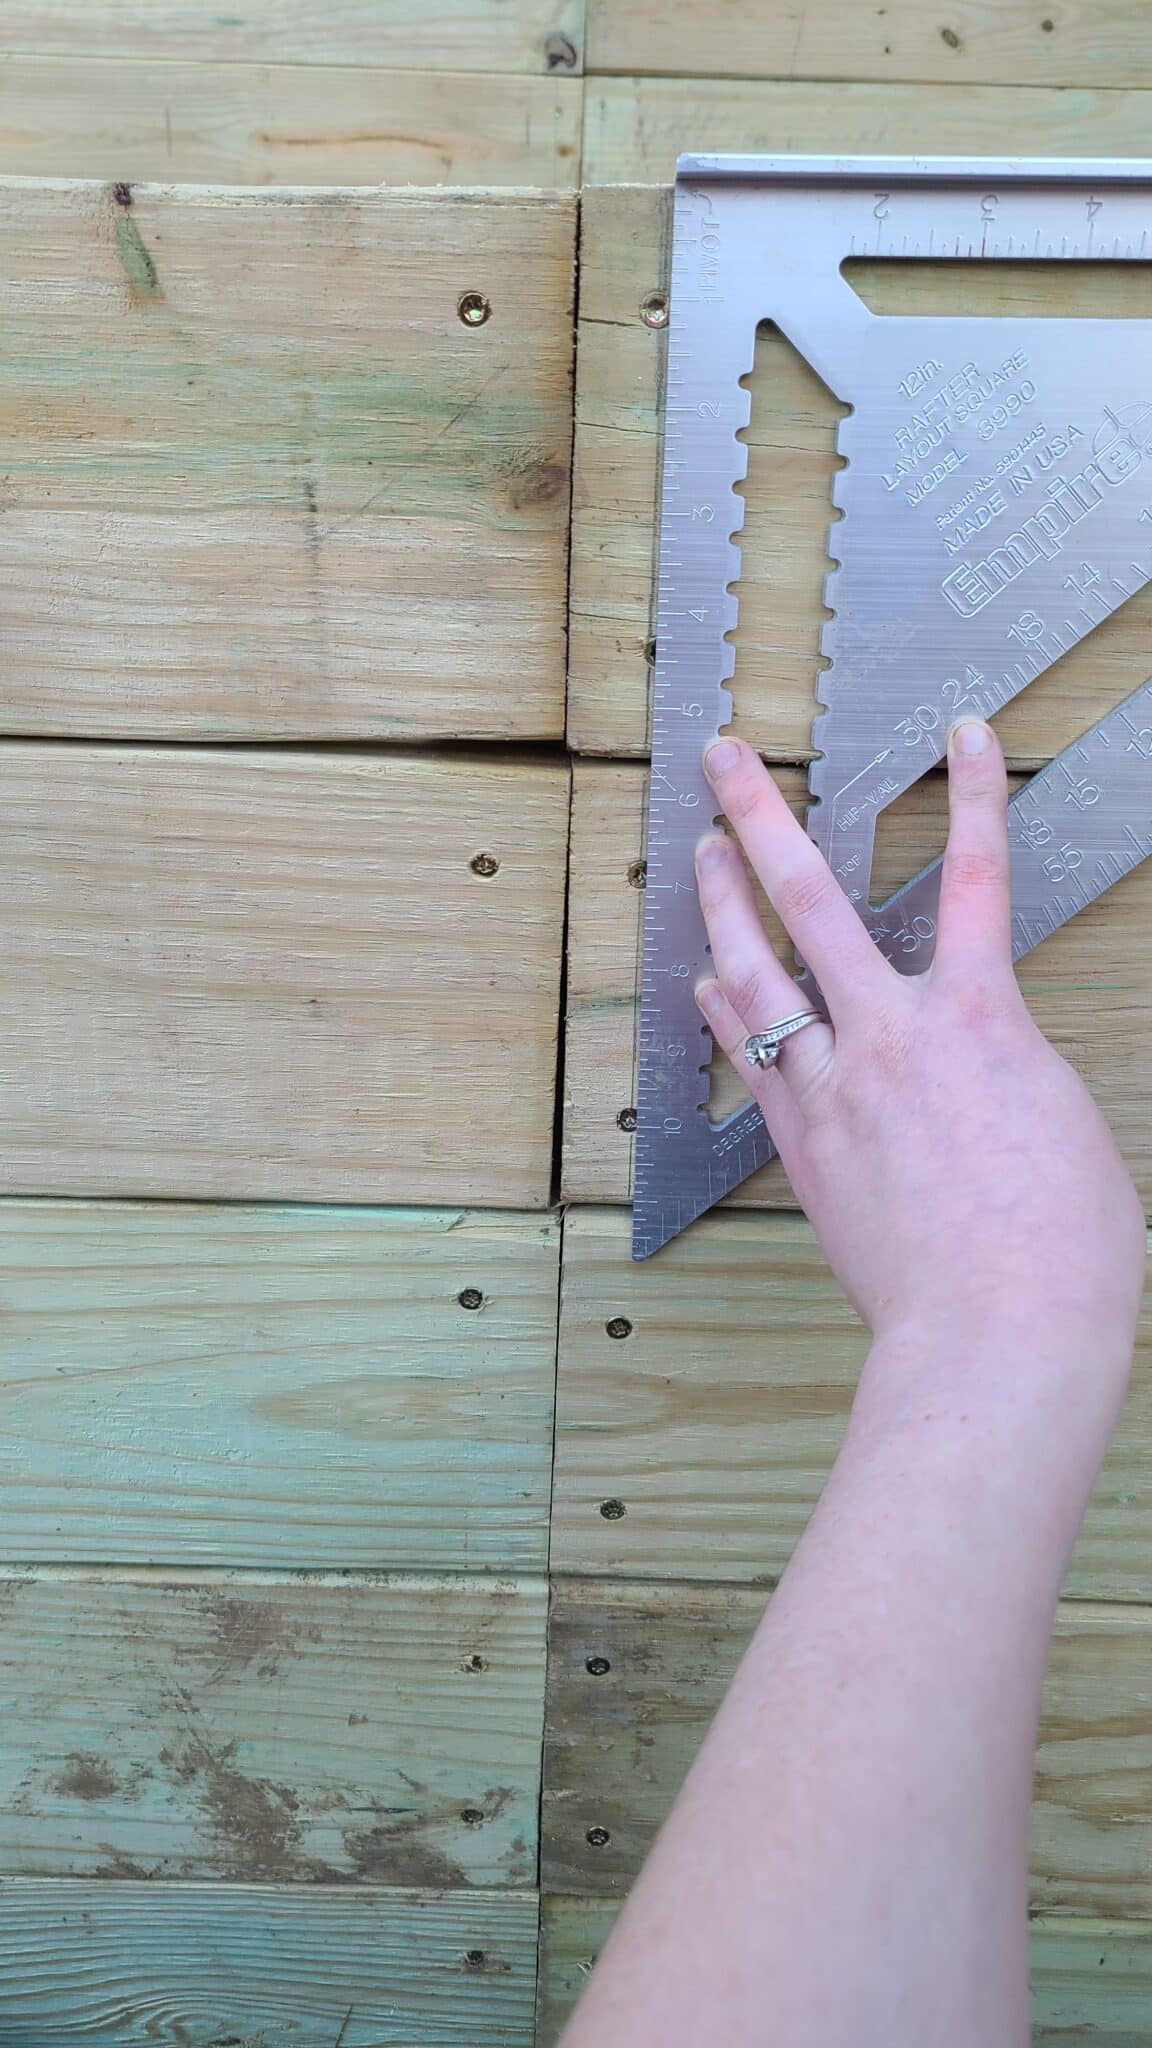
After the wall boards are temporarily attached, start pre-drilling your holes for the carriage bolts. We’re detail-oriented and designers, so we wanted to make sure all the carriage bolts were evenly spaced out and took the time to measure and mark each location.
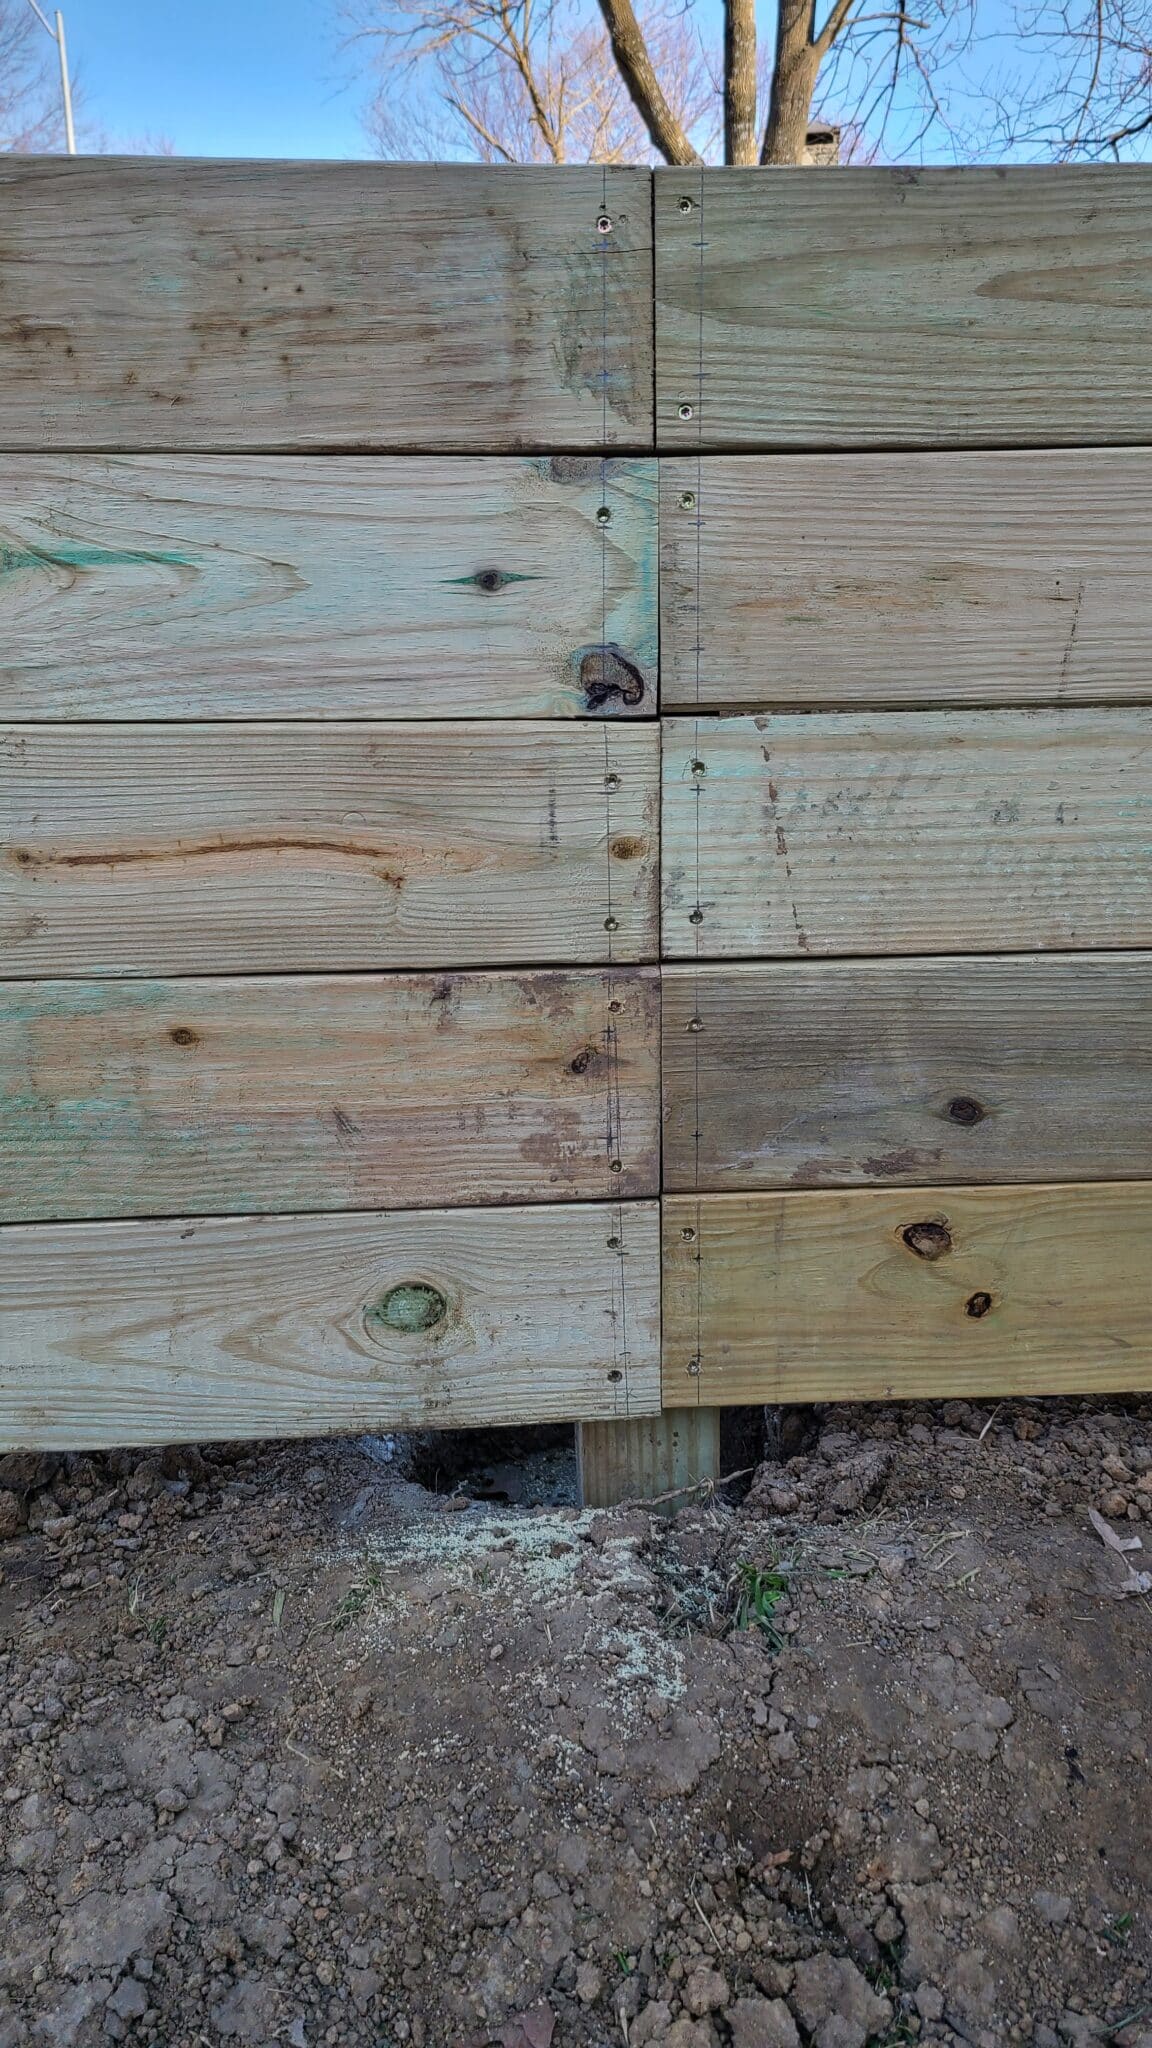
Using a straight edge or a speed square, mark a vertical line on all boards for the bolt location. On most boards, this will be centered on the post. However, where two boards butt up to each other on the same post, you will need to measure about 1” inward of each board.
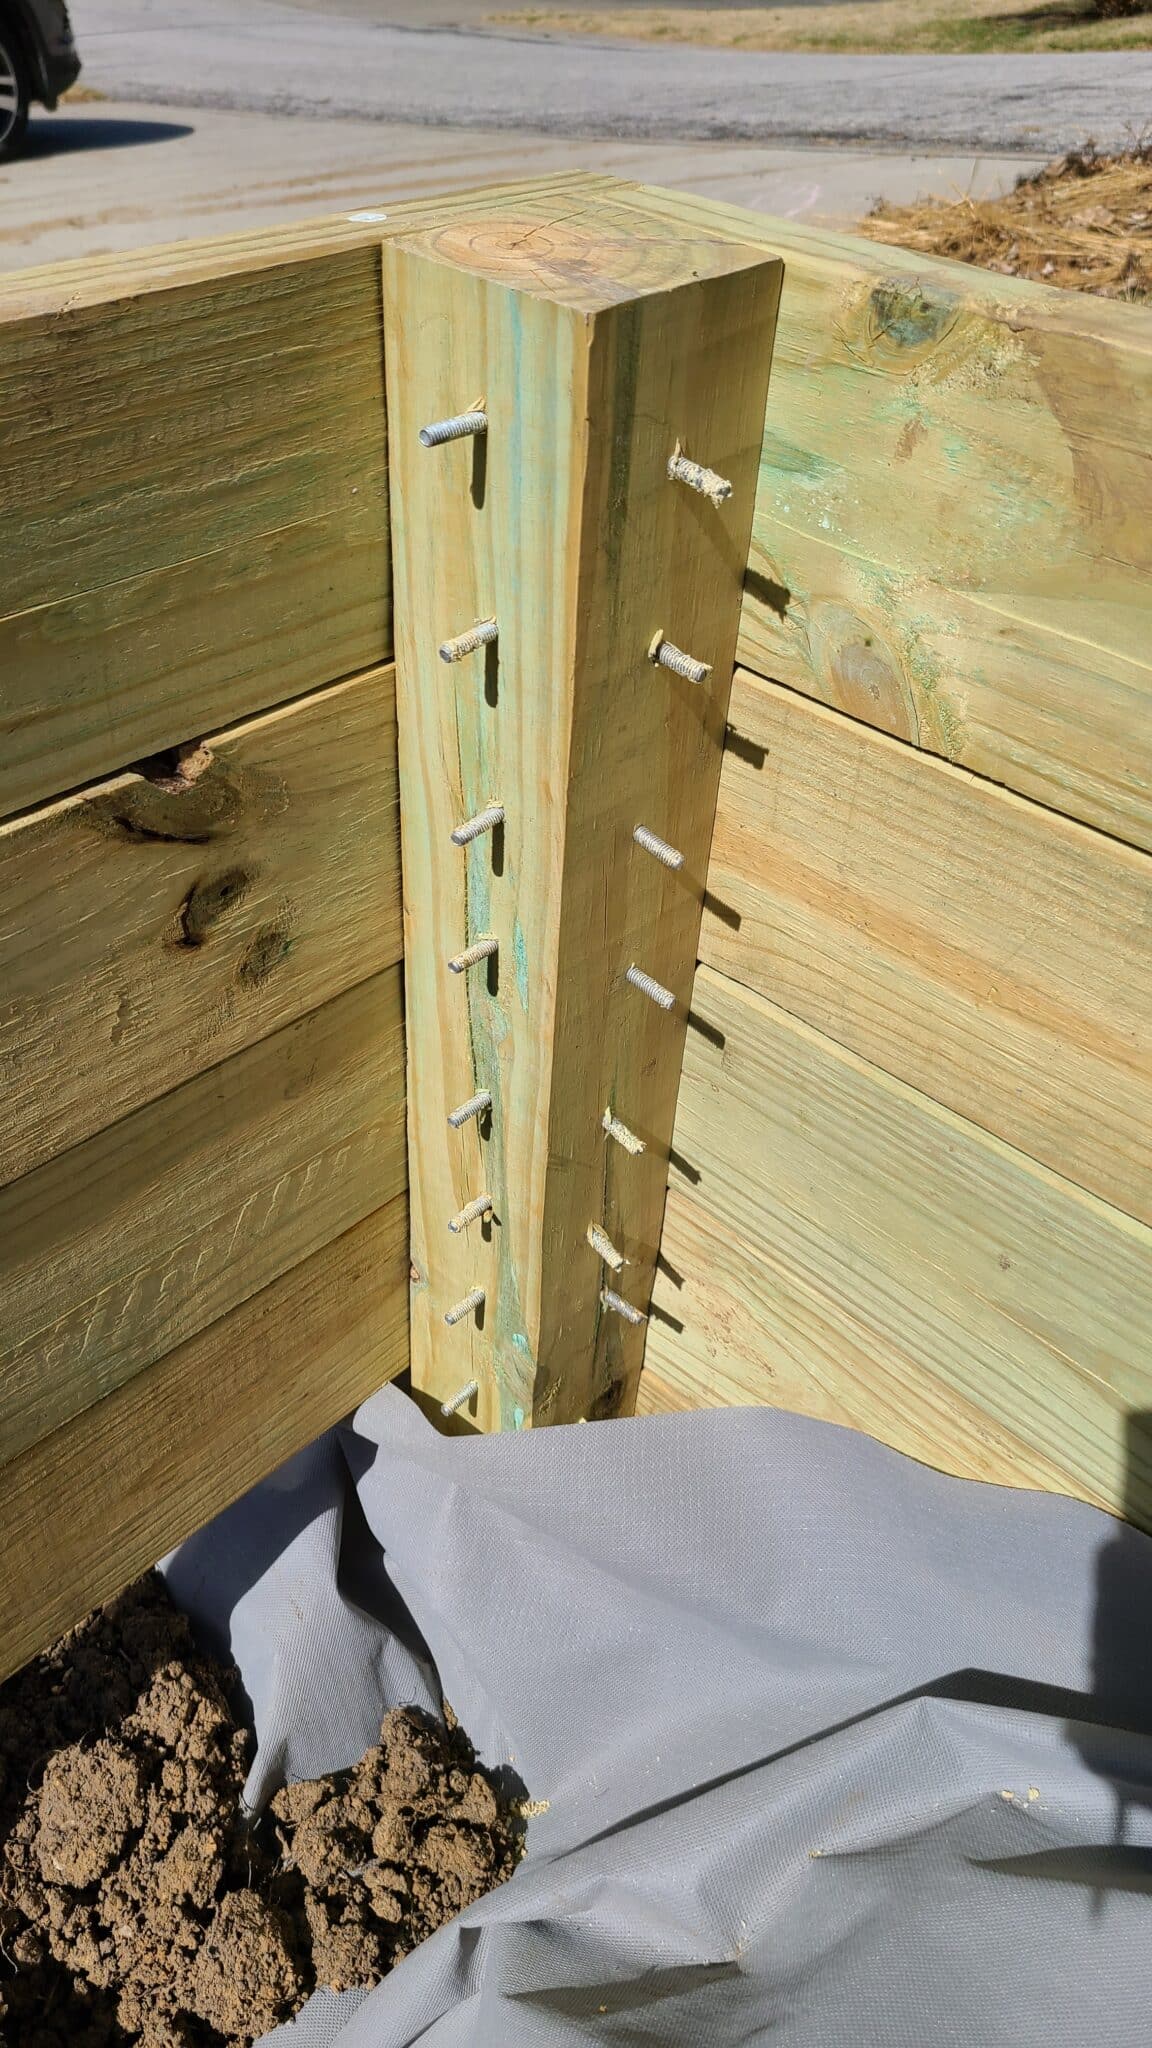
On the corner posts, you will need to make sure that the bolts on each side of the corner don’t hit each other. You can do this by either offsetting one of the sides up or down from the other side. Or you can angle both holes in opposite directions. For example, you can angle the front board’s holes upward and the bottom board’s holes downward. This way your bolts won’t hit each other.
After marking each location, pre-drill the holes for each carriage bolt to match the size of the bolt you used. We used ¼” carriage bolts so we drilled ¼” holes.
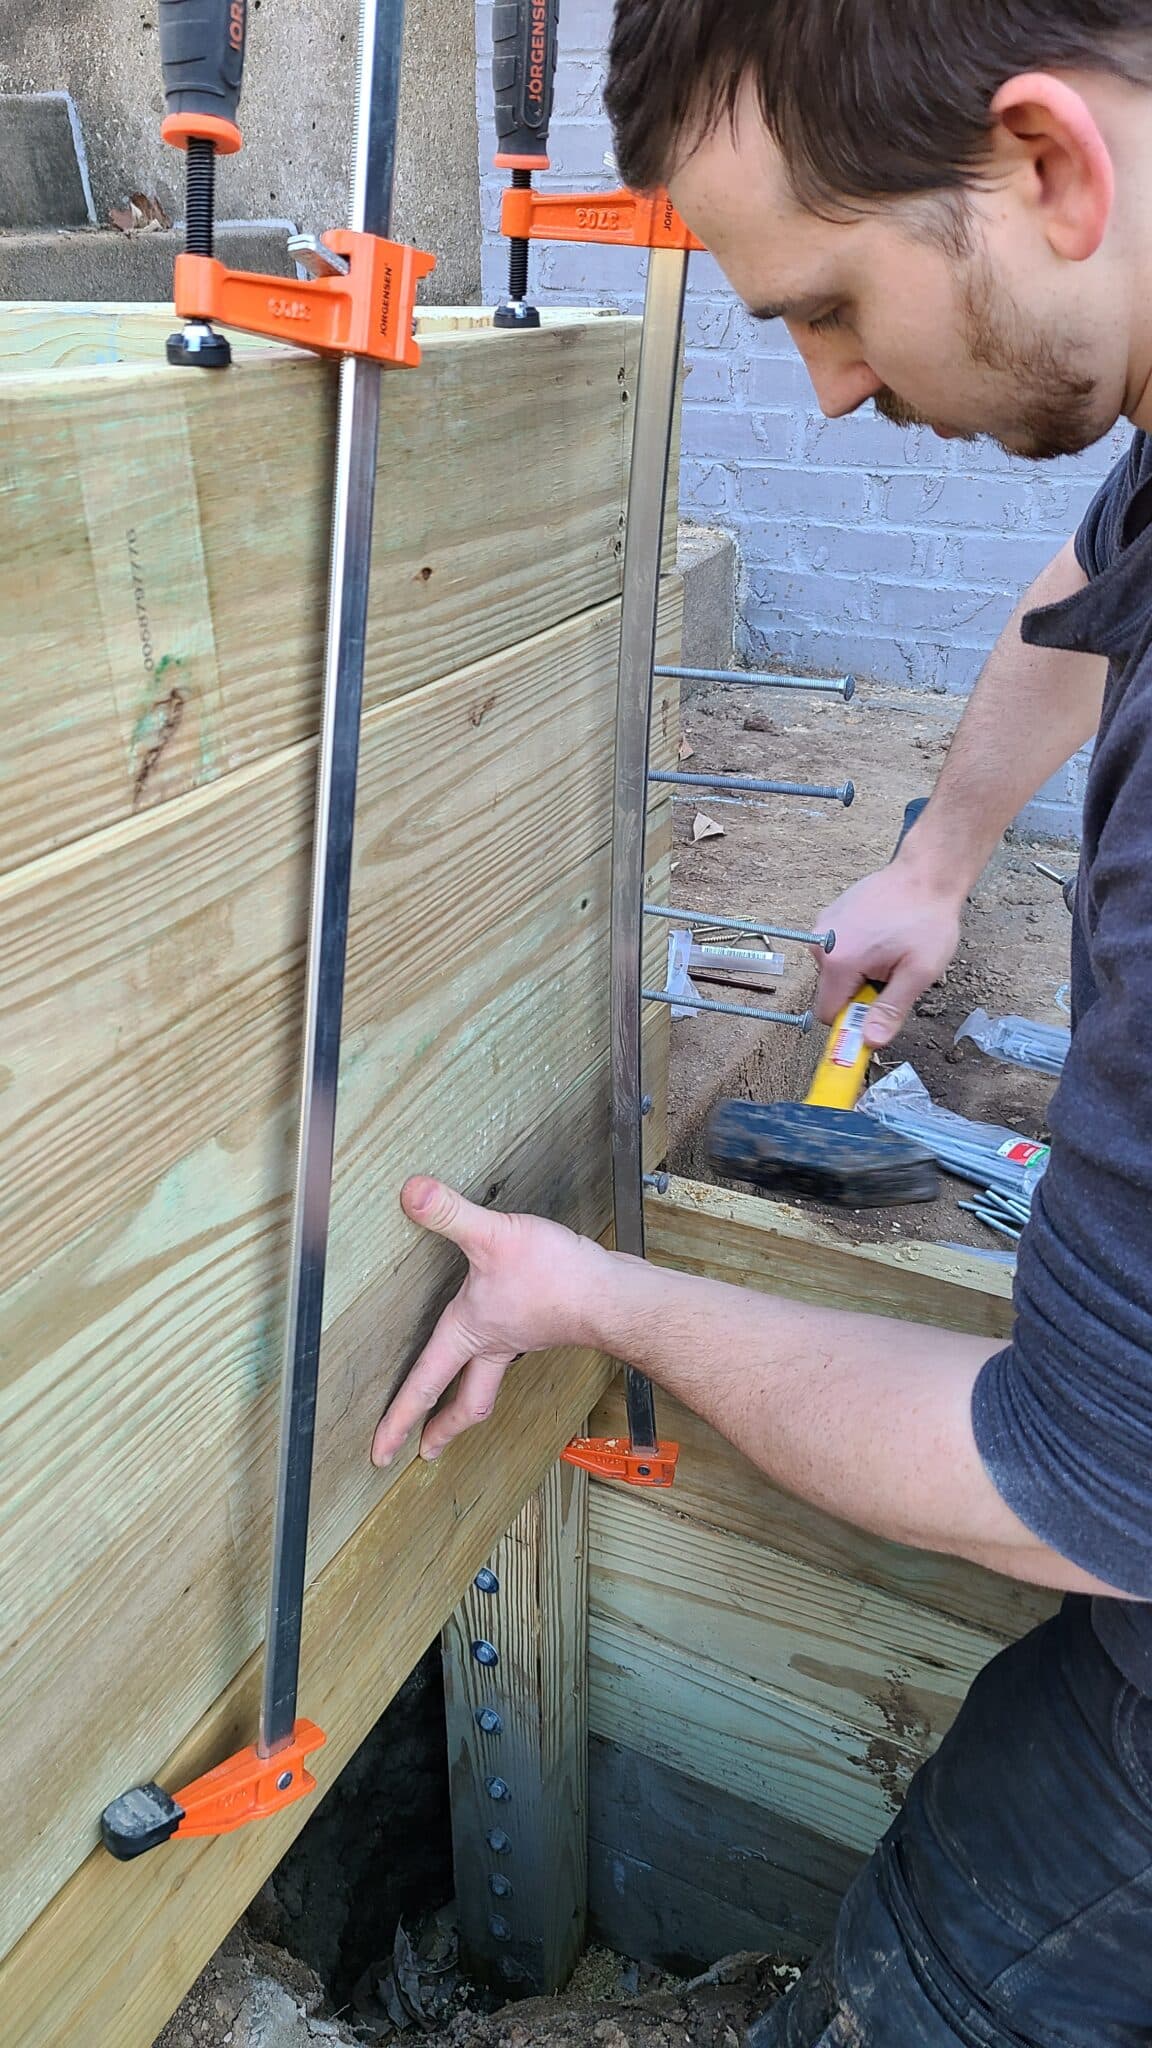
Install Carriage Bolts
Next, slide a carriage bolt into the hole. You’ll likely need a hammer to drive the bolt through as each hole should only be barely big enough for the bolt to go through. After the bolt is through, place a washer on the back side of the bolt followed by a nut. Then using a wrench, tighten the nut until the bolt’s head is flush against the wood. To speed this up, we highly recommend you use an impact driver and sockets.
It’s important to have a washer between the wood and the nut as the washer helps distribute the force applied when tightening. Thus, protecting the wood as well as keeping the nut from digging in.
Repeat this process for every board, wall, and terrace. I know…it takes a while, but it is what is helping secure the boards and hold back the soil!
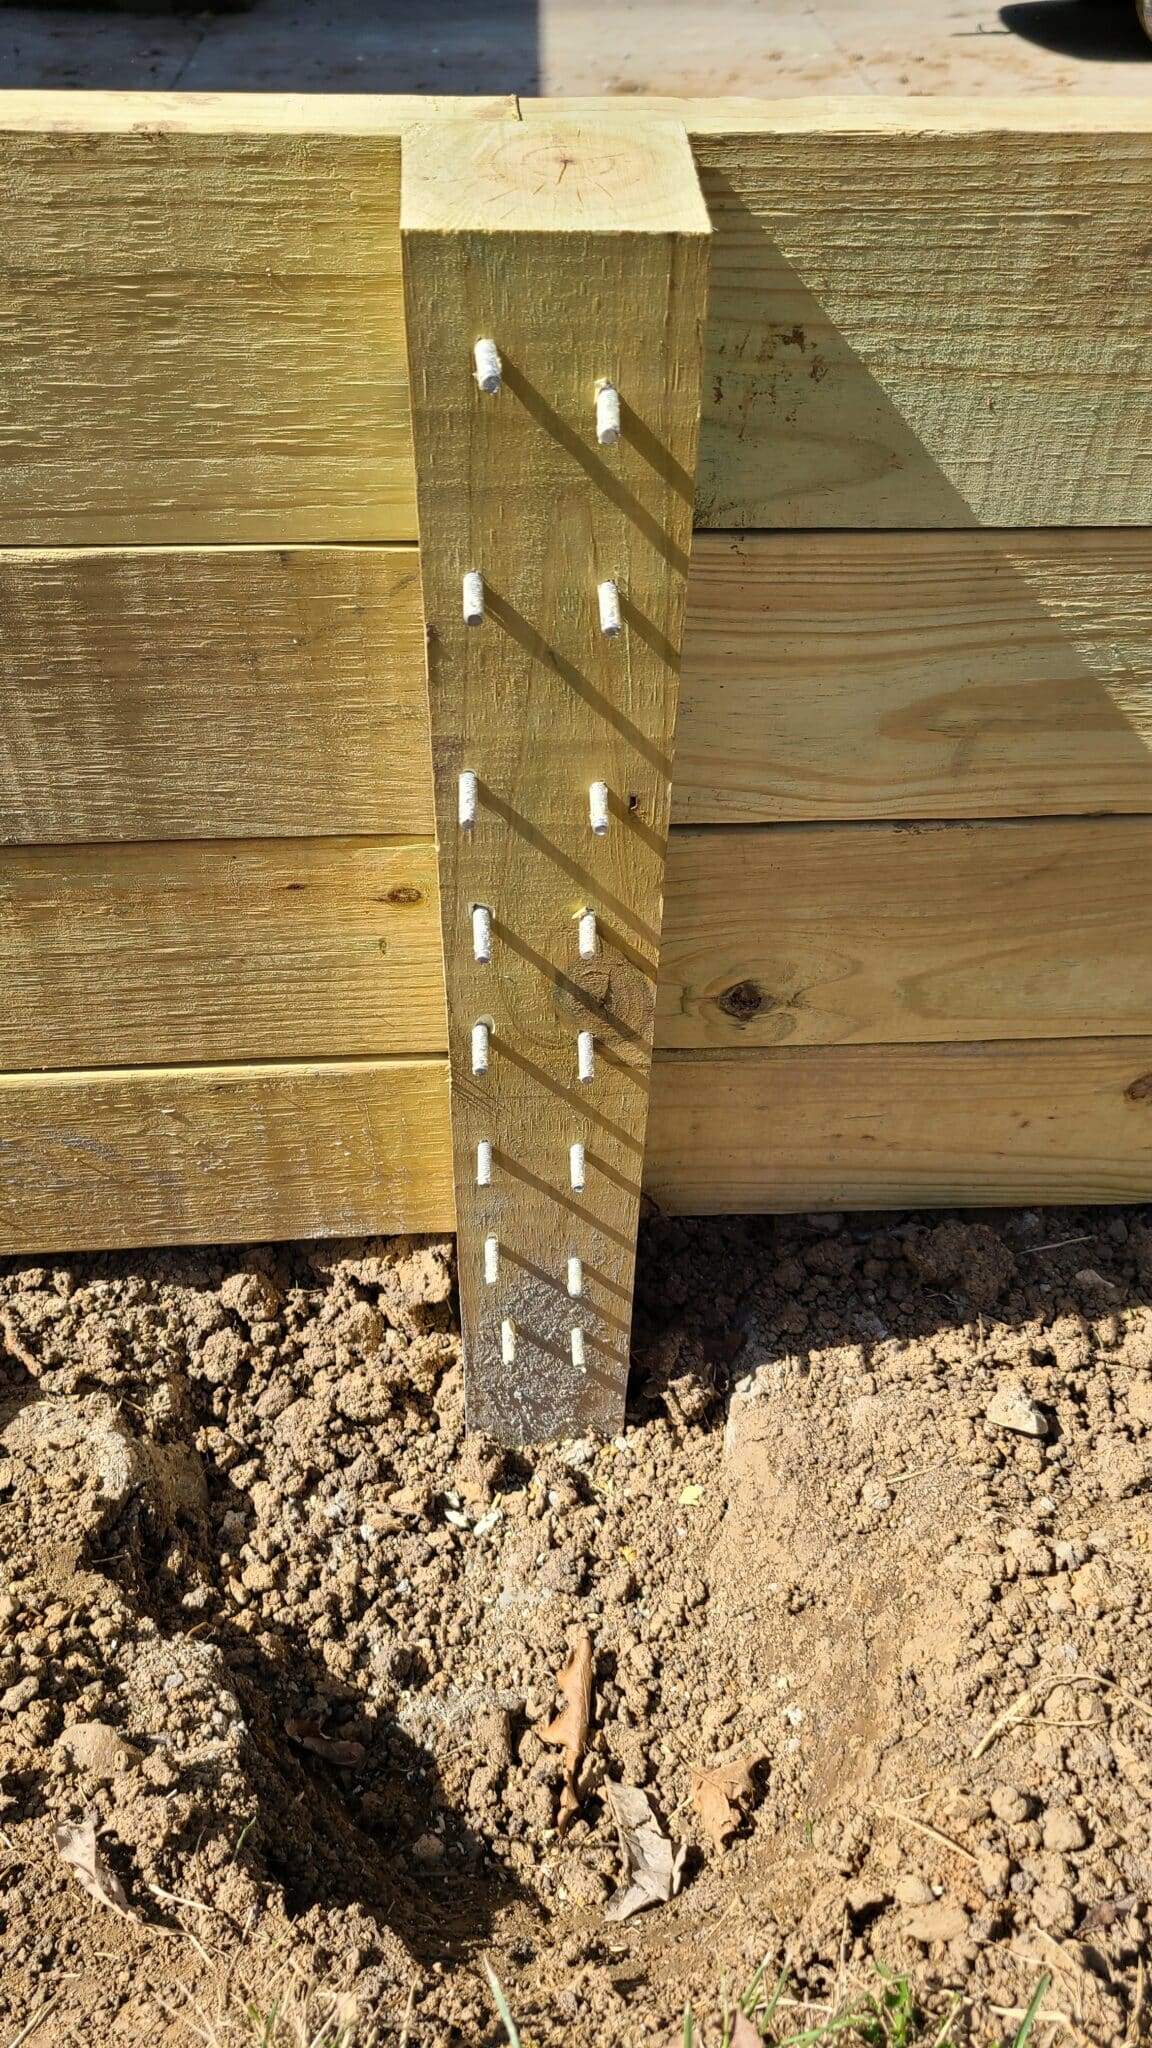
Step 8: Cut Post Flush
Remember how you kept the post lengths a little long? Now’s the time to cut them! You could use a circular saw, but it likely won’t reach the full depth to cut the post in one pass.
This Japanese pull saw can cut through the whole post and leaves a smooth clean, cut. Unlike regular handsaws, the pull saw’s cut on the pull stroke instead of the push stroke. I find this makes cutting easier, and I feel like I have more control over where the blade goes. This saw cut through each 4×4 post in no time. It amazed us how easy and quick it was.
Repeat cutting each post flush with the top of the wall.


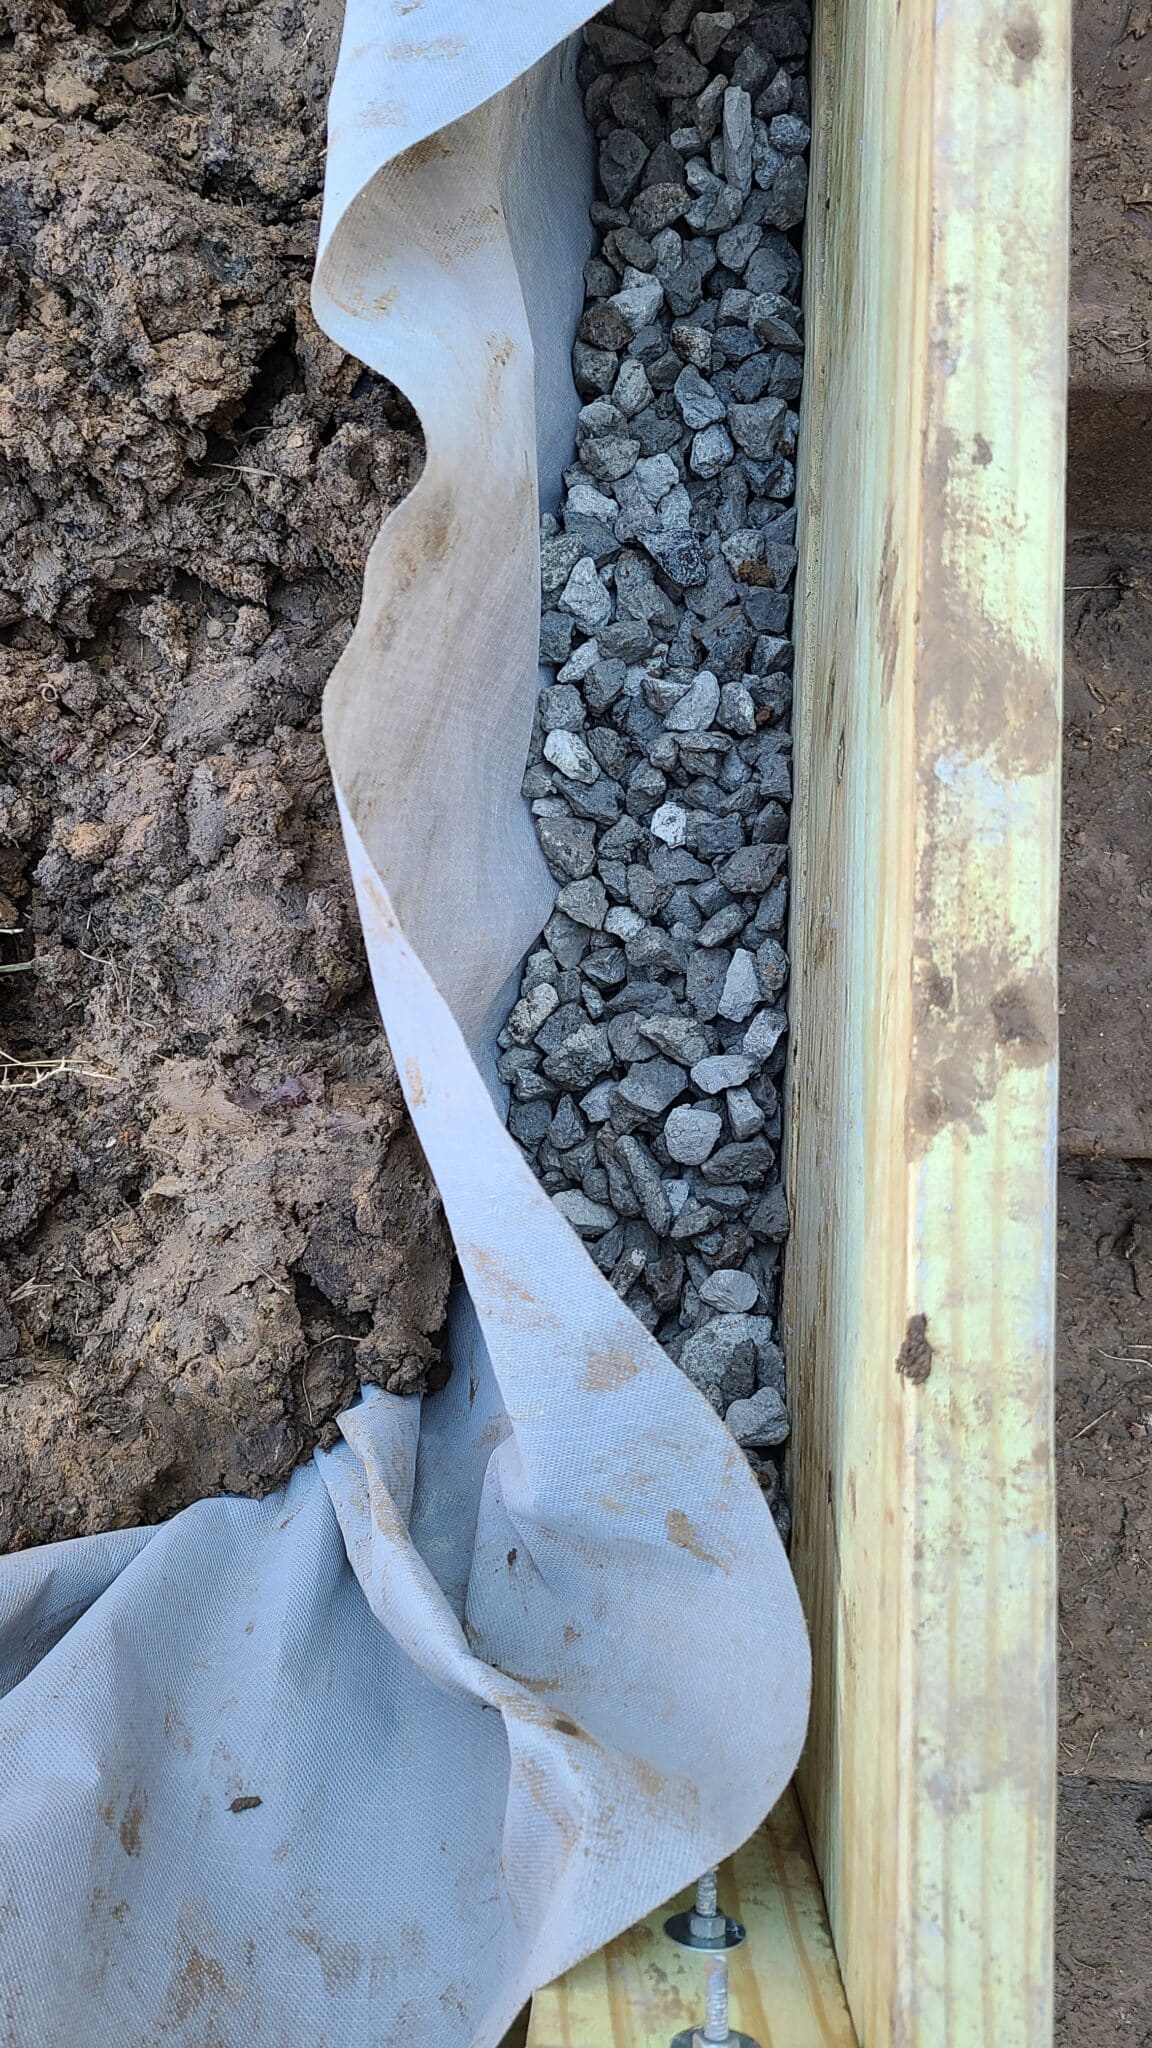
Step 9: Add Landscape Fabric, Gravel, & Drainage Pipe
After the wall is assembled, it’s time to start putting stuff back behind them. Even though pressure-treated lumber is rated for ground contact, you’ll want to separate it from the soil and provide adequate drainage to make your wood retaining wall last longer. Moreover, soil heavy with moisture on the back side of a wall can add increased pressure and strain on the wall.
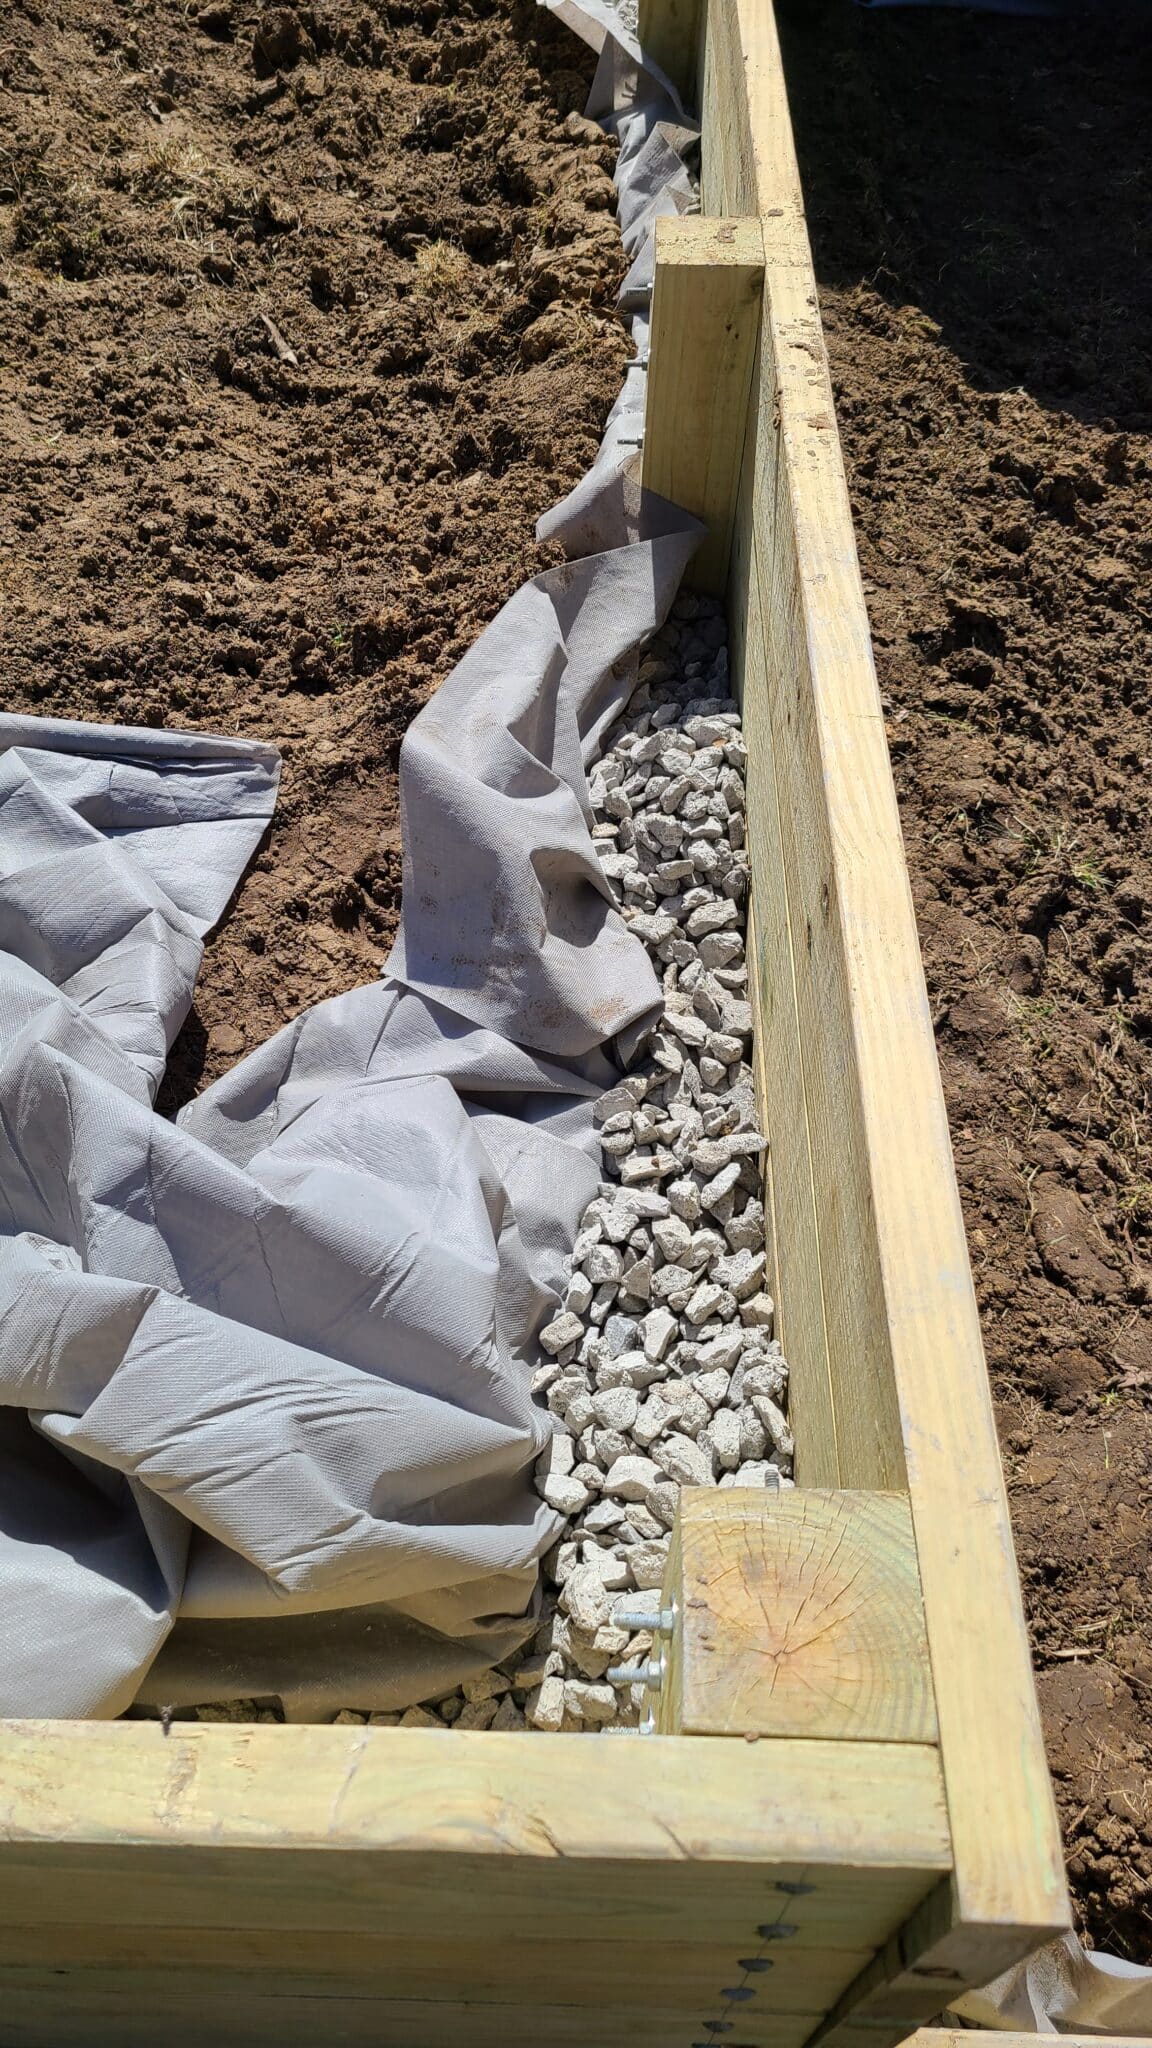
- Start by laying down the permeable landscape fabric so it touches the back of the wall and extends out about 12”. Make sure it wraps around the posts as well.
- Next, add a thin layer of gravel over the landscape fabric being careful not to get any soil mixed in it.
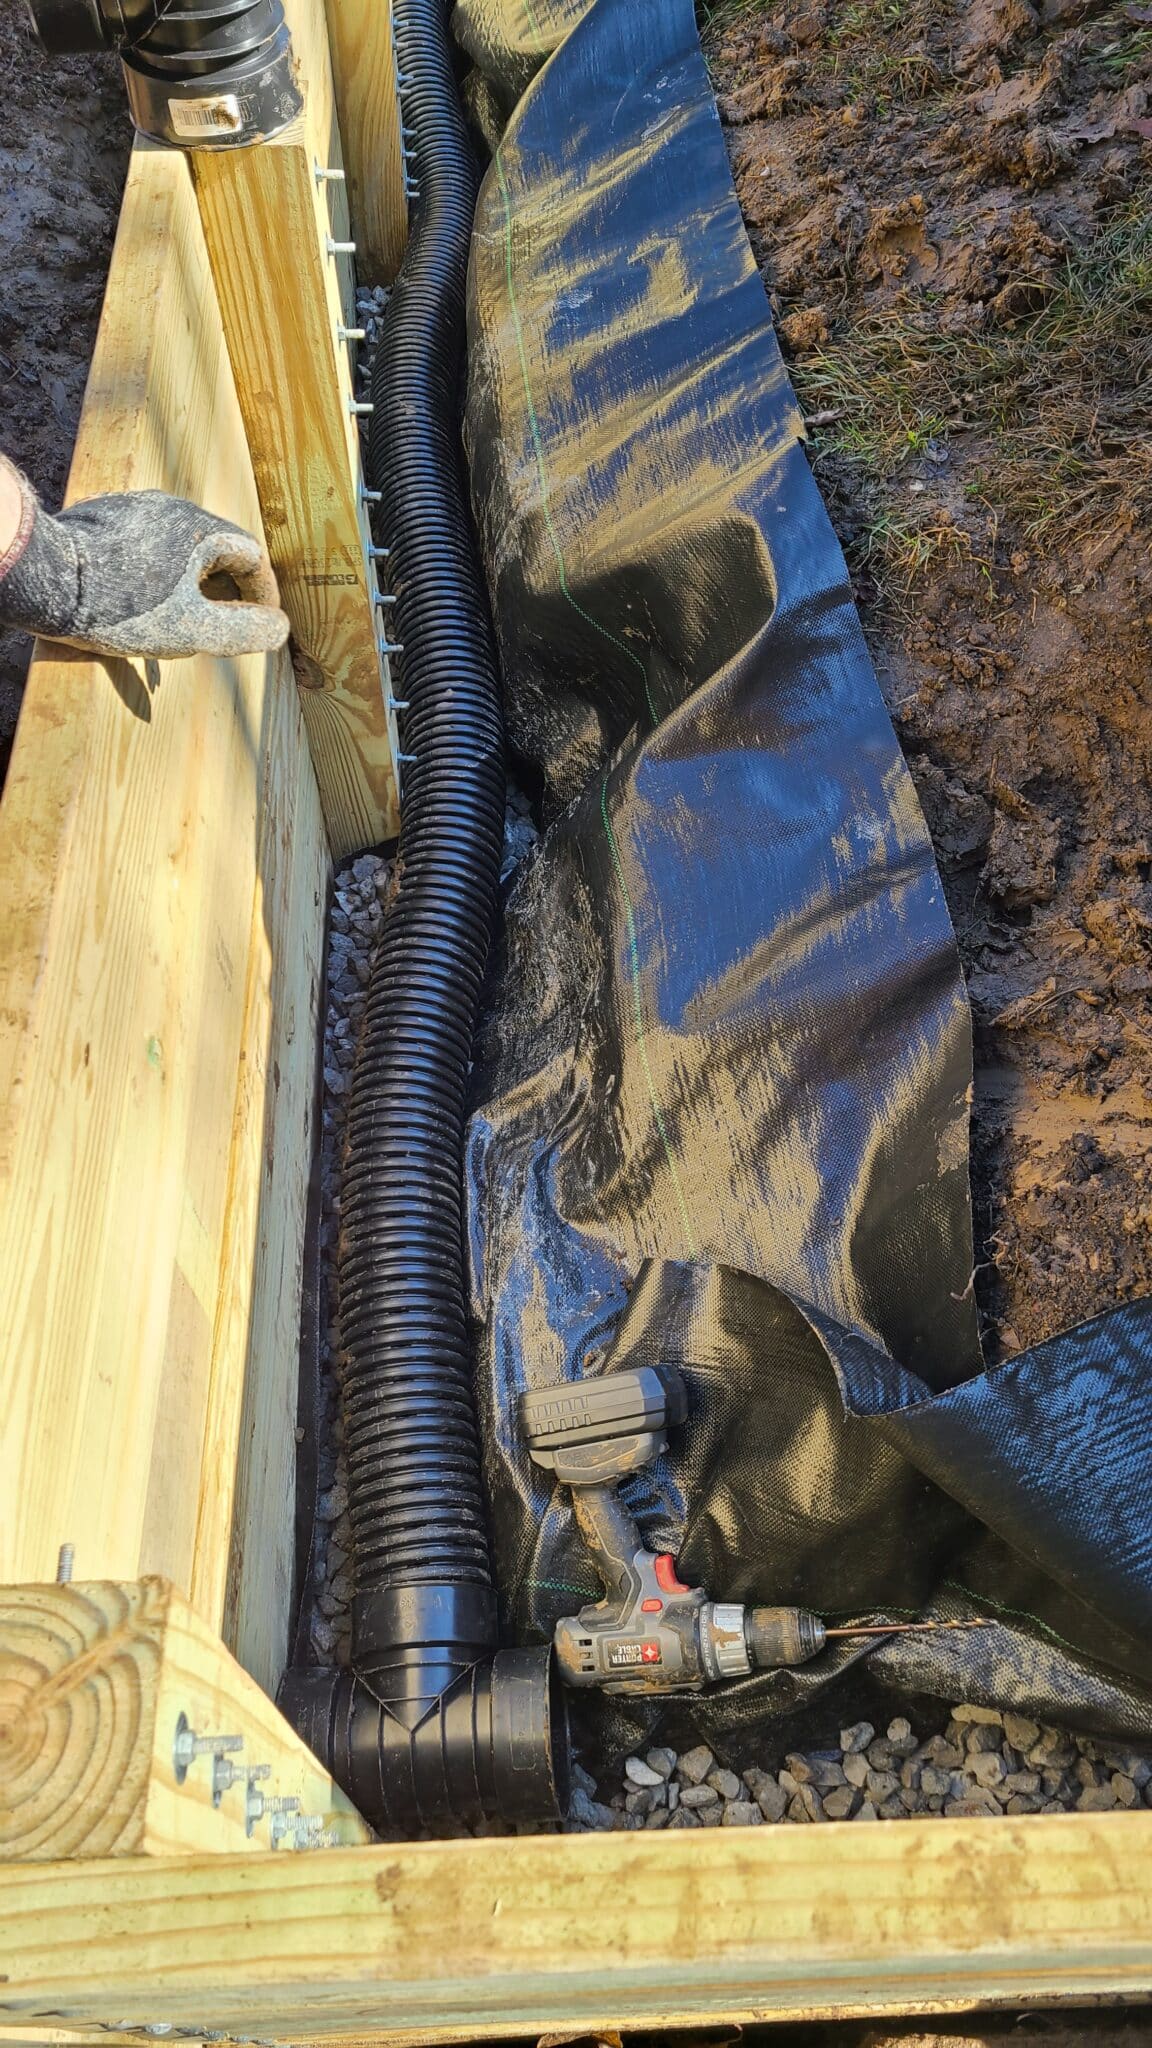
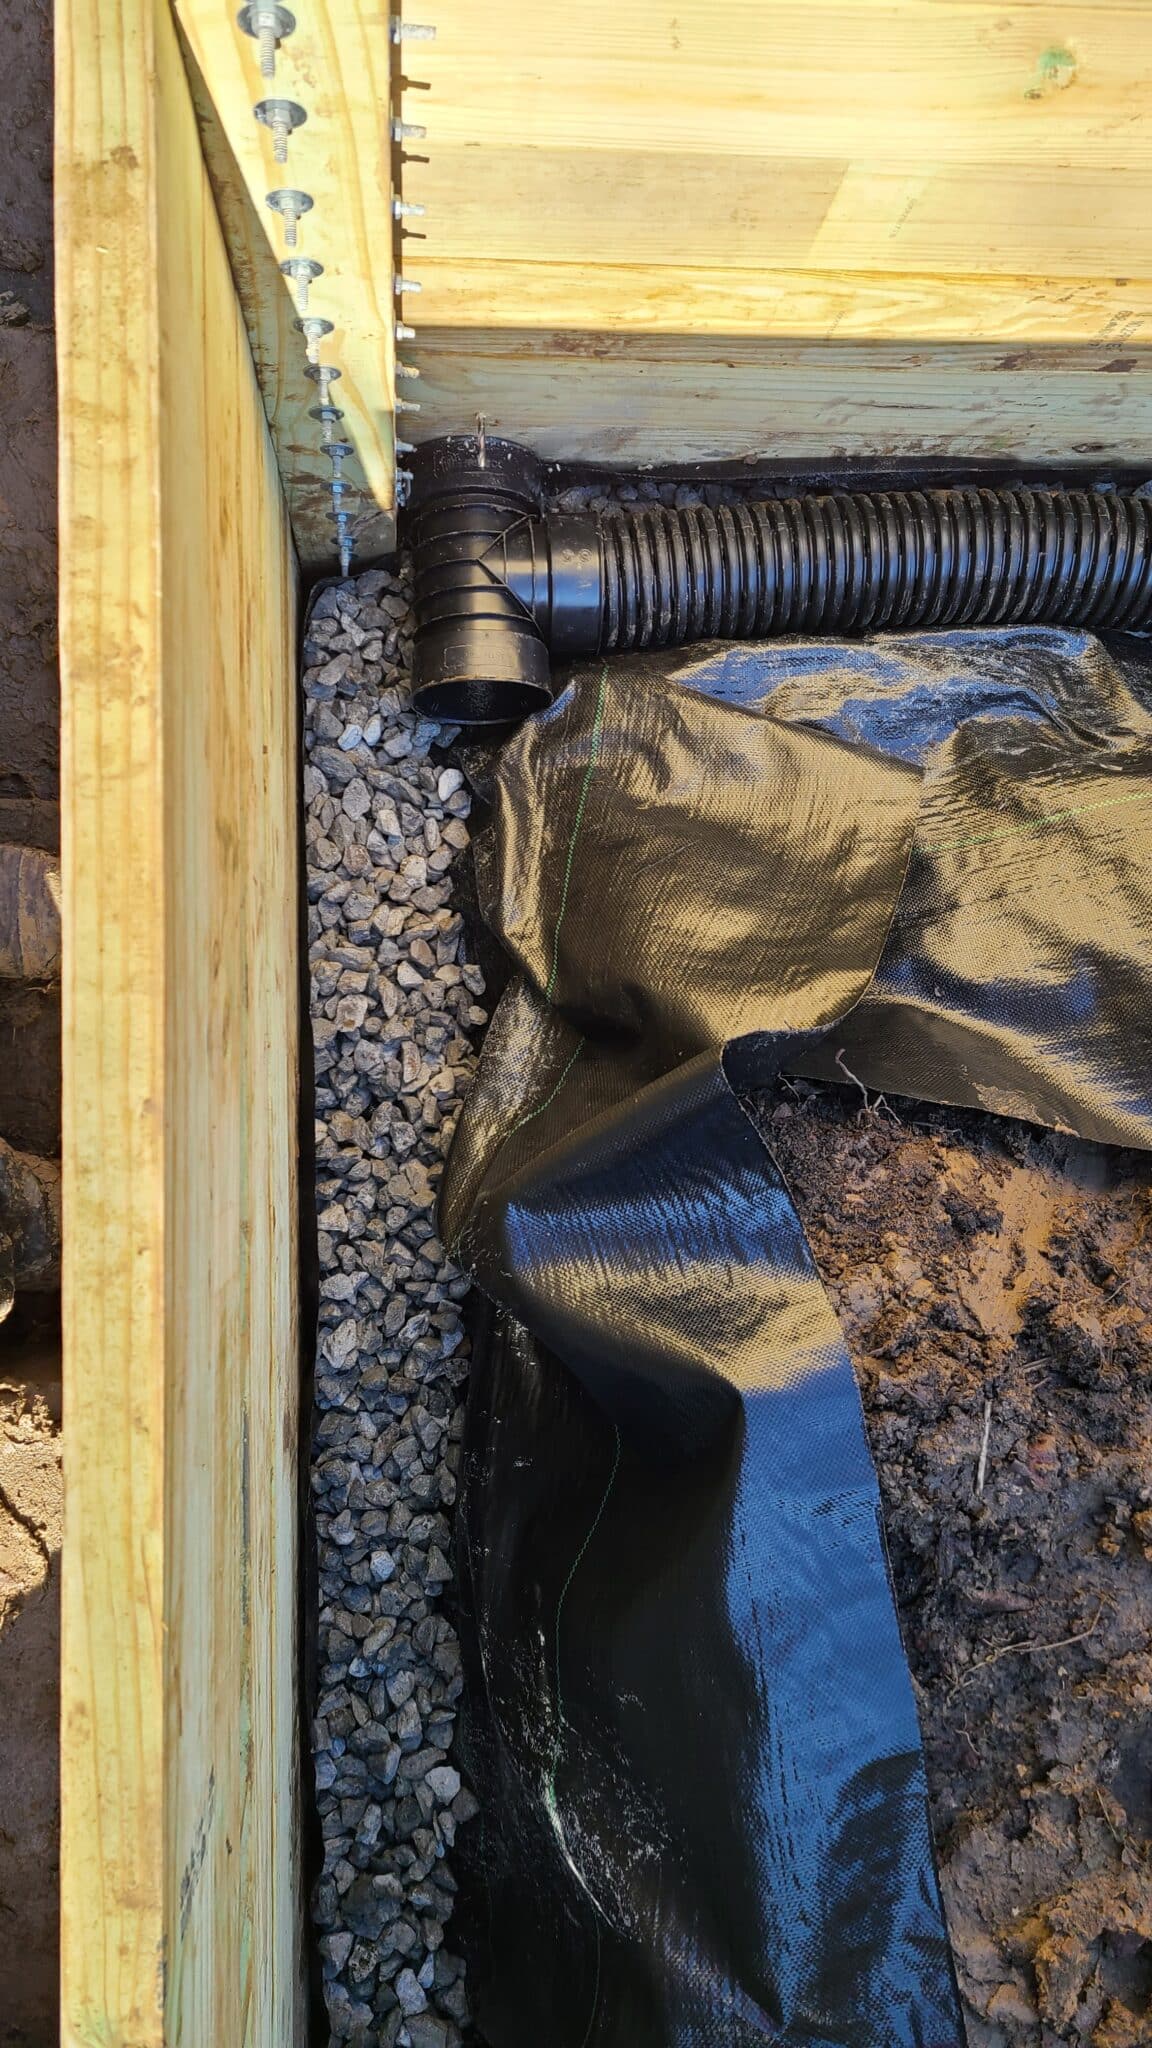
- Then add in the drainage pipe adjusting the gravel below it so it is sloped towards the low point and where there will be an outlet.
- After the drainage pipe is connected and adjusted to drain properly, begin adding gravel on top. Keep the gravel separated from the soil with the landscape fabric as you work upwards.
A Note on Landscape Fabric
You can just backfill the wall with gravel without the landscape fabric, but over time smaller soil particles will work themselves into the gravel and might eventually clog it up. If it clogs, then it won’t allow proper drainage and water can potentially sit on the backside of the retaining wall. This will cause extra strain on the wall and may lead to premature decay over time. So, the best practice is to separate the soil and gravel with a permeable layer like the landscape fabric.
DIYer Tip: Ensure to check the landscape fabric’s label to make sure it allows water to penetrate through. Not all fabric is permeable and allows water through. If you use a fabric that doesn’t allow water through (non-permeable), then you’ve basically created a dam or tub. This will lead to more pressure on the wall, and likely failure over time.
Note on Drainage Pipe
There are generally two types of drainage pipe: perforated and non-perforated. Non-perforated, or solid wall pipe, is typically used to channel water away from an area. It is often used to take water from downspouts and route it underground to a creek, retention pond, or drainage corridor.
Perforated pipe has holes spaced along the pipe body. It is used to distribute water across an area of ground like in a french drain, or to allow water to enter along its body to aid in even drainage. This is how we will be using it. As water weeps from the soil, through the landscape fabric, and into the gravel, it will work its way down the gravel to the bottom. If the ground below the gravel is saturated, then water will begin to accumulate here. By adding a perforated pipe, the water can enter into the drainage pipe and have a clear path to escape.
In practice, if you have good soil with high organic content, then the soil will retain most of the water and you probably won’t see enough buildup that water actually exits this pipe. But, it still may be holding water internally until the soil drys enough to absorb what’s left, so it is still good to have in place.
We recommend using a 4” drainage pipe for most installations. And if you have multiple tiers to your walls, be sure to connect the pipe runs together and provide the shortest possible path to drain to the low point of your wall.
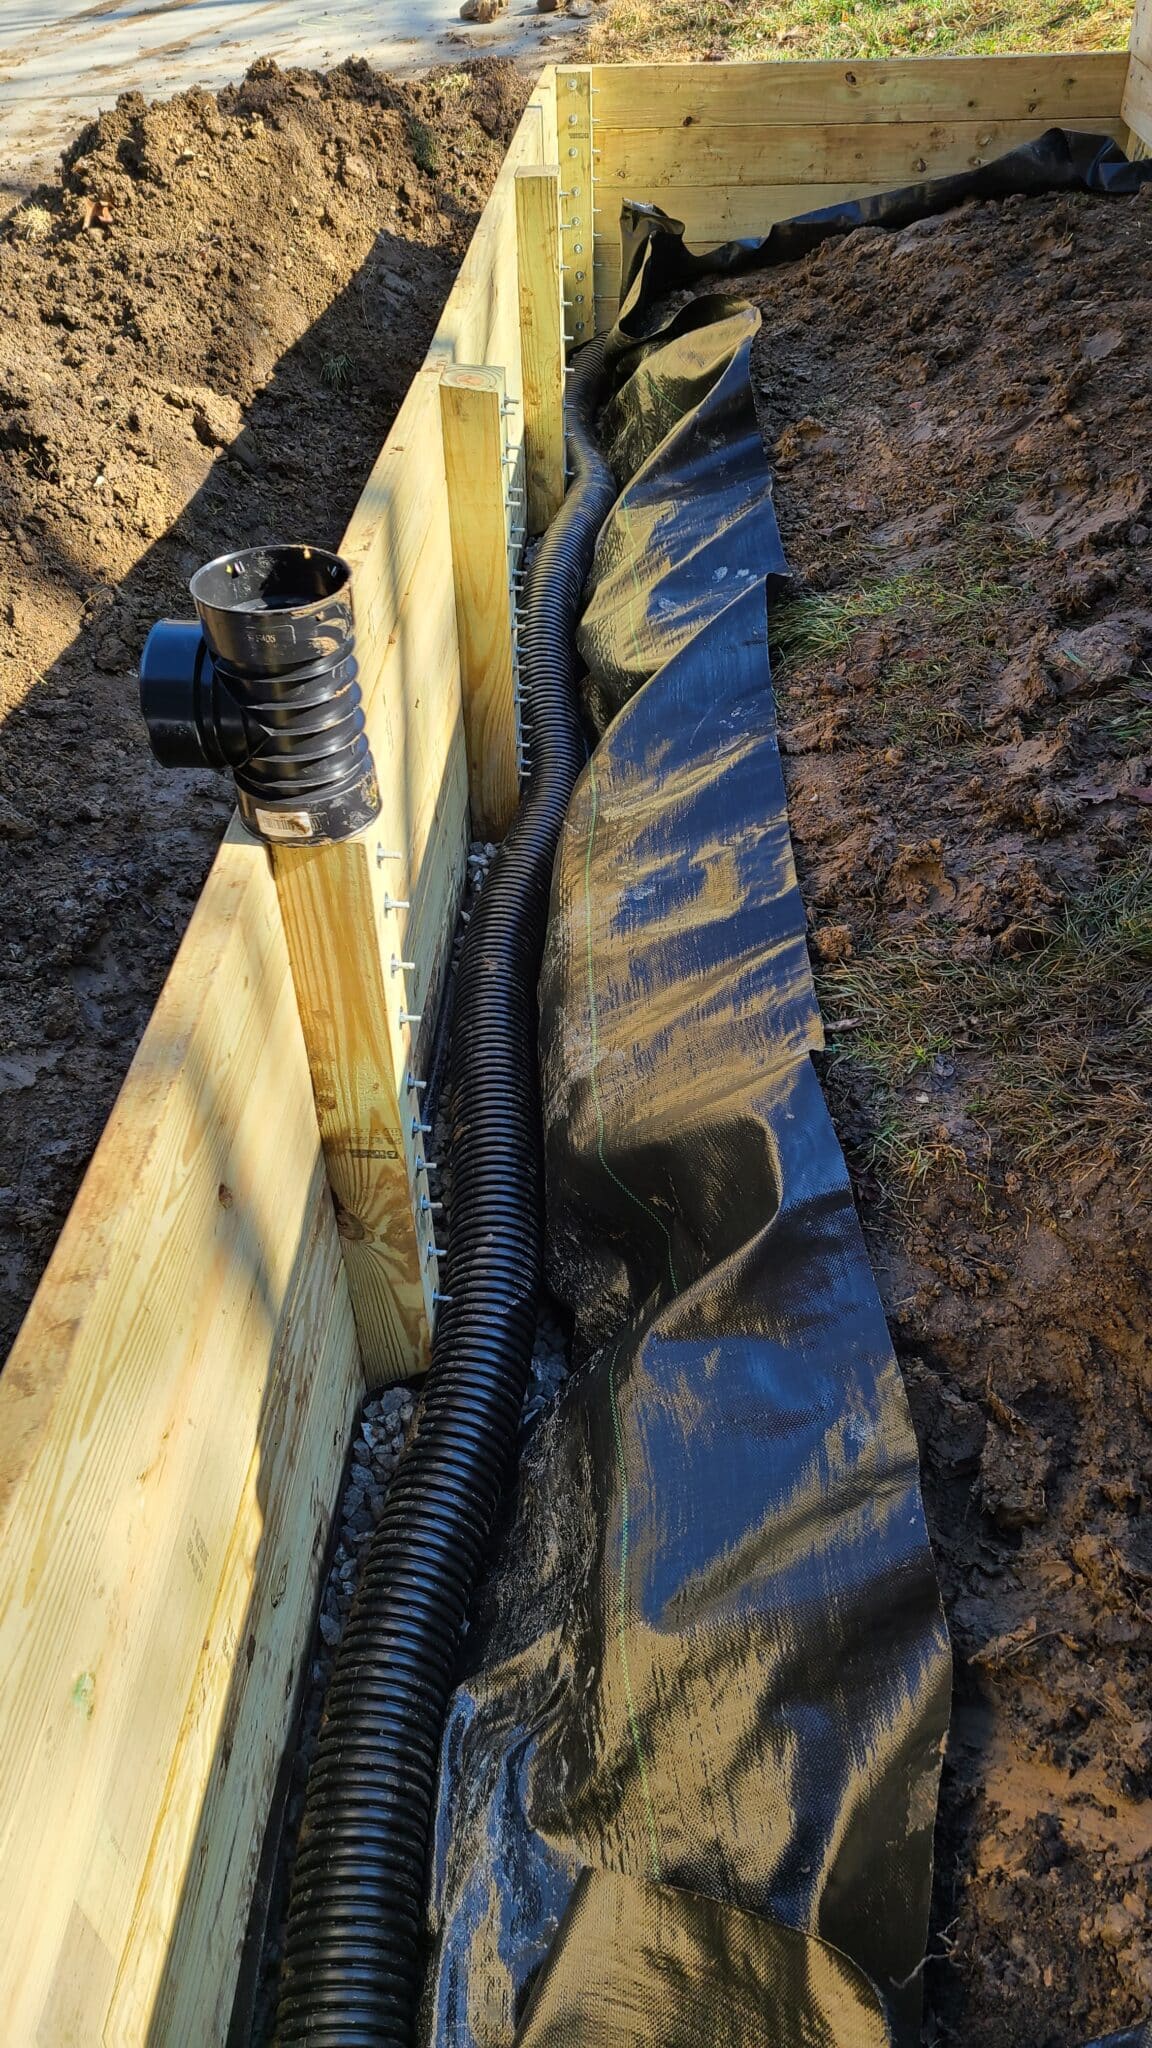
FYI, the black landscape fabric in the drainage photos above is incorrect. This was non-permeable fabric and we made the mistake of buying that first. So we had to redo this part. Lesson learned. Double-check the label on the package again right before installing, so you don’t have to redo it.
Step 10: Backfill With Soil And More Gravel
At a certain point, you won’t be able to continue adding gravel and getting it to stack on top of itself up the backside of the wall. In order to continue to add gravel along the backside of the wall, you’ll need to begin backfilling soil to support the gravel and landscape fabric.
You can alternate between adding soil and adding gravel if you have both materials on site already. This will make it easy to build up behind the wall a few inches at a time. However, if you are like us, you may be getting the materials by the trailer load and you don’t want to have to move everything twice. In this case, we recommend that you put down as much soil as you can, but pile it towards the back of the wall, away from the gravel zone. Then you can bring in a load of gravel and as you build it up, you can rake the soil forward and against the gravel to keep it in place. Then when you are out of gravel, get another batch of soil and repeat the process!
If you’ll be adding a pathway, skip ahead to Step 11 to read about how we created a base for the path using the native soil prior to completely backfilling the terraces.
Taper Gravel & Soil
As you work your way up the wall, you’ll want to taper the gravel layer. We had to start off wide at the bottom to provide a few inches of gravel all the way around the drainage pipe. But you don’t want to maintain that width the whole way up or you will lose a lot of planting room behind the wall. To compensate for this, reduce the width of the gravel zone as you work your way up. You should try to end up with just 3 inches or so of gravel between the wall and the soil by the time you get to the top of the wall.

Add The Good Soil
Topsoil is cheap and it goes on “Top” right? So why not buy lots of that? Unfortunately, most topsoil is lacking in the nutrients that plants need to grow and produce a good crop. Soil health is critical for plants to thrive. You will want a soil mix that is a blend of topsoil, sand, and organic matter in order to really give plants the nutrients they need and ensure they don’t develop root rot.
We have an Organic Recycler near us that sells a blend of Topsoil, Sand, and Compost for garden beds. It is a fraction of the price of buying the materials separately and mixing them ourselves. Moreover, it’s much less work, and the plants love it. Plus, you know that the organic matter was all sourced locally which promotes community composting, and there is no plastic bag waste! It’s a win win win! So do some searching and see if you can find a similar service in your area.
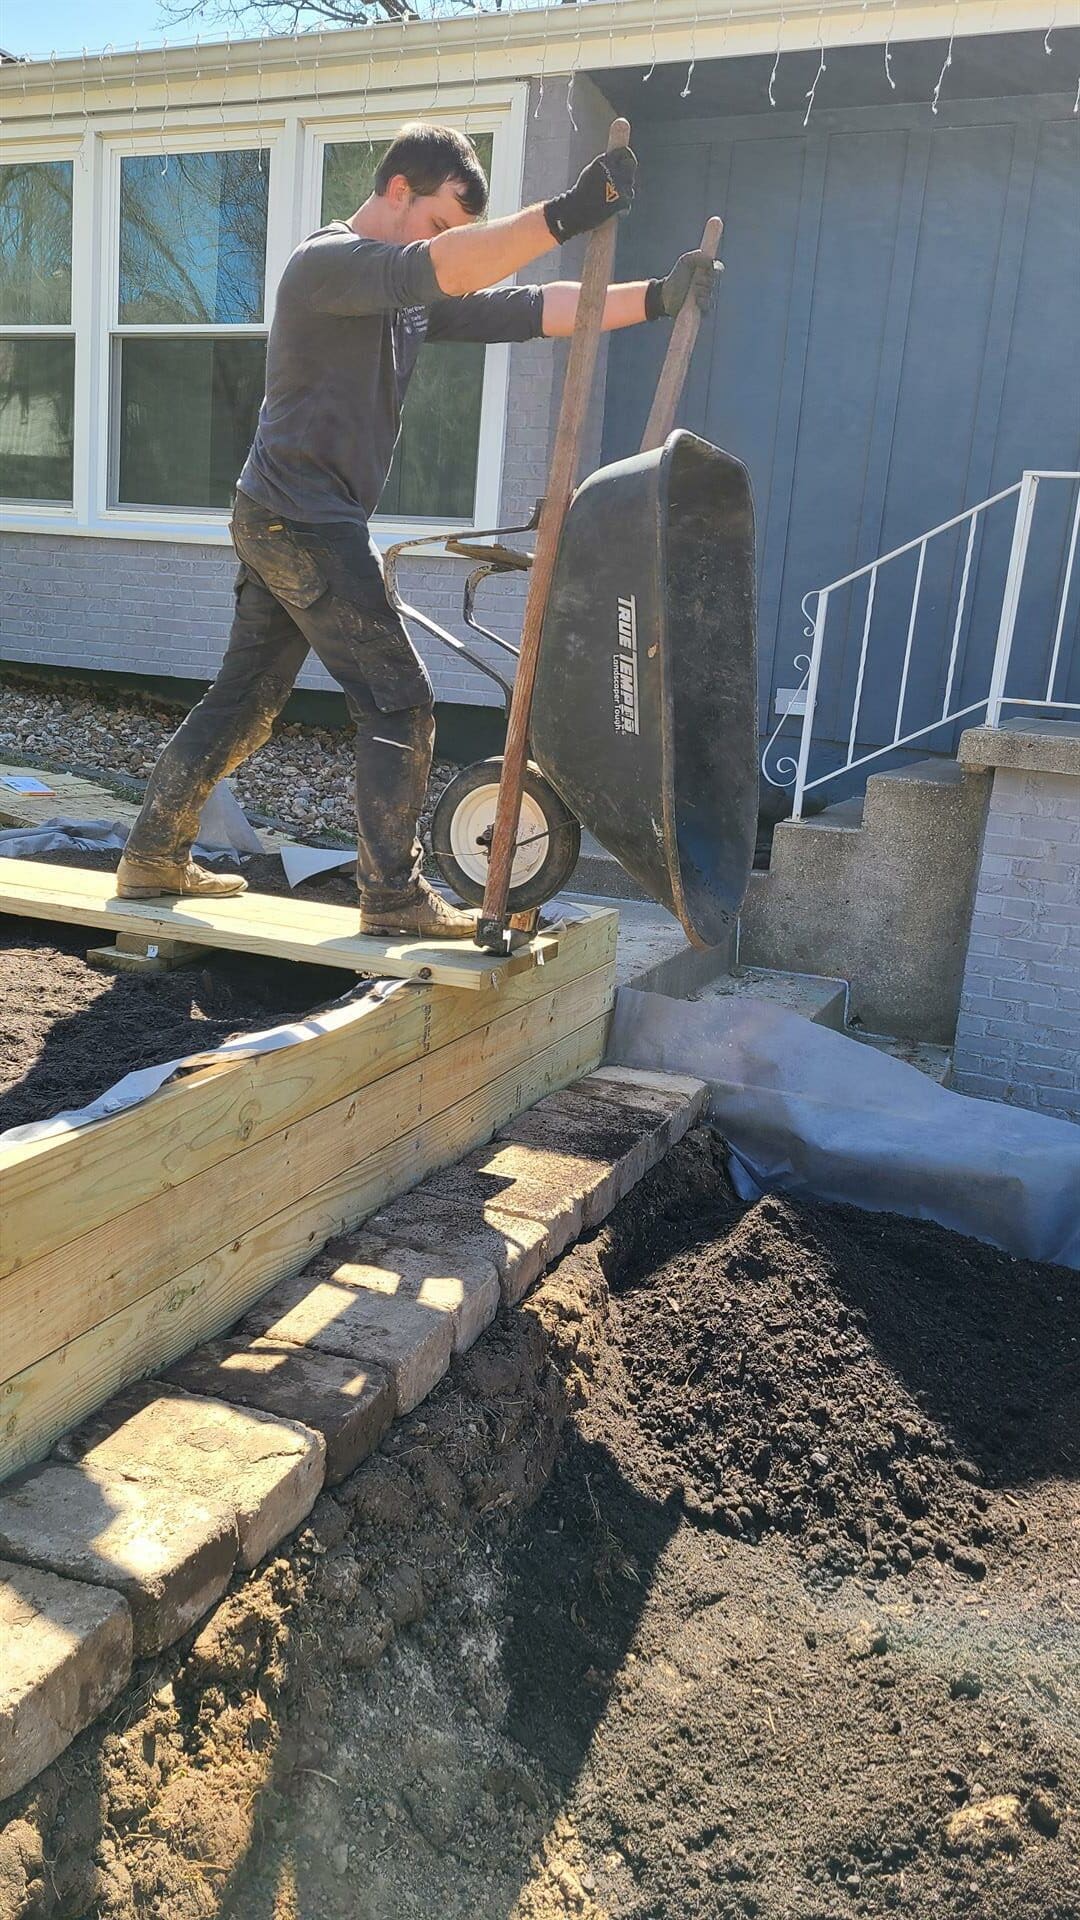
Step 11: Add Pathways (Optional)
If you’re creating a terraced wood retaining wall, then you may want some pathways. This can simply be a gravel path or you can add pavers or stepping stones.
We opted to repurpose the old retaining wall stones as pathways along the edge of the terraces to better access vegetables. Reusing what you have is a great way to save money and DIY sustainably.
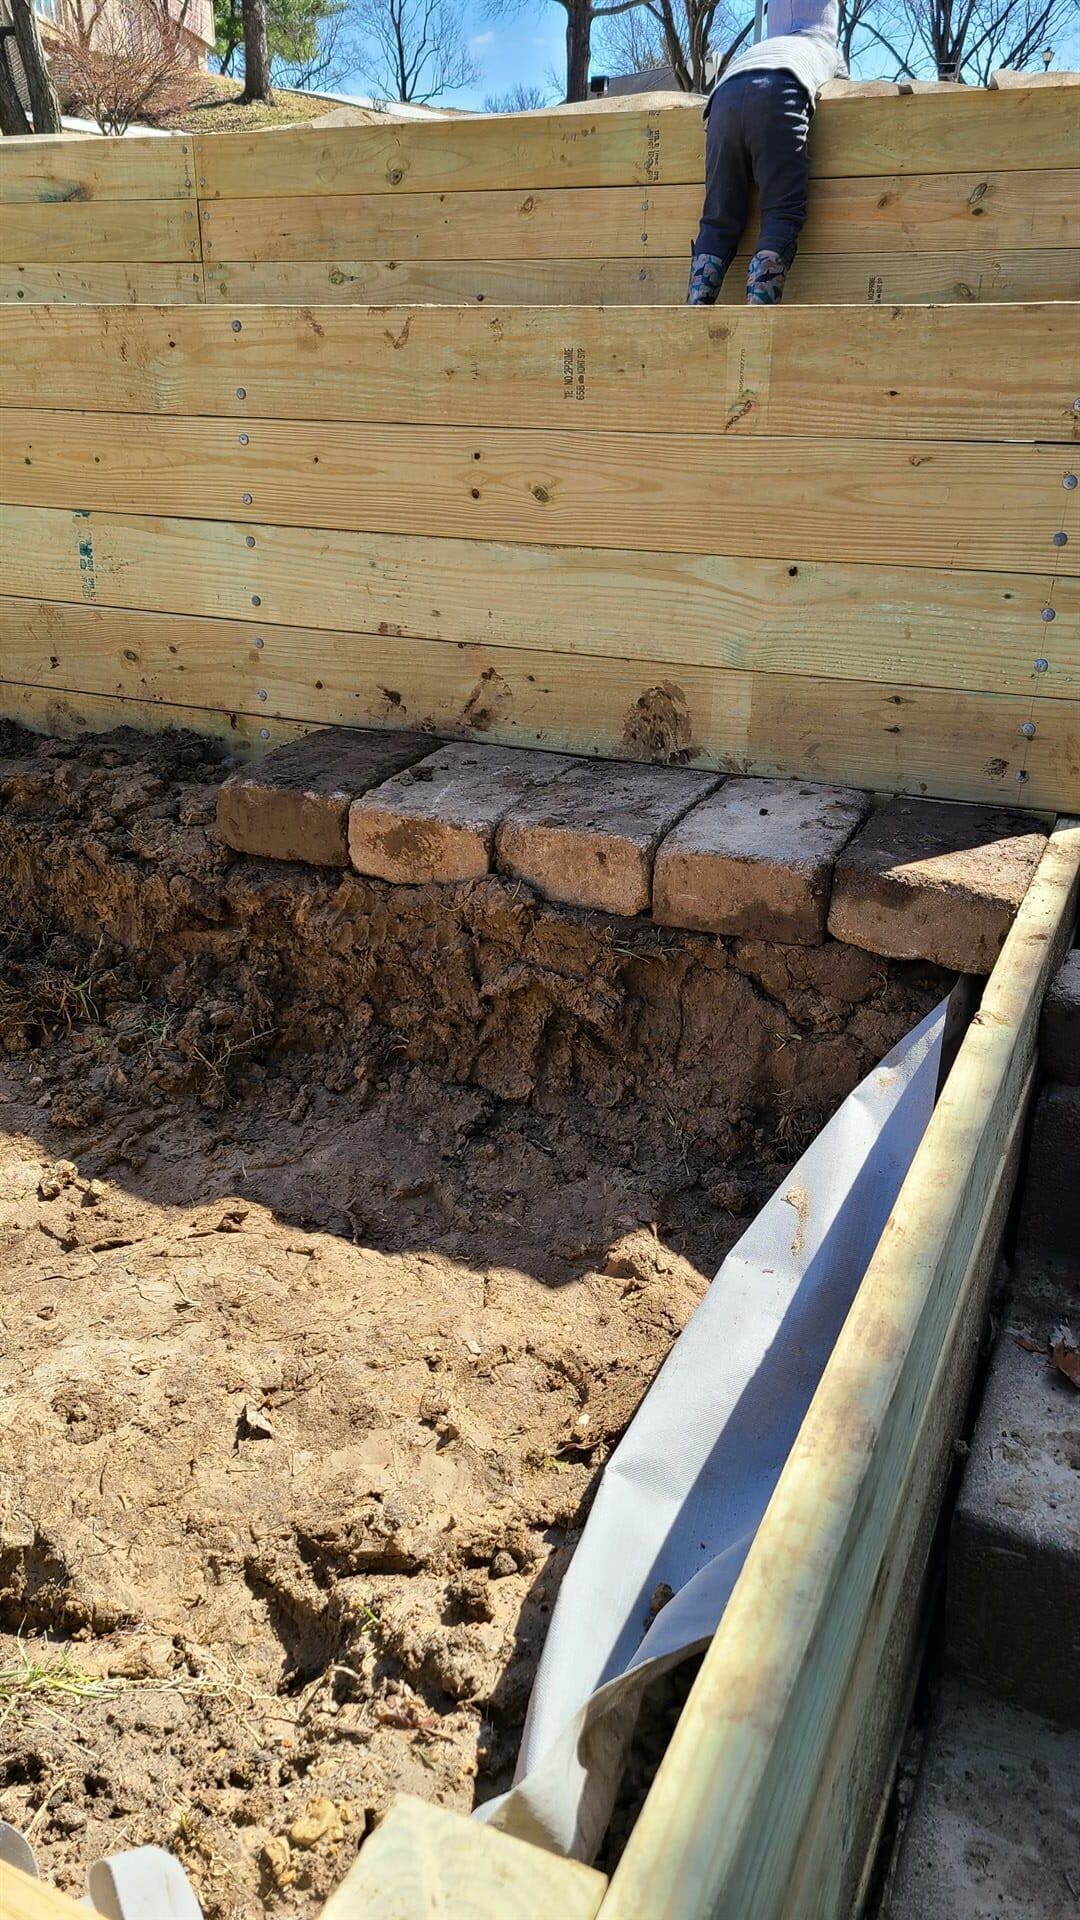
Create a Base For Path
When creating a path using stepping stones or pavers, you won’t want to waste backfilling a bunch of the good soil underneath it. It’s expensive and I personally feel wasteful. Not to mention that the new soil is likely to be pretty loose so you will have to spend a lot of time wetting and compacting it in order to make a firm foundation for the path.
A better option is to build up the native soil so it creates a flat shelf the width of the path. Use the pavers to measure how far up you need to be minus the paver’s thickness and then fill the soil up to that level and as wide as the paver is. This soil is likely already pretty compacted, but you want to make sure to get any air pockets you created back out. Re-compact the soil by tapping it down. You can use a piece of scrap wood or your feet to do this. Compacting the soil helps decrease the amount the pavers will shift. If you have extra gravel, adding a thin layer can help create a solid base as well and it makes the pavers easier to level.
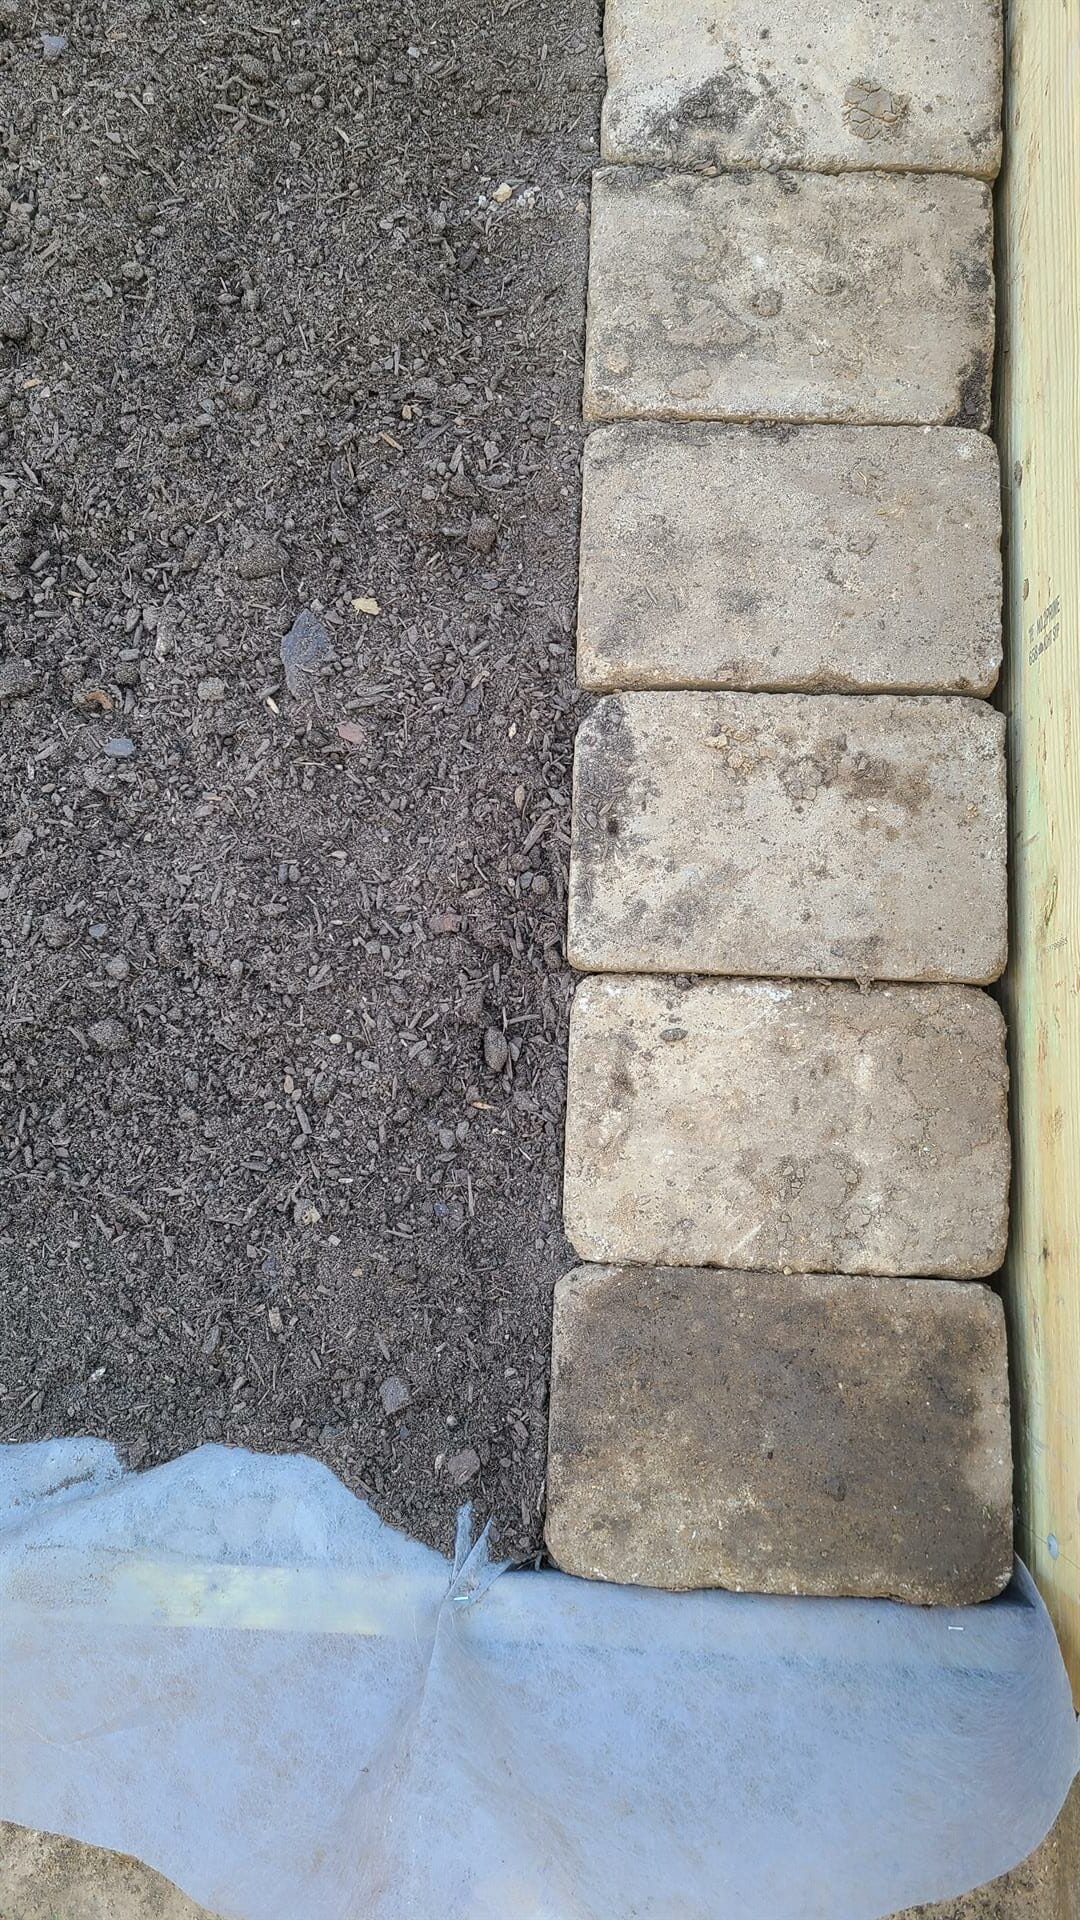
After the native soil shelf is level, begin laying the pavers down. We opted to lay the old retaining wall blocks right next to one another to create a solid little path between the terraces.
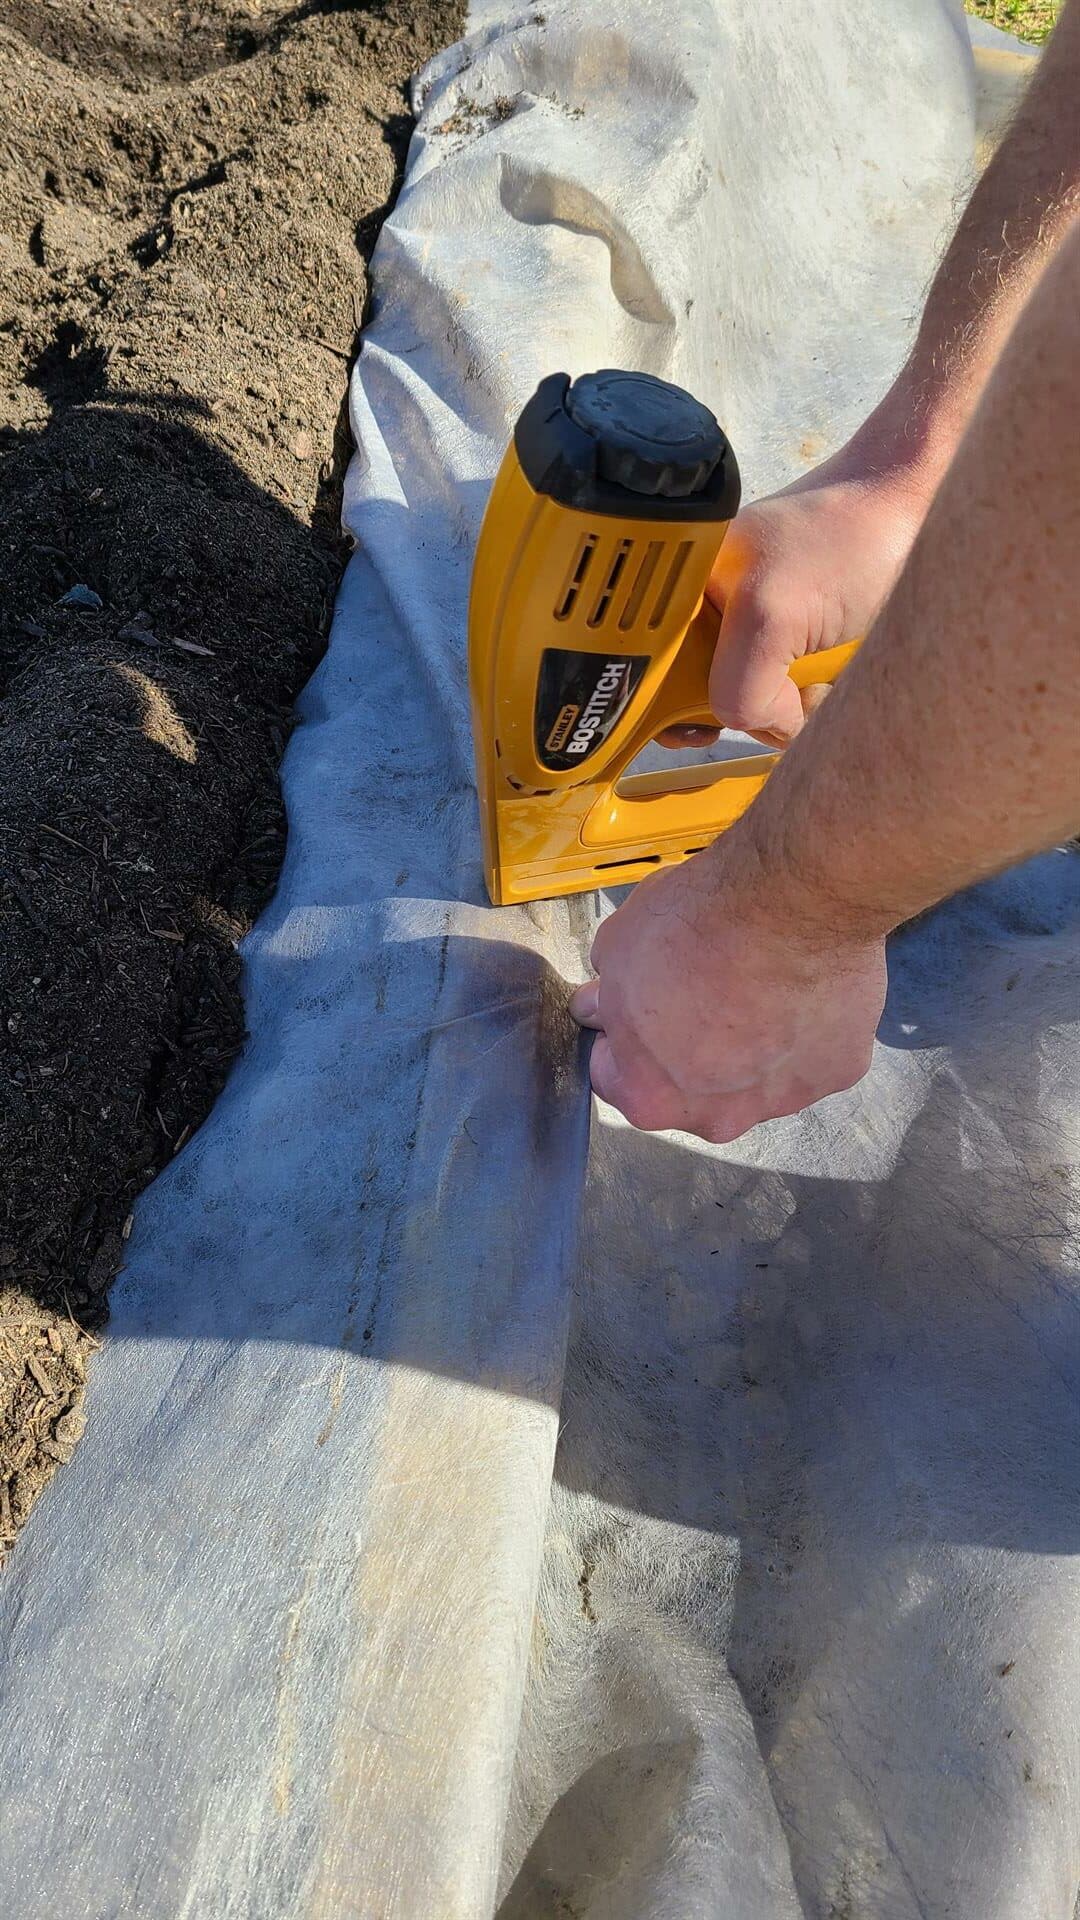
Step 12: Staple The Fabric At The Top
When the gravel and soil reach the top of the wall, it is time to wrap the landscape fabric over and secure it in place. Take a staple gun, pull the fabric tight over the top of the gravel, and staple the fabric to the top of the wood boards. This completely encloses all the gravel in the landscape fabric, keeping it separated from the soil so it will stay clean and drain properly.
This doesn’t have to look perfect as a wood wall cap will cover it. Then, just trim off any leftover fabric along the edges so it won’t be visible from the front once the cap is in place.
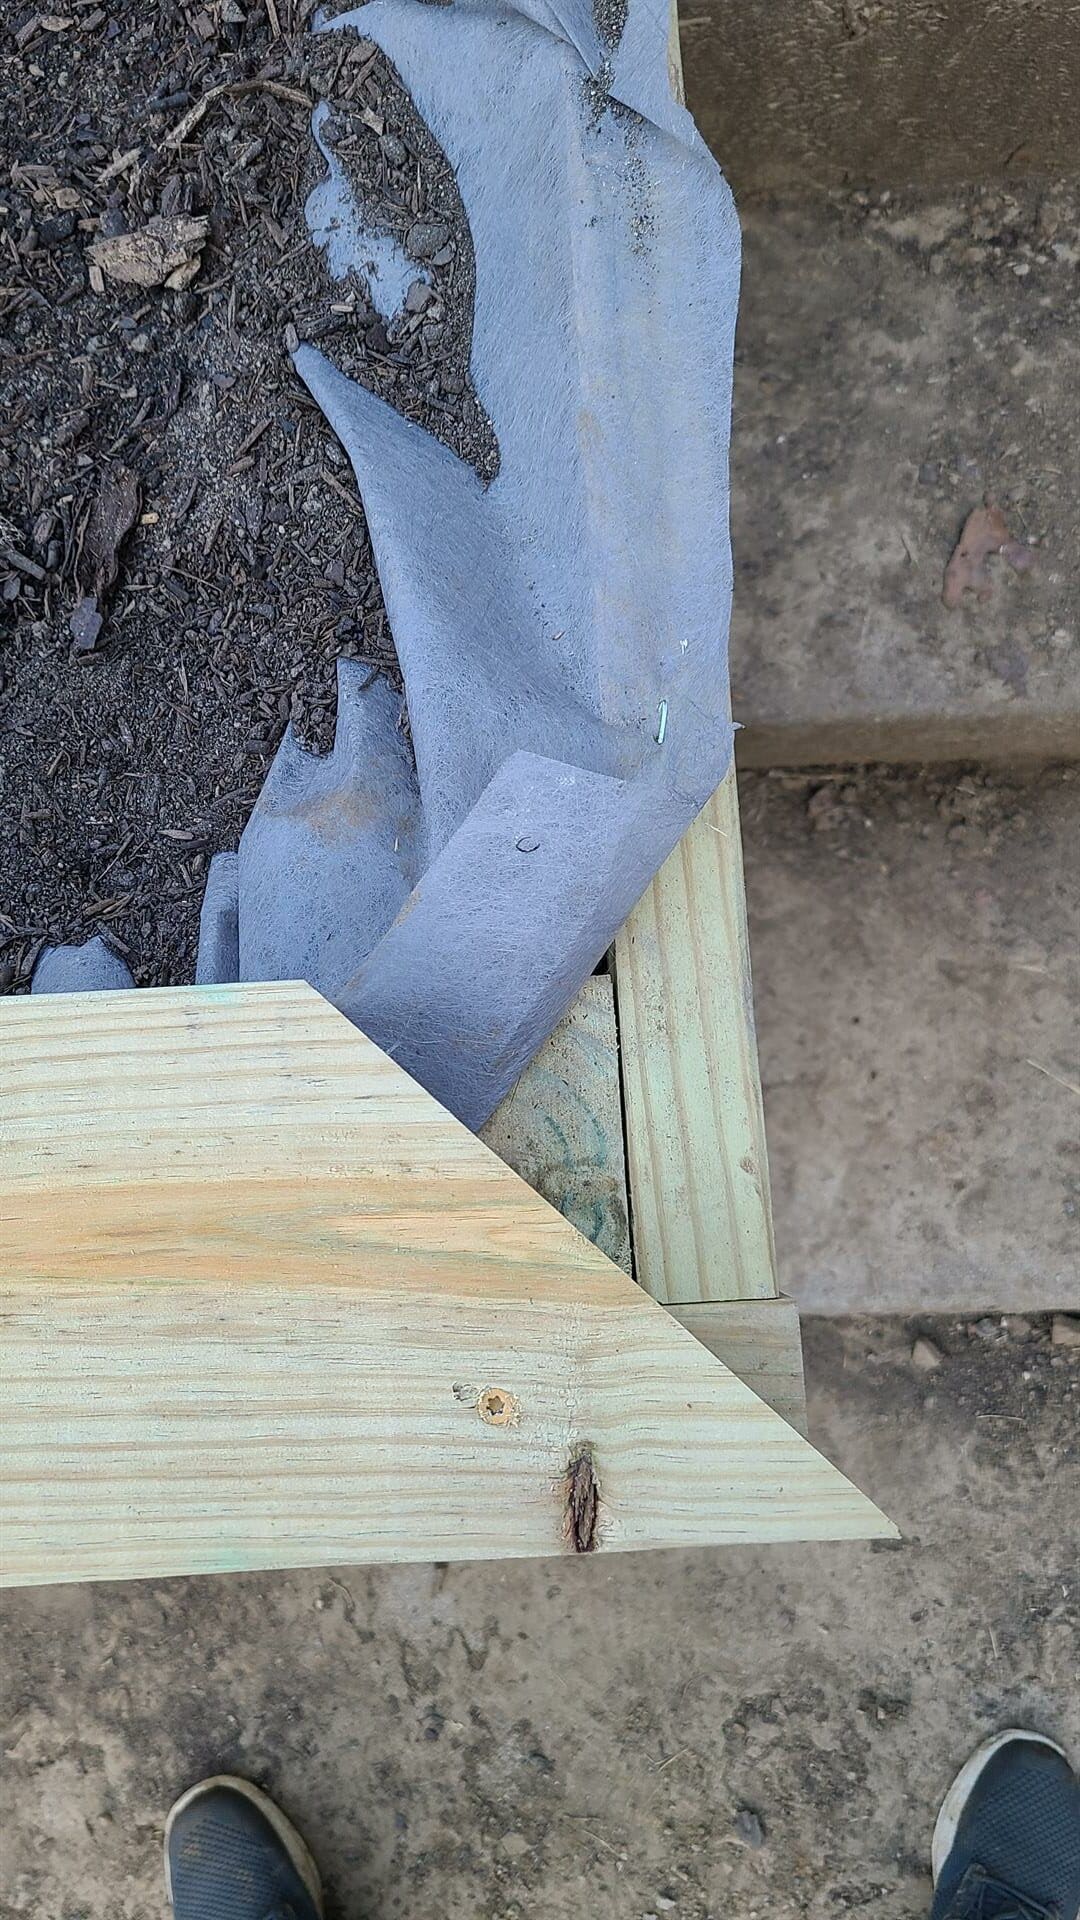
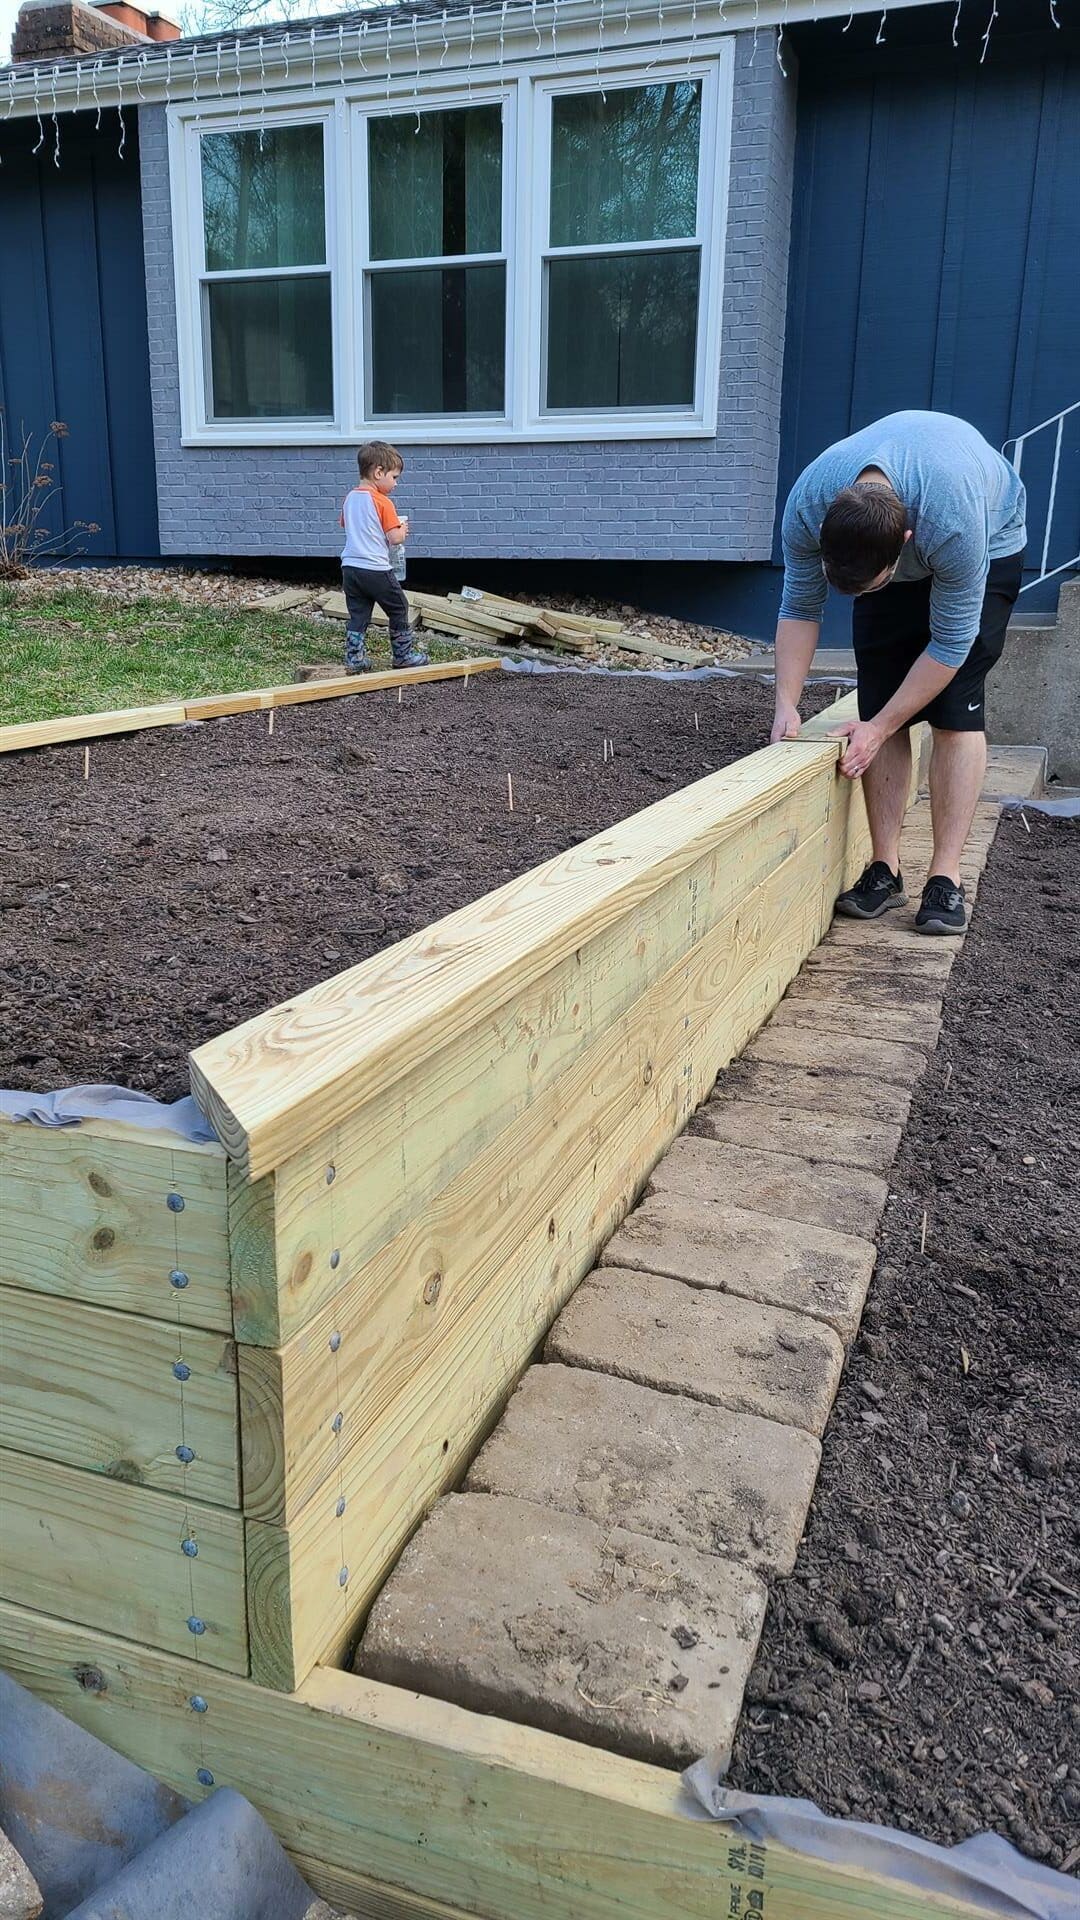
Step 13: Add A Wall Cap
After the fabric is complete, it’s time to make a cap for the retaining wall. Verify the length of boards needed and then cut using a miter saw. You can simply do a butt joint or opt for a mitered corner.
The wall cap should overhang on the front side of the wall between 1”-2” as well as cover the 4×4 posts. A 2×6 board will cover both the post and create an overhang. Once the boards are cut, align them on the wall and screw them down tight. Repeat this process until all of the wall caps are done.
Mitered Wall Cap
We opted to do a nice mitered corner for the cap on our wood retaining wall terraces. If you go this design route, then consider cutting the angles as you go instead of pre-cutting. Unless you’re an amazing DIY wizard, then the wall might not be 100% square, and cutting two perfect 45-degree angles won’t align when screwed into place. We discovered this the hard way. If you have a way to measure the corners, then you can measure them and then cut the boards to fit each corner. If you don’t then try the following method:
- Start by cutting one corner first at 45 degrees
- Lay the uncut board that it will meet onto the top of the wall and then lay the cut piece on top of that board
- Position both boards so they are parallel to the wall and have the desired overhang
- With the boards in place, mark the uncut board by transferring the line from the corner of the cut board
- Cut the second board at this angle
- Secure the boards in place with screws so they don’t shift while you work your way around the wall.
- Repeat this process for all of the other wall cap boards
Step 14: Finish Off With Soil, Mulch & Plants!
With the wall cap in place, the wood retaining wall is built!
Let The Soil Settle Prior To Planting
I highly recommend waiting a day or so to let the new soil settle. After about 24 hours or so, the soil will sink a couple of inches as some of the air gaps created when shoveling the soil in disappear. You can also give the soil a good soak with water to help it settle down to its final height.
It’s critical to do this so you can add additional soil needed prior to planting. If you plant immediately, then you may find later that plants have sunk and now are lower down. This can lead to drainage issues and water puddling at the plant’s base.
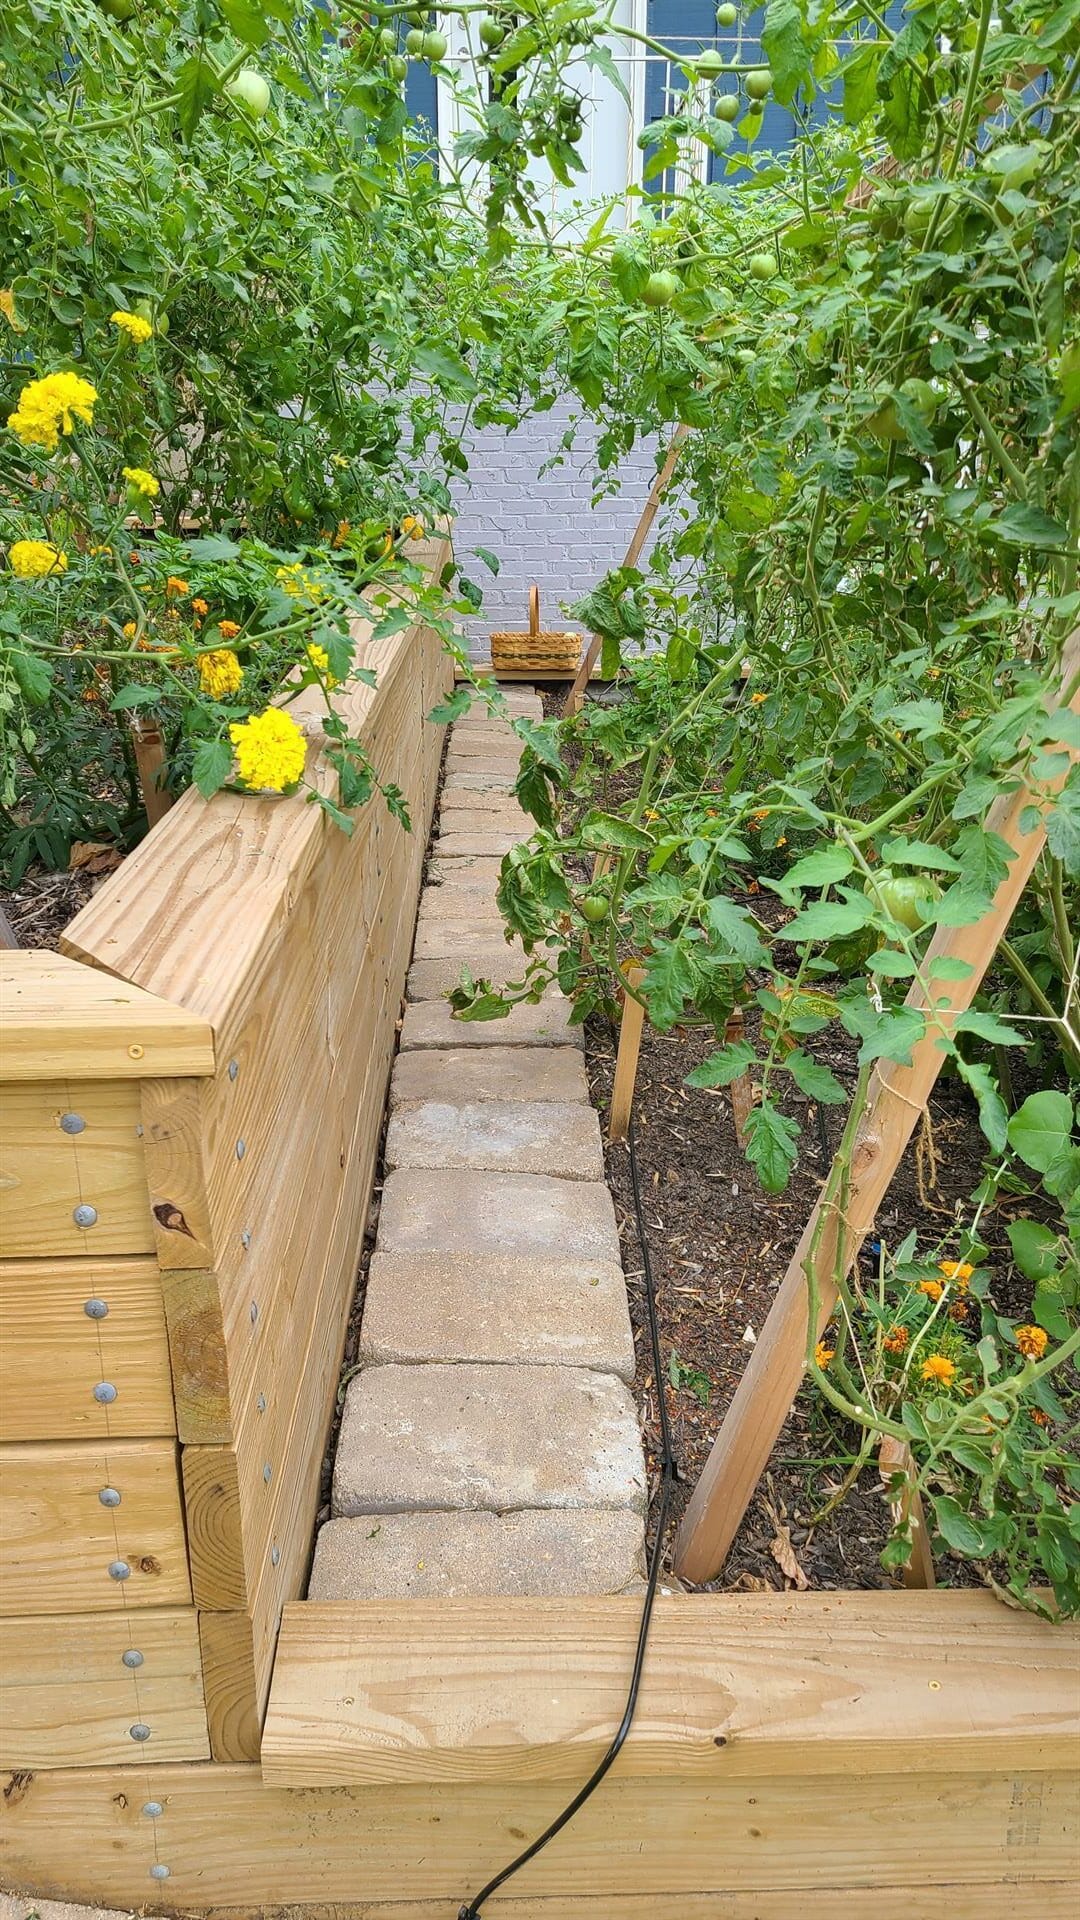
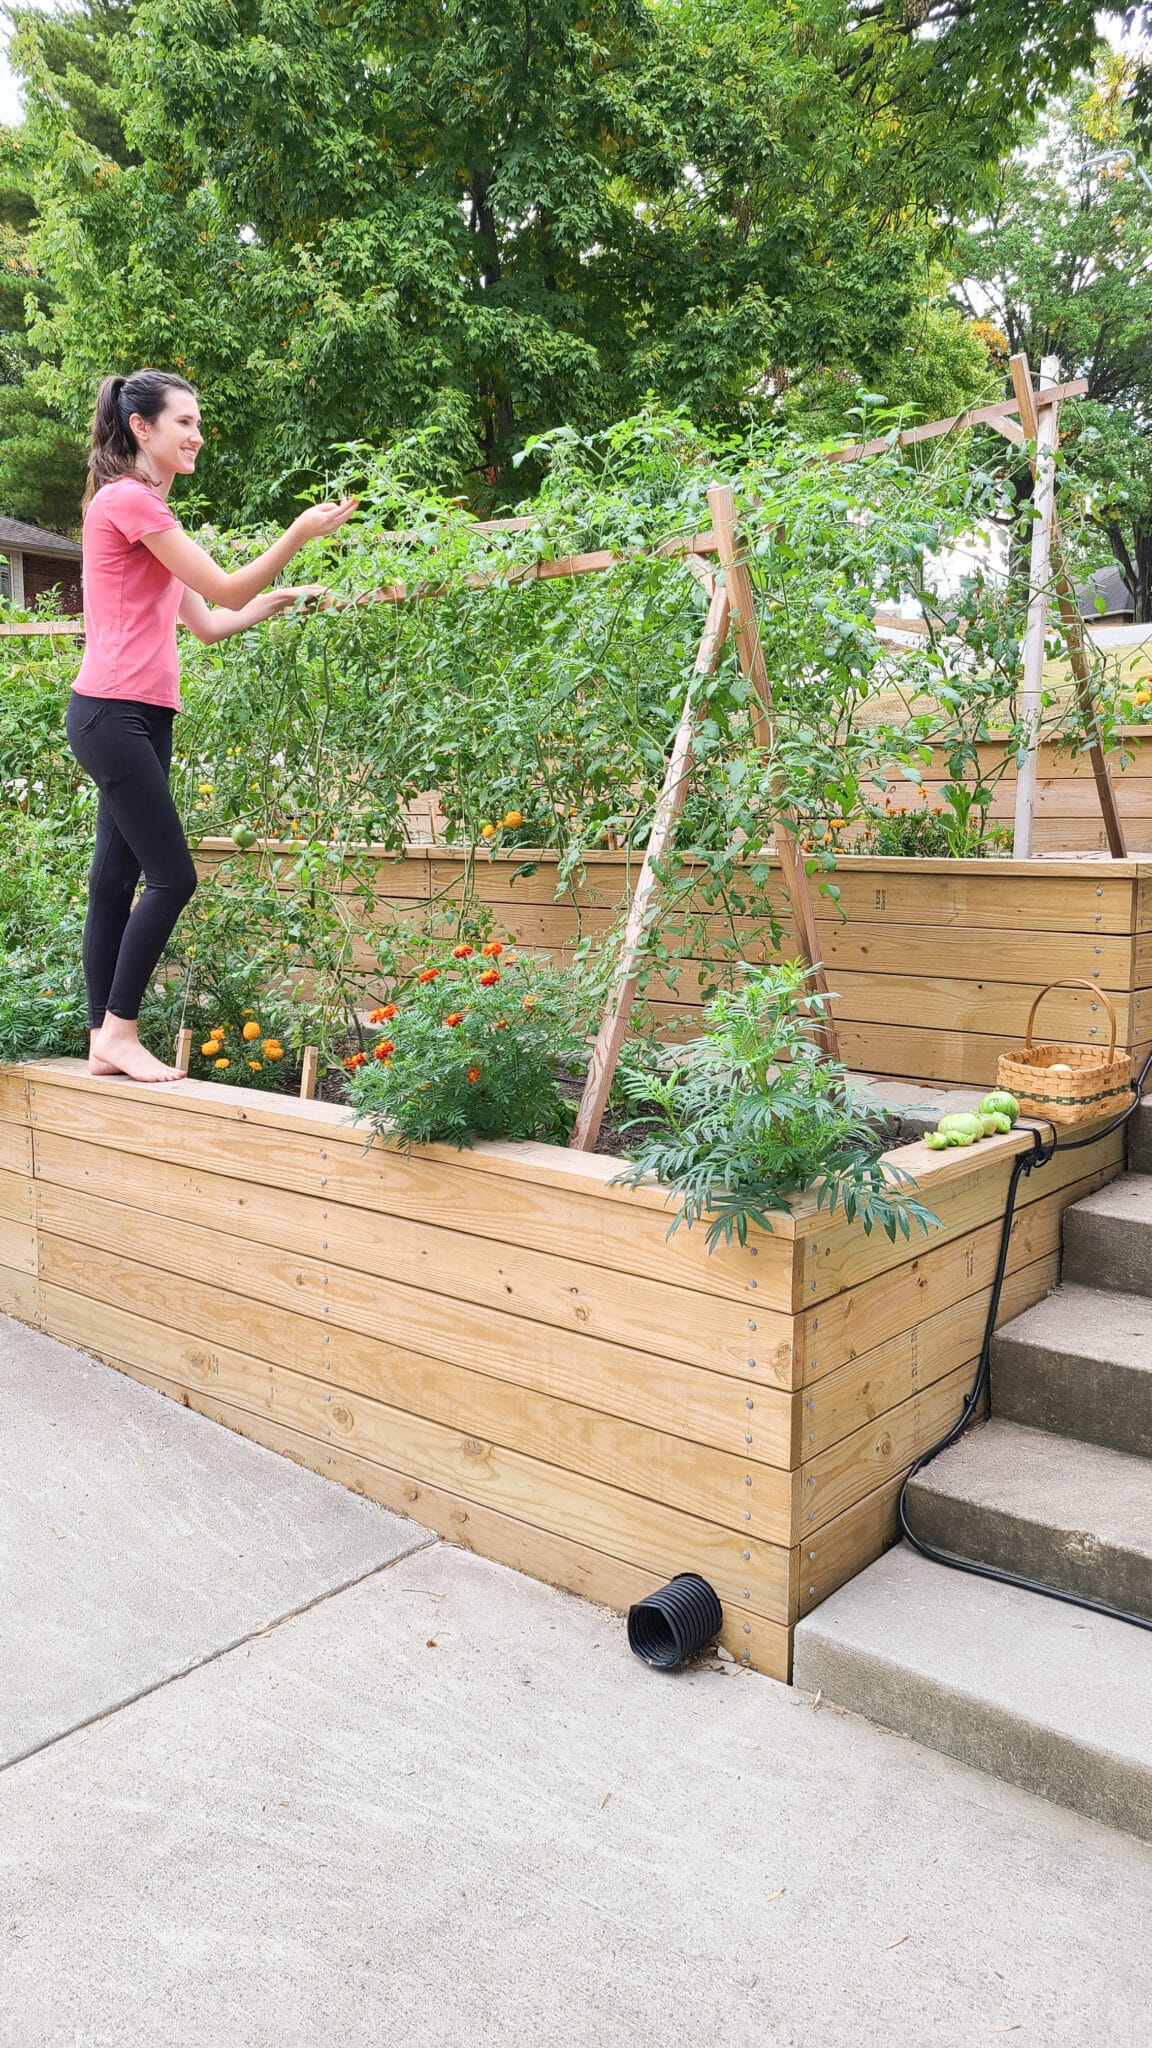
Plant, Trellis, Mulch, & More
After the soil settles, the fun part begins! Arrange the plants behind each retaining wall, dig the holes, and plant some beautiful plants. After everything is planted, water thoroughly to help the plants with the shock of being transplanted, and add a layer of mulch. Mulch helps retain moisture in the soil and reduces the need to water so frequently.
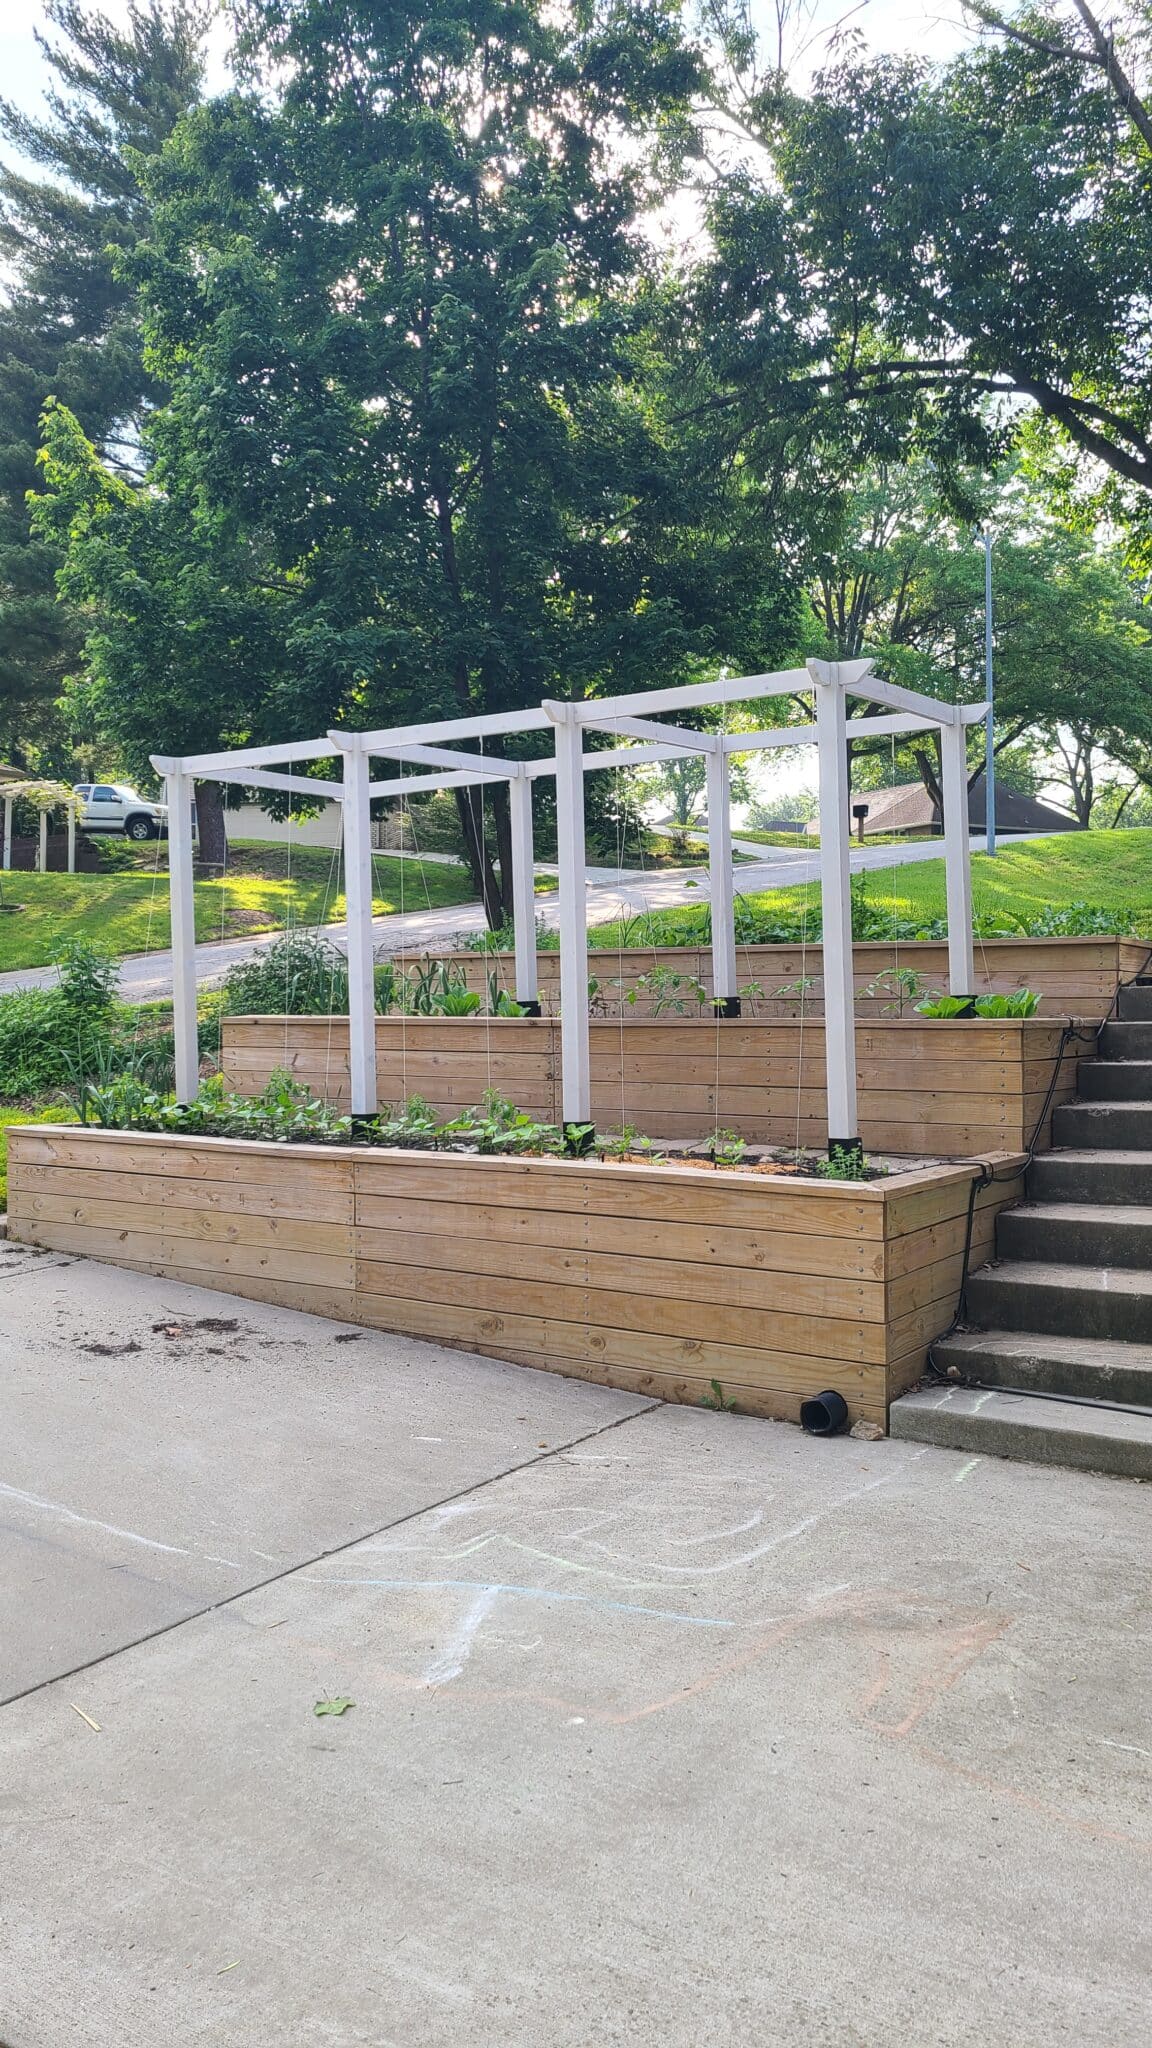
To maximize your garden space you can even build a trellis to grow climbing plants and vegetables vertically. We built a DIY Tomato Trellis to support all our indeterminate tomatoes and vining veggies. By growing vertically we have more space and higher yields to grow our own food on these vegetable garden terraces.
Tada! You DIYed a beautiful wood retaining wall (or set of terraces)!

More DIY Projects & Homesteading
With your new retaining wall and/or terraces built, you might be considering doing some more DIY projects or what to plant. Check out more of our DIY projects and gardening/homesteading articles for inspiration!
- Terraced Garden Beds After One Year – Words of Advice
- Hubby How To: DIY Tomato Trellis
- Hubby How To: DIY Planter Box
- Hubby How To: DIY Stacked Rain Barrel System
- 15 Awesome DIY Projects At Home You Can Do
- Down To Earth Tips For Eco-friendly Lawn Care


Hope this detailed How-To on building a wood retaining wall helps you plan, design and execute your vision! Let us know what questions you have in the comments below!


Disclaimer: This post includes affiliate links, and I will earn a commission if you purchase through these links. Please note that I’ve linked to these products purely because I recommend them and they are from companies I trust. There is no additional cost to you.


Thanks for the detailed project plan. Im in the process of implementing this project.
Where are the screws mentioned in the material used? I’m assuming they are for temporarily holding the boards and taken out after bolts were installed. Please correct me if I misunderstood. How did you route the perforated pipe? Does gravel and pipe cover all three sides of all levels?
Suresh,
Thank you and happy this has helped you plan out your project! Yes, the screws were used to temporarily hold boards before being taken out to install the bolts. We routed the perforated pipe on each side and the lowest edge of each level, basically creating a U-shape on three sides. They are routed and angled down towards the lowest point (for us that was the bottom corner by the stairs; you can see the pipe at the base). Lastly, yes, gravel and pipe cover all three sides on all levels with the top two levels connecting to the bottom.