Hubby How To – Modern DIY Platform Bed Frame
A bed frame is a staple in any home, so why not DIY your own beautiful bed frame? We’ve designed a modern platform bed with no exposure hardware that can be a feature in your bedroom. This post will cover how to make a modern DIY platform bed frame, including all the tools and materials necessary.
Updated 3/17/2024

Disclaimer: This post includes affiliate links, and I will earn a commission if you purchase through these links. Read about our privacy policy.
There are a lot of beautiful platform beds available on the market. However, we are serial DIYers, so instead of buying a platform bed frame, we decided to design and build our own! We love DIY furniture and projects as it allows for the exact design aesthetic we want, allows us to use the materials and products we want, and typically leaves a smaller carbon footprint. Also, we get so much joy and sense of accomplishment after completing a DIY project.
The design is a simple modern DIY platform bed frame with no exposed hardware, tapered bed legs, chamfered edges for a high-quality look, and durable yet functional so it can be used forever. Make sure to check out our wall-mounted headboard with floating nightstands to pair perfectly with this bed frame.
Here are the tools, materials, plans, and instructions for building your own modern DIY platform bed frame.
Tools & Materials For DIY Modern Platform Bed Frame
DIY Plans
Tools
- Tape Measure
- Drill
- Speed Square
- Table Saw
- Router Or Oscillating Multitool Or Chisels
- Random Orbital Sander with 3M Xtract Cubritron II Sandpaper
- Bluetooth Headphones
- Dust Mask
Optional Tools
Materials
- (4) – 2”x8”’x8’ Wood (Hardwood Recommended) – We used Sapele
- (1) – 4”x4”x8’ Post
- These need to match the 2×8’s, so if you can’t get a 4×4, get another 2×8 or two 2×4’s of the same wood as above to laminate together to make a 4×4.
- (2) – 2”x4”x8’ Pine/Poplar Wood
- (16-17) – 1”x4”x8’ Pine/Poplar Wood
- 1.25″ screws, 2” screws, and 2.5″ screws OR 1.25″ screws and Threaded Inserts with 2″ Bolts
- Preferred Finish
- We used Rubio Monocoat Oil Plus 2C in Black color (highly recommended!)
DIY Modern Platform Bed Frame – Build Process

Step 1: Get The Plans and Materials
First and foremost, you will need the DIY drawing plans. This post shows the King-sized modern DIY Platform Bed, but you can find the DIY plans for all standard-sized mattresses in our Site Shop or Etsy Shop.


If you’d like to build this platform bed frame in another size that’s not available, please email us at amanda@biglivinglittlefootprint.com. We would be happy to put together a custom-sized set of plans for you!
Alright! Let’s get started!
Now that you have the plans, go ahead and start procuring the materials. You will start with picking out the wood you want to use for this build. Our drawing plans were made with construction-grade lumber sizes in mind, but if you have a hardwood dealer near you, we highly recommend you pay them a visit. Construction lumber is great for specific projects and uses, but no stain can make pine look like true hardwood.
Choosing Wood Species & Finish Color
For this DIY platform bed frame, we tested a few different colors of Rubio Monocoat on several offcut pieces of hardwood we were able to get from our local dealer. Our goal was to try to match the dresser and nightstands that we already had. Ultimately, we settled on Sapele hardwood with Rubio Monocoat Black, which produced a beautiful brown with a slight red tint. Sapele also has a beautiful slight iridescence to it that we loved.
Choose the wood you like the most, but keep in mind you can only tint wood a shade or two off its natural color. Any change too big looks obvious. You can see this from the samples that we show below and in our full color test we did on 7 different species of wood with 6 different Rubio Monocoat colors.

Selecting Good Wood
Another thing to keep in mind when picking the main bed frame’s wood is to try and avoid wood with large knots or cracks that might weaken the integrity of the board. If these are near the end of the board, you may be able to cut them off and/or work around them. If they are in the center, you might be able to space it just right to avoid them, but the more you can avoid them entirely, the better off you’ll be.
For the pine/poplar boards, you don’t need to be quite as picky. These boards will be underneath the mattress and won’t be seen. The main requirement for the 2×4’s is they are straight and free of knots. The main requirement for the 1×4’s is they don’t have any massive knots that would cause the board to split when weight is put on them.
Spend some time picking through the boards or buy a larger board that you can rip down to the sizes that you need. You can often find better quality boards in the wider board section and then just cut them down to the size you need.


Step 2: Plan Your Cuts
Start by reviewing your wood. What areas do you like and what areas do you want to try to cut off or hide? Plan out your cuts for each board to determine which side you want to be the visible face.
If the lumber is still rough it may be hard to tell what the grain is doing in a particular area, so it may help to run it through the planer to skim the surface and expose the grain. If you have a smooth surface, then you can spray the boards with isopropyl alcohol or wipe them down with mineral spirits to show the grain.
Once you have decided how to lay out your cuts, go ahead and start marking your boards with their final lengths and widths. Notate which side is the visible face and if you have a preference on which side of the bed the board goes on or how it is oriented.


Step 3: Rough Cut The Lumber
If you have a miter saw or circular saw that holds a reliable square, then you can skip this step.
If you can’t get finished quality cuts from your miter saw or circular saw, then you’ll need to make sure the final cut is on the table saw. It can be extremely difficult to manage something this large on the table saw though. So the first thing to do is rough cut the boards to about ¼” longer than they need to be. It is likely that the factory edge is no good, so give yourself extra room so that you can trim both sides.
If there is any bowing, cupping, or twisting in the boards, you may want to run the boards through the planer now using a sled and shims to return the boards to a flat condition. You’ll then need to make sure to correct the straight edge on the boards as it likely isn’t square anymore.
Step 4: Cut The Boards To Length
Now that the boards are a little easier to handle, we will go ahead and put the finishing cuts on both ends. The rectangle of the modern bed frame will be made with a simple butt joint using fasteners to hold the boards together. This will make it easier to assemble and disassemble, over the years. The fancy joinery would be covered up by the leg pieces anyway, and it doesn’t need the strongest possible joint with the way the boards are loading.

Chop Each Piece
Take the pieces over to the table saw or miter saw and double-check everything is square. The blade needs to be square to the table and the fence to ensure a good cut. With that verified, put your finish cuts on all of the boards.
With boards as long as this, it can be helpful to have a table or something to support the weight of the board at its far end. If you are using a table saw, I highly recommend making or purchasing a crosscut sled to hold the board down while you cut, making things a little easier. Ensure you are keeping the straight edge tight against the fence to ensure your cut stays square. If doing this on the table saw, clamp the board to the fence of your sled to ensure it doesn’t rock while pushing it through the blade.
For the platform boards, it is very helpful to set up a stop block to quickly make repetitive cuts.
The only exception here is the leg pieces. If you are making them out of 8/4 material, you don’t want to cut them to their final length because you want to be able to trim them flush once they are glued up. We’ll cover that process in future steps. For now, give yourself an extra ½” or so of length.


Step 5: Rip The Boards to Width (If Necessary)
If you bought rough lumber or wider lumber than you needed, now is the time to rip the boards to their final width. Do this after cross-cutting because cross-cutting sometimes creates tear out at the end of the piece where the blade exits the board. By doing the rip cut afterwards, the rip cut will remove that section of wood with the tear out. So keep that in mind when orienting your cuts.
Start by putting the factory straight edge against the table saw fence and ripping it to about ¼” wider than needed. Then put this new straight edge against your fence and rip it to its final width. This will clean up any defects in the factory edge or its corners.
Again, the exception here is the leg pieces. If you are making them out of 8/4 material, don’t rip them to their final width because you want to trim them flush once they are glued up. Leave yourself an extra ½” of width or so.
Step 6: Plane The Boards (If Necessary)
With the boards now at their final size, make sure the boards are also at their final thickness. Plane any boards to their final thickness, if needed.
If you bought construction lumber, it is likely already at its final thickness. You can choose to leave it at this thickness, but it might be worth running it through for a light pass to get a cleaner flat surface. However, this will mean you have to adjust your dimensions in the next steps, so keep that in mind if you choose to deviate.
Now is also a good time to go ahead and sand all of the boards to 80 grit to remove any high spots or defects. It’s a good idea to do this now because if you end up taking off a lot of material, you don’t want that to affect your fit and finish later. You will also be adding edge profiling to the boards later and you don’t want to end up sanding away the smooth transition of your radius.


Step 7: Glue The Leg Pieces Together (If Necessary)
If you were able to purchase 4×4 posts of the same wood species to match the modern bed frame lumber, then you can skip this step. In our area, it’s impossible to find 4×4 posts in Sapele wood like we used for this project and most other hardwoods.
If you couldn’t buy a 4×4 post, now is the time to glue up the leg pieces. Pick pieces with similar color profiles so the seam blends in as much as possible. Spray the boards with isopropyl alcohol or wipe them with mineral spirits to really bring out the color and better match them up, if needed.
Once matched, check that they fit together with no gaps. If needed, plane the board’s surface or give it a light sanding to knock down any high spots until the boards fit together better. Apply a generous amount of glue to each face and spread it around to fully coat your piece. Then press the two pieces together.
Do your best to align your short edges. However, it’s better to have the two long edges offset slightly from the other. This allows you to put one board against your table saw fence without the second board interfering with your straight reference line.
Apply clamps and observe the glue squeezing out. If you applied enough glue, you should see some squeezing out around the entire piece. If you didn’t apply enough and are only getting glue squeeze out in a few areas, then try adding another clamp there to close a possible gap. The goal is to have as tight of a seam as possible.


Step 8: Cut The Leg Pieces to Width and Length
Once the Leg pieces have dried, its time to cut them to the final dimensions. Before doing that, you need to ensure you have a straight edge to reference against the fence. You should have left yourself a long straight edge earlier during the glue up, if possible, but chances are that there is glue squeeze out sticking up past this edge. Grab your chisels or sander and knock down all of this glue until it is flush with or below your straight edge.
Referencing the straight edge you created against the fence, rip the opposite side to create a flat surface. It is likely your table saw cannot cut this full thickness in a single pass, so flip the piece over and rip the second half of this cut.
If your cuts are not perfectly aligning, check to make sure your blade is at a perfect 90 degrees, and that your fence is parallel to the blade. If you haven’t planed your boards earlier, then it is also possible that the two faces of the leg are not parallel. A quick pass through the planer can fix this. Repeat this on each of the other Leg pieces.
If you can trust your miter saw and the saw can cut through the material this thick, then place this new flat surface against the wall of the miter saw. Cut one of the short ends of each leg to create a second flat surface perpendicular to your first. Repeat this on each leg and then set up a stop block to cross-cut the second short end of each board to its final dimension. With the cross cuts made, you can now rip the boards to their final width back on your table saw by cutting off the last glued up edge.
Method Without A Miter Saw
If your miter saw can’t make the cut in a single pass or you don’t trust it, then you will have to cut the pieces on the table saw in two passes, and you will need to flip the pieces from one face to the other. This means you need the two long edges to both be straight and parallel since you will have to reference both of them against the sled wall or miter gauge.
Putting your previously trimmed long edge against the fence, rip the remaining long edge to get the final width on each board. With this done, you can put one of the long edges against the sled fence or miter gauge and set up a stop block so the second half of the cut overlaps perfectly with the first half.
Cut each leg to clean up one of the short sides. If you are having trouble getting your cuts to line up, consider cutting as far as you can with your first cut and then making your second cut long so that you can use a flush trim bit to clean it up.
Finally, flip the pieces around and move the stop block to make the final crosscuts cutting the legs to their final length. Repeat this process for each leg.
Keep in mind that if you are making a Full-size bed frame or bigger, there will be an additional center support leg. This leg is shorter than the others, so you will have to move the stop block one final time to cut this piece to its final length.


Step 9: Taper The Leg Pieces
With the leg pieces now fully sized, it is time to add the taper to each leg. The DIY plans we’ve created provide a paper template to trace the angles for the leg. The best way to do this is to use a Tapering Jig. Ideally, this is a sled that fits in your miter rail and clamps the Leg pieces down. This allows the wood to be suspended at an angle as you run it through your table saw.
However, a simple piece of scrap plywood works too. You will just need to hold it firmly against your table saw fence as you make the cut. You won’t be able to clamp the Leg piece down, so you’ll need to hold it against some stop blocks.


Using A Tapering Jig
If you have a tapering jig, then move on to tracing out the angle. If you are using a scrap of plywood, then set your fence and run the scrap through the saw once to put a straight edge on it. This way you know exactly where the blade will cut. Do not move your fence again after this cut.
Next, start by tracing out the cut line for the taper and then align that line to the edge of your tapering jig. Or mark it out on a piece of paper to create a template that you can use for alignment. Clamp the Leg piece in this position if you can.
Add Stop Blocks
You will then want to add a few stop blocks so you can easily repeat this same cut on each of the next few pieces. Do this by screwing a few pieces of scrap to your jig that will touch two sides of your leg pieces. But who really wants to put holes in their tapering jig?
A better method is to put a piece of painter’s tape on your jig and on your stop block. Then put a bit of CA glue on the tape and press the block in place. Since the glue is between the two pieces of tape, it will hold the block in place, but can be easily removed later. With the blocks in place, you can now quickly align each of the legs by pushing them up against these blocks in order to get the same taper on each piece.
Cut Pieces With Jig
With that set, run each of your pieces through the table referencing the stop blocks each time. Since your saw probably can’t cut through the full thickness, you then have two cutting options.
Option one is to flip the piece over, carefully align the cut, set up a second set of stop blocks, make your cut, and then sand any slight seam to blend the two cuts.
Option two is to use a hand saw to finish the cut and then sand or use a flush trim bit to blend the seam of the cut. Either way, keep the off-cut scrap from each piece.
Once your first taper is on each leg, it is time to cut the second taper. It may be tricky to keep the piece flat for this second cut. If you are having issues, tape the off-cut scrap from the first cut back onto the piece to help support the leg as you make the second cut. Repeat this process for all of the remaining tapers.


Step 10: Create Pockets In The Leg Pieces and Bed Frame
With all of the legs now sized and tapered, the next step is creating a modified castle joint to hold the bed frame. This joint is modified to ensure the boards only enter from two sides, but don’t pass fully through the leg. This hides most of the end grain part of the boards inside the leg, and ensures you don’t have any bed frame overhanging your leg and waiting to bruise your shins.
Make Pockets On Leg Pieces
The best way to make this joint is with a plunge router and a template. Cut out the pattern from some MDF or plywood, or set up some boards as stops that your router base can touch to guide you. Since we have a 3D printer, I printed out a template for ours, but it functions the same way. Then, using a pattern bit, slowly remove material until you have fully formed the pockets creating the modified joint.
If you don’t have a plunge router, but you have a regular router, you can go as deep as your bits will go, and then finish forming the pocket with an oscillating multitool or some chisels.
If you don’t have a router at all, you can cut this entire joint with an oscillating multitool or with chisels. With a multitool, use a straight piece of wood as a guide to keep your cut straight and square. Start by cutting around the edge of the cut. Then make several cross-cuts between the grooves so you can come down from the top and remove the material in sections. It will take more time and a little finesse, but you can do it! For more information on this technique, check out how we did it when building our Canopy Bed and Hanging Bed!


Make Pockets On Bed Frame
After cutting the leg pieces, next is cutting pockets into the two ends of the modern bed frame for the Center Mattress support. A simple straight bit will work well enough here. Clamp a few pieces of wood to your frame to use as guides for your router. Cutting progressively deeper, slowly form the pocket needed for your mattress center support to fit into.
Once you have the pocket made with the router, the last thing to consider is the corners. If you are trimming up your center support and it will have sharp corners, so you’ll need to use a chisel to remove the rounded corners from the pockets.
However, if you use a ½” straight bit, the radius of the corners will be ¼”. So if you put a ¼” roundover on your mattress support board, then it will fit in the pocket cleanly without any chiseling. I recommend going this route as the roundover on the center support makes it feel like a quality product.


Step 11: Test Assemble The Bed Frame
With the castle joint made, it is time to do a test assembly of the modern bed frame. Place a short and long piece together, align their edges, and use a square to ensure they are aligned properly. Drill a pilot hole through the face of one board and into the end grain of the second board. Countersink the hole in the face of the board, and then use a screw to temporarily join them together into a butt joint. You are joining all of these joints with screws so it can be taken apart for finishing and easier transport later.


Put 3x 2.5″ screws into each joint. Be sure the center of your top screw is no higher than 4” from the bottom of the joint. This ensures that the countersink and screw hole is hidden inside of the leg piece.
Repeat this process for all four corners of the bed frame. Once the bed frame is together, you may notice that the widths of your frame boards do not perfectly align or the butt joint is not perfectly flush. Go ahead and grab your sander and clean up your transitions now before moving on.
Step 12: Add A Chamfer To The Bed Frame and Legs
Now is a great time to add the chamfer profile around the perimeter of the bed frame. You want to do this while the boards are connected so the chamfer from one board flows right into the chamfer from the next board.
The best way to do this is with a chamfer bit on your router. I recommend starting on the bed frame’s back board so that if your router depth drifts during your cut, the misalignment can be sanded out and hidden behind the bed.
While adding chamfered edge profiles, you may also want to consider adding an ⅛” roundover to all of the other edges of the bed frame to give it a smooth to the touch feel. Take your router and go over all the other corners.
If you don’t have a router, then you can do the chamfer with a handheld belt sander, power planer, or block plane. If you don’t have any of those tools, you can set the angle on your table saw and rip the chamfer into the boards. However, you will likely have to do a fair bit of sanding to clean up the edges afterward and this has to be done with the boards disassembled, so ensuring edge alignment becomes more difficult.
With that done, install your router into a router table and use the same chamfer bit to add a chamfer to the two outside edges on the top of each leg. Then consider using the roundover bit to soften all of the other edges. Again, this can be done with other tools if necessary, just be careful since these legs are small and power tools can easily kick them out.
Finally, put a roundover on all of your platform boards to smooth their edges and prevent them from wearing out your sheets. I recommend a ¼” round over for these boards, but you can do ⅛” if you prefer. Alternatively, you can just use sandpaper to knock down all of the edges on all of the boards instead of a roundover.


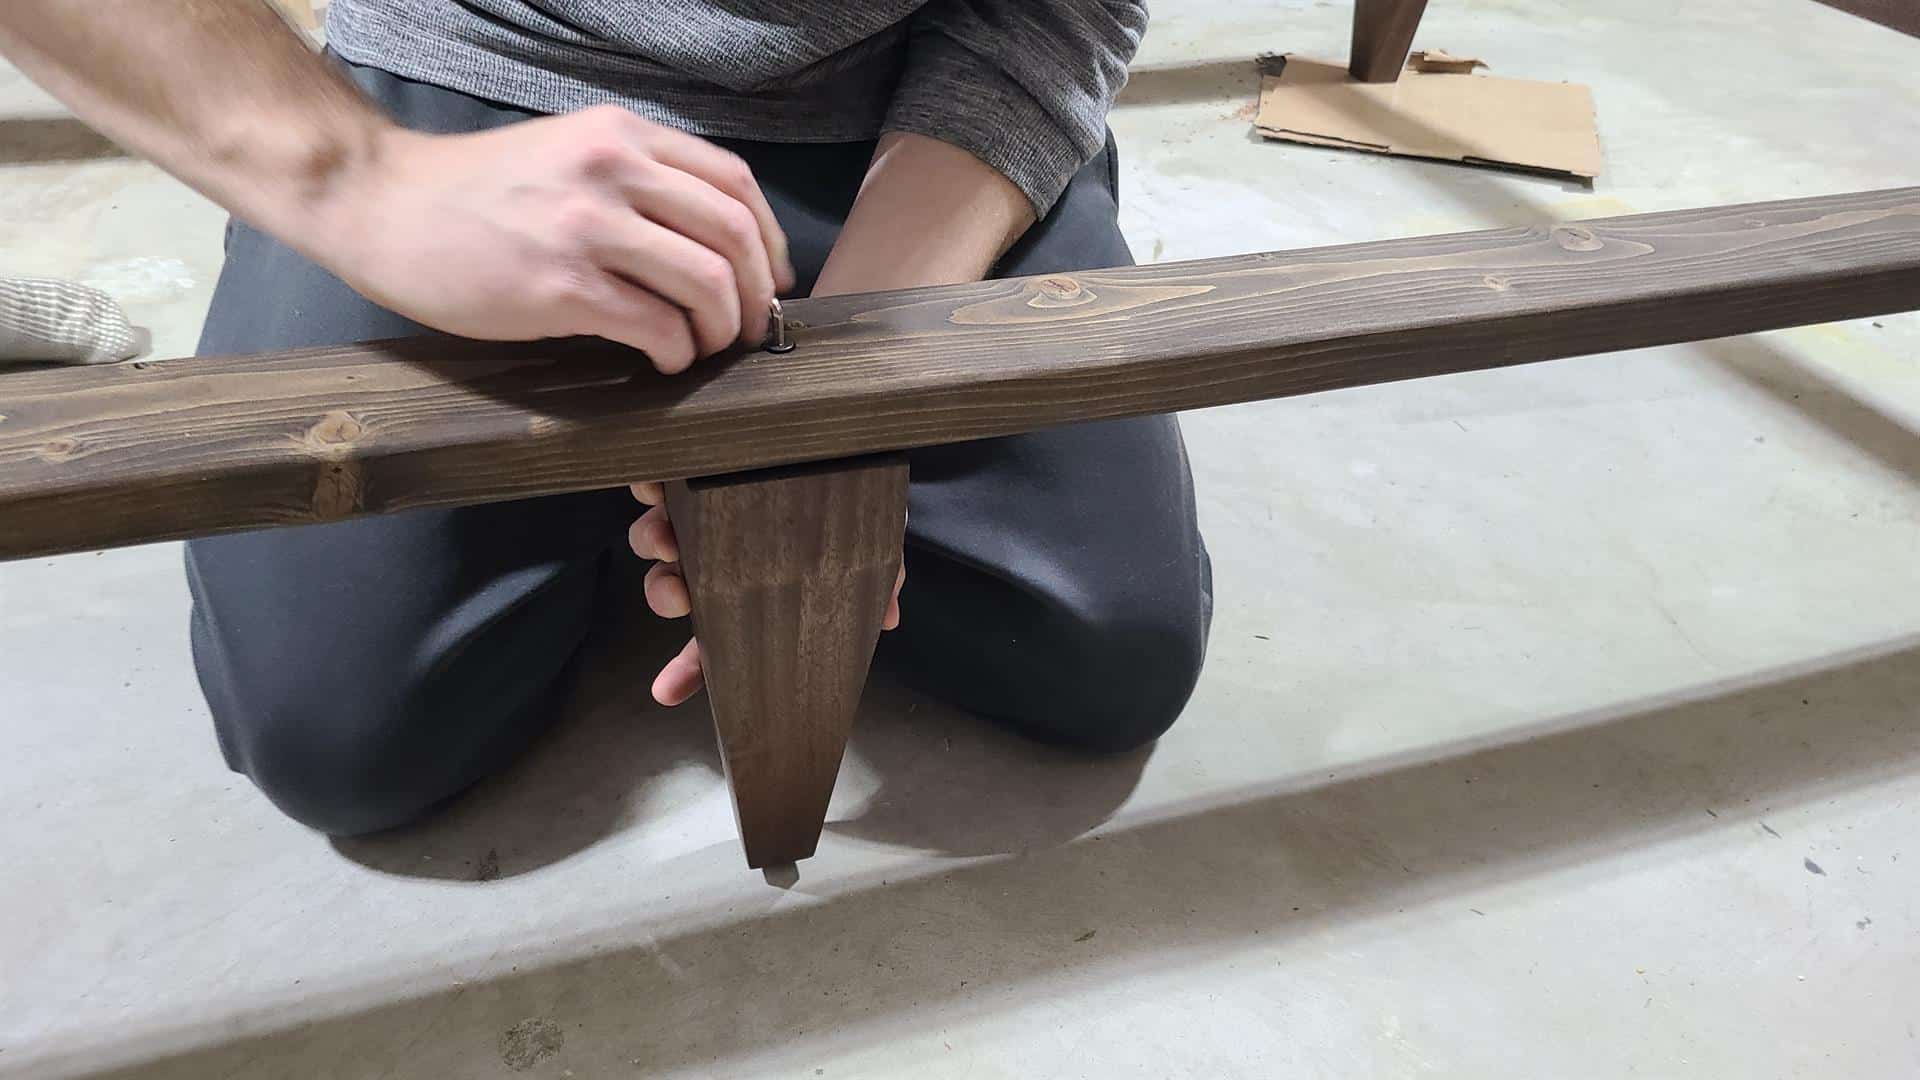
Step 13: Install the Legs and Center Support
If you haven’t already, go ahead and flip the bed frame over now as it will make this step much easier. Just be sure to put some cardboard or something on the floor to protect the wood from damage and moisture.
With the frame upside down, you can test install the Legs. If they don’t quite fit, remove a little material from the leg’s channels and try again until they fit. A rasp or sanding block works well here for small adjustments. Once each leg can fit in its respective corner, it’s time to test install them.
For each Leg, put a 2″ screw near the top and bottom of the frame to fully secure the leg. Preferably, put one screw into each side of the corner so you are holding it tight against the bed frame as well. You can do this by drilling through the face of the boards or by making a pocket hole. All of this will be covered up by the mattress. But it is visible when the mattress is removed, so you still want it to look good. Again, use pilot holes and screws here. You’ll have the option to upgrade these to threaded fasteners in a moment.
Repeat this process for all the Legs to ensure everything fits together properly. If it’s a little snug right now, that is okay. It will loosen up a bit after we sand everything to the higher grits, but you still want it to go together fairly easily at this point. With the screws in, the Legs should feel tight with no play or wiggle in them. If you are getting play, evaluate if you have any gaps that you might need to add a shim into, or if there is a problem with your screw positioning.
With the Legs installed, install the mattress center support bars into its pocket. Sand the bar as needed to get a good fit in its pocket. Once it is in its pocket, drill and countersink two 1/8″ pilot holes to help align threaded inserts later, or use 2x 2.5″ screws at each end.
Finally, check to make sure the side supports and platform boards all fit. Trim them to length, if necessary. Once you know that everything fits, go ahead and disassemble everything.


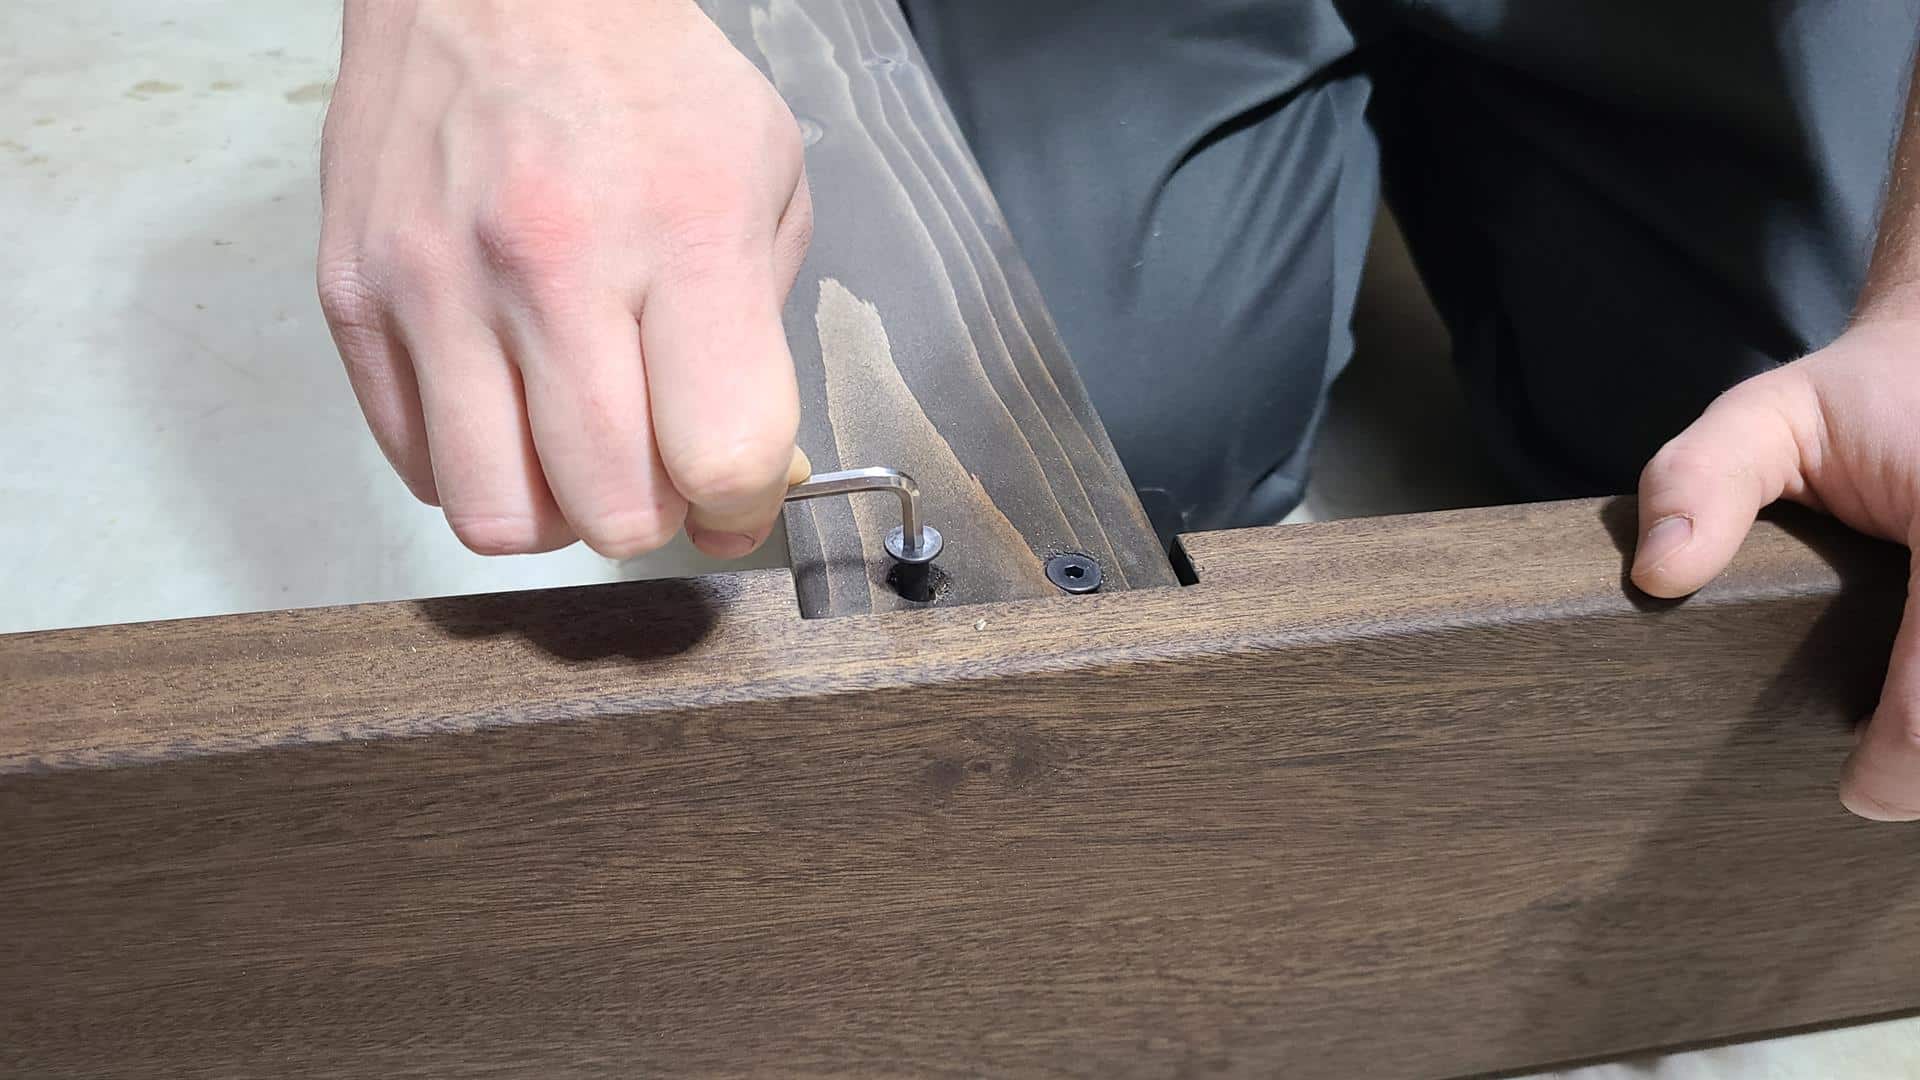
Step 14: Add Threaded Inserts (Optional)
This step is optional as you can use traditional screws to hold the bed frame together.
With everything disassembled, you now have small holes in all of the pieces where the screws were installed or pilot holes were drilled. I highly recommend you widen these out and install threaded inserts and bolts. Not only will these hold better over time, but the inserts are also more convenient to assemble and give your bed frame a high-quality furniture feel.
If you are using ¼-20 threaded inserts and bolts, then drill the bolt holes out to just over ¼” and make sure your countersink is large enough to fully recess the head of the bolts. On the threaded inserts, drill your hole large enough that the body of the insert will fit in the hole and only the threads will be biting into the wood. This will probably be around 23/64”, but follow your threaded insert manufacturer’s directions and I would try a test piece first. Once the hole for the threaded insert is made, I recommend adding some super glue to the edge of the hole before installing the threaded insert. This helps keep it from backing out in the future.


Step 15: Sand Everything
Now you are finally ready to start the finishing process. As always, this starts with sanding. Start with 80 grit (If you didn’t already) and work your way up to 180 grit. I recommend water popping (see details below) between grits. Take the extra time at 80 grit to really get out every imperfection you can, and it will make the following grits go by a lot faster. If you are just now doing the 80 grit, then you may need to come back and touch up your edge profiling to get a good roundover feel.
Once done sanding, wipe everything down with either Rubio’s Wood Cleaner or with Mineral Spirits. Then set the pieces to fully dry before moving on to applying finish. This can take a long time. It can help if you set up a fan or two to blow air across the pieces overnight.
For the less critical pieces like the bed slats and the slat support rails, you don’t necessarily need to take them up to 180 grit. The main concern on these is just removing any sharp edges and rough surfaces so that you don’t get splinters or wear on your sheets/mattress.
What Is Water Popping?
Water popping is simply a process that opens the grain in wood. You can do this using a spray bottle with water. Wood, by its nature, is hygroscopic and absorbs water. As wood absorbs water the wood cells expand (open) and as the water evaporates the expanded cells remain more open.
This helps even out any tone variations that might show up when you apply finish, helps you see if there is any glue residue you missed, and helps really bring out the wood grain. We highly recommend doing this between each grit level of sanding.


Step 16: Apply The Finish
Finally, it is time to apply our finish to the pieces. Set the bed frame pieces on blocks, or an old towel to keep them from getting scratched by the ground. Then apply your preferred finish per the manufacturer’s instructions.
We chose the Black Rubio Monocoat Oil Plus 2C finish for our Sapele wood bed frame. After we discovered the Rubio Monocoat finish, we’ll likely never go back to any other stain and it’s truly the ultimate wood finish for us. Check out our Rubio review and color tests on different wood species if you’re looking to use it too!
Rubio Monocoat Finish Process
If you choose to use Rubio Monocoat, then the process is fairly straightforward. When using the Rubio Monocoat Oil plus 2C, you mix up roughly 1 part hardener to 3 parts color.
Rubio’s cans actually provide more color than hardener, but Rubio confirmed you can mix it all at the provided ratio. This way you don’t end up at the bottom of your can with no hardener. It just may take a little longer for the Rubio to fully harden up and cure. I recommend using a syringe for measuring as we are dealing with a relatively small amount here. We used an old syringe that came with children’s medicine. Yay for reuse!
A little goes a long way with the Rubio finish. One 350mL can will cover 180 sq ft of hardwood. So mix up only what you need or less than you need and then mix up a little more as you need it. But don’t worry, we did the math for you for each bed size!
The approximate amount of Rubio you will need per board is as follows:
Total Rubio Finish Needed For Each Bed Size
| Size | Total Rubio Needed (mL) | Color Needed (mL) | Hardener Needed (mL) |
| Cal King | 87.6 | 68.8 | 18.8 |
| King | 87.8 | 70 | 18.8 |
| Queen | 80.4 | 63.2 | 17.2 |
| Full | 75 | 58.9 | 16.1 |
| Twin | 66.8 | 52.5 | 14.3 |
Rubio Needed Per Piece
| Size | Board | Total Area (sq. ft.) | Rubio/Board (mL) | Rubio/Side (mL) |
| Cal King | Front | 8.9 | 17.3 | 8.6 |
| Cal King | Side | 10.7 | 20.7 | 10.4 |
| King | Front | 9.4 | 18.3 | 9.1 |
| King + Queen | Side | 10.2 | 19.8 | 9.9 |
| Queen | Front | 7.5 | 14.6 | 7.3 |
| Full | Front | 6.7 | 13 | 6.5 |
| Full + Twin | Side | 9.6 | 18.7 | 9.3 |
| Twin | Front | 5.0 | 9.7 | 4.9 |
| All | Corner Legs | 1.3 | 2.5 | 0.6 |
| Full or Larger | Center Leg | 0.8 | 1.6 | 0.4 |
Applying Rubio Monocoat
Once the Rubio is mixed, use the syringe to apply a line of it to the piece, preferably with the wood grain. Don’t let this line sit long as you don’t want it to absorb unevenly. Immediately start spread it out around the piece. Make sure you are using a soft rubber or plastic trowel as you don’t want to scratch the piece.
Once it is spread around the piece, it is time to start buffing it in. I recommend using a buffer or a buffing pad on your drill or sander, or an actual electric buffer. You will get better results than if you do it by hand. If you are using your sander, ensure you remove any loose dust from the sander first so it doesn’t fall onto your piece. Dust isn’t so much of an issue, but the small pebbles of compressed dust that some sanders accumulate could scratch your piece if it gets trapped in the buffing pad.
Keep buffing until the wood feels fairly dry to the touch. You can’t really buff too much off, but you can leave too much on. If you have unevenness in the color, then you likely need to add a little more Rubio to that area and then buff it around. A new buffing pad may absorb a fair bit from your first piece until it is a little saturated.
Repeat this process for each side of every piece until all of the main frame and leg pieces are finished. These pieces will need to be set aside for a few days while the Rubio hardens up and cures.


Finish Support Rails & Slats
For the Mattress Support Rails and Slats, we switched to a simple dark stain instead of the nicer Rubio finish. This protects the wood from warping over time, but didn’t waste our nicer stain and saved some time. It’s up to you how you want to finish the more hidden bed frame pieces.
Step 17: Assemble The Final Bed Frame
Now that everything is dry, it’s time to finish off this build. All that’s left now is to reassemble everything. FYI, the bed frame will be heavy! So do your final assembly in the room it’s going to stay, if possible.
Repeat the process from earlier, by first screwing the bed frame pieces together using your chosen fastening method (screws or threaded inserts). Then raise the frame up and install each of the four legs. Attach the Mattress Support Side Rails to the bed frame sides using 2″ screws every 8 to 12″. These won’t need to come apart so no need for threaded inserts here. Screws will do just fine.


Install the Center Support Rail into its pocket using your preferred fastening method here as well. Since it will need to come apart if the bed frame needs moving, I highly recommend threaded fasteners here.
All that’s left now is to drop in the Mattress Slats. You can leave these loose if you wish, but that annoys us when changing the sheets. I recommend securing them in some form. You have a couple of options.
- Run a strap down the length of the bed, staple each support rail to the strap, and then secure the strap to either end of the mattress.
- Place mating pieces of velcro between the rails and their supports below.
- Drive 3x 1.25″ screws into each of the boards to secure them to the side support and center support rails.
If you expect to have kids jumping on this bed, I would recommend using screws for the extra strength it will provide the entire structure. That’s what we did because we have a very bouncy toddler.


Now bring in your mattress and take a step back to admire your work. You did it!
Final DIY Modern Platform Bed Frame
We truly love designing and building beautiful things. Moreover, we love sharing them and helping others create their own. Hopefully, you love and enjoy your modern DIY platform bed frame as well!


Other Hubby How To Projects
Now that you have completed this project, why not try one of our others?! Head on over to our Shop to check out our other DIY plans, and sign up for our newsletter so you don’t miss any new DIY projects and plans. Also, check out our other Hubby How To posts in our DIY Category
- Hubby How To: DIY Planter Box
- How To Make DIY Floating Shelves – Live Edge Wood Shelves For Kitchen
- Hubby How To: DIY Hanging Daybed Swing Plans
- Hubby How To – DIY Modern Headboard With Floating Nightstands


Hope this how-to helps you build a beautiful modern DIY platform bed frame! We’d love to know your thoughts on the design and if you built it! Also, feel free to leave suggestions or questions in the comments below!


Disclaimer: This post includes affiliate links, and I will earn a commission if you purchase through these links. Please note that I’ve linked to these products purely because I recommend them and they are from companies I trust. There is no additional cost to you.


So from what i see, the front legs are not screwed in the frame. Am I right?
Hey Mathieu,
Nope, the front legs are screwed in from the inside of the frame. We walk through installing the legs on Step 13 with screws as part of the dry fit, and Step 14 discusses how you add threaded inserts if you desire instead. The images are of the dry fit prior to finishing. In our specific build we opted for the threaded inserts, which is why we don’t mention adding the screws in again during the final assembly. You would simple use screws in place of the threaded inserts when you do the final assembly.
Best,
Amanda