Hubby How To – DIY Stacked Rain Barrel System
Looking to collect some rainwater and maximize your water storage to water your landscape and garden? A stacked rain barrel system is a great way to do this and a fairly easy DIY. This post covers the tools, materials, and how-to for your own three tiered DIY rain barrel system!
Updated 09/26/2023

This post may contain affiliate links. Read about our privacy policy.
Many of us are spending more time at home, enjoying our yards, and even trying our hands at gardening. Gardens or any kind of landscape require a lot of water typically. Even if you’re not trying to grow a vegetable or kitchen garden, just watering anything around your house adds up to a lot of water. Especially with the more frequent heat waves and thirsty plants!
One way to water your plants for cheap is to actually collect the rainwater from your roof! Rain water harvesting, as it’s called, has been around for a while and is greatly beneficial both to you and the environment. You can water your plants for next to nothing cost wise and help reduce stormwater runoff. Many urban and suburban water systems have excessive stormwater runoff due to vast areas of hardscape causing flooding and overwhelmed systems. By storing your water on site, you help slow down runoff and relieve the systems a bit.
Rain barrels are a great way to harvest rain water and fairly easy to DIY. But why stop at one rain barrel, when you could maximize your water storage in a small space by stacking multiple barrels!?
This Hubby How To shows the building process of a 3 Tier Rain Barrel System to collect rainwater from the gutter. We built this exact system and use it to water the plants in our garden with the ultimate goal of setting up a drip irrigation system to automate the process. Are you ready to build a DIY rain barrel system!?

DIY Rain Barrel FAQs
Here are a few common FAQs to hopefully answer any questions you have before building your system But feel free to skip this if you are ready to start building! Read the entire build process to learn more, too!
Can You Stack Rain Barrels?
Absolutely! Like many things, going vertical can save you space. You just have to ensure you have good connections.
Why Build A Stacked Rain Barrel Water System?
So why build a 3 Tier System instead of setting the barrels all on the ground? Two reasons! First, by elevating the highest water line, you increase the water pressure to your hose. Second, it takes up less space. The downside is by putting the barrels on their side, you do lose a little bit of the capacity as not all of the air can escape when the barrels are filling and they can’t drain completely when emptying.
How Do You Make A Rain Barrel Water System?
There are many ways to make a rain barrel water system. The following DIY plans show how to make a multiple rain barrel system vertically to save space and maximize your storage.
Can I Use The Water I Collect For Drinking Water?
Because the water is collected from your roof and not cleaned and processed, it’s not a good idea to consume this water collected in your rain barrel system. It’s what design professionals would call “greywater”. Meaning, it’s not bound for the sewer (black water) due to human waste, but it’s not filtered and cleaned to a safe drinking standard either. Just think of drinking any bird poop (potential chemicals, etc.) that are on your roof that the water has to run over first. Nope, not risking it!
How Do You Connect Multiple Rain Barrels?
Chaining multiple rain barrels is a great way to increase storage. You can either connect them side by side on the ground or stack the barrels vertically. Both options require some additional fasteners and piping to create a combined system. We prefer the stacked rain barrel system for better water pressure.
Do I Need A Overflow System Like This Design?
No matter what, you’ll need some overflow or water outlet to ensure water can get out when the rain barrels are full. The designed bypass plumbing system allows for this to be done in a clean channeled way like a gutter system. Other rain barrel system’s overflow bypass literally is a hole near the top of the barrel and water will come gushing out of there. It can cause issues and erosion in the long-term.

3 Tier DIY Rain Barrel System Materials
Drawing Plans
Tools
- Tape Measure
- Drill
- Framing Square
- Miter Saw (Preferred) Or Any saw that can make straight cuts
- Jig Saw OR Band Saw
- 36″ Long Clamps (Recommended)
Frame Materials
- (13) – 2x4x96 Board (Pressure Treated Recommended)
- 2 ½” Screws (Exterior Rated)
- 4” or Longer Screws (Exterior Rated) (Recommended)
Plumbing Materials
- (3) – 55 Gallon Tight Head Drums with Bung Plugs
- (1) – Short Length of 4” PVC
- (2) – 10 ft Lengths of 2” PVC
- (1) – Short Length of ¾” PVC
- (1) – More than 7 ft of ¾” Tubing
- (1) – Leaf Filter (Suggested)
- (1) – ¾” Hose Bib
- (3) – 2” NPT Male to 2” Pipe Fitting
- (6) – 2” Pipe Tee
- (3) – 2” Pipe Elbow
- (1) – 4” to 2” Pipe Reducer
- (1) – 2” Pipe Socket Ball Valve
- (1) – 2” to ¾” Pipe Reducer
- (1) – ¾” NPT Female to ¾” Pipe Fitting
- (2) – ¾” NPT Male to ¾” Barbed Tee
- (1) – ¾” NPT Male to Barbed Elbow
- (1) – PVC Cement
Decorative Screen Cover Materials (optional)
- (32) – 1X4X96 Board (Pressure Treated Optional)
- (4) – 2x4x96 Board (Pressure Treated Optional)
- 1 ½” to 2 Screws (Exterior Rated)

DIY 3 Tier Rain Barrel – Build Process
Step 1: Get Your Plans and Materials
First and foremost, you’re going to need a drawing packet to help guide you through the construction of the frame and the assembly of your plumbing. You can find the plans for this build in our Shop or if you prefer, you can buy them from our Etsy Shop.

Now, it’s time to buy your material. The materials are listed above and in the drawing packet. The exact quantities could vary if you make any changes to the design.
Material Options
This is especially true in the case of the plumbing pieces. It is entirely possible you won’t be able to find exactly the same fitting and reducers listed at your local big box store. In that case, there is usually a workaround that may require additional adapters or reducers to get everything you need. If that doesn’t work, or you don’t want to try to figure out alternate combinations, you can buy everything from McMaster Carr online and have it delivered.
As for lumber, I recommend you stick with pressure-treated wood for the frame. There is going to be a lot of weight in these barrels the frame is supporting, and the last thing you want is a rotten board collapsing a few years from now.
For the decorative frame, you can either use pressure-treated wood, opt for cedar, or stain/paint a less weather-resistant wood. As always, inspect the wood you are buying. Don’t purchase severely warped or bowed boards or boards with large knots across their face that could weaken the strength of the wood.

For fastening this all together, it is designed to utilize exterior-rated screws. Look for deck screws or similar fasteners. For extra strength, consider lag bolts instead, but it isn’t necessary with the way the frame’s design carries the load.
Rain Barrel Sourcing
Finally, when it comes to sourcing the barrels, try to find a local vendor. You’ll want a 55 gallon food-grade barrel with two bung hole plugs. Ensure you have the plugs when you purchase it. Some people will use non-food grade barrels, but there’s a potential for contamination, so it’s not advised.
There are often people selling reclaimed barrels for a fraction of the cost of new barrels. Check out Facebook Marketplace, Ebay or other online sellers to find some local sellers. We purchased ours through a local guy on Craigslist for fairly cheap. It’s a great way to reuse the barrels and save them from the landfill. Just be sure to clean out the barrels before using them in case there is any residue.
New 55 gallon food-grade barrels can be purchased online if no other secondhand option is available.
Step 2: Pick Your Spot and Measure The Space
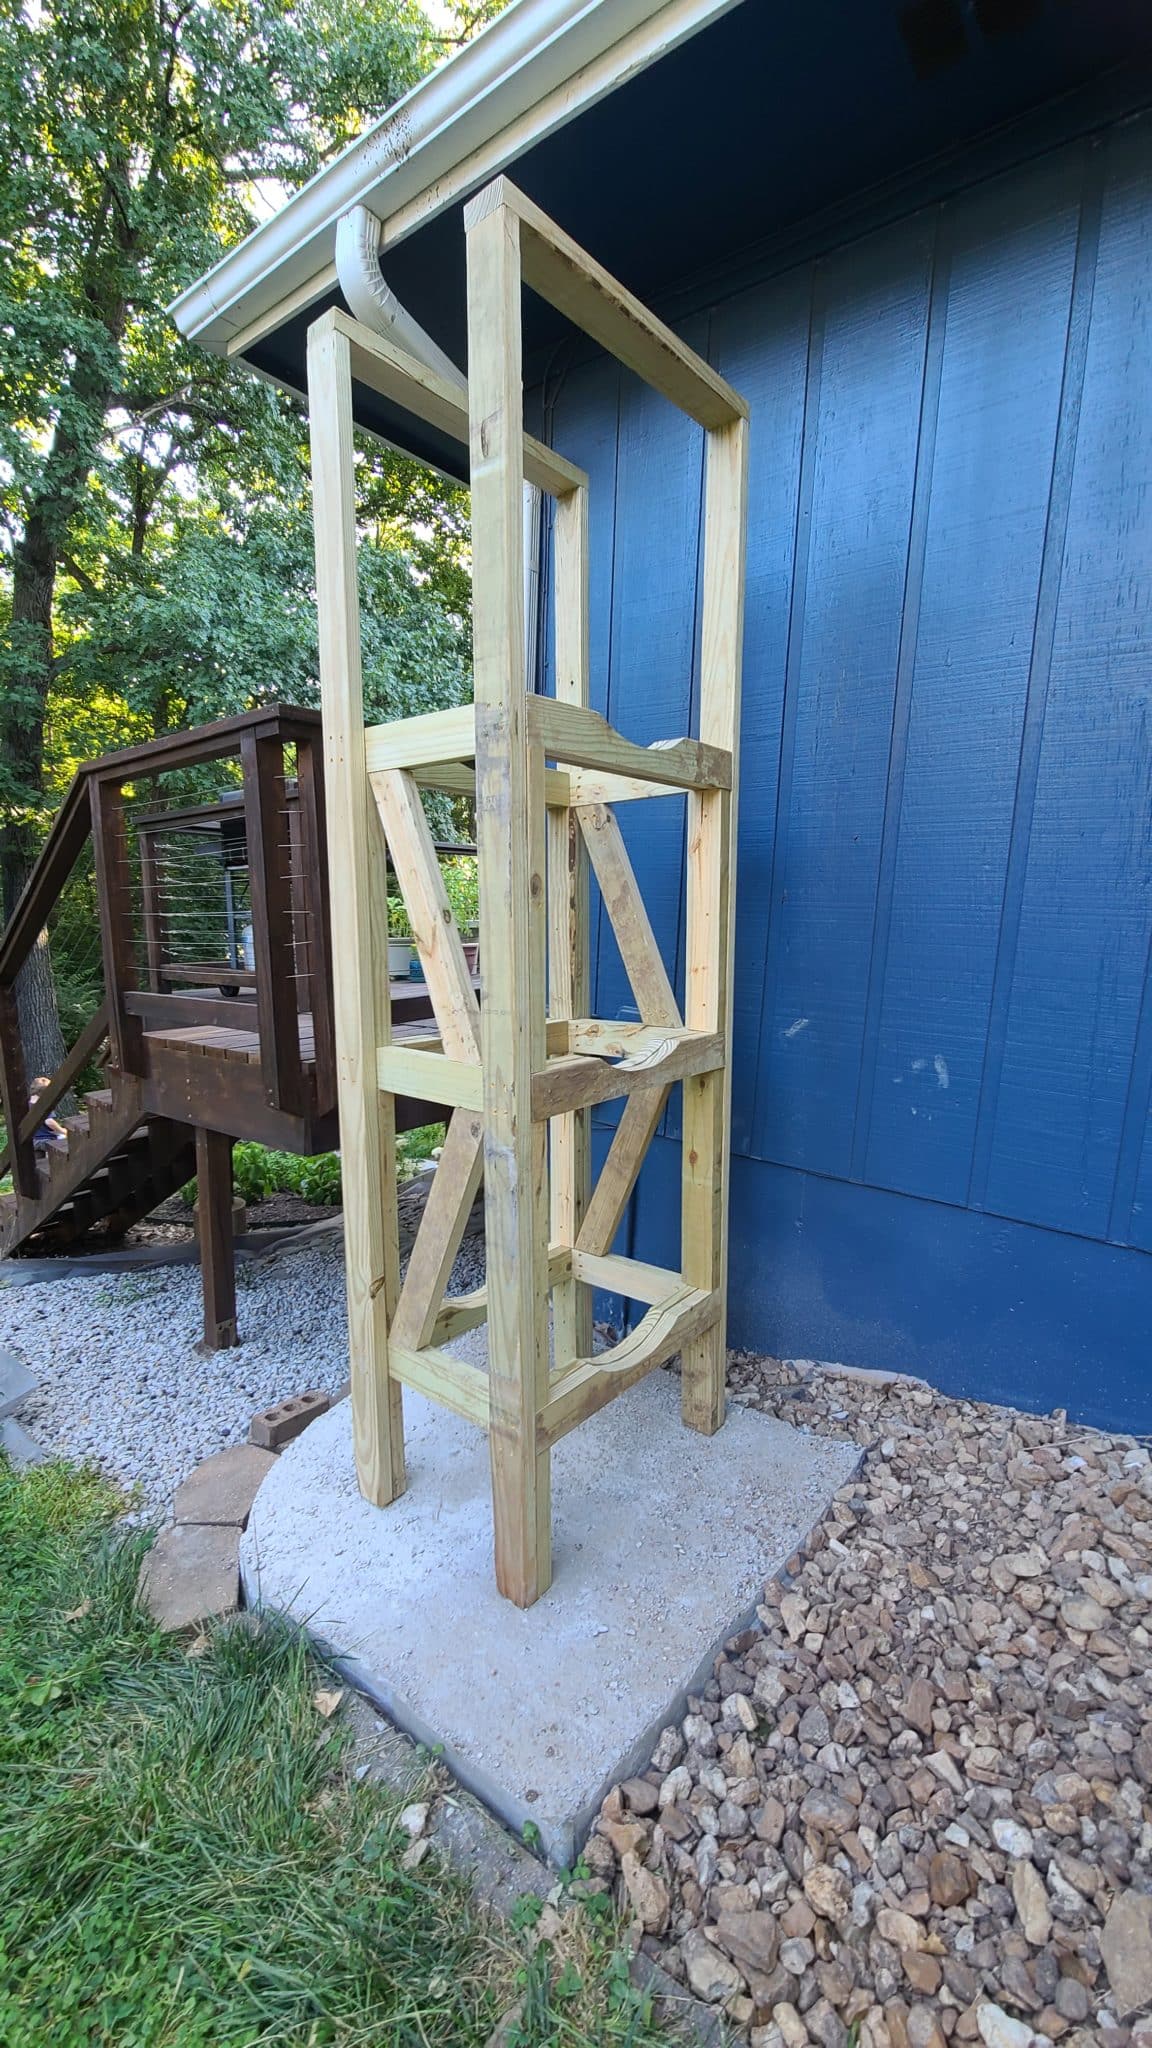
The best location for this rain barrel system is near an existing downspout to limit any issues harvesting water. If your property is on a hill, pick a downspout on the higher side of the property. Otherwise, you won’t have any water pressure in your hose when you go uphill.
These barrels will be extremely heavy, so it is important the location you pick be level and strong. I recommend pouring a small concrete pad or using premade deck post footings. If that’s not an option for you, then try to create a level bed of gravel and place several boards across the bottom of the feet. This will help to distribute the load and prevent it from sinking into the ground.
Since our house is on a slope, we chose to tie into one of the two gutters on the uphill side of our home. One of these two gutters was located next to our gas meter, which has clearance zones you can’t put structures by. This left us with only one option. Unfortunately, it is the gutter farther from our garden, but this won’t cause much loss in water pressure. It just means we will ultimately need a longer hose to water our plants. Try to keep factors like this in mind when choosing a location for your rain barrel system.
Hubby Tip – Don’t use leftover fast setting concrete just because you have it laying around. You’ll end up with a pretty ugly looking slab that sets up before you can get it fully level and smooth….we’ve learned from experience with this project.
Step 3: Cut Wood to Length
Now with materials purchased and a location chosen, it is time to start construction. Begin with cutting all the boards to length. All of the cut dimensions and quantities can be found in our plan set. There is also a convenient cut guide showing you how to maximize the nesting of your pieces in order to minimize your scrap. It’ll also save you an extra board you have to buy.
Repetitious Straight Cuts
The majority of the frame boards use simple straight 90 degree cuts. For these boards, I highly recommend using a miter saw for its convenience, accuracy, and repeatability. Since there are multiples of each board, set up a stop block by clamping some wood near your miter saw.
This lets you set the block once and then make multiple cuts to the same dimension without having to measure and mark each board individually. This is especially helpful if you are cutting all of the boards for the decorative cover.
If you don’t have a miter saw, then you can use a jigsaw or other saw capable of making straight cuts. I just recommend using a framing square to ensure all of the cuts stay straight and true to 90 degrees.
Cutting Angled Boards
There are 4 boards that need to be cut at an angle. They will be installed as a cross member in the frame to form a truss. This simple addition adds a lot of strength and rigidity to the frame and allows it to resist strong winds or the occasional bump.
To cut these boards, mark the angle on your board and then cut it out using either your miter saw or jigsaw. This can be a bit trickier to get right. Take your time here to measure and mark all the boards so you cut the right angle and the right length. Using a triangle or angle tool helps to get an accurate angle.
Cutting the Barrel Supports
Finally, you will need to cut the boards that hold the water barrels. These boards have an arc cut into them for the barrels to sit in to help support the weight better. To make this cut easier, there’s a template to use in our plans.
Print out this template at a 1:1 scale. Then cut out the template and use it to trace the cut pattern onto each of your parts. Once all of the pieces are marked, use a jigsaw or bandsaw to cut along this line giving the pieces the arc they need.


With that, you are done with all of your cuts!
If you have any jagged edges from cutting, quickly take some rough grit sandpaper and knock the edges smooth. Since this is an outdoor piece used for its utility, we aren’t going to bother with sanding the entirety of the boards.
This is especially true of the framing boards since they are made of pressure-treated wood. We always recommend wearing a mask when sanding, especially with pressure-treated wood because it contains chemicals that can be especially hazardous when in dust form. Be sure to clean up all of your sawdust from your project and dispose of it responsibly.

Step 4: Assemble The Frame
The assembly of this frame is pretty straightforward. We are going to build the frame from the ground up to ensure everything fits tightly together. This allows the weight to transfer from board to board instead of putting load on your fasteners.
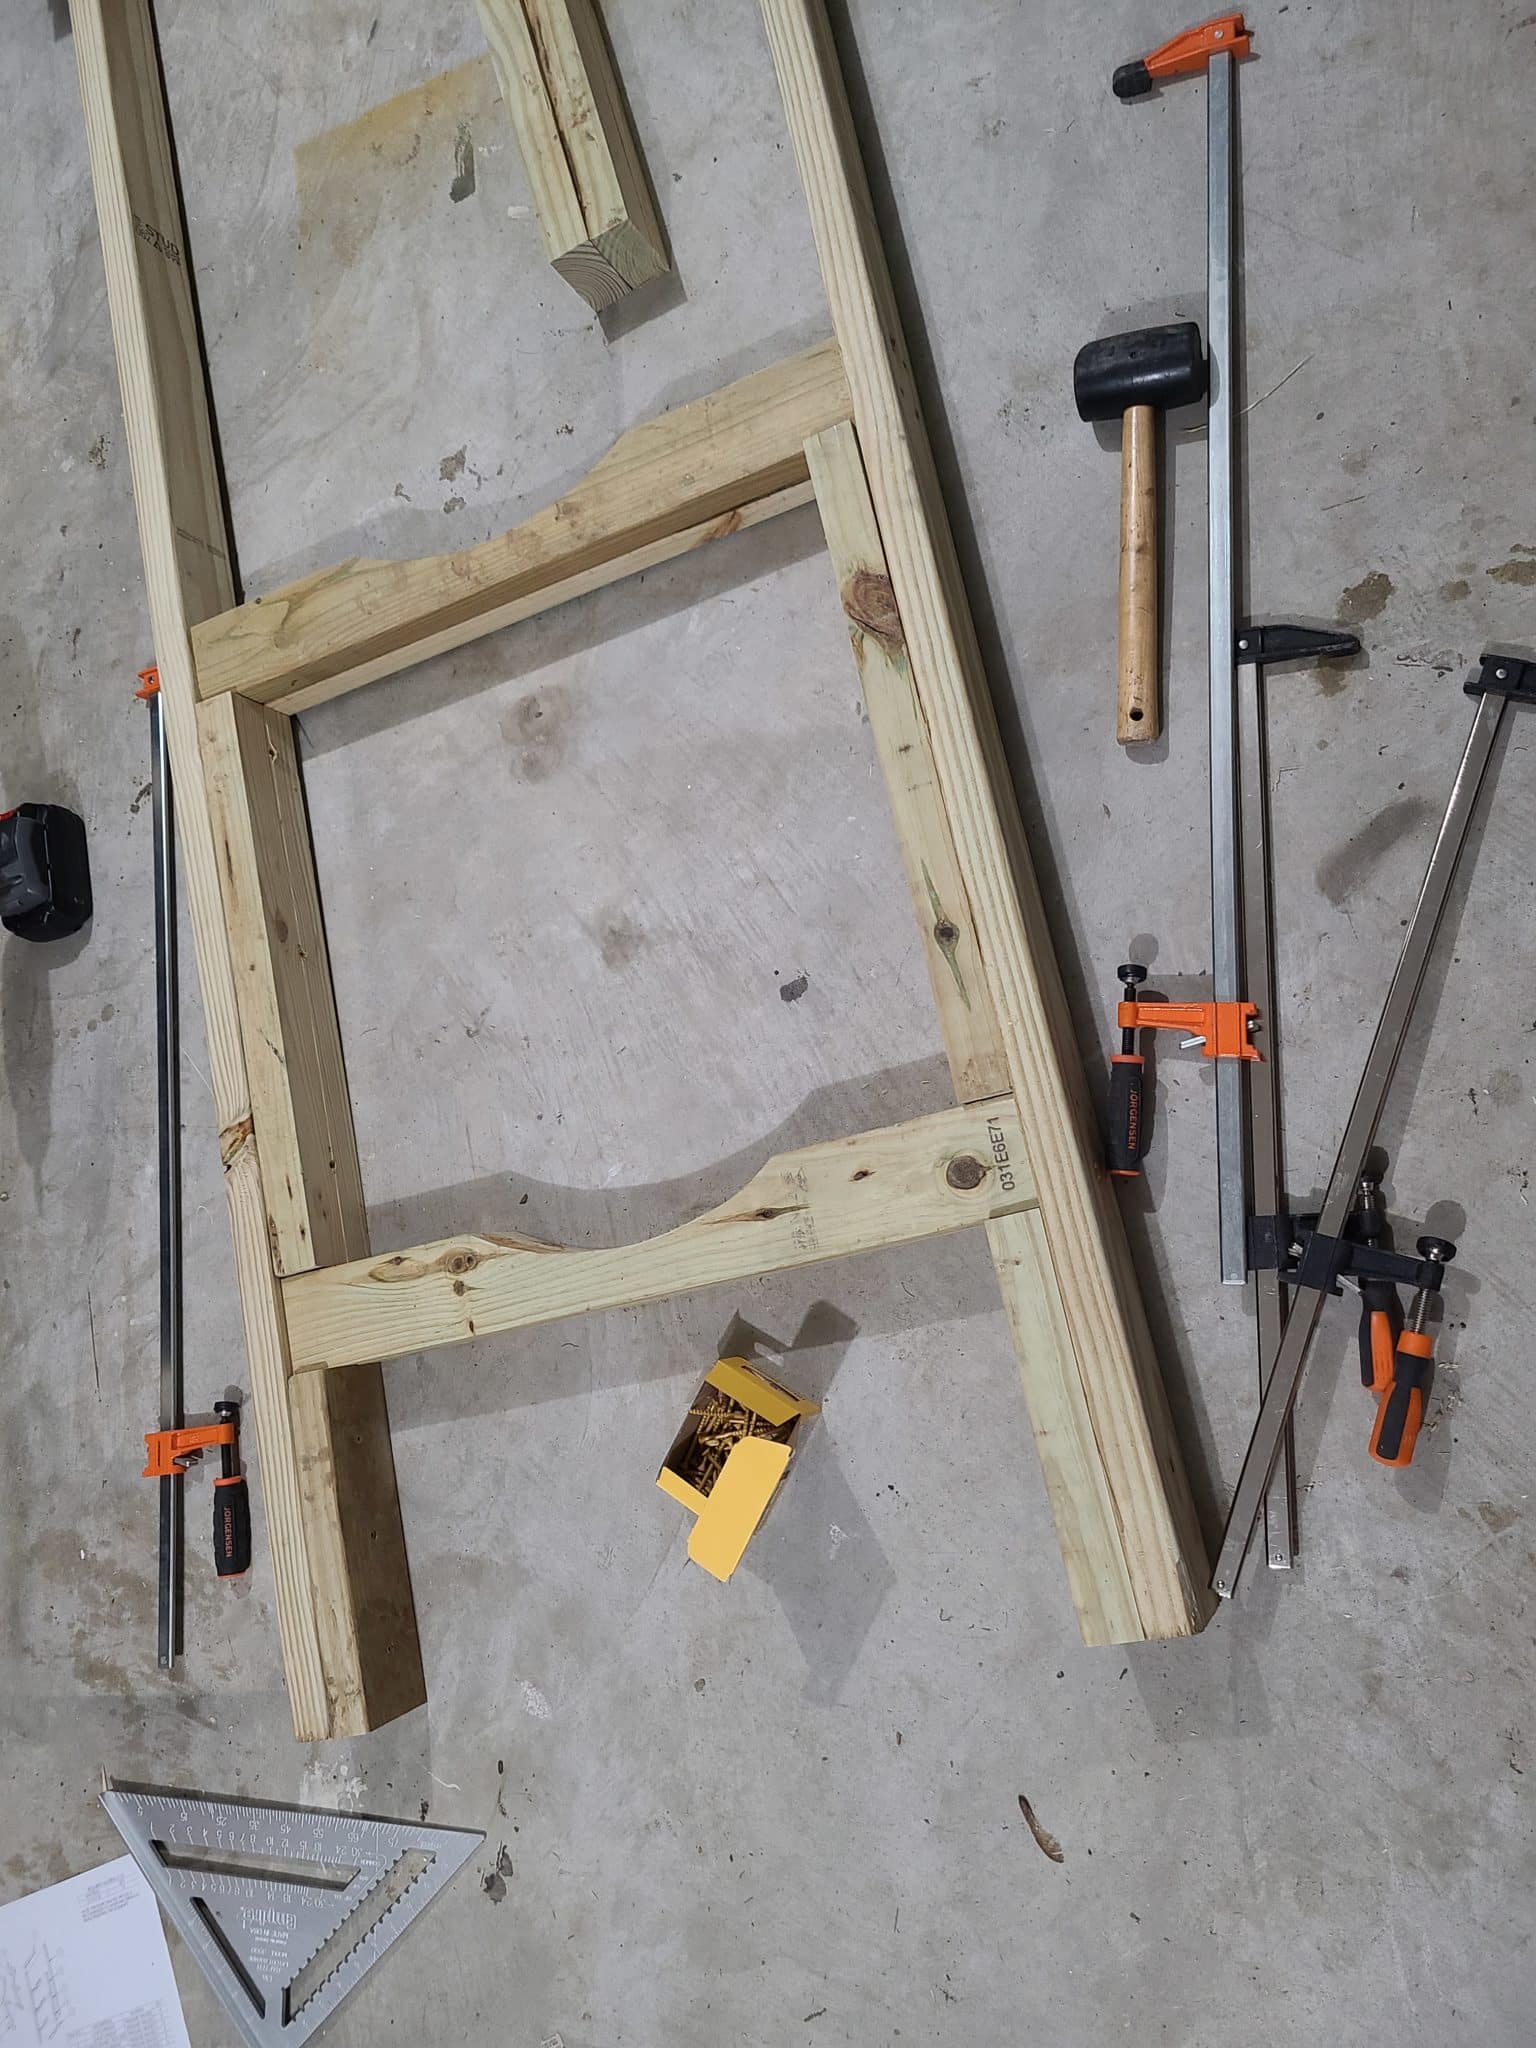
Assemble Legs
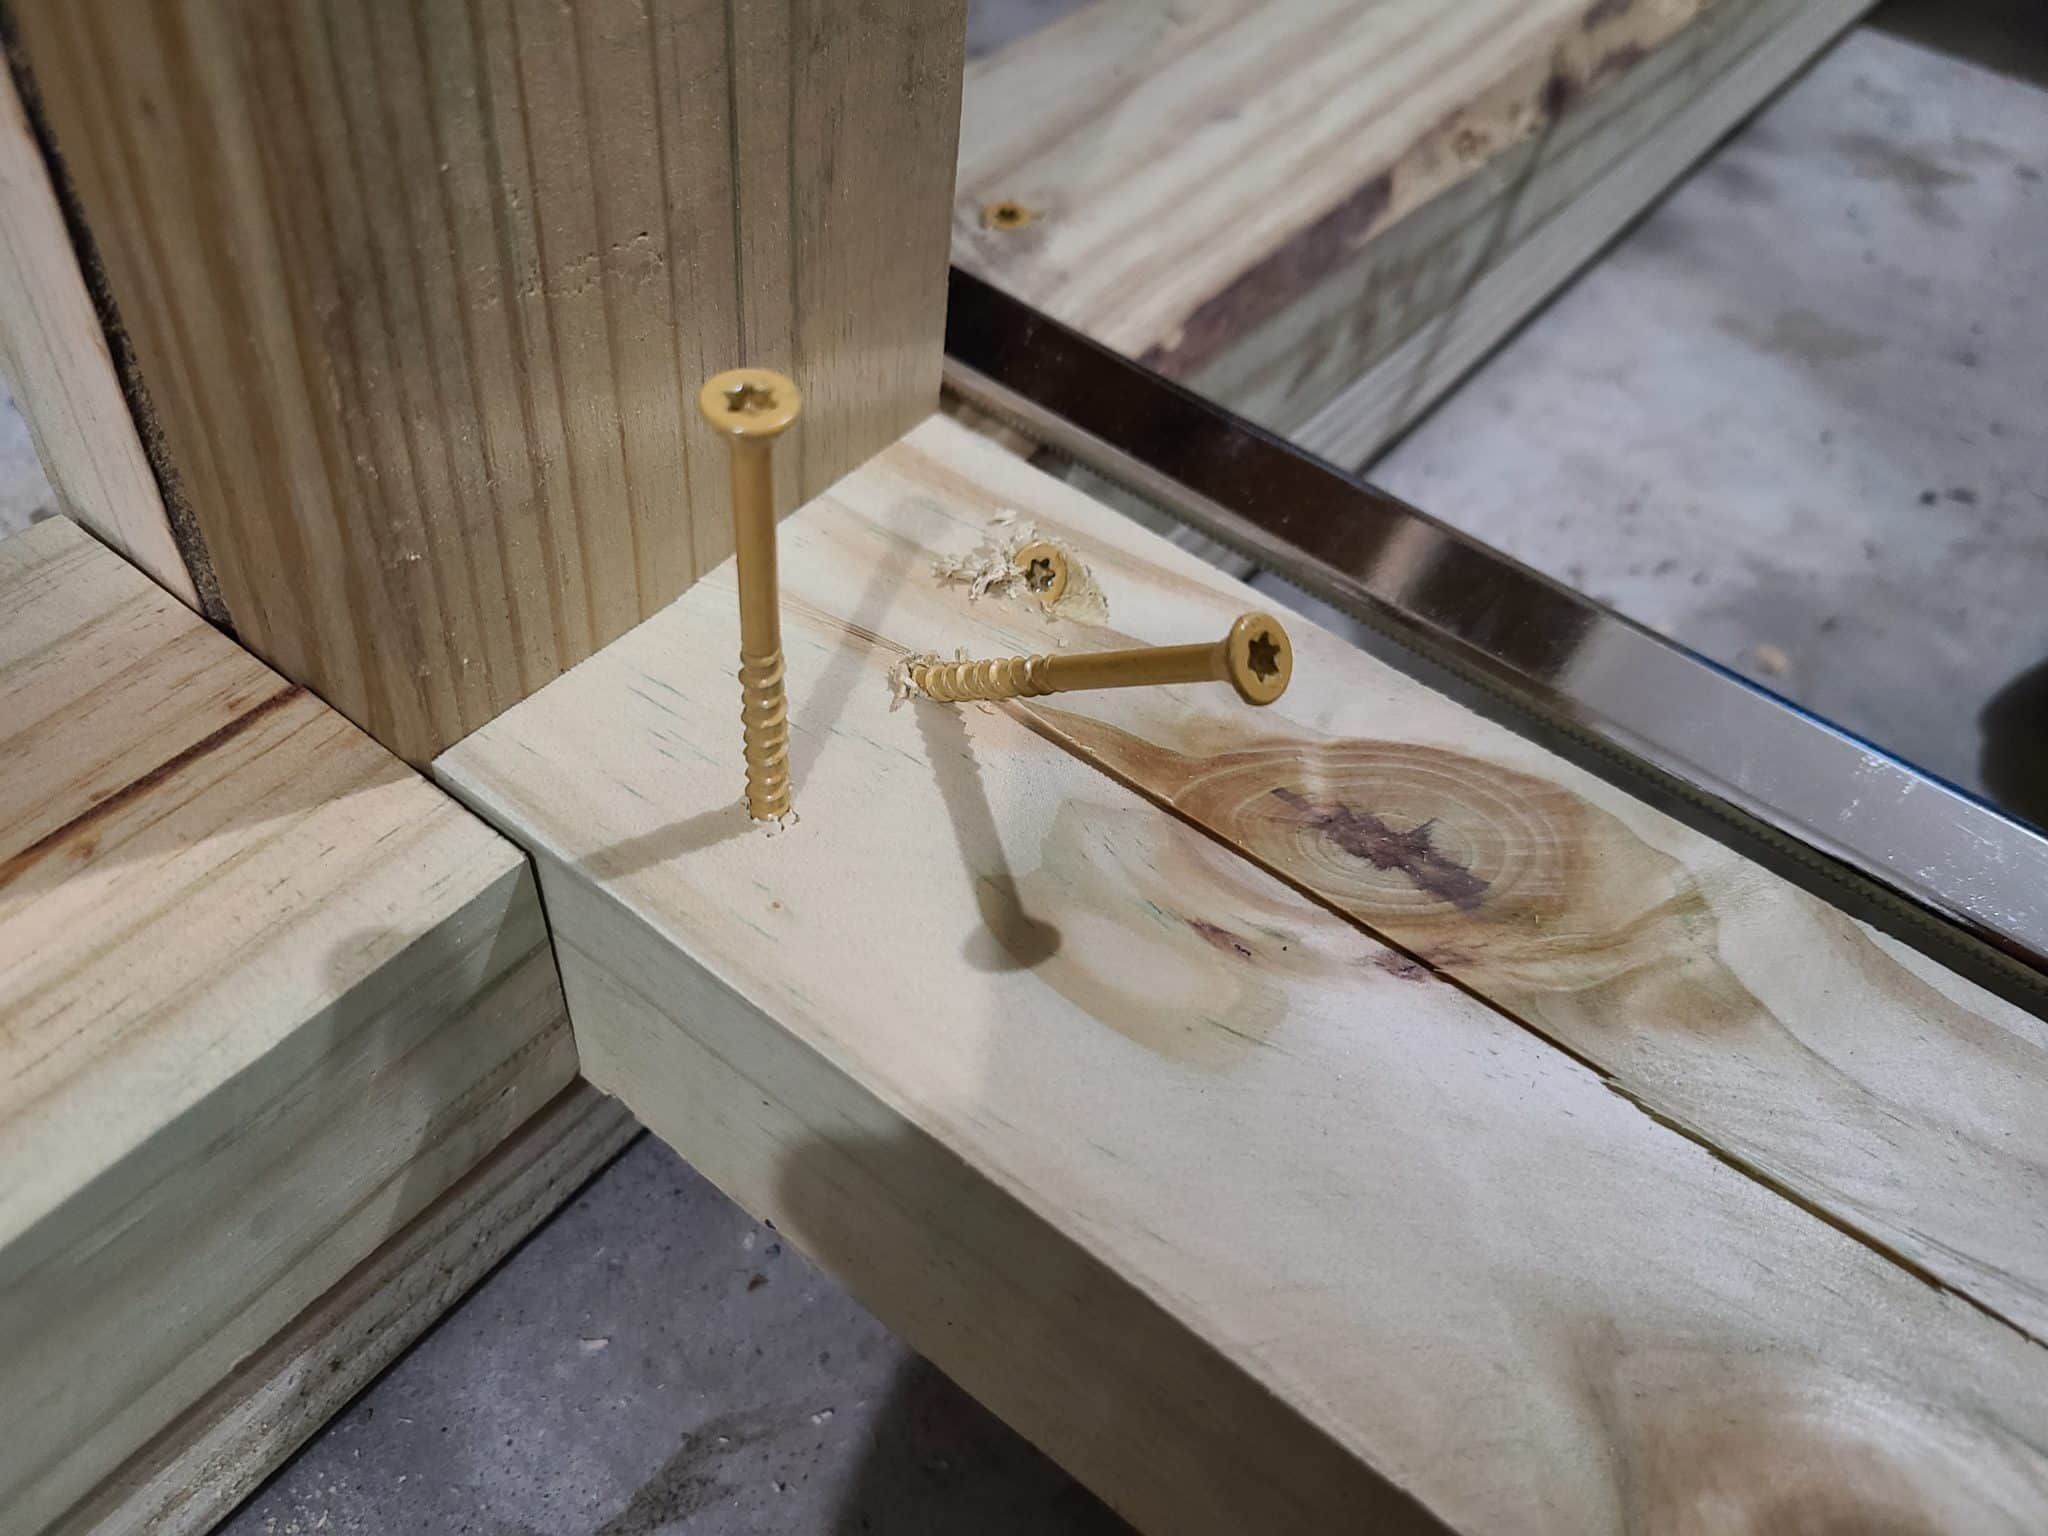
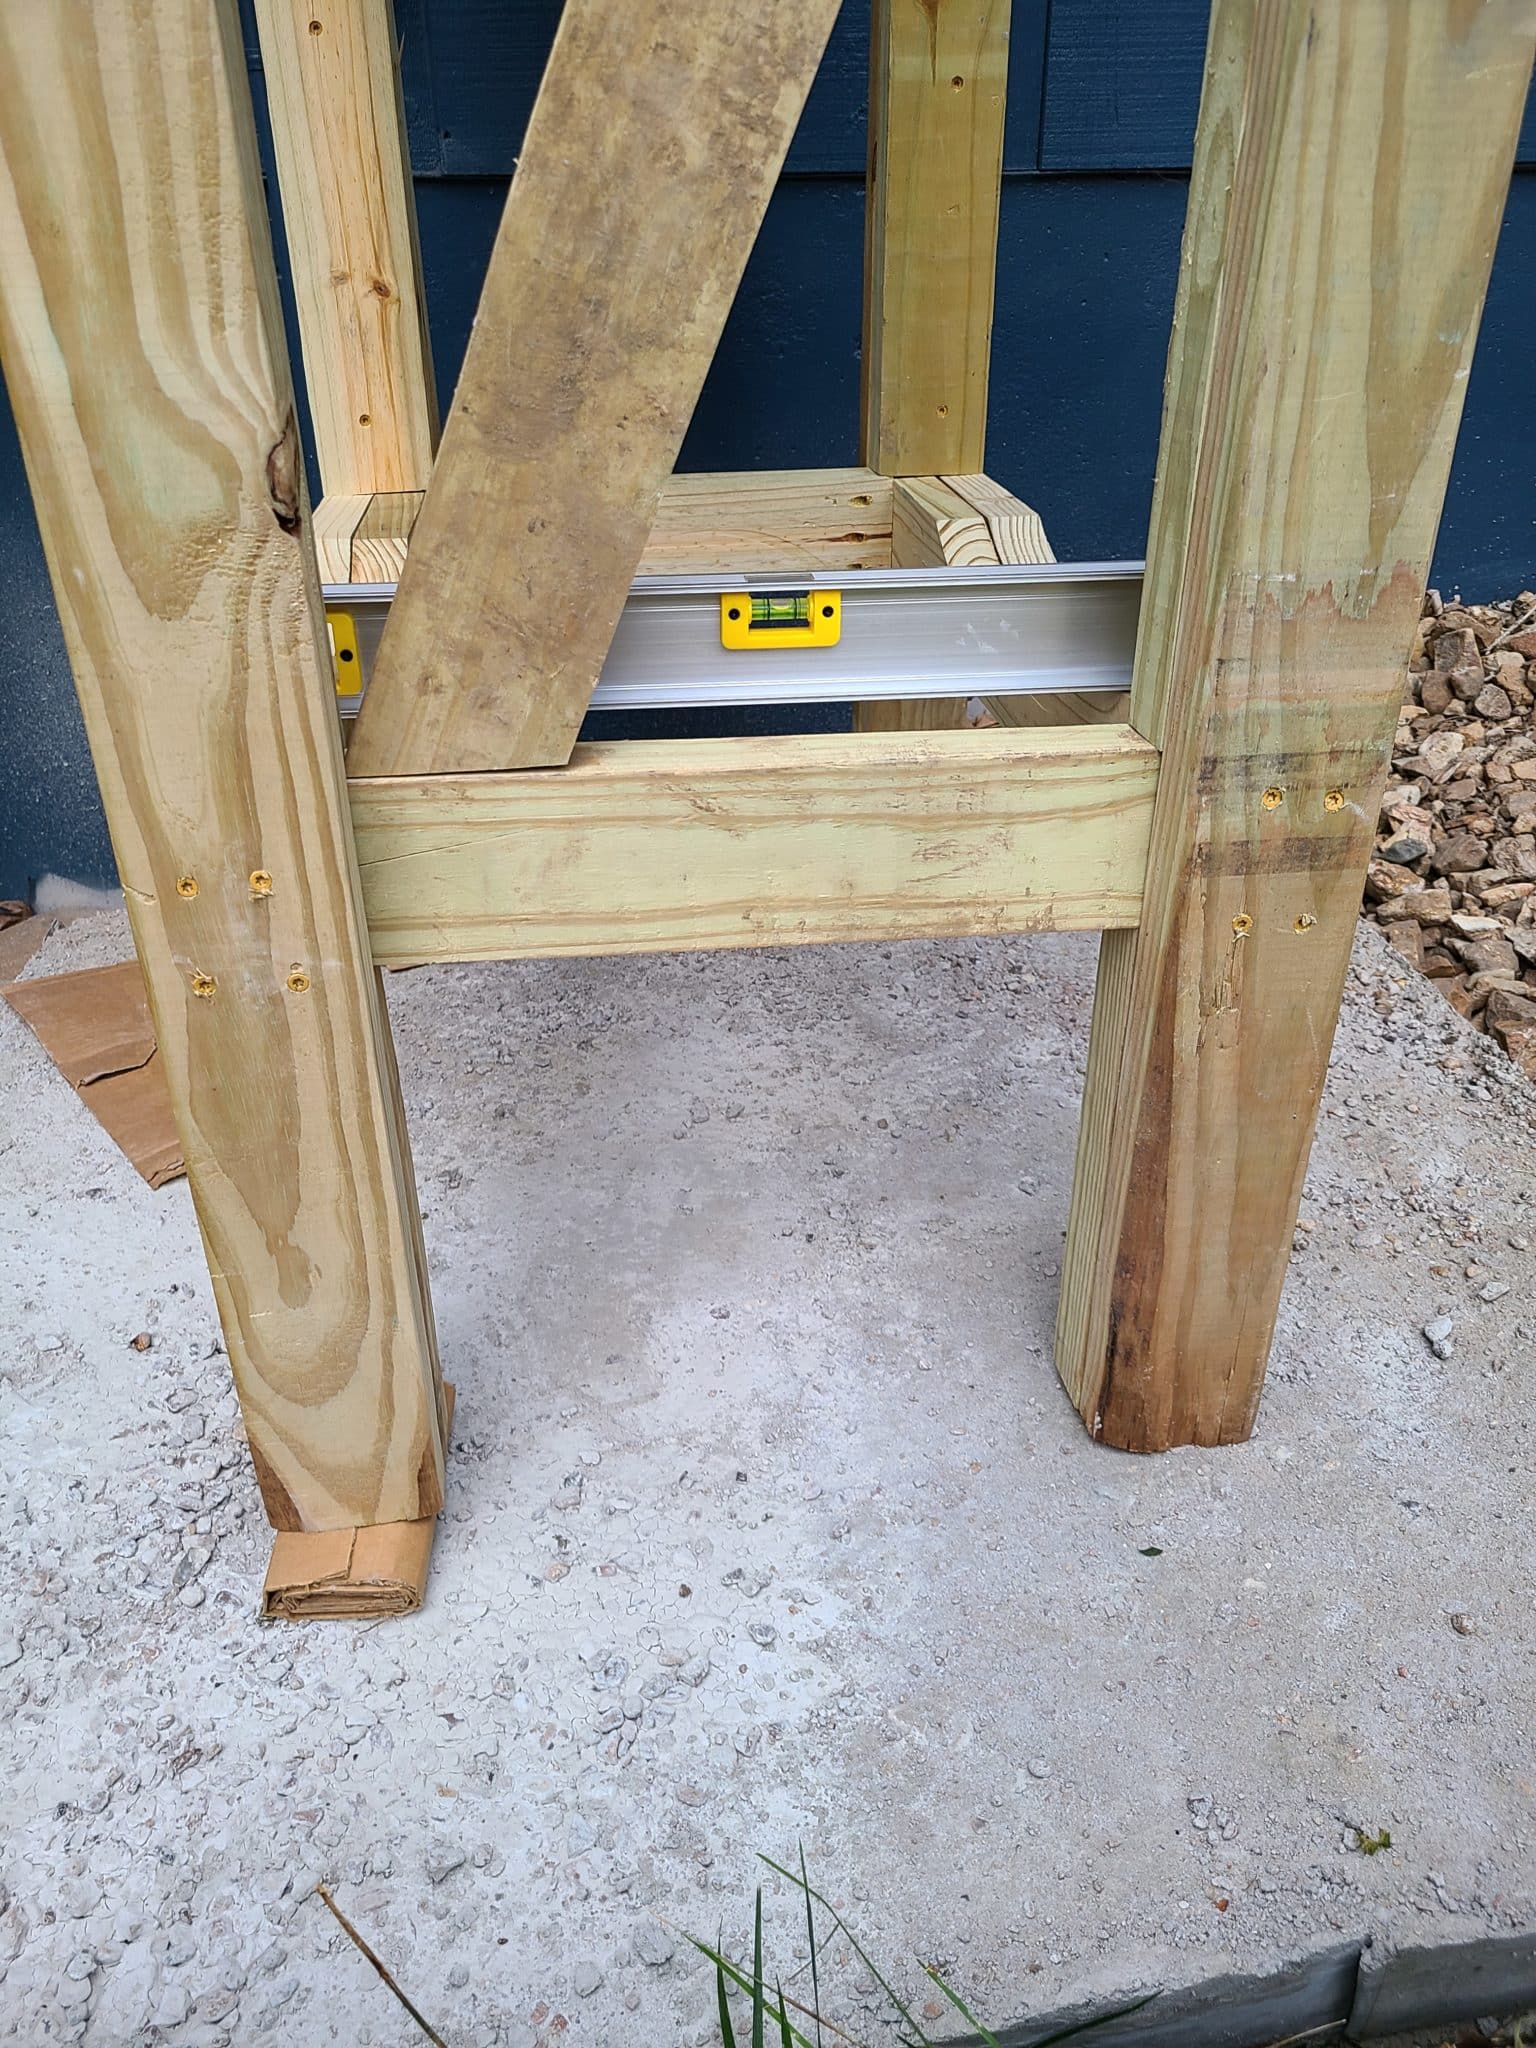
Begin by attaching the Bottom Upright to the end of each Long Upright using 3 screws each. This gives us the foundation for the legs. Be sure the bottom edges of these boards are aligned by using a scrap piece of wood as a stop face you can align to.
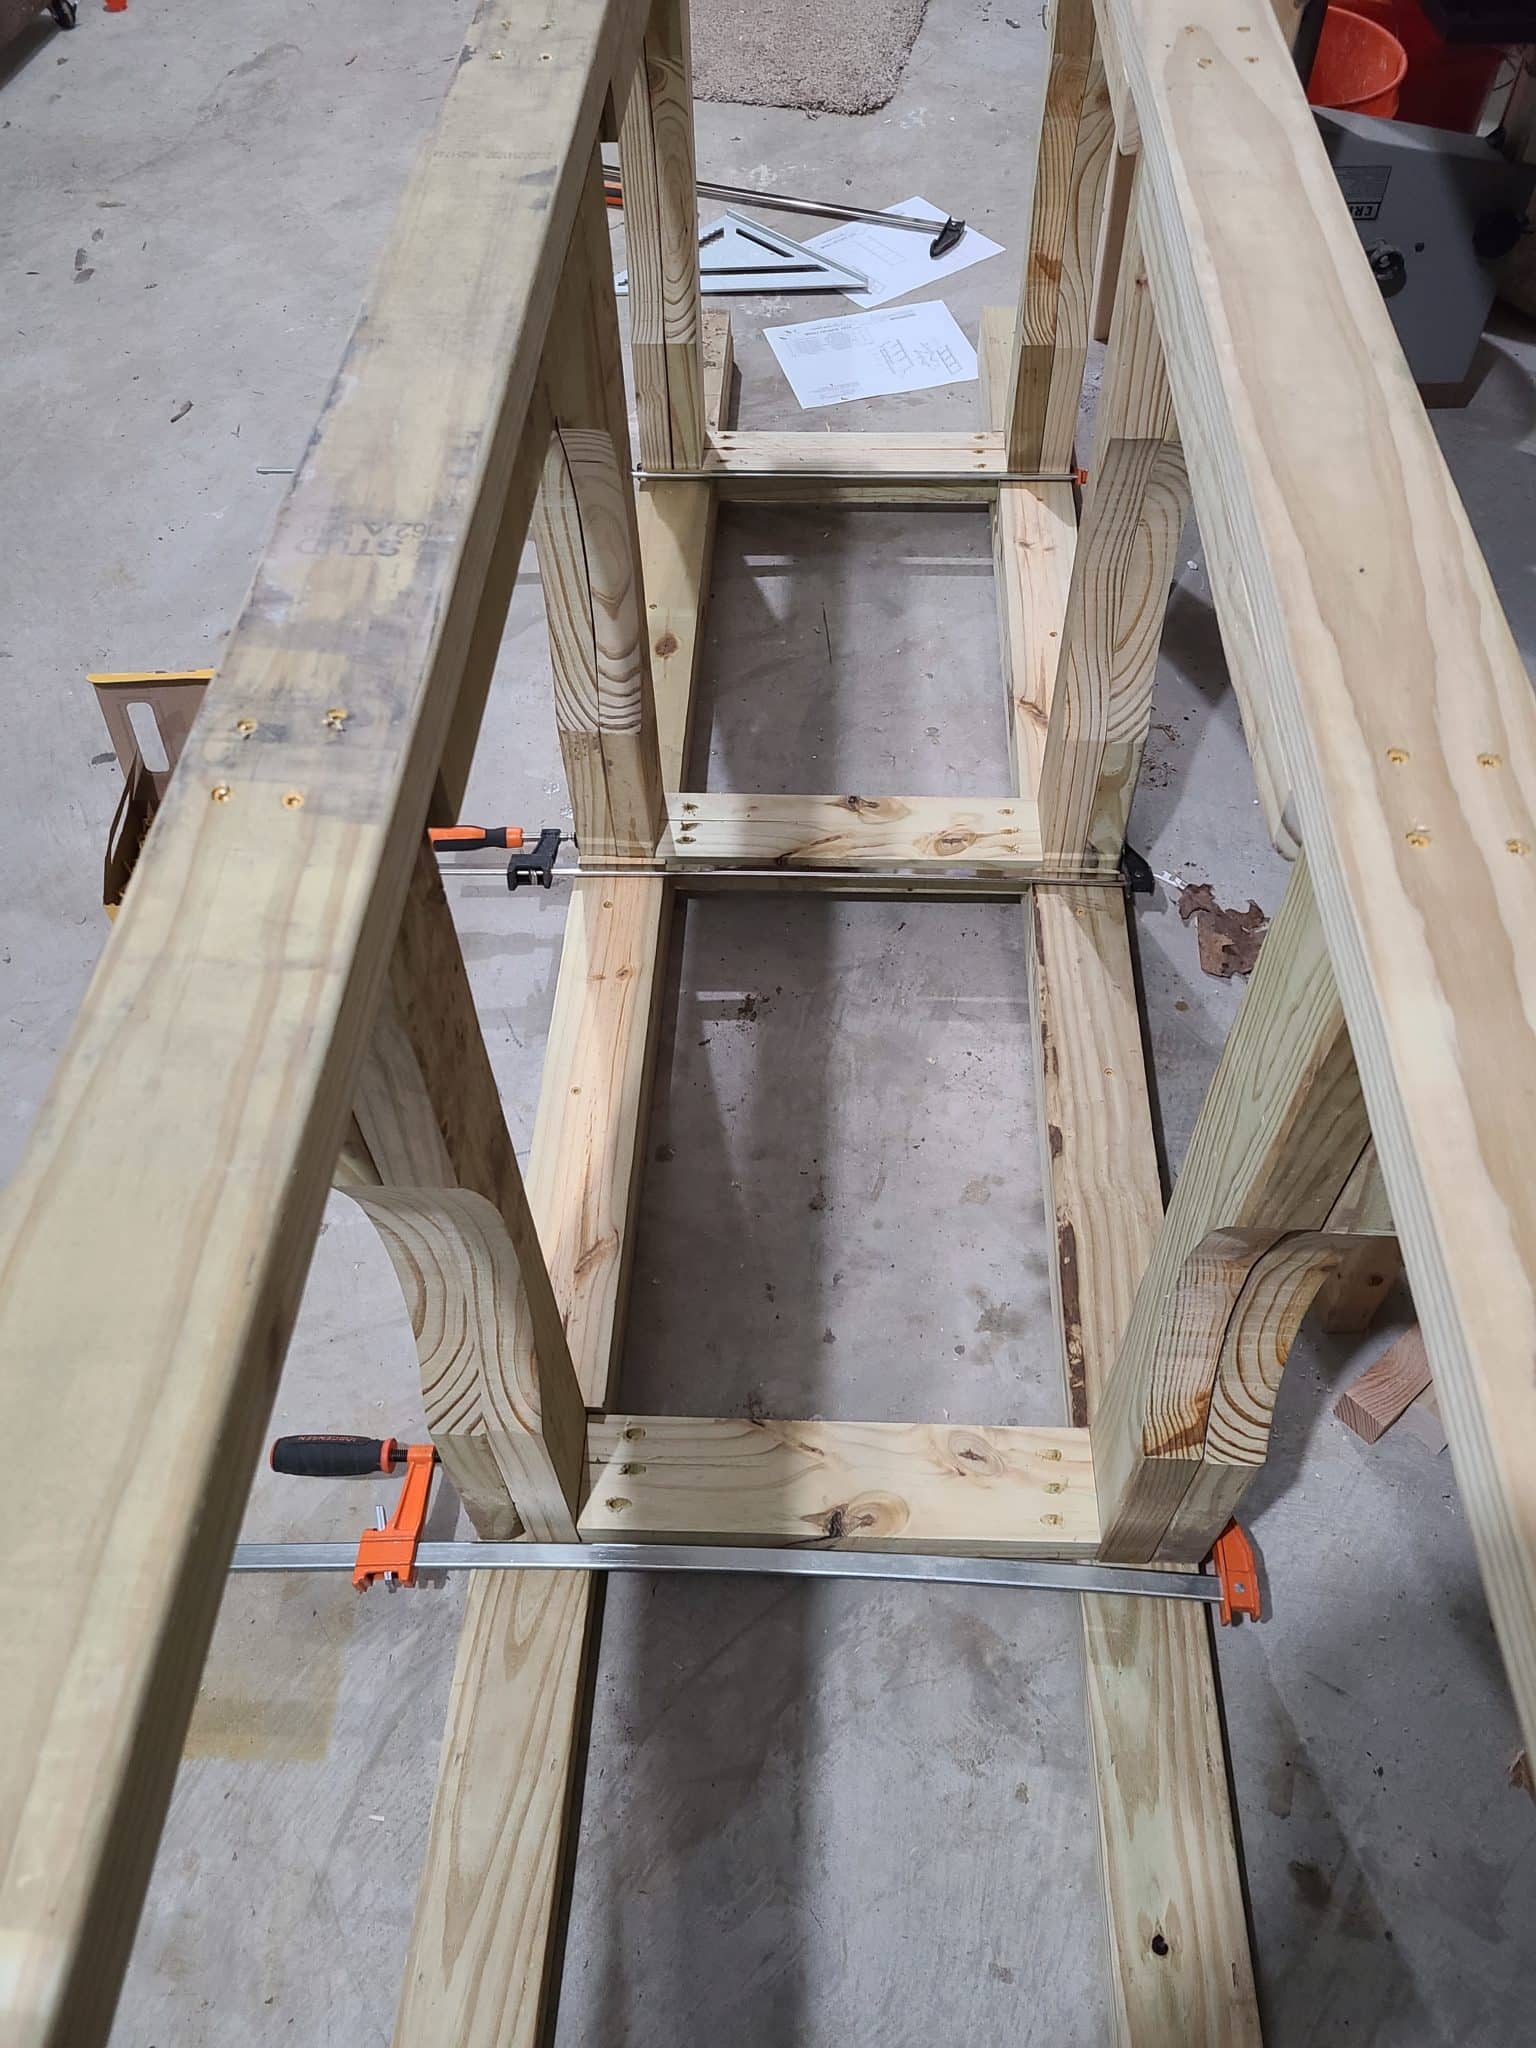
Once those boards are assembled, lay down pairs of legs facing each other. Place two of the Notched Cross Boards on top of each other. Then insert them between the two Long Uprights and position them on top of the Bottom Uprights.
A pair of clamps to keep everything tight and pulled downward can be quite useful here. An additional clamp can be used to clamp across from one Long Upright to the other.
Note that since the bottom boards are resting on the floor, there is a ½” gap between their face and the edge of the long upright. We will use this gap in a moment, so be sure to keep it there.
Once you have everything positioned, drive two screws through the face of the Long Uprights and into the ends of each Notched Crossboard. For added rigidity, you can also drive a few screws into the face of one of the Notched Cross Boards to tie the two together.


Repeat that process for the second pair of legs. And just like that, you have your first rain barrel tier done! But why stop there? Onward and Upward!
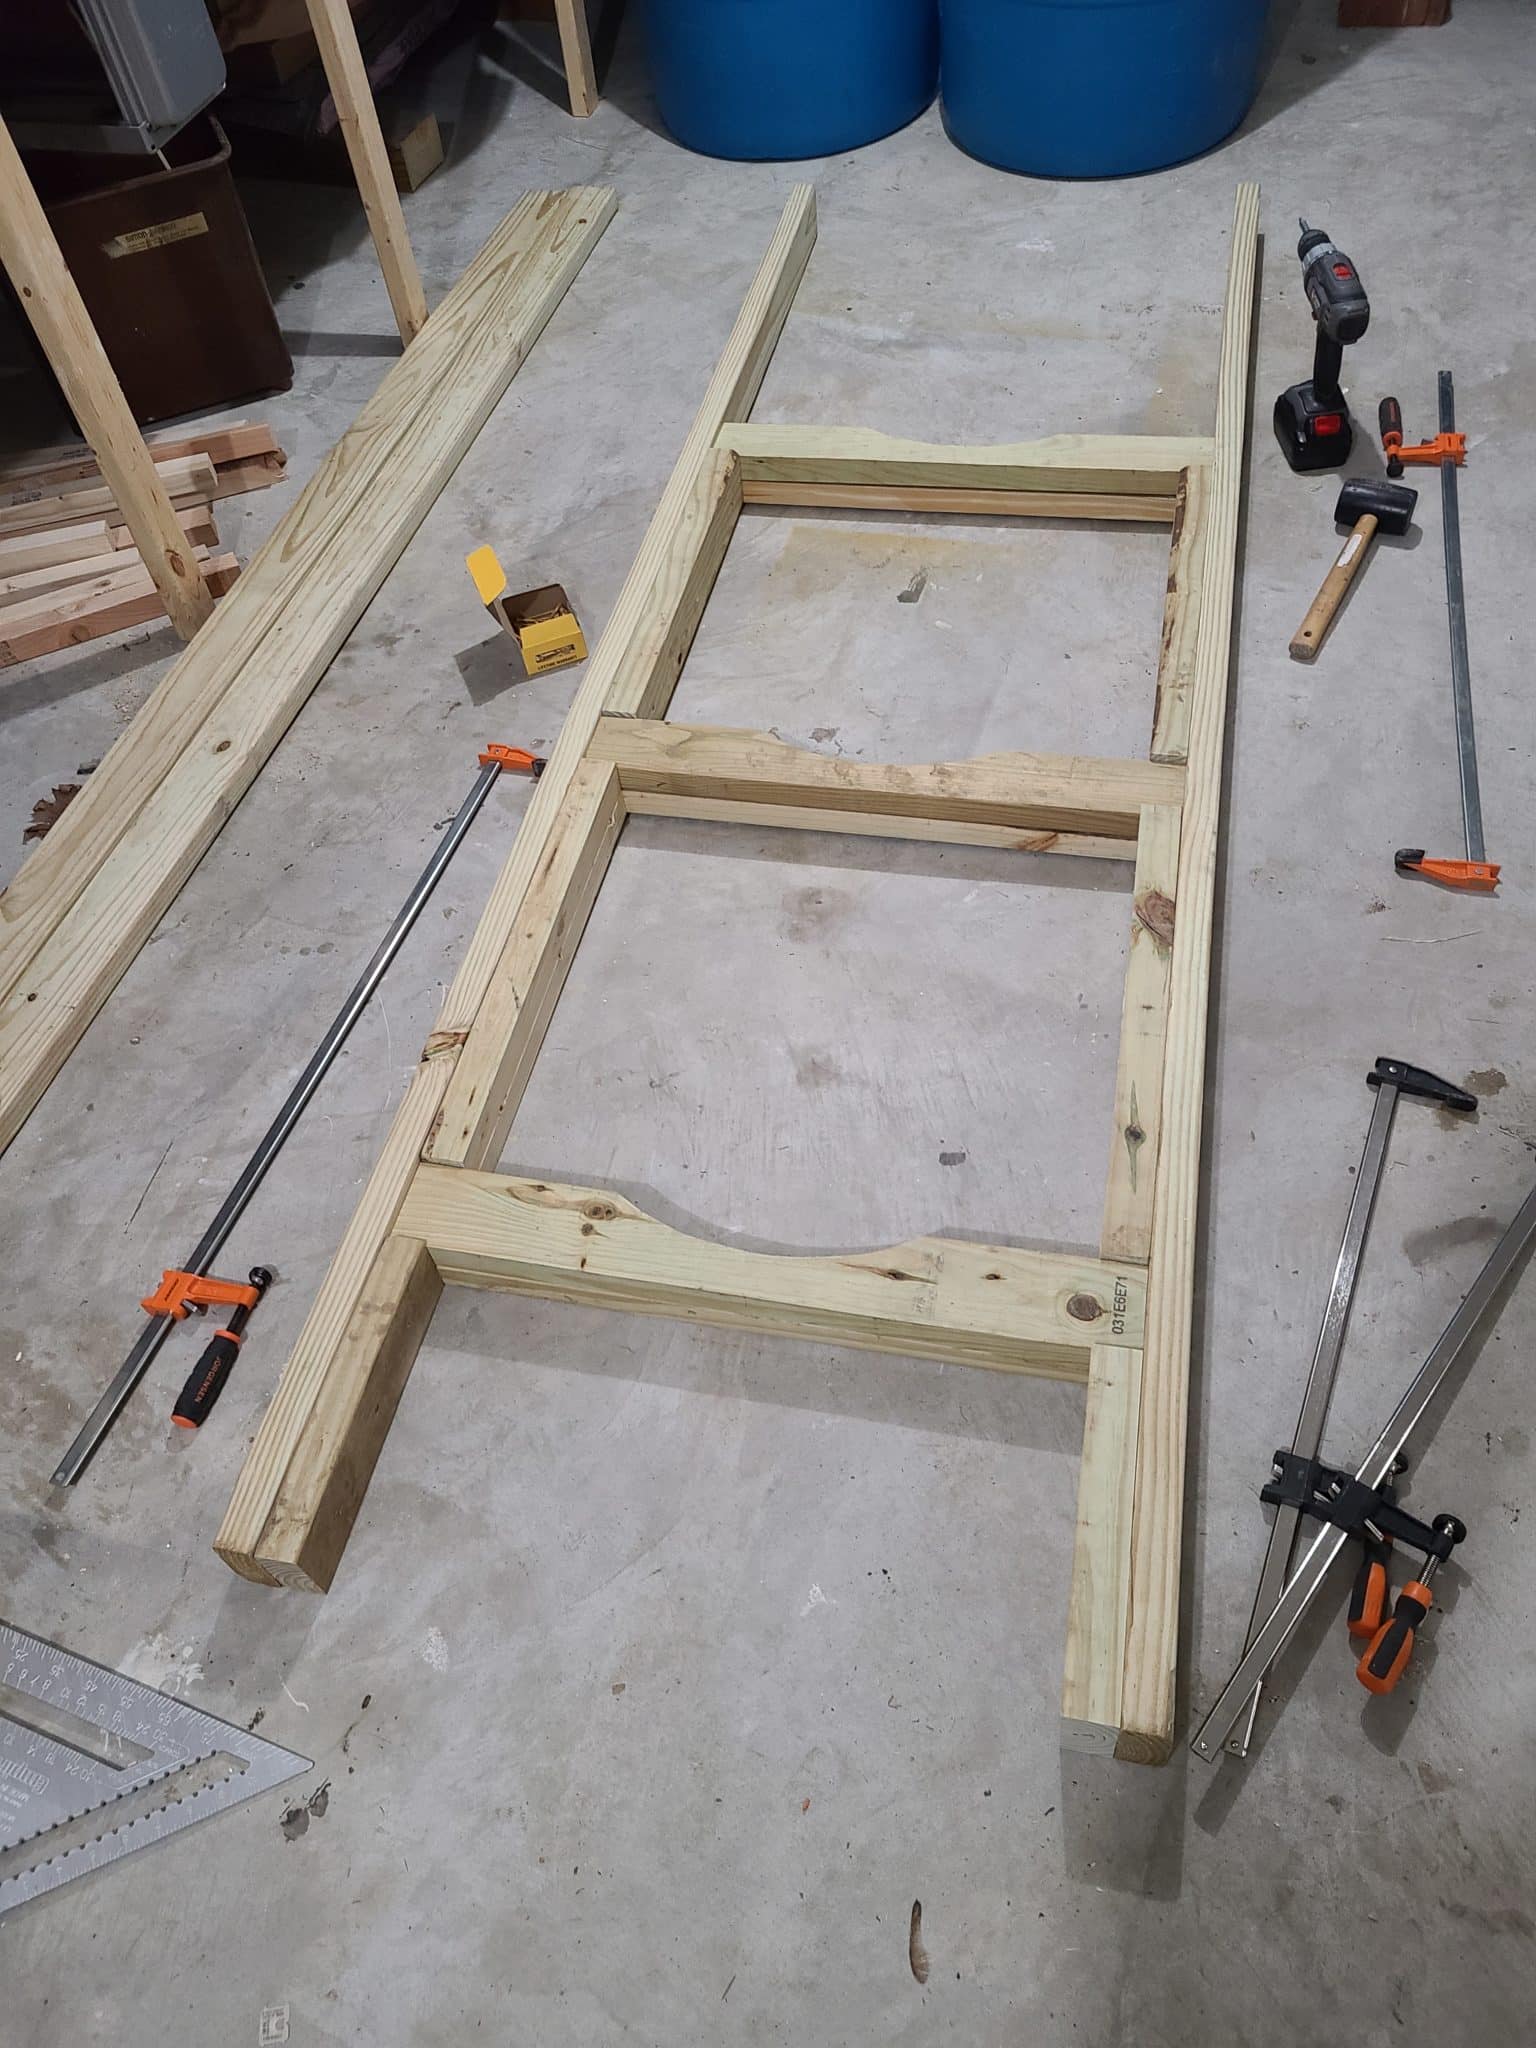
Stacking Frame Pieces
Now continue up the stack on each pair of legs by placing a Short Upright against each Long Upright and above the Notched Cross Boards. Don’t screw these boards in just yet.
Instead, place another pair of Notched Cross Boards on top of them just as we did before. Now use your clamps to pull everything tight together by clamping from one set of Notched Crossboards to the other. Add another clamp to pull the Long Uprights towards each other. A final pair of clamps can be used to pull the two Short Uprights tight against their Long Uprights.
Now with everything all clamped together and tight, it’s time to start screwing it together. Drive 4 screws into the face of each Short Upright to join it to its Long Upright. Then drive 2 Screws through the face of each Long Upright and into each end of each Notched Cross Board.
Repeating The Process
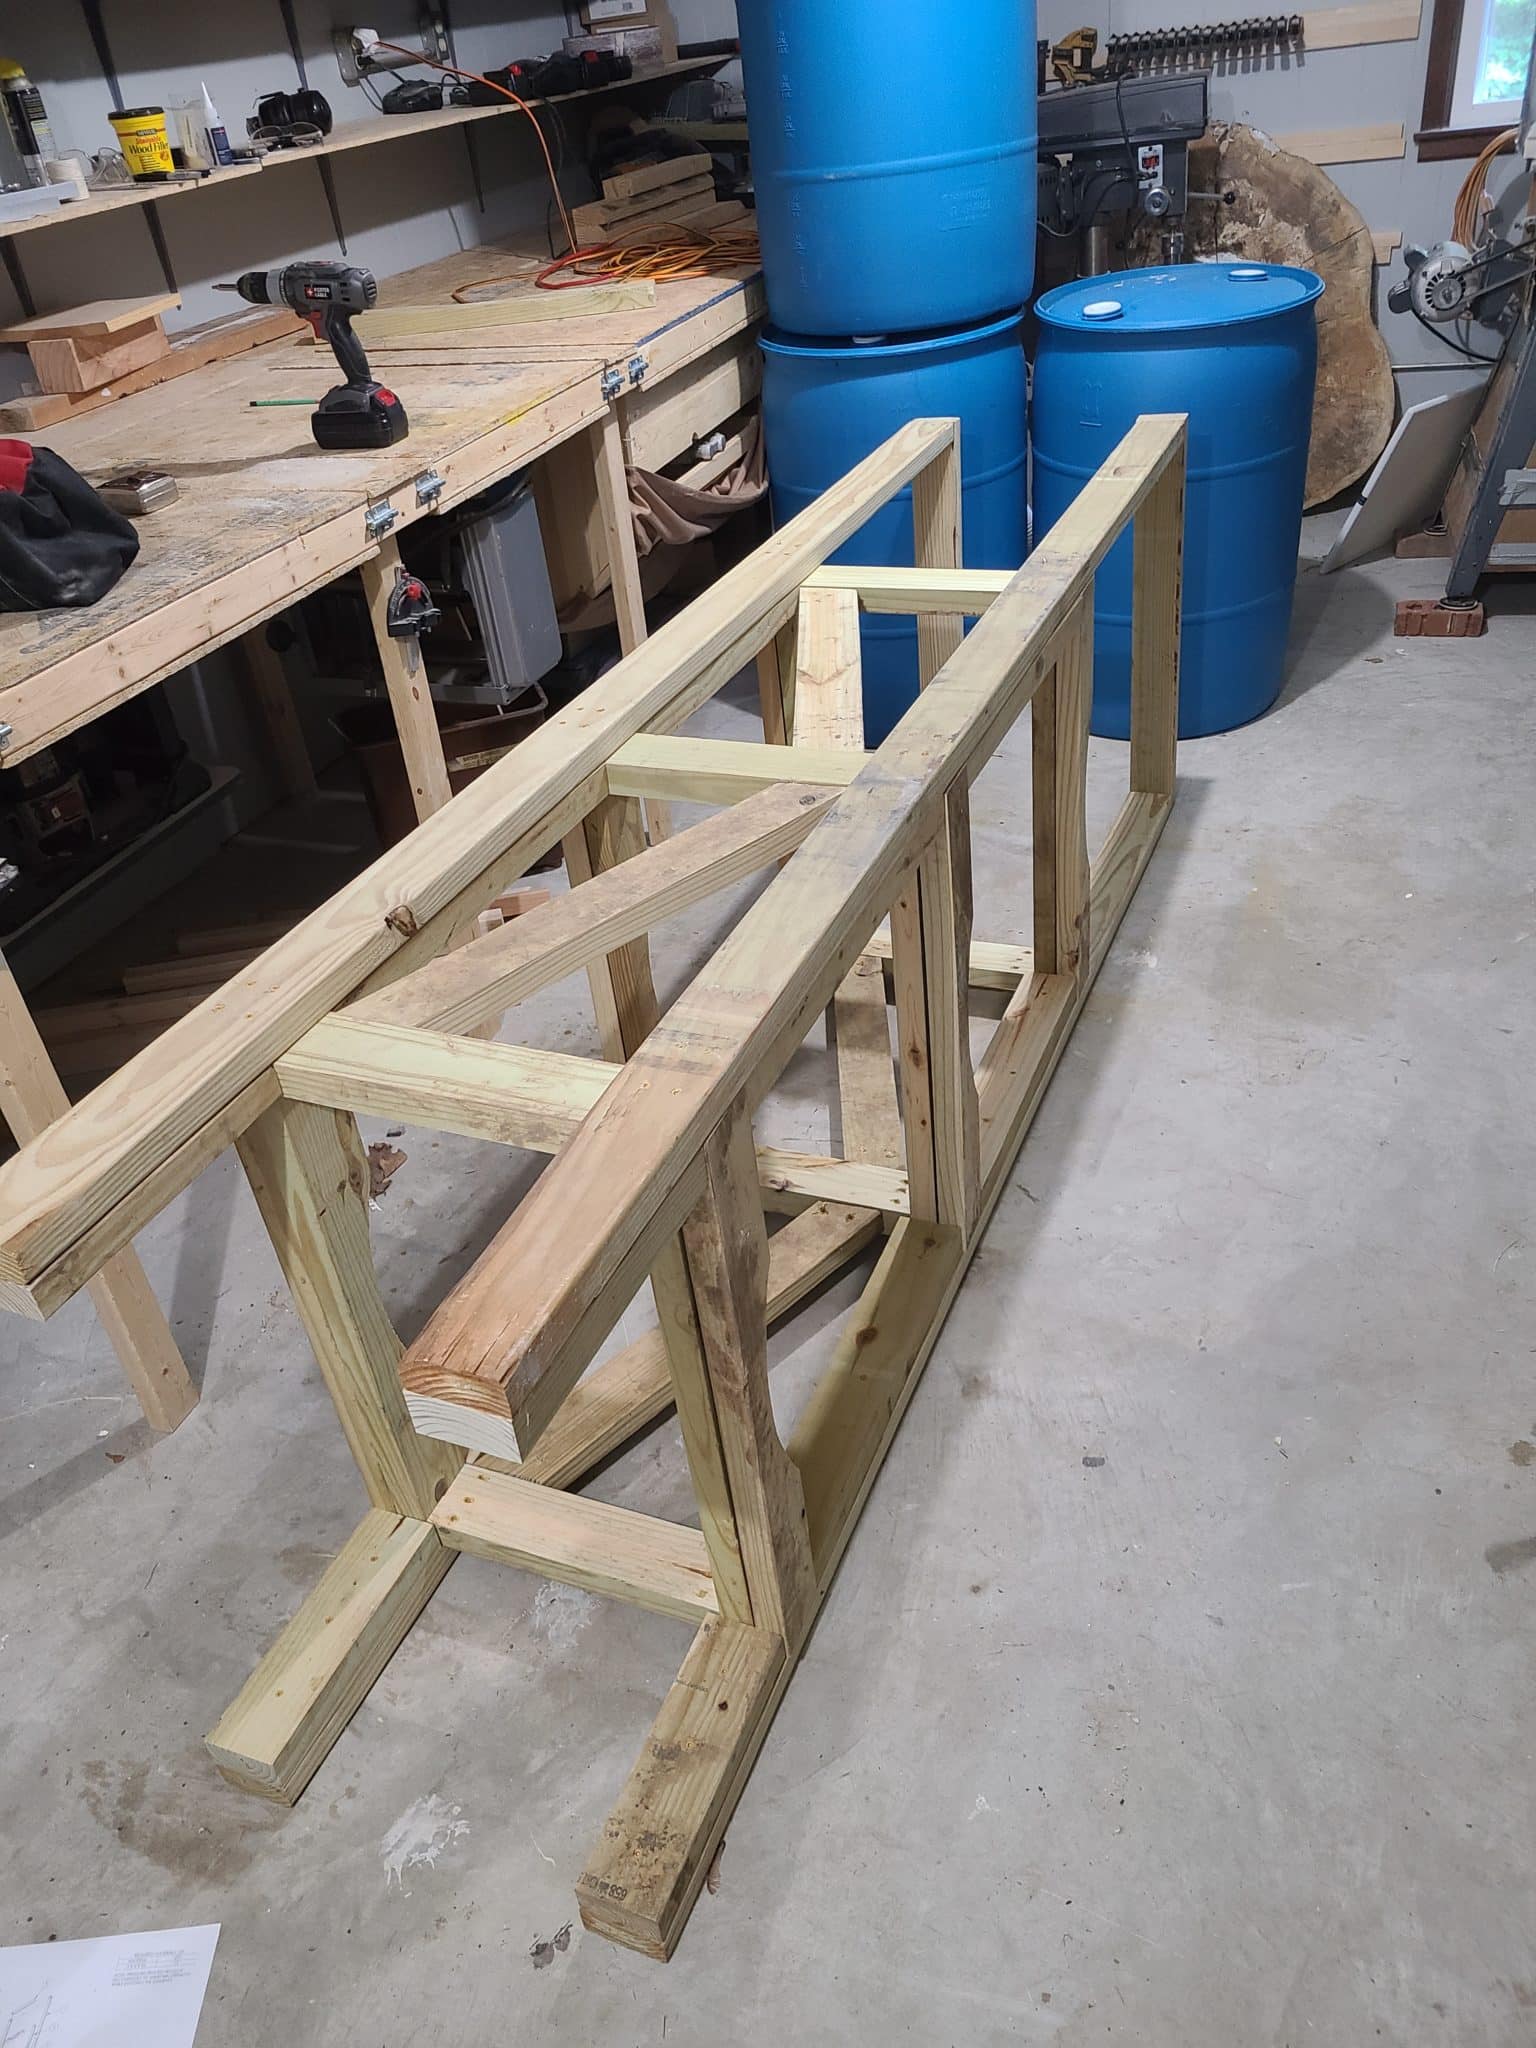
Repeat this process for the other pair of legs. Then repeat the process one more time for each pair of legs to install the upper tier of Notched Cross Boards. Finally, cap each pair of legs with a Top Cross Board.
This construction should feel rock solid to you. If you feel there is any play in any of the joints, then unscrew the boards, reclamp, and wring it out. You want everything tight. If you are still having difficulties, then try cutting some scrap boards into triangles and use them as gussets to add more rigidity to your build.
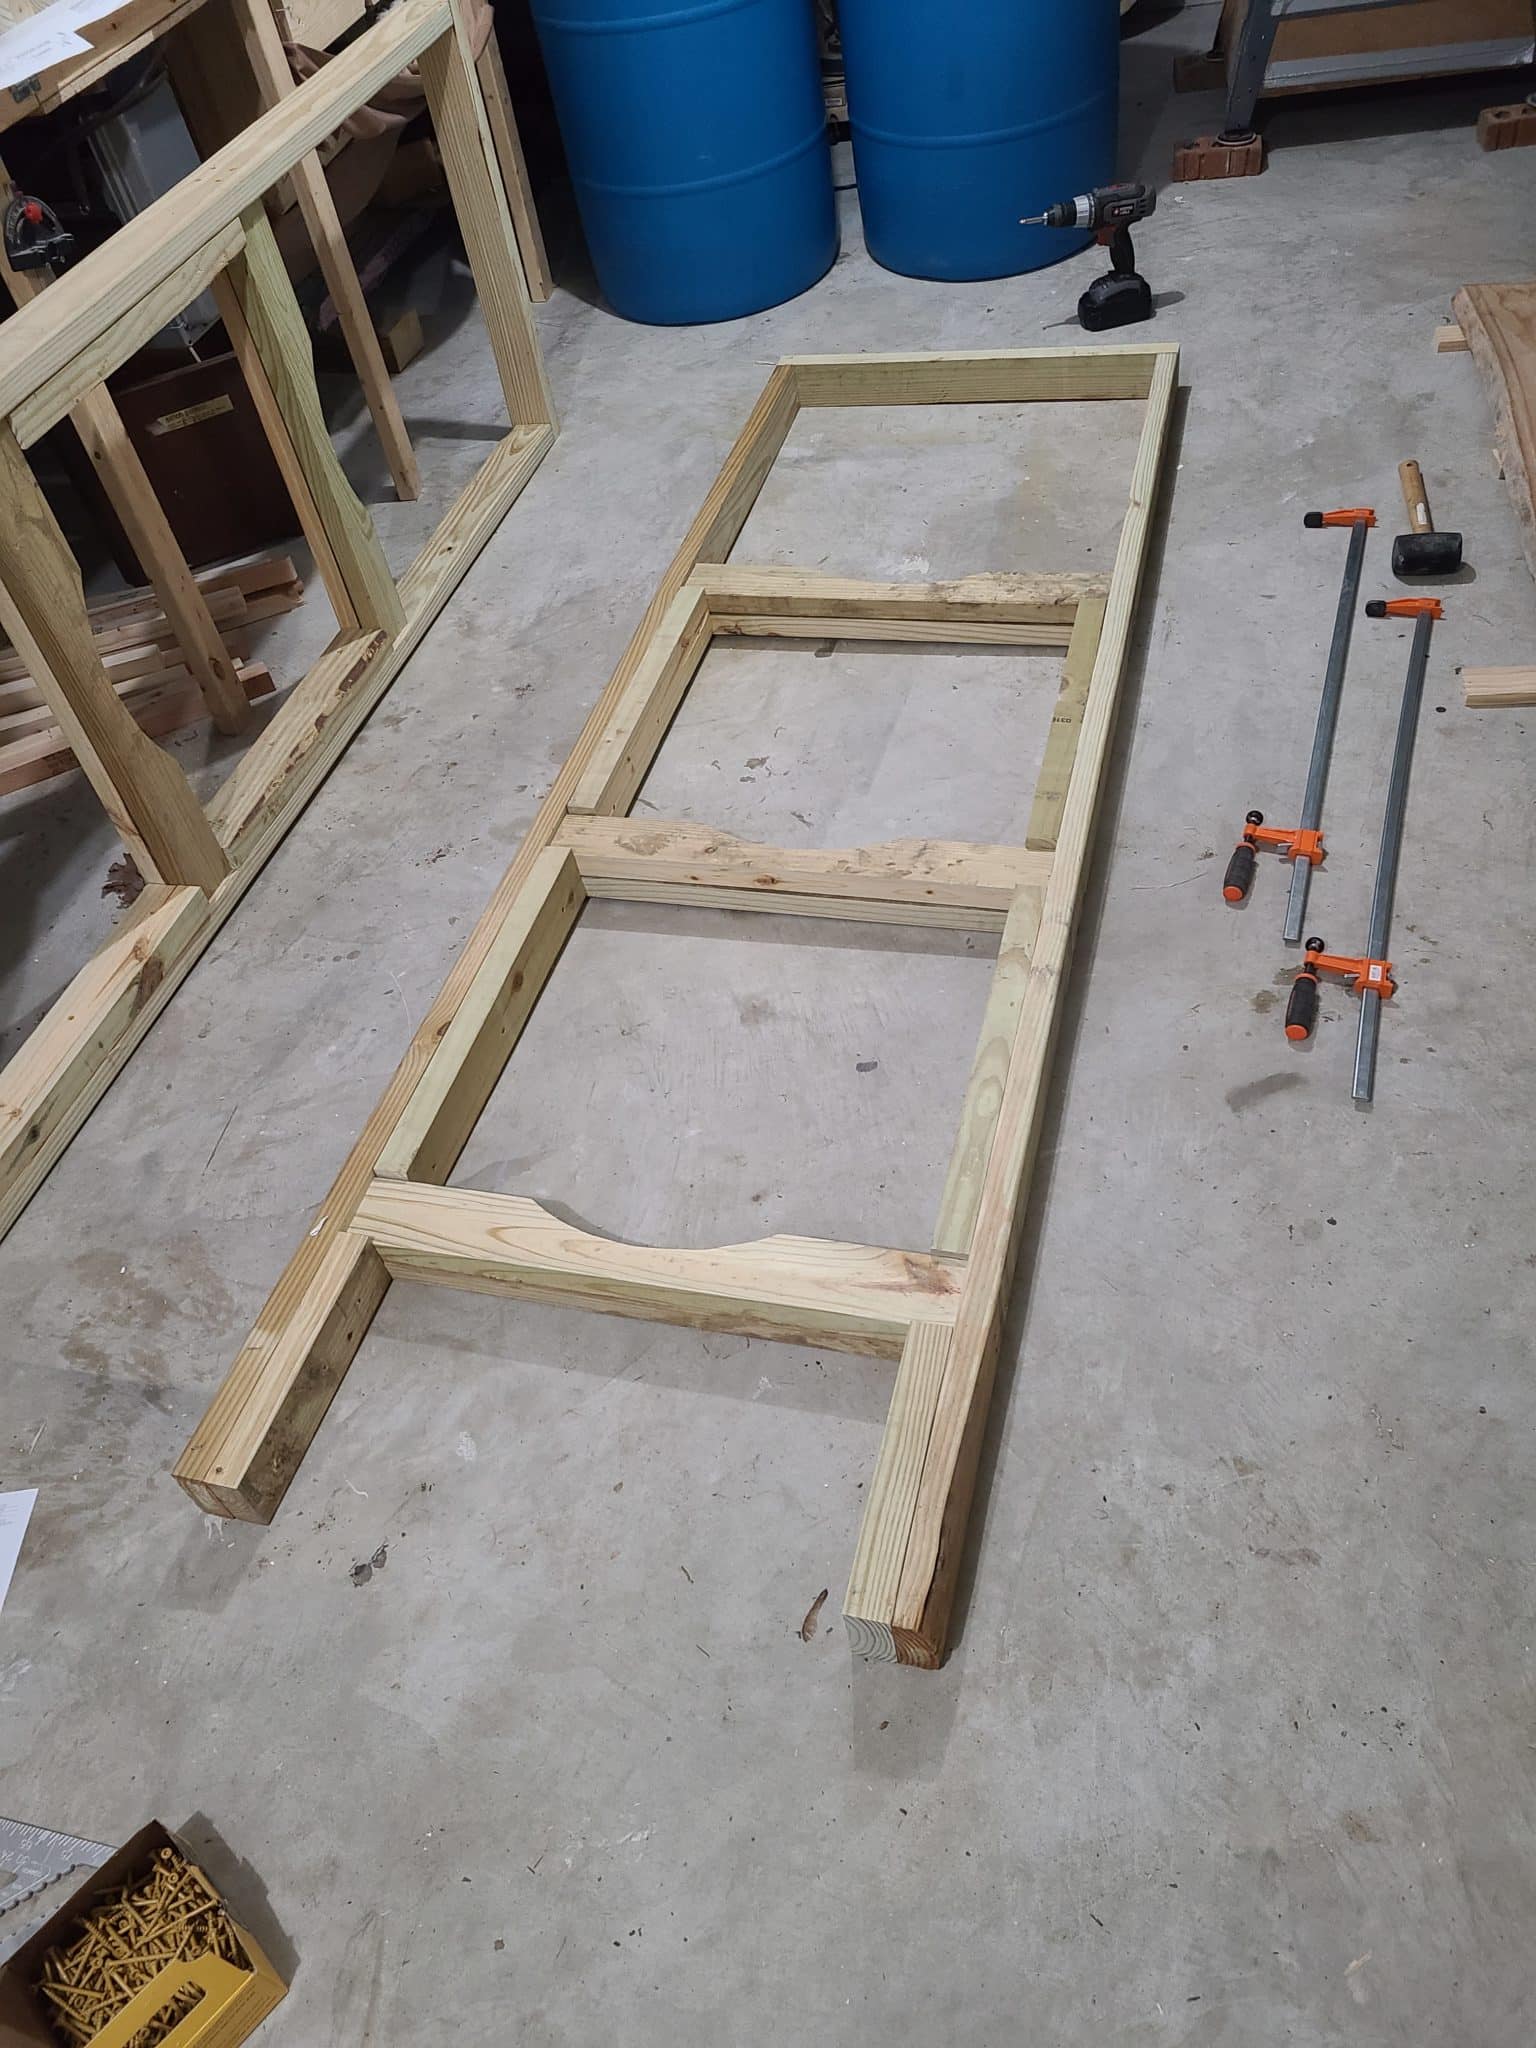
Joining The Pairs
Alright! Now that we have our two pairs of legs fully assembled, it is time to join them together.
Stand one pair of legs up and have someone hold it for you, or lean it against a wall. Or if you don’t have a tall enough ceiling in your workspace like us, you can lean it up on its side.
Grab two of the Side Cross Boards and insert them into the notch between the Bottom Upright and the Short Upright. Stand up the next pair of legs and bring them over to the first pair. Position these legs so the Side Cross Boards fit into their notches as well.
If you have clamps long enough, then use them to pull these two pairs of legs tight together and sandwich the Side Cross Boards. If you don’t have clamps long enough, a ratchet strap can also work here. But be careful it doesn’t pull your assembly crooked. Use additional clamps as needed to get the boards to all sit tight and face to face.
Screw The Pieces Together
Once the boards are good and tight together, it’s time to screw everything together. You can use long screws to go through the two Notched Cross Boards and into the end of the Side Crossboards. Pick screws at least 4” long to give this connection enough strength.
Otherwise, it may be best to use a pocket screw approach to attach the Side Cross Board to the Notched Cross Boards. Preferably, these screws would be long enough to even go into the Long Upright board and really tie everything together. Pre-drill your holes here since you are working near the ends of boards and don’t want them to split. However, if you have self drilling screws and are using pressure-treated wood, this isn’t as much of a concern.
Continue With Other Tiers
Once this bottom tier of boards is screwed in and secured, time to install the next two tiers of Side Cross Boards. You’ll want to loosely fit both of these tiers at the same time. If you installed the middle tier without the top tier in place, it could potentially pinch the frame slightly and make it difficult or impossible to install the top tier of boards later.
Once you have all of the Side Cross Boards loosely in place, clamp one of the tiers together just as before. I would recommend starting with the top tier. If you have enough clamps, go ahead and clamp both tiers. Once everything is good and tight, go ahead and screw it all together just like the bottom tier.
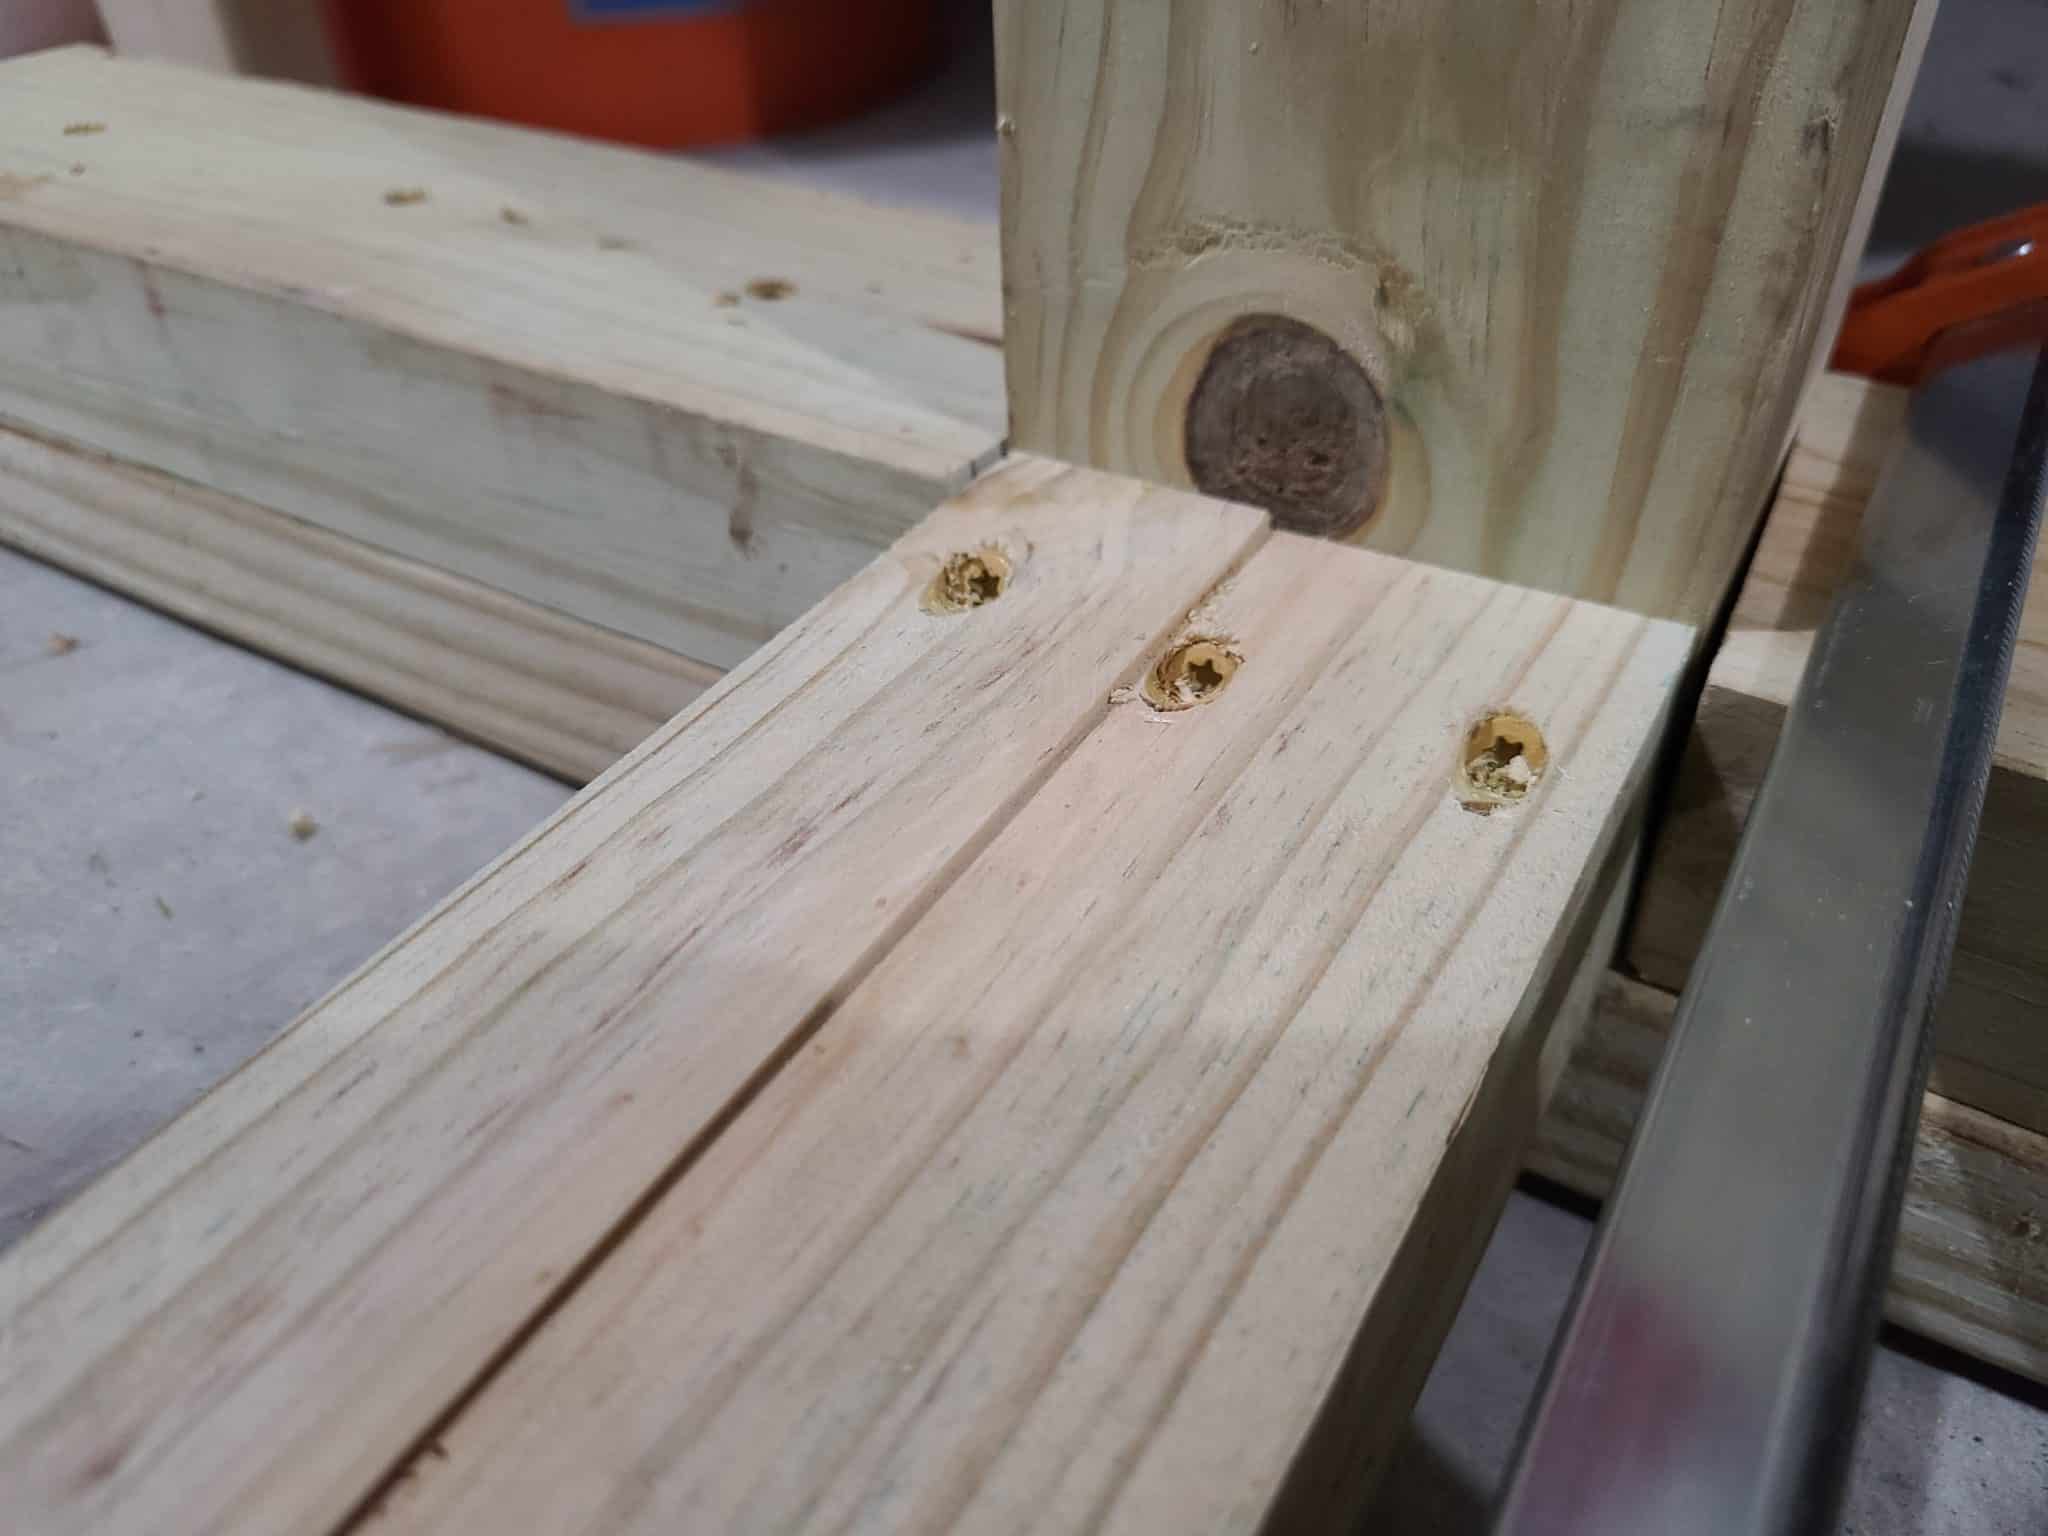
Install Diagonal Boards
All that’s left now is to install the Diagonal Cross Boards to finish tying everything together. Fit your Diagonals in place and secure them with pocket screws. I recommend two screws per end. Again, it may be a good idea to pre-drill your holes to prevent splitting here.


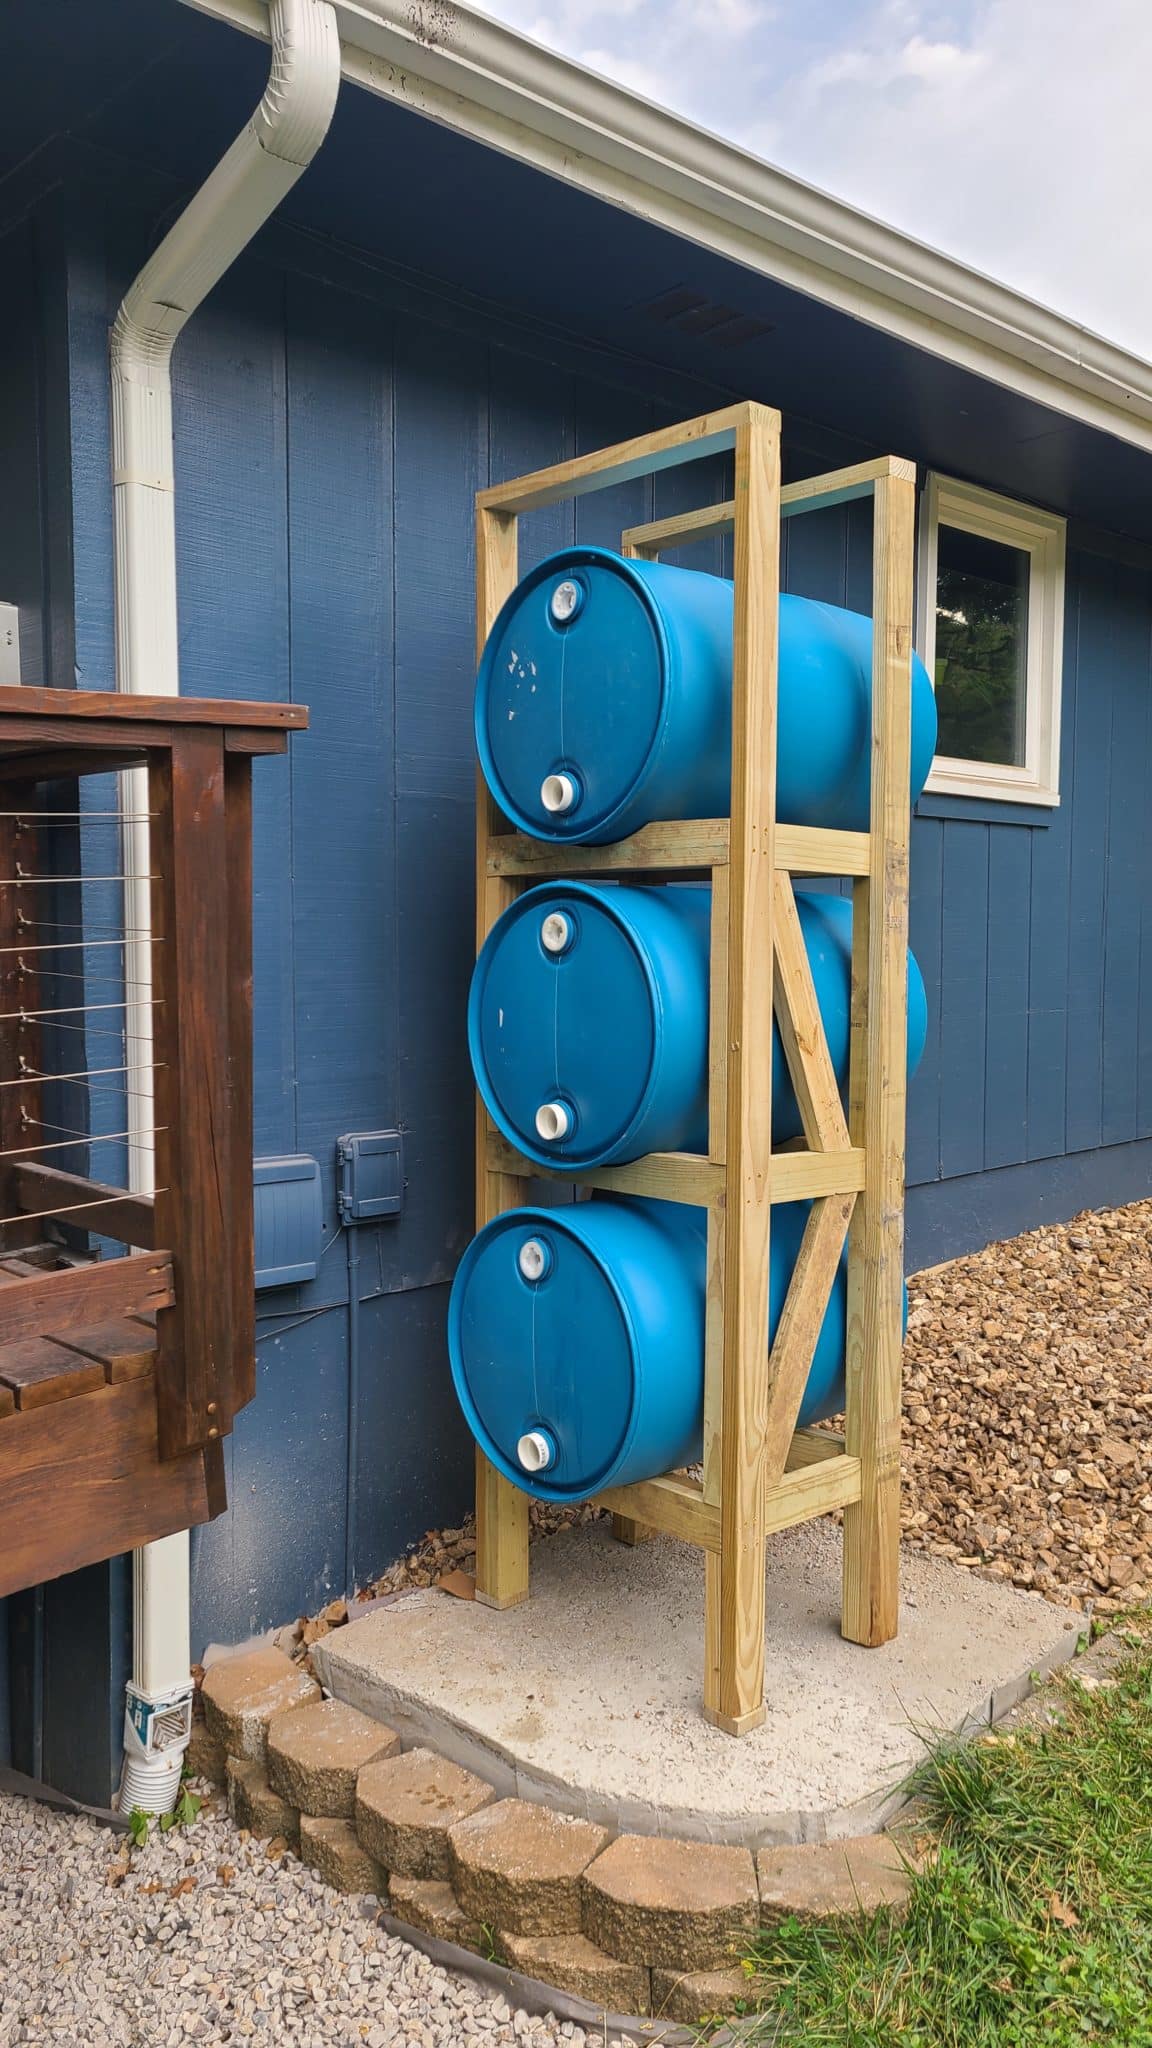
And with that, the frame is assembled. Time to haul it over to the chosen location and start working on the plumbings! This rain barrel system frame is extra sturdy which also means it is extra heavy. Be sure to get a friend to help you move it. If your slab isn’t level, be sure to add shims under the feet to get it level. You can use cardboard to play with different thicknesses, then take a measurement and cut a few piece of pressure-treated wood to glue under the feet.
Step 5: Cut Pipe & Connect Barrels
Alright! You have the frame constructed and placed on its footing by the gutter. Now it’s time to tie it in so it can start collecting water!
Cutting the PVC Pipe
This part involves cutting and connecting a lot of PVC fittings. There are fancy PVC shears that will cut quickly and cleanly through PVC pipe. However, almost all saws will have no trouble cutting PVC either. Just take care to clamp it down as the blades can sometimes catch as it cuts through the walls and will kick your piece.
It’s also a good idea to have a strategy to clean up all of the plastic fragments afterwards so you don’t spread microplastics, and they don’t get mixed into the regular sawdust and ruin it. That’s right, I said ruin it. There are tons of good uses for sawdust! We often use ours as biodegradable mulch that helps with seeding our yard, or as a pet-friendly ice melt in the winter.
Grab your drawing plans and begin cutting out the pieces needed. Keep in mind the drain pipe may be different if you are connecting to a corrugated line or if you need to add an elbow to drain it away from your house. If you do need to add an elbow, then cut your drain pipe a bit shorter and cut yourself an additional 24” segment to put at the end of the elbow.
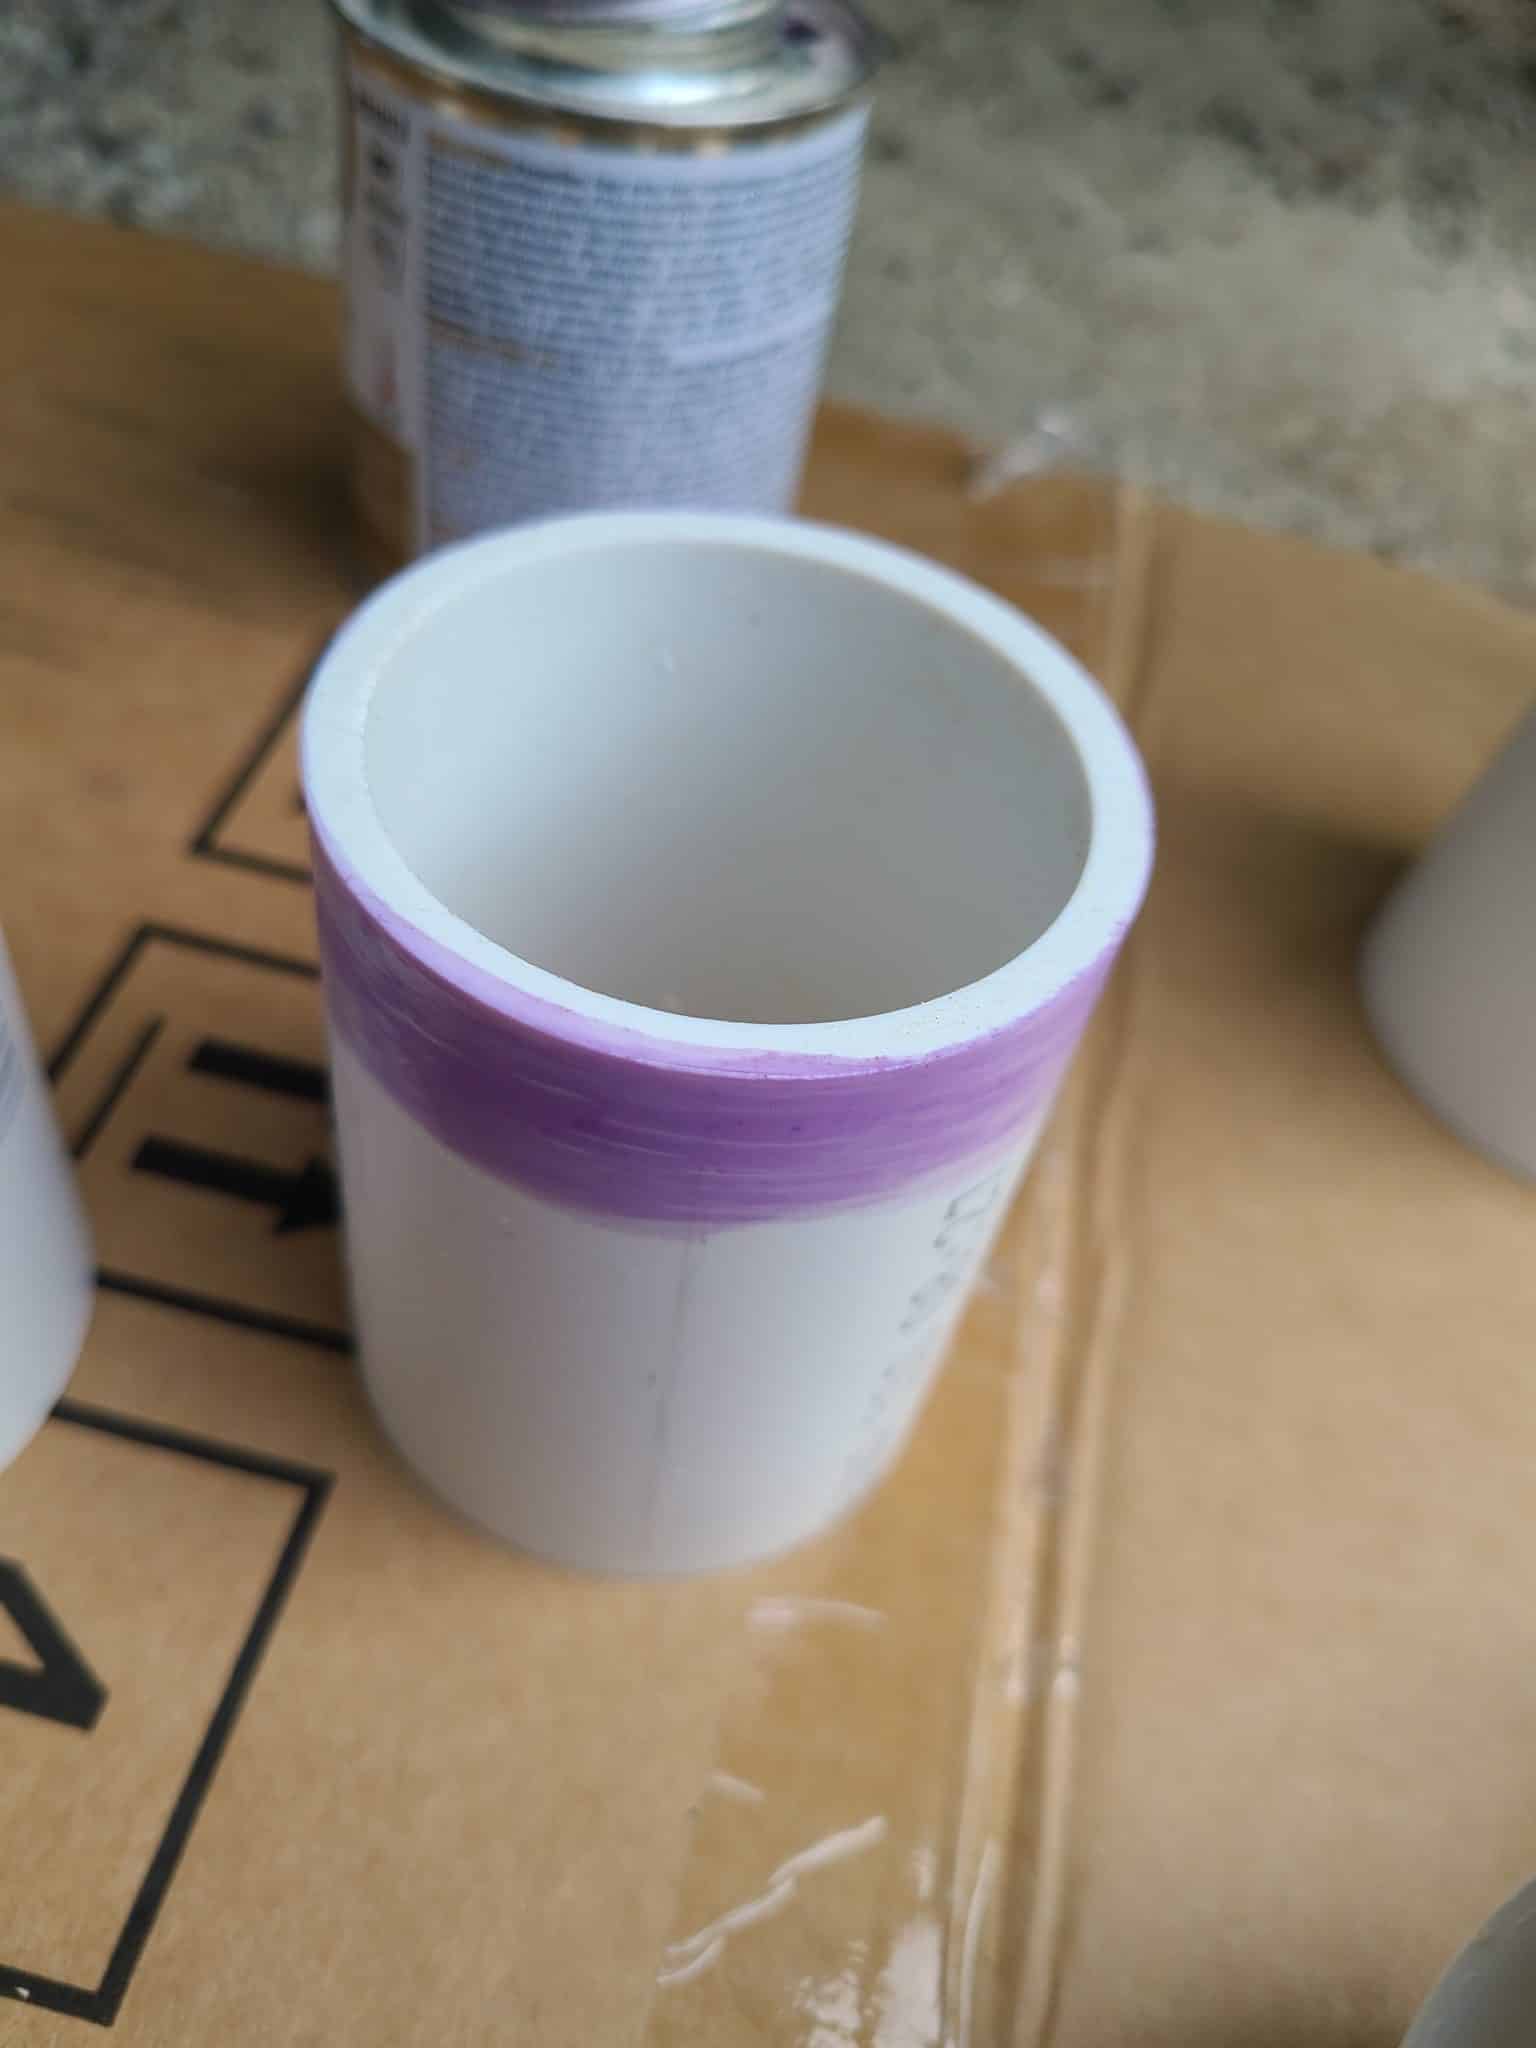
Priming & Cementing PVC Pieces
Once all of your pieces are cut, use a bit of sandpaper or deburring knife tool to smooth the cut end. This is to make assembly easier and to get a good connection.
Speaking of connections, we will be using PVC Cement for this project. It is pretty easy to apply, but if this is your first time I recommend finding a quick Youtube video to familiarize yourself with the process.
The key takeaways are to clean the surface if it’s dirty, use primer on both the inside of the fitting and the outside of the tube. Then apply cement to both of those surfaces, push them together and hold for 30 seconds while they cure. A twisting motion can be useful to get the pieces fully inserted, but be sure to get everything aligned quickly as it sets up very fast. You should also prime and cement each joint one or two at a time as you need to use the cement within 5 minutes of applying the primer to get the best results.
Hubby Tip – The primer is very runny and is prone to drip everywhere. Put down some newspaper to catch drips and wear clothes and shoes that you don’t mind staining purple.
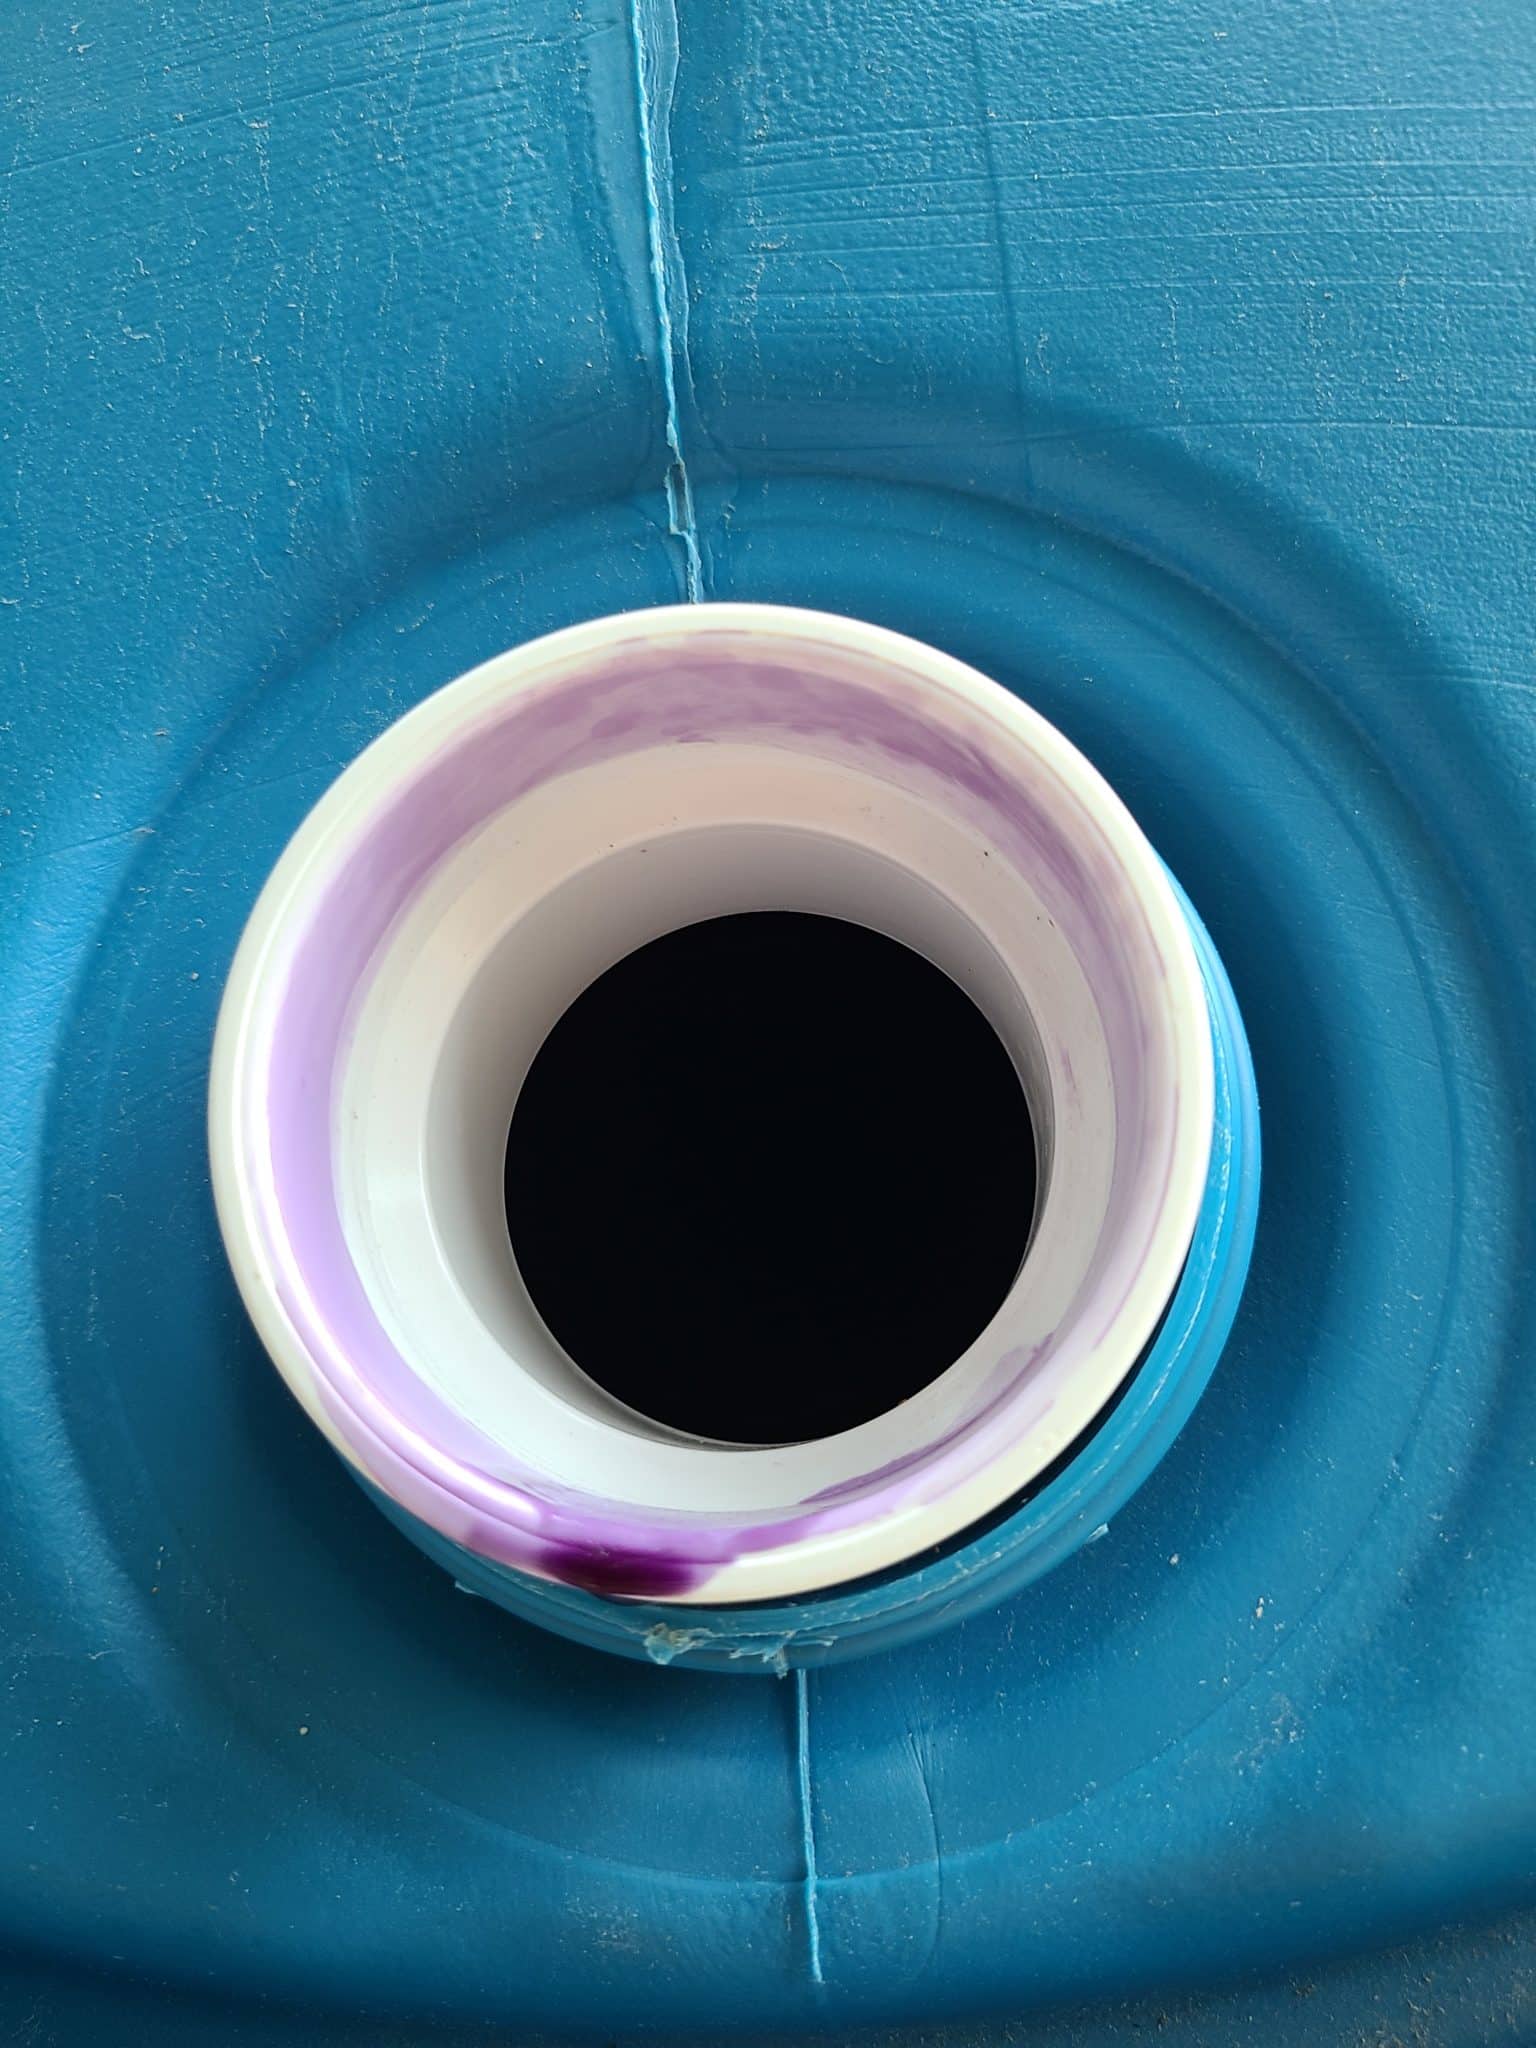
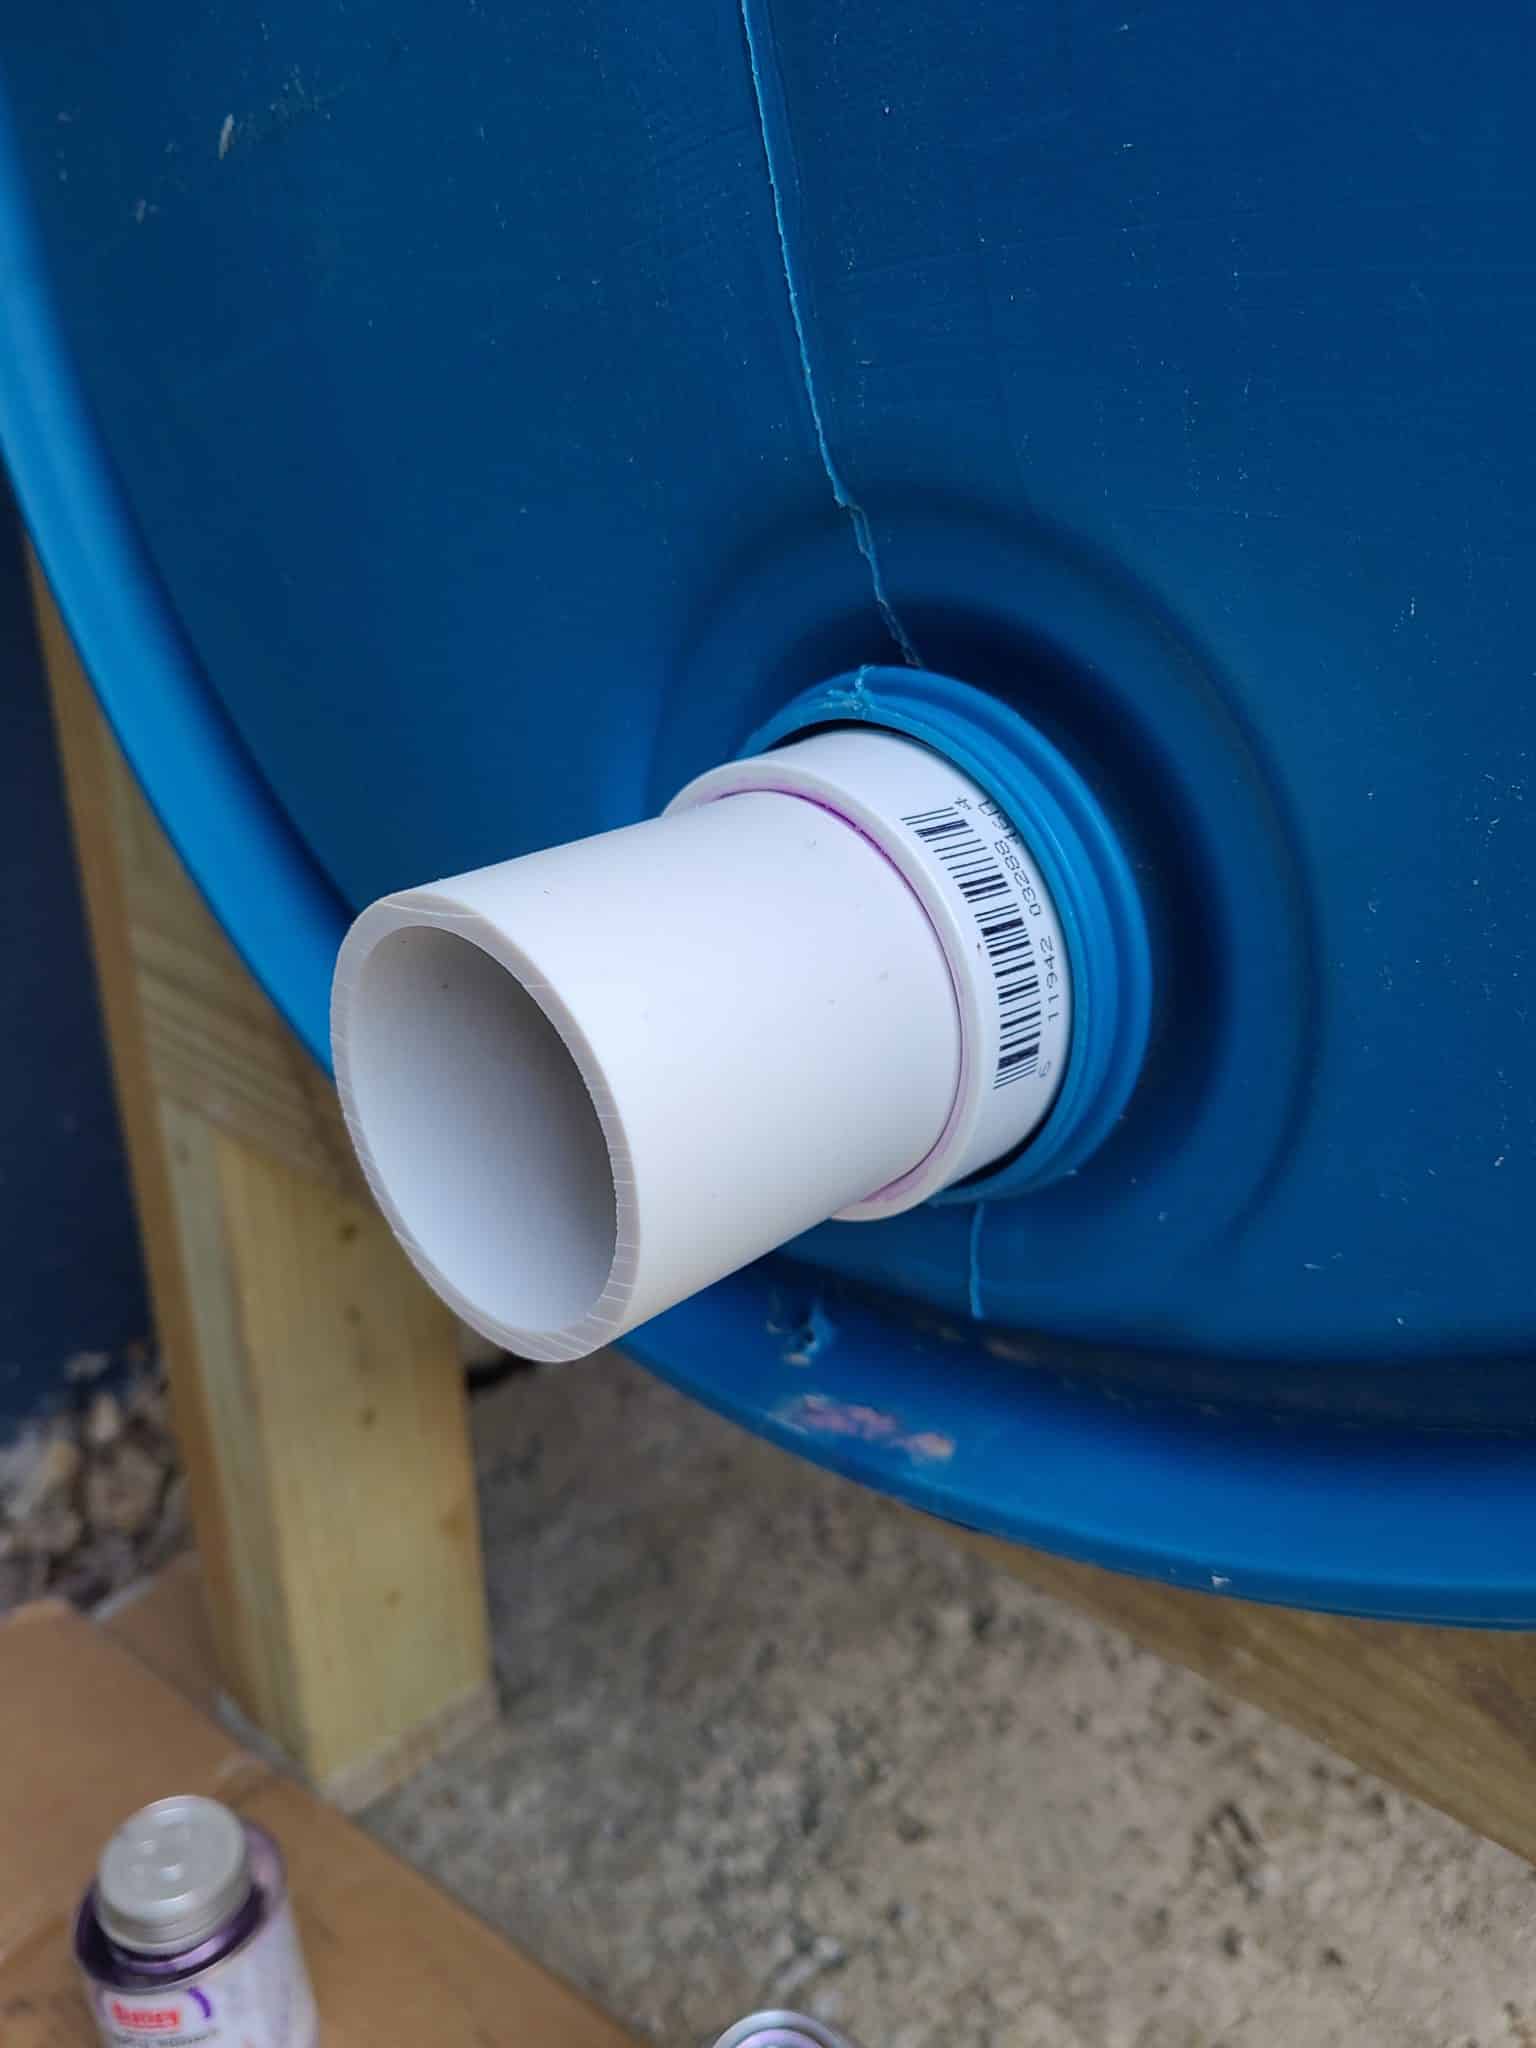
Now that the pieces are cut and we know how to join everything together it’s time to get started! First thing first, get the barrels placed in the frame and prep them. Each barrel should have two bung plugs in them. Remove the lower bung plugs and install the 2” Male NPT Fittings. It’s a good idea to use some pipe tape here to make sure you get a good seal.
Now grab 3x of our short pipe segments (5) and cement one into each of the NPT Fittings
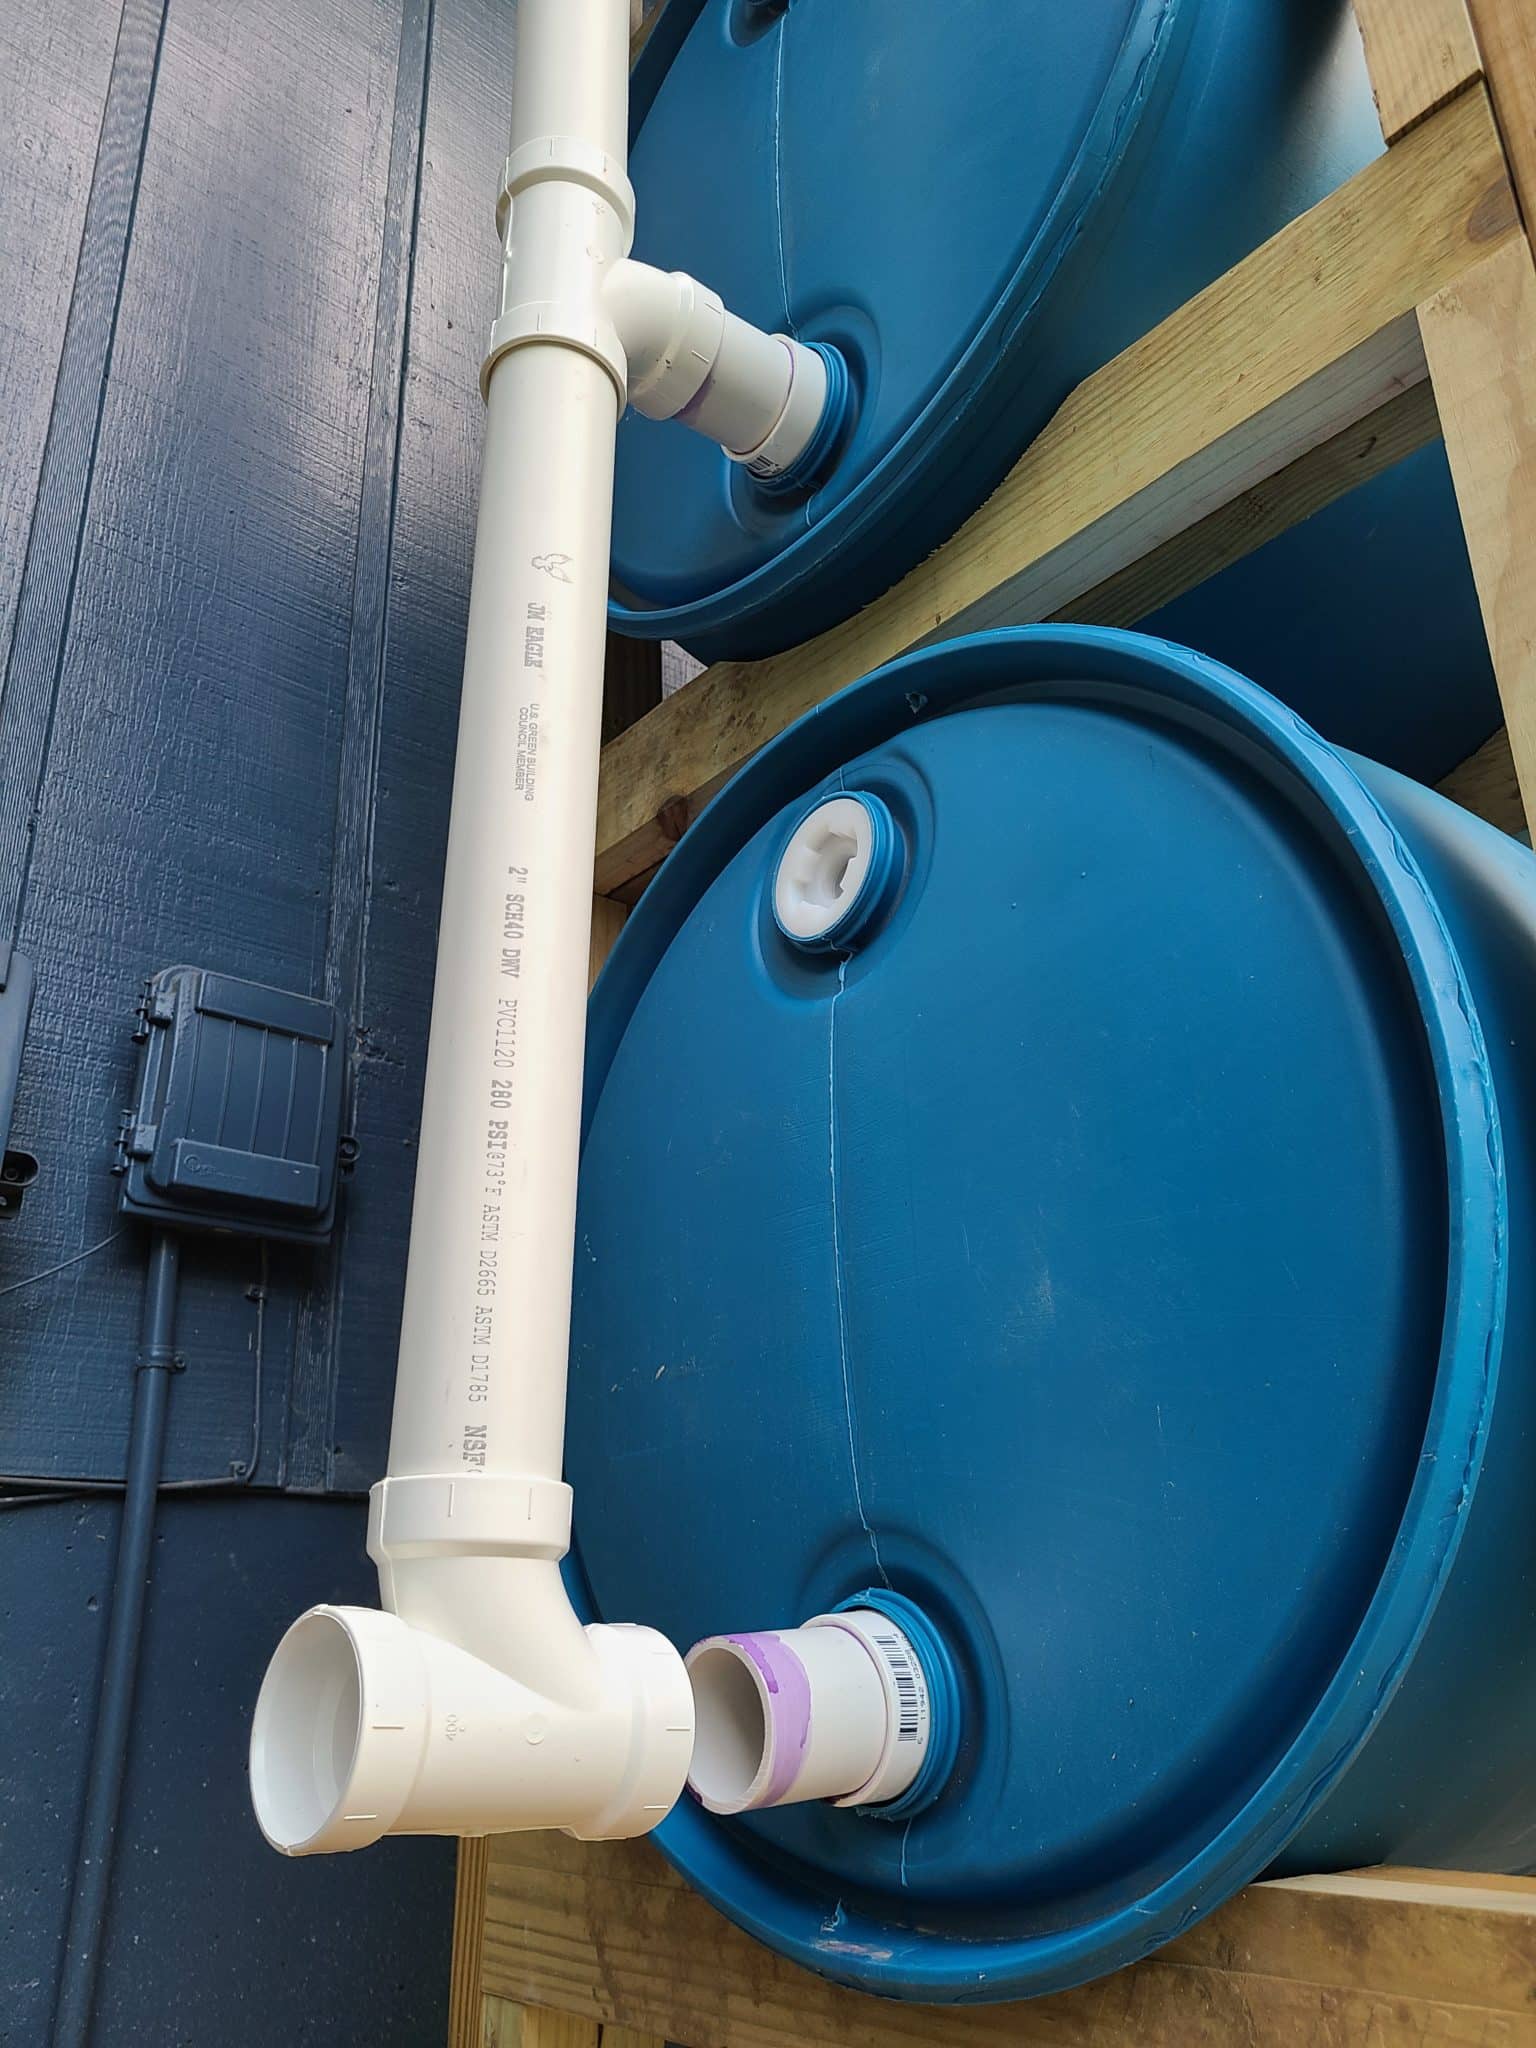
Barrel Tee Connections
Now, we want to ensure that the pipes all line up for this next step. To ensure it, dry fit the 3 Tees and the two pieces of pipe (7) between them. Now adjust this set up so each of the tees fits onto their respective fitting. You may need to rotate the barrels slightly to get everything to line up.
Once aligned, pull these pipes away and prime each Tee on the end that connects to the 3” pipe (5) only, as well as each 3” pipe. Add your cement and then press these Tees onto their pipes. It may be easier to press them on one at a time, just make sure everything stays as aligned as possible.
Once these Tees are cemented to their 3” pipes, work on connecting the tees together. Pull the pipes (7) between the Tees out, then prime and cement them back into place. I recommend starting with the bottom Tee and working your way up one pipe at a time.
Tadah! Your rain barrels are all now connected!
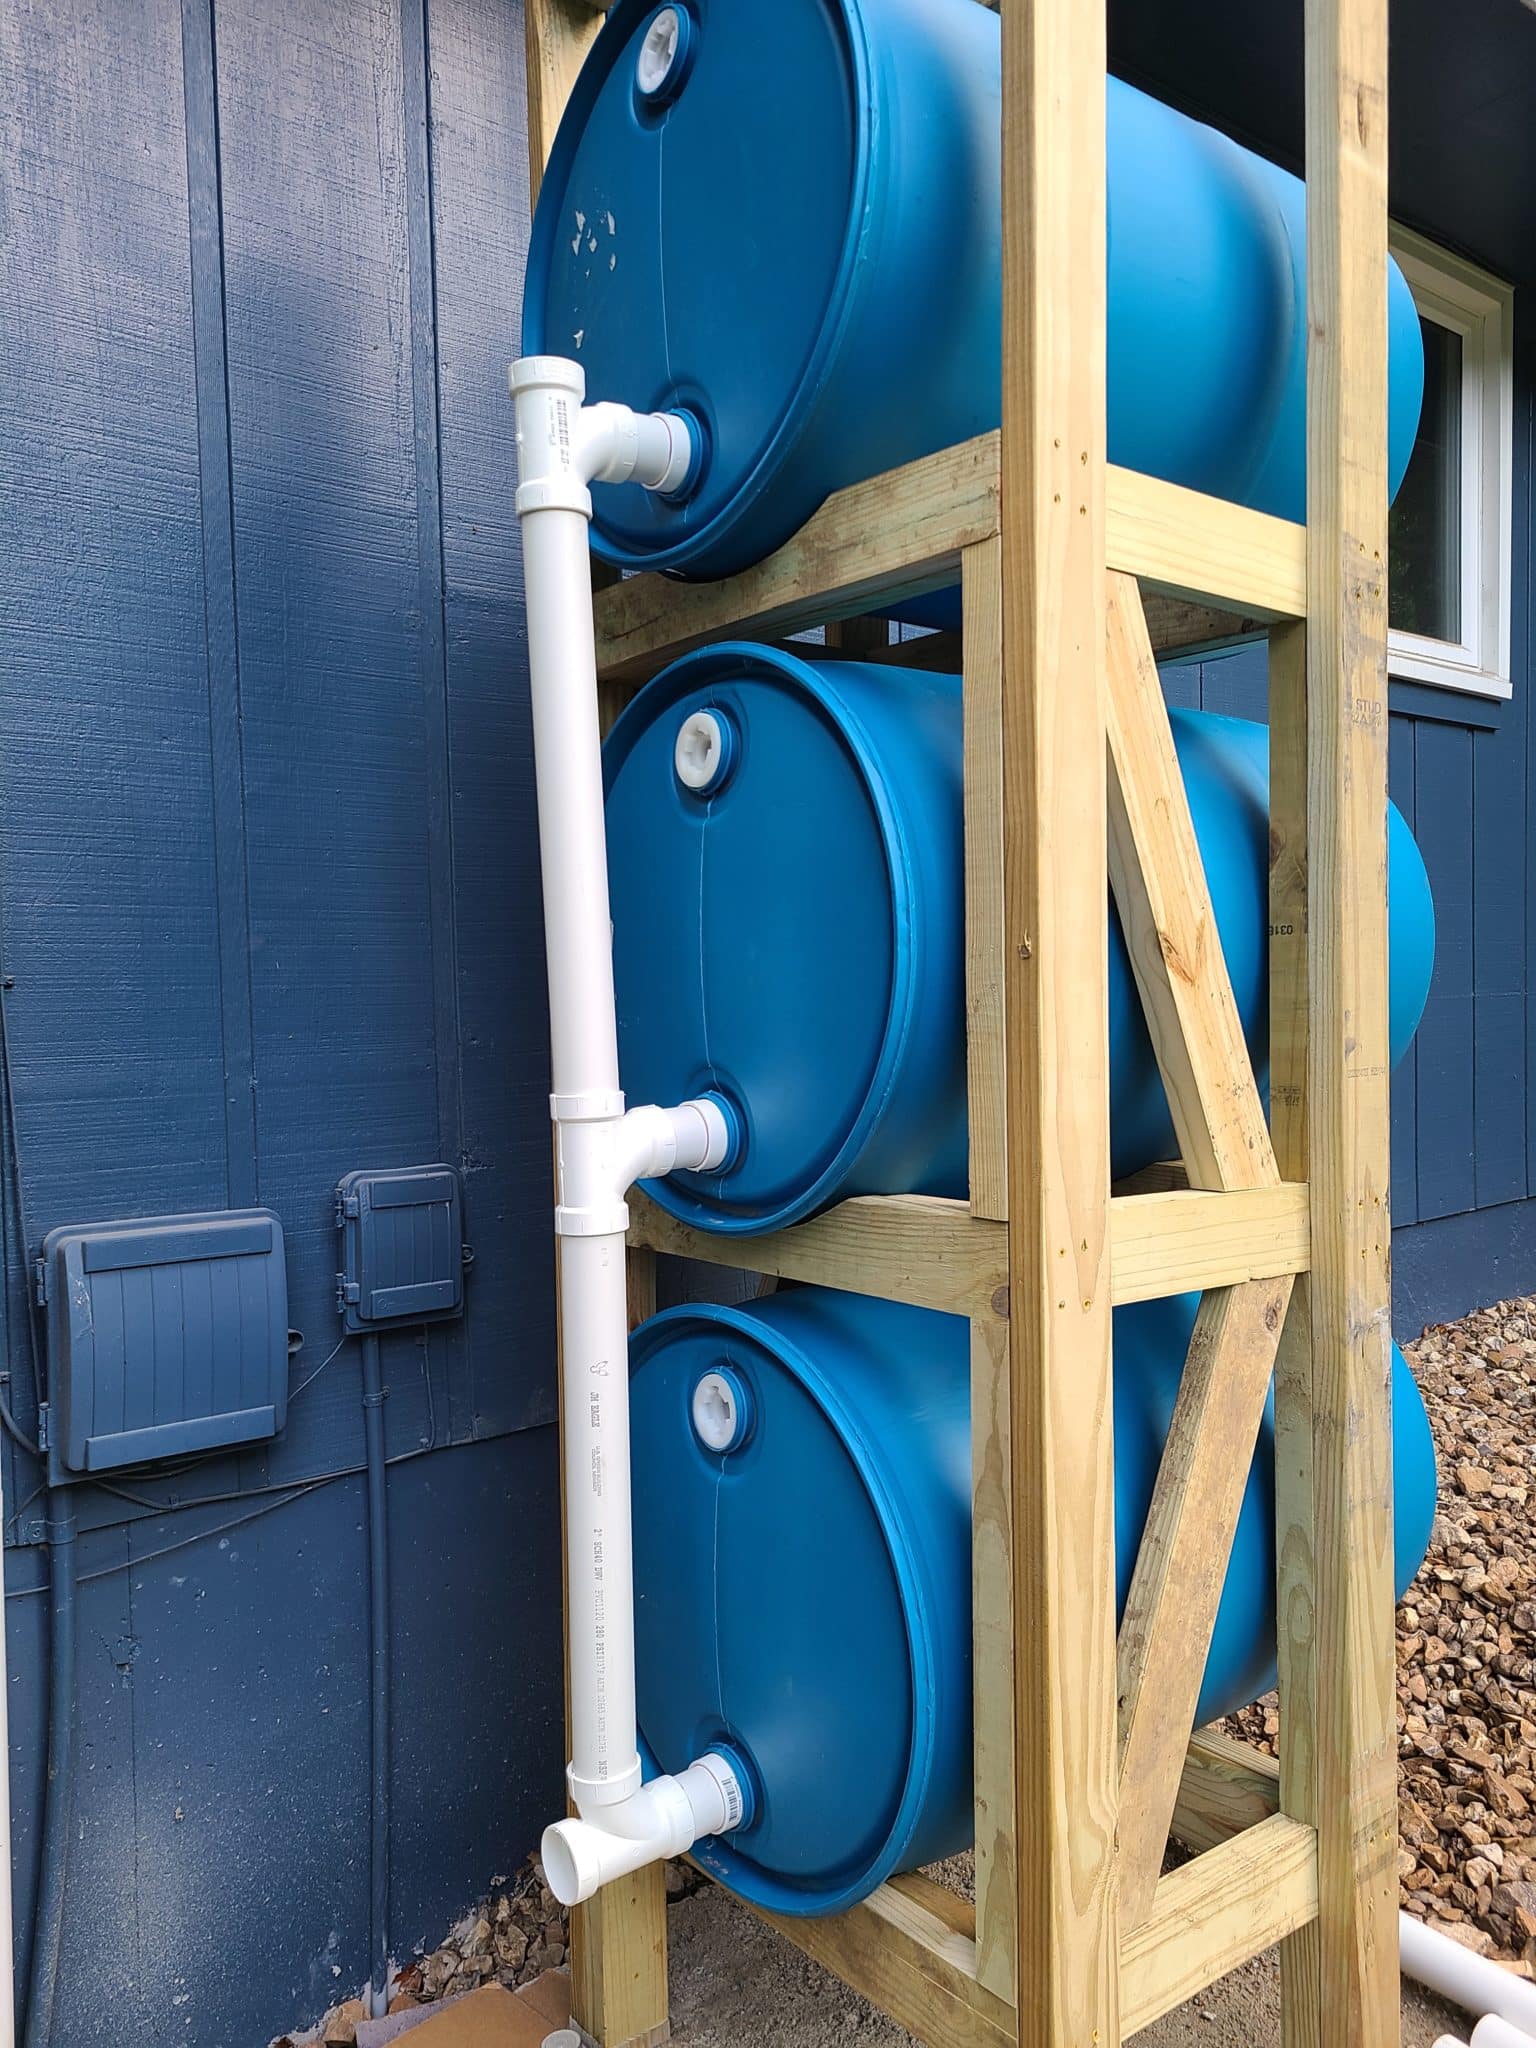
Step 6: Create Vertical Column & Bypass
Now that the barrels are connected, start building up the connection to connect them to the gutter.
Begin Vertical Column Assembly
In the topmost Tee, go ahead and install your vertical pipe (6) as well the elbow that goes on it. Be sure this elbow sets up pointing towards the wall so you can reach the gutter. Install the horizontal pipe (9) into this elbow and then install a Tee on to the other end of the pipe. Ensure the Tee is pointing straight up and down. From here, cement the short pipe (5) into the top of the Tee, and the long pipe (8) into the bottom of the Tee.


On the bottom of the long pipe, there will be a valve installed. If you are not using a decorative cover screen, then put this handle facing straight out towards you for easy access. If you are using the decorative cover, then I recommend putting the valve at a 45 degree angle between straight out and facing the wall. This is so you can easily reach around the decorative cover and turn the valve. Once you’ve decided on your angle, cement this valve in place along with the short pipe (5) below it.
Dry Fit Bypass Pieces
In order for all of the pieces to fit properly in this next part column, start by dry-fitting everything together. Press an elbow onto each end of the longest pipe (10) and then press a short pipe (5) into each elbow. Press a Tee onto the top and bottom of the vertical column you were forming and then press each end of this overflow bypass into those elbows.
When this is all installed, the overflow bypass should run between the wall and the water barrels. If it is hitting the barrels, then rotate the two tees together until it clears. Once you are happy with the position, pry one of the Tees off and then cement it back into place on the vertical column. Repeat this for the other Tee. That will set the angle. Now disassemble your bypass segment and cement it back together one joint at a time. You now have your bypass complete and are almost done!
Step 7: Assemble Water Inlets & Outlets
Assemble Water Inlet
Now we’ll tackle the water inlet. Simply install the short pipe (5) and the 4” to 2” reducer onto the top Tee of the vertical column. If you can’t get the rain barrel in a good position to tie into the gutter, then you may need to add a section of corrugated pipe or a few more pieces of PVC to get everything connected.
If you have products on your gutters to keep leaves out, then you won’t need a leaf filter and you can simply put your downspout right into this reducer. I recommend adding a leaf filter here to get rid of most debris if you don’t have products on your gutter. Add a short section of 4” pipe to the top of the reducer to get a better fit on the leaf filter if needed. Then stick the leaf filter right into it. If you get a lot of seed pods or pine needles in your gutter, then adding a piece of mesh over the leaf filter inlet can help keep a lot of that out of your barrels as well.
Assemble Water Outlet
Once your water inlet is set up, assemble the water outlet. If you have a corrugated drain pipe then simply connect the bottom Tee to this corrugated pipe using a section of pipe (7). Adjust the length of this pipe as needed to fit. If you don’t have an underground drain, then cut this lower pipe shorter and add an elbow and a 24” piece of pipe to the end in order to funnel water away from your home.

Step 8: Attach Hose Bib
Finally, it’s time to add the hose bib. This is where things can get a little tricky to find. You need to reduce down from our 2” pipe to a ¾” thread for the hose bib. Your local hardware store might not have the best fittings to make this easy.
You may need to reduce from 2” to 1” and then from 1” to ¾” or something like that. And you may need to use threaded fitting instead of socket depending on what you have available. Take some time in the hardware store to lay out your pieces and ensure you have the proper stack up to get where you need to go.
Or if that sounds like a headache, then you can order all of these pieces off of McMaster Carr’s online store. It will cost a little more and you’ll have to pay for shipping, but it can simplify things for you if you’re not having luck at the store.
Once you have all of our fittings, install them all together. Be sure to use cement on the socket joints and pipe tape on any threaded joints. Once everything’s put together, take a step back and admire your work. You now have a functioning rain barrel system!
Step 9: Install Air Relief
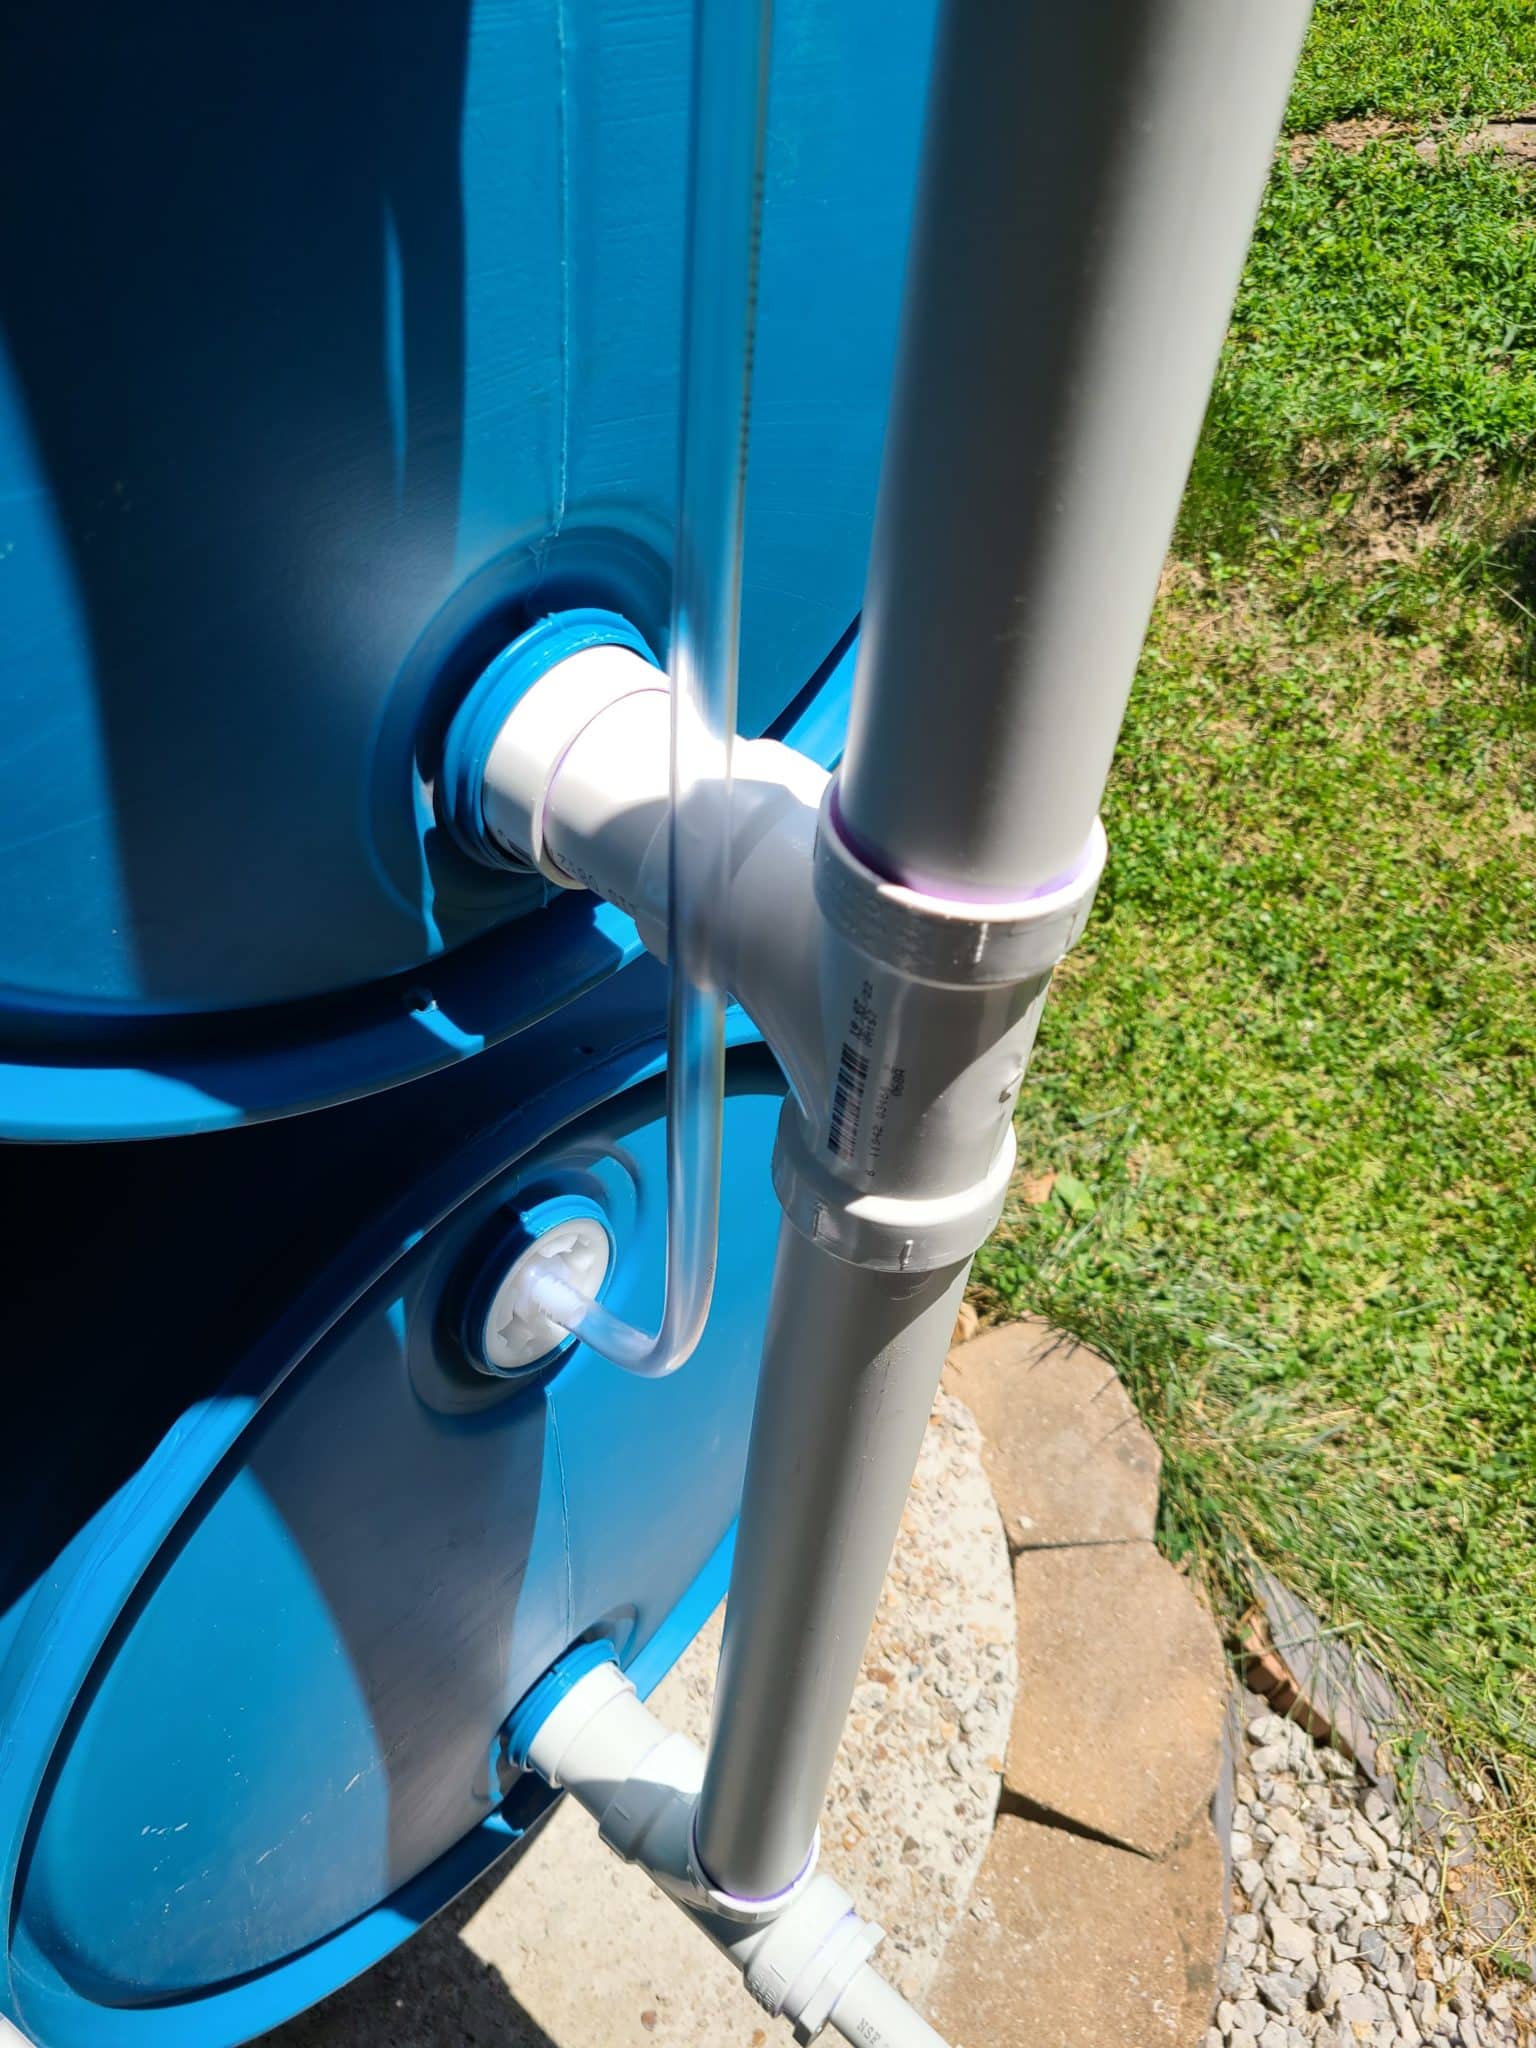
But wait you say, aren’t we forgetting something? Yes. Yes, we are. We now have a way to collect water, but how is the air in the rain barrel system going to escape so it can fill up all the way? I’m glad you asked! We are going to run a flexible line to each of the barrels in order to let the air escape.
To get the absolute most air out of the barrels as possible, you could drill a hole and install these barb fittings near the top of each barrel. But getting your hand inside to get a nut on the back side of the fittings and then ensuring you get a good seal can be extremely difficult.
Instead, sacrifice that small amount of water storage and use the threads on the top bung plugs. Drill out the center of the bung plug so air can escape. Then simply wrap some pipe tape around your barbed fittings and thread them in.
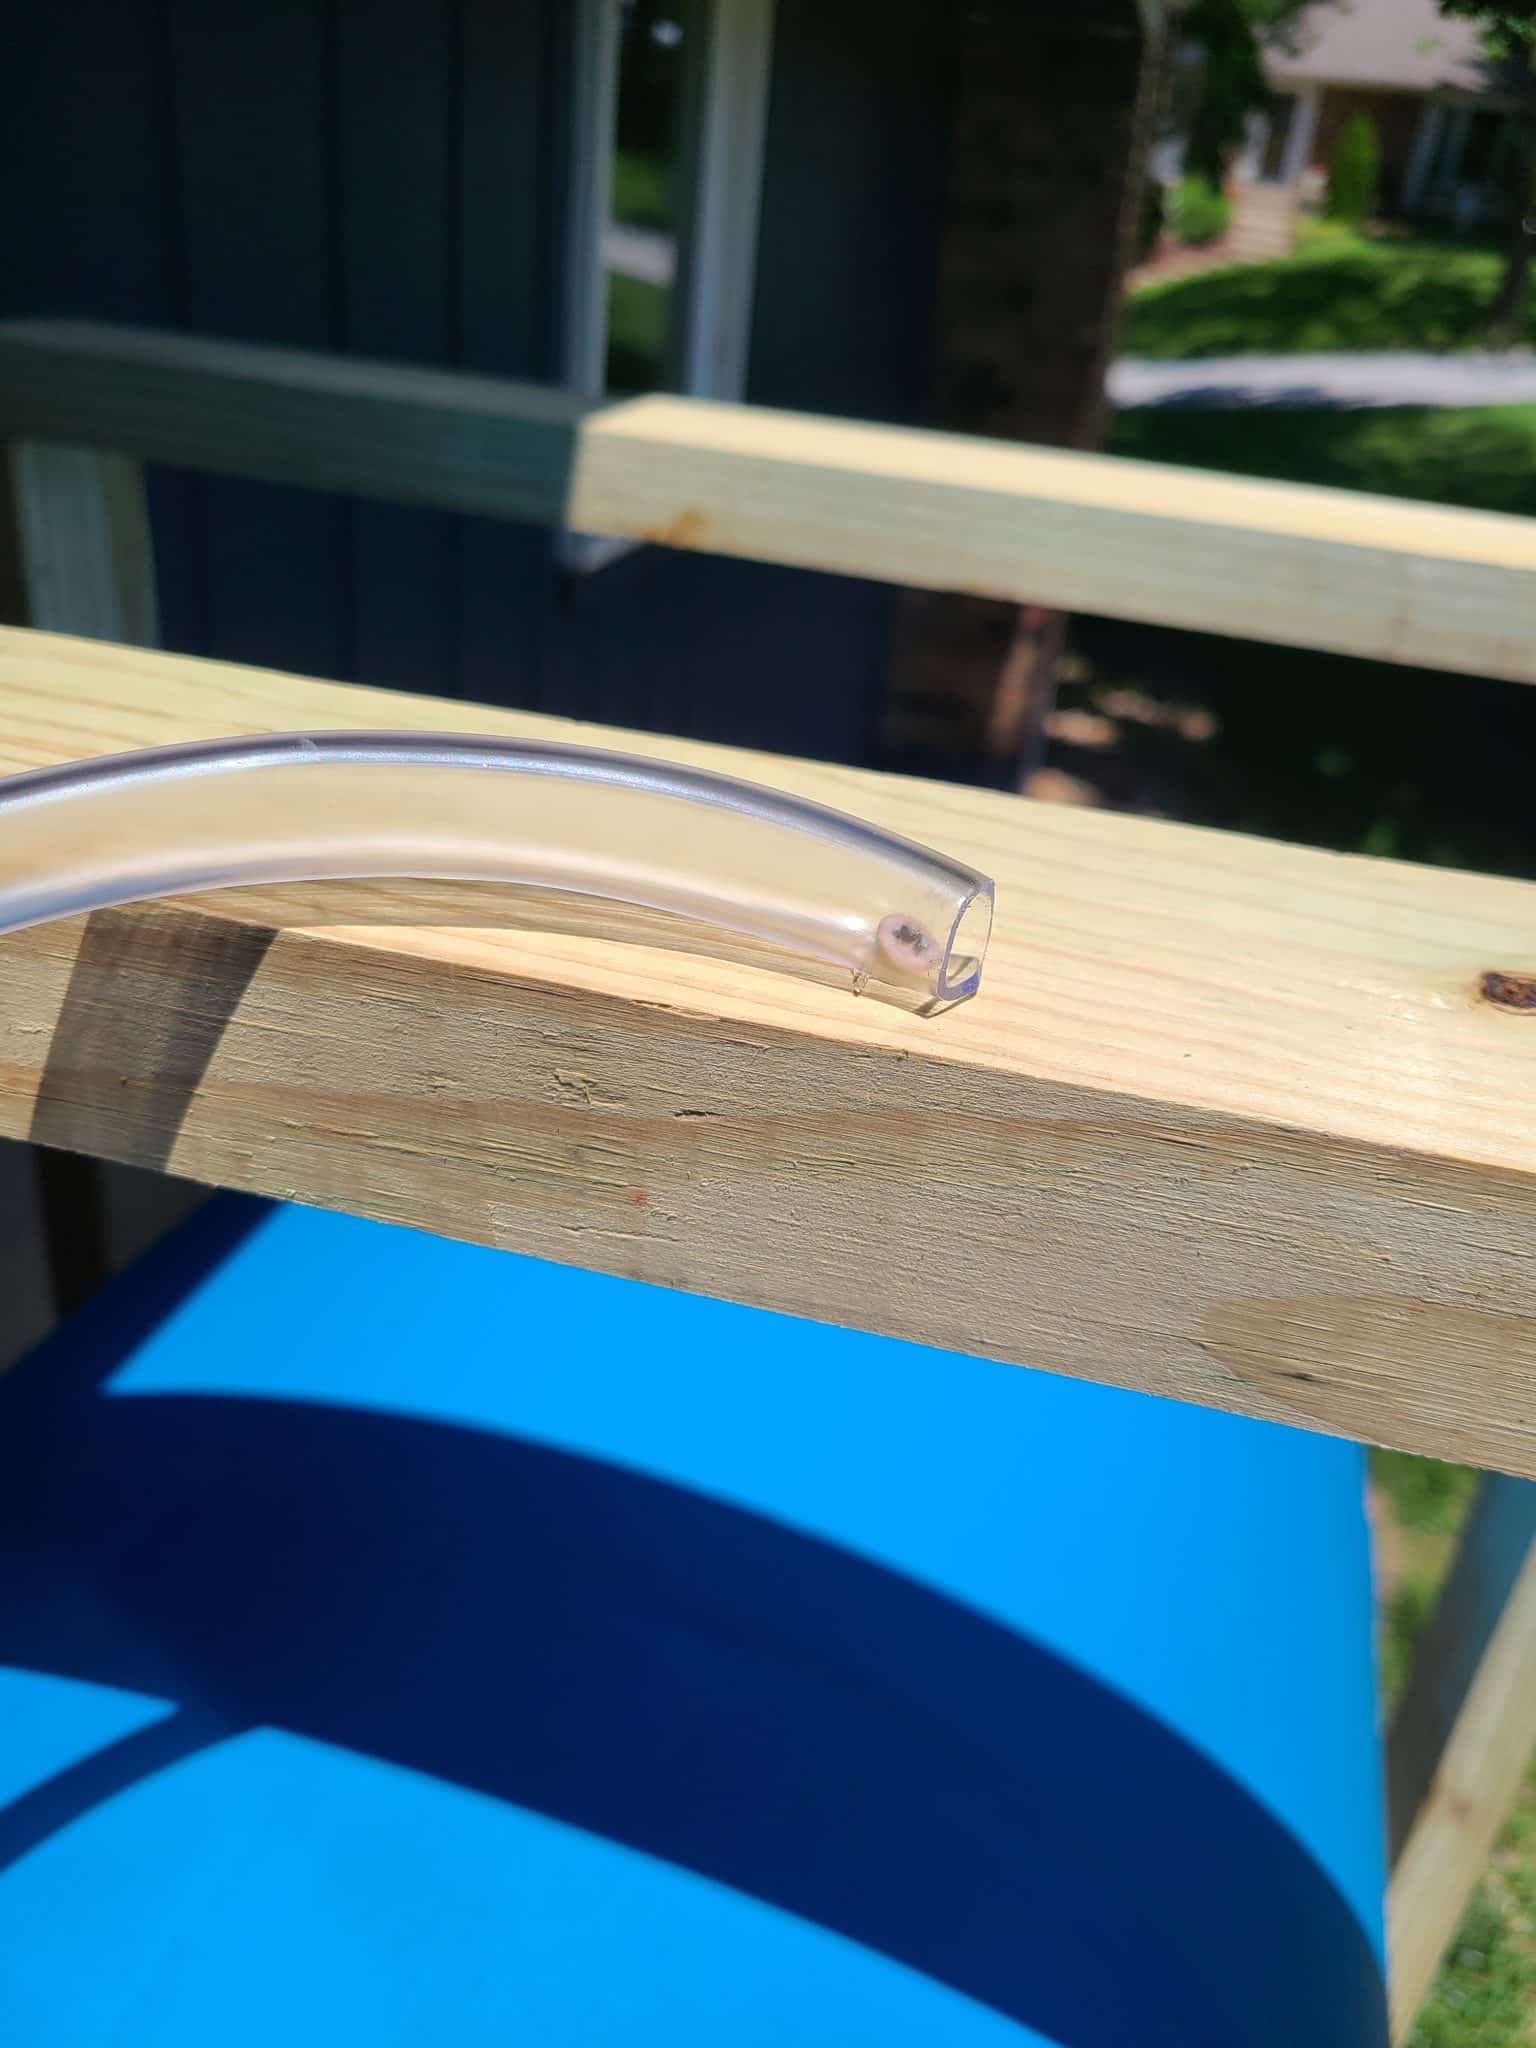
Once all three fittings are in place, simply connect them with a flexible line. Then run an additional length of flexible line from the top most fitting to the top of the frame and secure it there. You just need this highest point to be up above where the overflow bypass is so no water backs up this line and escapes out.

Step 10: Test The DIY Rain Barrel System
All that’s left is to grab a hose and test fill your DIY rain barrel system to make sure none of the joints are leaking and everything functions as it should.
The initial dirty water should collect in the vertical column until it fills up and begins filling the rain barrels from the bottom up. Air should escape from each barrel up to at least our top bung plug before then continuing on to fill the next barrel. Once the rain barrels are full, the water in the vertical column should rise enough that it starts flowing through your bypass.
If this all works and nothing leaks, then you are in great shape. Turn off the hose and connect it to the hose bib, then open the hose bib and make sure water flows well and can water your crops or yard. Finally, open the valve in your vertical column and watch your dirty water flow away.
If everything worked then all you have left is to put your decorative cover in place, if you want one. There’s a quick guide in the plans for a simple decorative screen, but you can do whatever you like best. Or if you don’t want to screen the DIY rain barrel system, then you don’t have to.
Congratulations, you’re ready to start harvesting rainwater!!
Hope this Hubby How To helps you build a great stacked rain barrel system and starts collecting rainwater soon! Let us know what you think of our stacked system and if you’ve built it in the comments below!


Disclaimer: This post includes affiliate links, and I will earn a commission if you purchase through these links. Please note that I’ve linked to these products purely because I recommend them and they are from companies I trust. There is no additional cost to you.


What a great tutorial! Well done with nice details. I’m in the process of building a 9-barrel system and am having trouble with the 2″ NPT threads. Did you run into any issues threading and sealing these? The threading seems very tight and I’m concerned I might strip them out. Any insight you might have would be appreciated!
Hi Stephen,
Firstly, thank you for the kind words, and it’s so exciting to hear you’re making a huge rain barrel system!
Originally, we wrapped pipe tape twice around the 2” NPT fitting that went into our barrels. We had tightened it, but we did get a small leak.
So we undid all that. Then used the gaskets off the bung caps from the barrel and put it on the NPT fitting. Then wrapped the threads 3 times with the pipe tape and threaded it back on. We threaded it until the gasket started to compress. It was really tight, but we basically bottomed out the threads and never stripped the barrels.
It’s likely that if you’re using plastic barrels, the threaded hole in the plastic barrel is expanding under the pressure of being threaded into.
Adding the gasket and pipe tape helped, and we haven’t had any leaks since! That’s our experience, so you can give that a try if you want. Hope that helps!
Thanks so much for the quick response, I can’t thank you enough!!
Of course, always happy to help!
Hi – This article is really great. We’re having a really hard time finding the “2” NPT Male to 2” Pipe Fitting,” any suggestions?
Hi! Thank you, I’m glad you found this article so helpful!
We typically can find them at a local home improvements store like Lowe’s or Home Depot, but each store tends to carry different stock. Here’s a link to one at Home Depot (may or may not be available where you are): https://rstyle.me/+tH0CxLIQzSWL6deY4eXunw
Sometimes you’ll find them called out as “MPT” or “MNPT” instead of “NPT”. NPT stands for “National Pipe Thread” whereas MPT is “Male Pipe Thread”, which is a sub-type of the NPT standard. They should be the same thing just a different naming standard.
Also, if you can’t find it at a local store, you can order all the fitting parts for this build off of McMaster-Carr as a last resort. You can find anything you’ll ever need on McMaster-Carr, but it’s not super user-friendly and you’ll have to pay shipping typically. Here’s the link if that’s helpful: https://www.mcmaster.com/4880K66/
Thanks for reaching out with your question and please let me know if you need any more help!
I’m considering building one of your rain barrel systems. I live in an area that gets down to around zero degrees in the winter how do you winterize the rain barrels?
Hi Wayne, thanks for asking!
We winterize our rain barrels like most items that hold water by doing a couple simple steps:
1. We drain all the water out of the rain barrels.
2. With this design, we open the vertical column’s overflow bypass to ensure water collected from our roof gutter during the winter goes directly into the existing house drainage system and not into the barrels.
3. Keep it this way until it warms back up and then flip the overflow bypass lever back. Then the barrels will begin to fill again and be ready to use!
You definitely want to drain your system as the frozen water would expand and potentially break the barrels/pipes causing leaks. Also, the great part about having the bypass is you don’t have to disassemble/reconnect anything unlike traditional rain barrel setups.
Hope that helps and let us know if you build one!
Best,
Amanda
I love the set up and am considering using it. How do you clean the system?
Hi Jen!
As the water isn’t meant for drinking, we personally don’t “clean” the whole system. After using it for over a year, here’s a few things we do:
1. We use the water frequently, so the water isn’t stagnant for weeks in the barrel. Also, having opaque barrels is key to keeping things from growing in them.
2. We drain the barrels every winter before it freezes, which empties the system and keeps it from breaking.
3. The screens on the openings and the first flush bypass minimize most debris, so whatever little organic matter/debris that does get in, the water just breaks it down and washes out as we use it.
4. The clear air pipe between the barrels is really the only thing that gets dirty for us. It’s not glued so we detach it and wash it out every once and a while.
You can check out our other article on the basics of rainwater collecting too for a deeper understanding/more details.
So that’s what we do! Hope you can start collecting your own rainwater soon!
Best,
Amanda