How To Install Solar Panels On A Roof & Connect Them
So how do you install solar panels on a roof and connect them? If you’ve decided to do-it-yourself, then this may be a question you’re asking yourself. We cover our step-by-by DIY journey on how install solar panels on a roof, and share all our tips/tricks we learned along the way!
Updated 3/12/2024

This post may contain affiliate links. Read about our privacy policy.
Installing solar panels yourself can seem a little daunting if you’ve never done it before…or even if you have. It’s a fairly long process of laying out, measuring, drilling, installing, bending, connecting wires, and making mistakes. Yes, there will probably be what most people consider mistakes as you do your DIY installation. We definitely drilled some extra holes and had to rework some alignments. But don’t worry, as truthfully that’s the nature of DIY projects, and you can fix them.
We learned a lot through our DIY process of how to install solar panels on a roof. This article focuses on walking through the installation process and sharing tips and tricks we learned. Fair warning, this is a LONG post in order to provide tons of DIY details. Hopefully, this helps your DIY solar panel installation process go smoother and leaves you less stressed out.
This is the four article in our Going Solar post series helping anyone on their solar journey. If you missed the previous articles, check them out!
First article: Are Solar Panels Right for You?
Second article: How Much Do Solar Panels Cost? What is Their Payback Period?
Third article: How to Buy A Solar Panel System – Our Experience
Still need to get connected with a solar panel company? Let us connect you with our contact at GoGreenSolar to help get you started! Shoot Amanda an email using this link and we’ll get you hooked up!
Or you can contact GoGreenSolar directly through this link to sign up for a FREE quote and see what size solar panel system you’d need.
Alright, here is where the fun begins! We’re going to walk you through the tools and the installation process.
To start off, you will need the following tools:
- Tape Measure
- Chalk Line Snapper
- Drill
- Drillbits
- Impact Driver
- ⅜” Impact Drive Sockets
- ⅜” Impact Socket Adapter
- Stud Finder
- Regular Chalk
- Roofing Pry Bar
- A piece of metal wire / a metal clothes hanger
How To Install Solar Panels On A Roof

Step 1: Understanding Your Hardware
I don’t say this very often, so listen carefully. It’s important to read the instructions. Especially my instructions. I mean, that’s why you’re here, right? To understand better how to install solar panels on a roof.
But in this rare instance, you should also read the manufacturer’s instructions. Familiarizing yourself with the mounting hardware and how it’s installed is key to this whole process. The hardware for our system was the Iron Ridge EMount system. Here is the data sheet and a link to an installation video for this specific hardware.
I found the video to be very helpful especially since I wasn’t familiar at all with roofing. If you have a half hour, Iron Ridge also has a series of videos that take you through the entire process. These videos use slightly different hardware, but all the principals are the same, and they give good detail on how to mark out and drill the holes for the mounts.
We’ll also be hitting some of the best tips below so stick with us!
Step 2: Marking Out Your Track
Before beginning the installation process, you’ll want to make sure there isn’t any rain in the forecast until you are done. You’ll be marking out the rails with chalks, marking stud locations, and drilling holes for the mounting bosses. Rain will wash away your chalk marks, and you certainly don’t want rain after you’ve drilled holes, but haven’t installed the bosses yet.
Another important thing to consider is safety. We have a very low pitched roof so it is easy for me to walk around on it. If I were to fall off the side where our panels are located, I would only fall 8 feet onto our deck. That is still a hazard, but it is a manageable risk. I felt personally safe enough to forgo a harness during my installation. That said, if you have a steeper/slicker roof, your roof is high off the ground, or you don’t feel confident walking on the roof, please invest in a climbing harness with a belaying/repelling device. Then be sure to use it! Also, always wear shoes with good traction and use knee pads if you are likely to have pain from kneeling on the shingles.
Alright, so you’re up on the roof with your plans, tape measure, chalk, and a line snapper… Now what?
The first thing to do is mark out the bounds of the solar panel array from your plans. The plans will provide measurements from your roof line and/or vent pipes to help mark out the panel locations. Use your tape measure and chalk or the line snapper to mark out the rectangles that represent where your panels will end up.
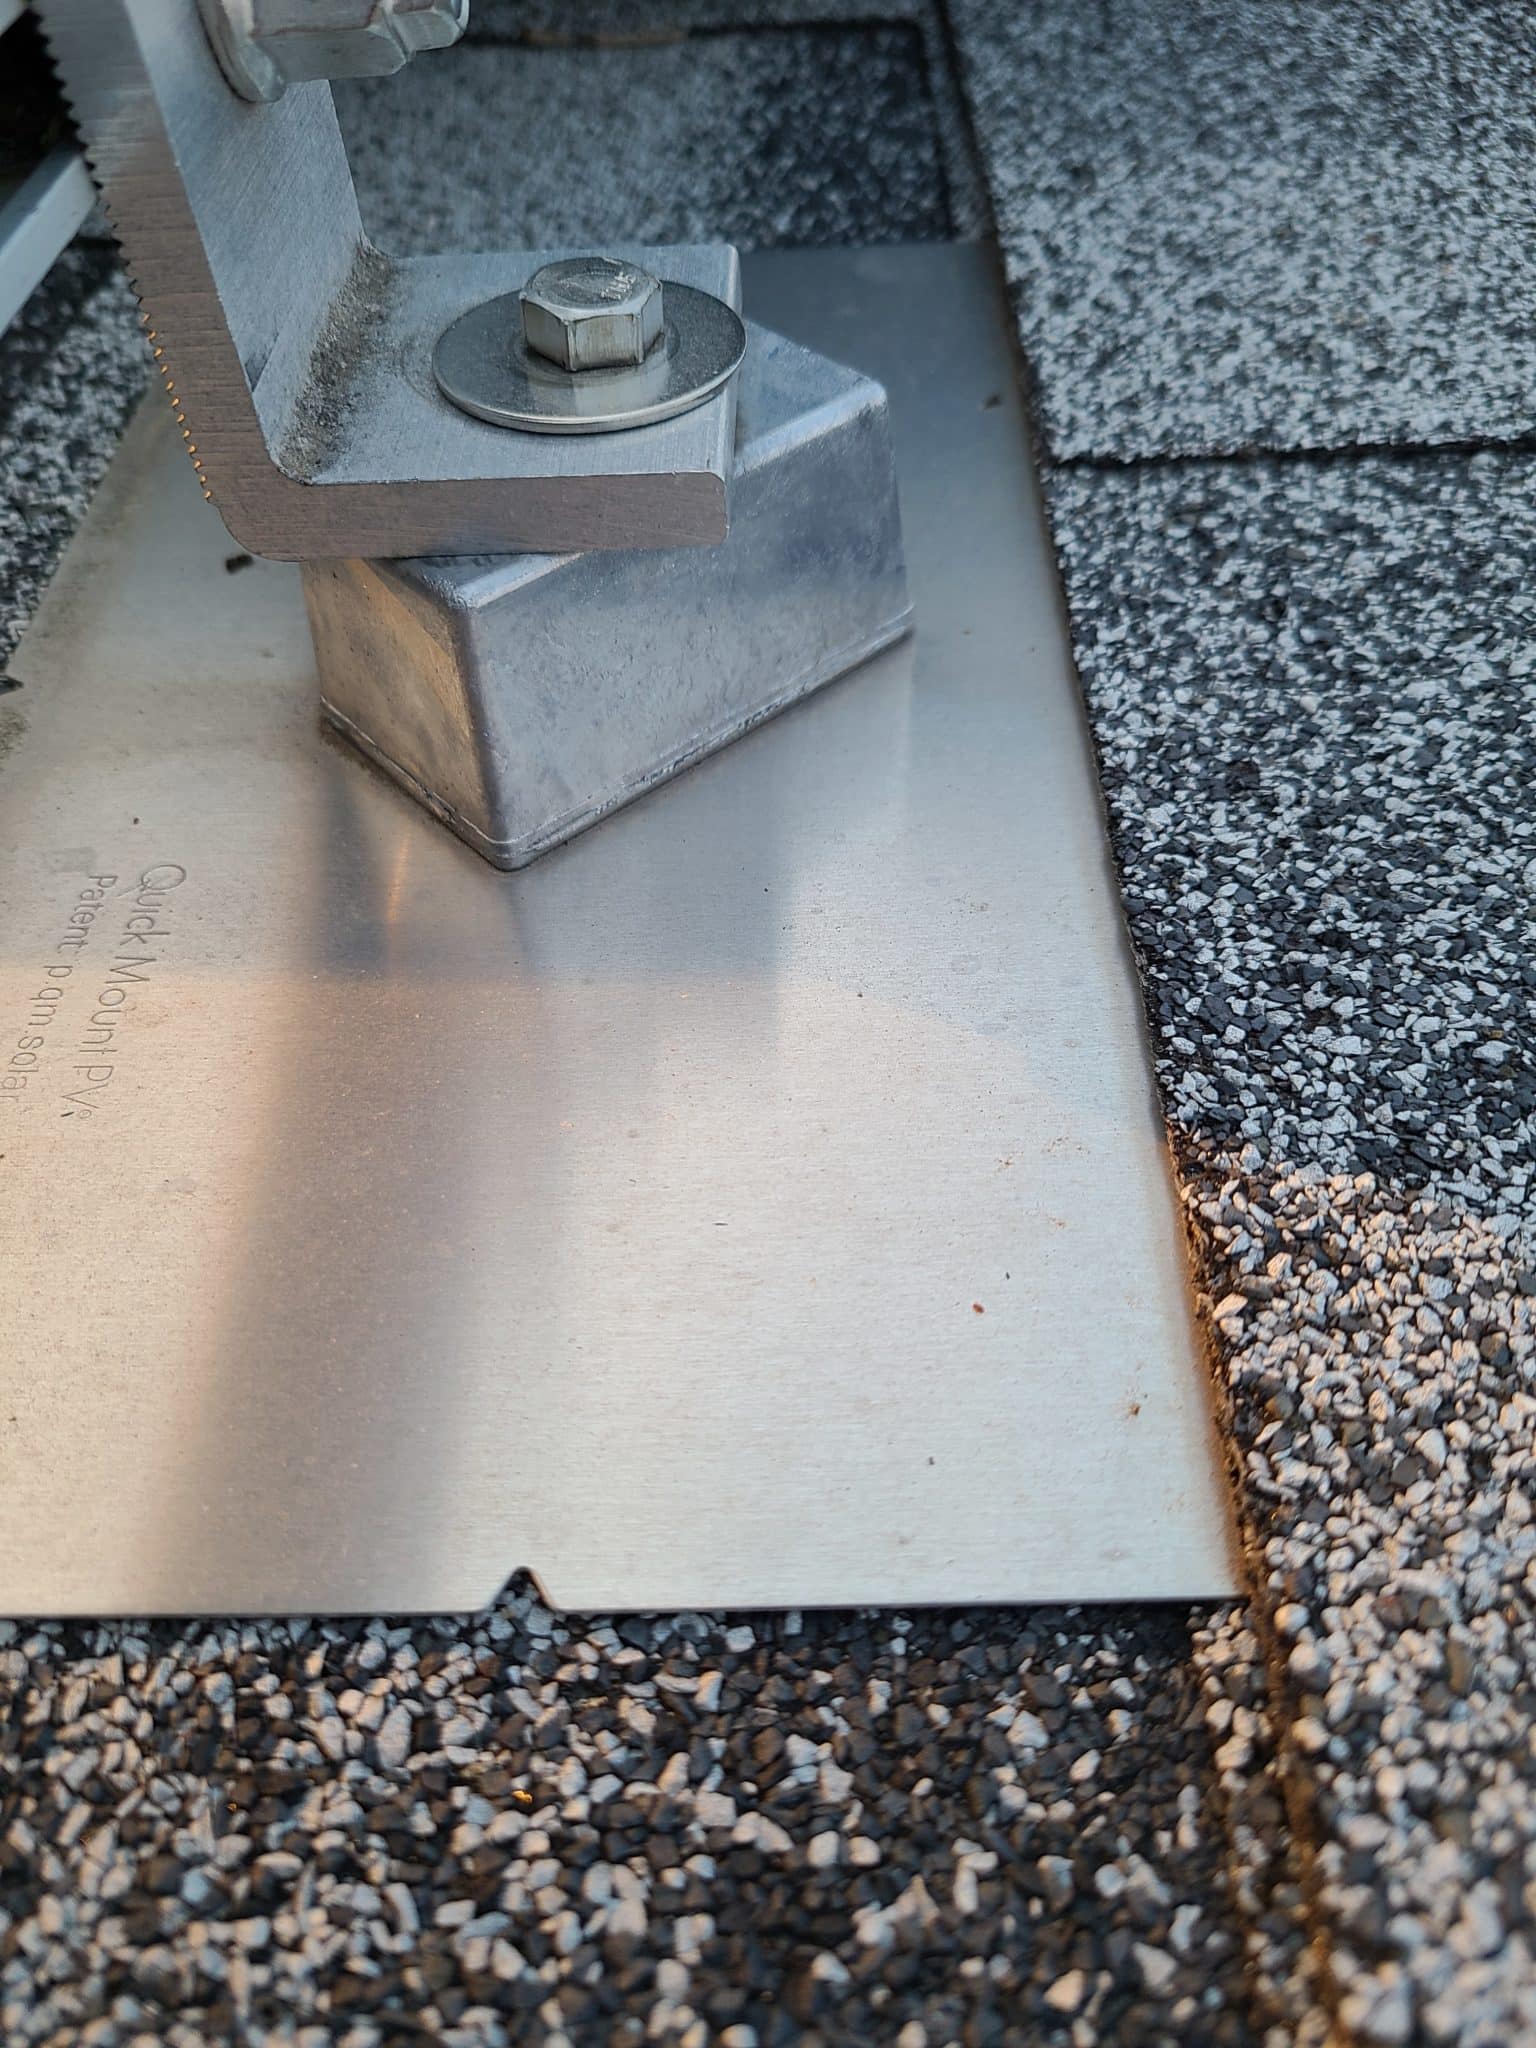
Once you’ve made sure the panels will fit on your roof as shown in the plans, you’ll want to mark the locations of the rails. These are also shown on your plans and will be a set distance up from the top and bottom of the panels. This distance is important, but it is slightly flexible. If you read the manufacturers spec sheet on your panels, they’ll tell you where you can put the rails on the panels and still meet their load bearing requirements. Typically, there will be a few inches of flexibility in either direction. This allows you shift the rails a few inches in order to avoid potential conflicts on your roof and to place your rails in an alignment with your shingles.
Ideally, you place your rails about 2.5” down from the edge of a row of shingle so the mounting boss as a little space between it and the shingle, but not so far down that the flashing of your mounting boss hangs over the edge of the next row of shingles. If that sounds like gibberish, I don’t blame you. Just use the image below from the Quick Mount PV – QMSE – LAG – Data sheet as a helpful guide.

If you are using different mounting hardware, then your instructions may differ a bit. Please refer to the data sheets that came with your hardware to make sure you understand their correct installation.
The key here is to make sure any rain water coming down the roof will run onto the flashing and continue down and off the flashing. This flashing will keep water from entering into the holes you drill and entering your home. Proper installation is important.
Once you know where your rail will need to be, mark the position at both ends of the panel array and use your chalk line snapper to snap a straight line between those points. This will mark the line your rails will follow. Having a straight line here is critical, so take your time as you measure and mark these out. It also helps to have someone hold the line for you as you mark these out. However, it can be done by yourself by hooking the end of the line to the edge of a shingle. Repeat this step for all of the rails on your plans.
Step 3: Finding Studs and Drilling Holes
Once you have all of your rails marked out in nice clean lines, it is time to find your rafters and drill the holes for your mounting hardware. This is probably the most intimidating part of the process.
“I’m going to drill holes in my perfectly good roof?” - Yup. You sure are!

“What am I thinking?” - Solar Panels are AWESOME!

“What if I mess up and my roof leaks?” - That’s what the flashing and caulking are for!
You will miss, but it can be fixed.
Let’s get this out of the way now. No matter how careful you are, you are probably going to drill a hole that doesn’t hit a rafter. This means you will have at least one hole in your roof that you won’t be putting a lag screw into.
I personally had 10-20 extra holes by the time I was done. Admittedly, I panicked at first. Berated myself for a while. Wallowed in despair, before finally accepting my error. You know, the 5 stages of grief. Well, minus the bargaining. I mean, who talks to their roof? Begs it to move the hole? Pleads with it to undo the damage you have done?…
That would be crazy, right?….
…..
Right?
…..
Just me?
Where was I? Oh yes. So you will have some extra holes in your roof. These are an easy fix. When installing your mounting bosses, all the holes are filled with silicon. Then covered with a piece of flashing to protect the holes. So any hole made will be doubly sealed so long as it is close enough to the mounting boss that the flashing covers it.
This is why when we were in our attic, we wanted to note if our rafter pattern changed. You need to expect the general location of every rafter. Then try to verify that location with your stud finder before drilling. Knowing you’re close to the right location helps make sense of any funky readings from the stud finder and ensures any bad holes drilled will be covered by the flashing. If your rafter pattern changes and you don’t know in advance, you could end up drilling a hole too far away for the flashing to cover. You’ll then have to fill that hole with caulking and paint over it in order to seal it up, or even replace the shingle.
So I guess what I’m saying is don’t worry if you mess up, just try not to mess up too bad.
Alright! Now that we’ve hopefully calmed those nerves, let’s get to work!

Tip 1: Start with a point of reference.
Use the geometry of your roof to find a point of reference and locate your first rafter. This could be an overhang, a peak, an edge, a dormer, or a vent pipe. Familiarize yourself with your rafter layout from the attic. Then take a measurement as a point of reference, if needed, to help you find that first rafter.
Tip 2: Mark the general location of each rafter using their spacing measurement.
If your rafters are spaced every 16 inches, then use a tape measure and chalk to mark where they should cross your rails. Doing this now will also ensure you don’t lose count later in case your rafter pattern changes part of the way down your rail. Then compare these rafter locations to your plans. This allows you to know which rafters actually need a mounting boss installed on them. Then go circle those rafters so you don’t accidentally drill a hole that you don’t need.
Tip 3: Complete one rail first
Do a single rail first and then you can use a plumbob to find where that same rafter should cross the upper or lower rails.

Tip 4: Place cardstock under your stud finder
Place a sheet of cardstock, a manilla folder, or a piece of cardboard under your stud finder to make it easier to slide along the roof and get better measurements.
Tip 5: Set your stud finder to the lowest depth
If your rafters had to be reinforced then it is likely that the sistered board is not going to be flush up against the plywood of your roof. This means that your stud finder might give you some weird readings. If your stud finder is adjustable, try to take readings using the lowest depth possible to find your rafters. Then try to take note if your rafter has it’s sister board on the right or left side. Ideally, you will want to drill into the main rafter instead of the sistered board. If you feel your drill bit hit open air before plunging into the rafter, then you know you have a gap and you’ll want to shift over 1.5” to drill a new hole.
Tip 6: Tapping to find the stud
You can use a rubber mallet to bang on the roof to try and hear and feel the location of the rafter in case your stud finder is proving to not be reliable.
Tip 7: Locate stud with wire
After you’ve drilled a bad hole, stick a curved piece of thick wire or a coat hanger into the hole and spin it until you feel the location of the stud. Using that angle and knowing the length of the wire, you can know exactly where your stud is located and drill a new hole.
Tip 8: Mark the bad holes with an “X”
If you drill a bad hole, cross it off with chalk so you know it is bad and to help you find it and fill it later. Then circle the good hole just for good measure.
Using the tips above, go down each rail and drill the holes needed for your mounting bosses. Make as many marks with chalk as you need to keep everything organized to you. Remember not to get frustrated if you are having trouble finding the rafter. Worst case scenario is you drill a hole that you have to fill later. But drilling that hole may also make it easier for you to find the rafter once you fish a wire into the hole, so go for it! This is the hardest part of the whole project, but you can do it!
Step 4: Dry Fitting The Mounting Bosses
Congratulations! You have holes in your roof! Okay, now time to finish learning how to install solar panels on a roof.
I know you’re eager to fill them, but first we have to prep all of the bosses. This allows you to do all the bosses at once when we open the tube of caulk rather than setting the caulk gun down in between each one. The caulking used is very sticky and makes quite a mess if it drips or gets on your hands and tools. So we want to be able to do that process as quickly and smoothly as possible. To do that, we need to go ahead and prefit all of our bosses.
To do this, you’ll need your roofing pry bar and one of the mounting bosses. A hammer can also be useful here in case you run into stubborn nail or to tap your pry bar through.
If your shingles are like mine, each layer of shingles is essentially glued together using an approximately 1” adhesive strip at the edge of the overlap. You’re going to want to use your pry bar to break through this adhesive and lift apart the layers of shingles.
Tip 1: Break strong adhesive with a pry bar
The adhesive on our singles was particularly strong, so I had to use a hammer to tap my pry bar under the top layer of shingles and break into the adhesive. Once the pry bar had broken into the adhesive, I angled it 45 degrees and tapped it sidewise to broaden the opening until it was wide enough for the mounting boss’s flashing to fit.
Tip 2: Don’t force it
Do not lift up on your pry bar or try to force it if you see the shingle start to rip. Instead, remove your pry bar and try coming at it from another location and walking your way over to your desired position. You don’t want to tear up your shingles by being too aggressive. Take your time here. Once your opening is big enough, try to fit the flashing into the opening.
Tip 3: Lift over the nail or hammer it in on the first row
You may hit the edge of a nail head for the first row of shingles. If you do, stick your roofing bar under the Mounting Boss’s flashing and lift up over the edge of the nail head. You may need to hammer this nail head down a bit more to help the flashing clear better.
Tip 4: Remove the nail for the second row
If you hit a nail in the second row of shingles, you won’t be able to simply go over it and you will have to remove it. To do this, use your roofing pry bar to get under the head of the nail and then pry it upwards to pull it out of the roof. This is where the hooks on the back of the pry bar come in handy. You’ll then have to break the adhesive on that row of shingles in order to actually get to the nail to remove it.
Tip 5: Chalk marks makes aligning mounting bosses easier
Once you have the mounting boss’s flashing installed under the shingles, look through the hole of the boss and align it with the hole you drilled. This is where the chalk marks you made earlier come in handy so that you can be sure you are aligning it with the correct hole. Once you have the boss positioned, continue down the line and then move on to the other rails.
If you are having trouble with this step, I recommend watching an installation video of your mounting hardware to see how they do it and to build some confidence in your process. If you have a different kind of roofing material, then it would also be beneficial to learn more about how your roofing is constructed. See if you can find a video that shows installation on that type of roofing. There are a lot of resources available on YouTube and manufacturer websites that you can take advantage of.
Once you have all of your bosses in place, it is time to get ready to caulk them in place. We’re going to do the next two steps quickly and in sequence so read them both and have your materials prepared ahead of time.
Step 5: Caulking the bosses
For this step you will need your caulking and caulk gun along with your roofing pry bar.
First things first, go ahead remove all of the bosses you just worked so hard to install. You’re going to flip them over so the bottom side of the flashing is facing up. Then place them above the holes. If your roofing is too steep for the flashing to sit there without sliding down, then you’ll need to do this on the ground and carry them back up. Or do each one at a time as you go down the line.
Tip 1: a plastic bag can be helpful
If you are going to do each one one at a time, then I recommend taking a plastic bag with you to stick over the end of the caulk between each flashing and to release the plunger after each use to prevent caulking from getting all over your roof.
Once you have all of your flashing prepped, go ahead and cut the end of your caulking and pop the foil seal, if needed. You are now going to go down the line and do two things. You are going to fill each hole you drilled (good and bad) with caulking. Press the tip of the nozzle into the hole and squeeze until you are sure that the hole is completely filled.
Tip 2: Use your non-dominant hand for touching caulk
After filling the bad holes, I liked to put a little extra at the top of the hole and then press it down with my finger to really smoosh it into the surrounding shingle material. This helps ensure there are no small gaps that water could seep through later on. After doing this, wipe your finger off or be sure to not touch anything with that finger. I used the middle finger of my left hand as I could then keep from using that finger for anything else until I was done.
Tip 3: Caulk in upside down “U” shapes
Secondly, you are going to caulk a line on the flashing in the shape of an upside down “U”. Be generous here as this line of caulk will have to contour to the geometry of the shingles, so having extra caulking to smoosh will help you get a better seal. This is so if water does get under your shingles somehow, it is forced to flow around the hole(s) you drilled.
Make sure you make this U wide enough to cover any bad holes you drilled as well.
If you drilled any bad holes that aren’t going to be covered by the flashing, now is the time to fill them as well. Be extra generous with these holes and then be sure to give them a good topping that you press into the surrounding shingles.
Tip 4: Keep Caulk On-hand
If you accidentally ripped the shingles, then you’ll want to keep your caulk ready so that you can glue them back together after you’ve installed your flashing. If the rip was too significant, you’ll want to replace the shingle to be safe.
Once you’ve caulked all your flashing and holes, release the plunger and either put the caulk tube in a bag, tape the end of it, or throw it away.
Now go back down the line and reinstall your flashing.
Tip 5: Use the pry bar to help position the flashing
You may find it useful to stick your roofing pry bar in first and then slide the flashing along the top of the pry bar in order to keep it elevated as you position it. This ensures the flashing doesn’t get caught on any of the nail heads on the first row.
Once you have the flashing realigned with the proper hole (once again relying on our chalk marks), press it down to set the caulking in place. Then proceed to the next boss and repeat the process until all of your bosses are set. We will now want to move on quickly to the next step before the caulking dries too much.
Step 6: Securing the Bosses and L-Brackets
 Flashing under the shingles
 Secure bosses at an angle
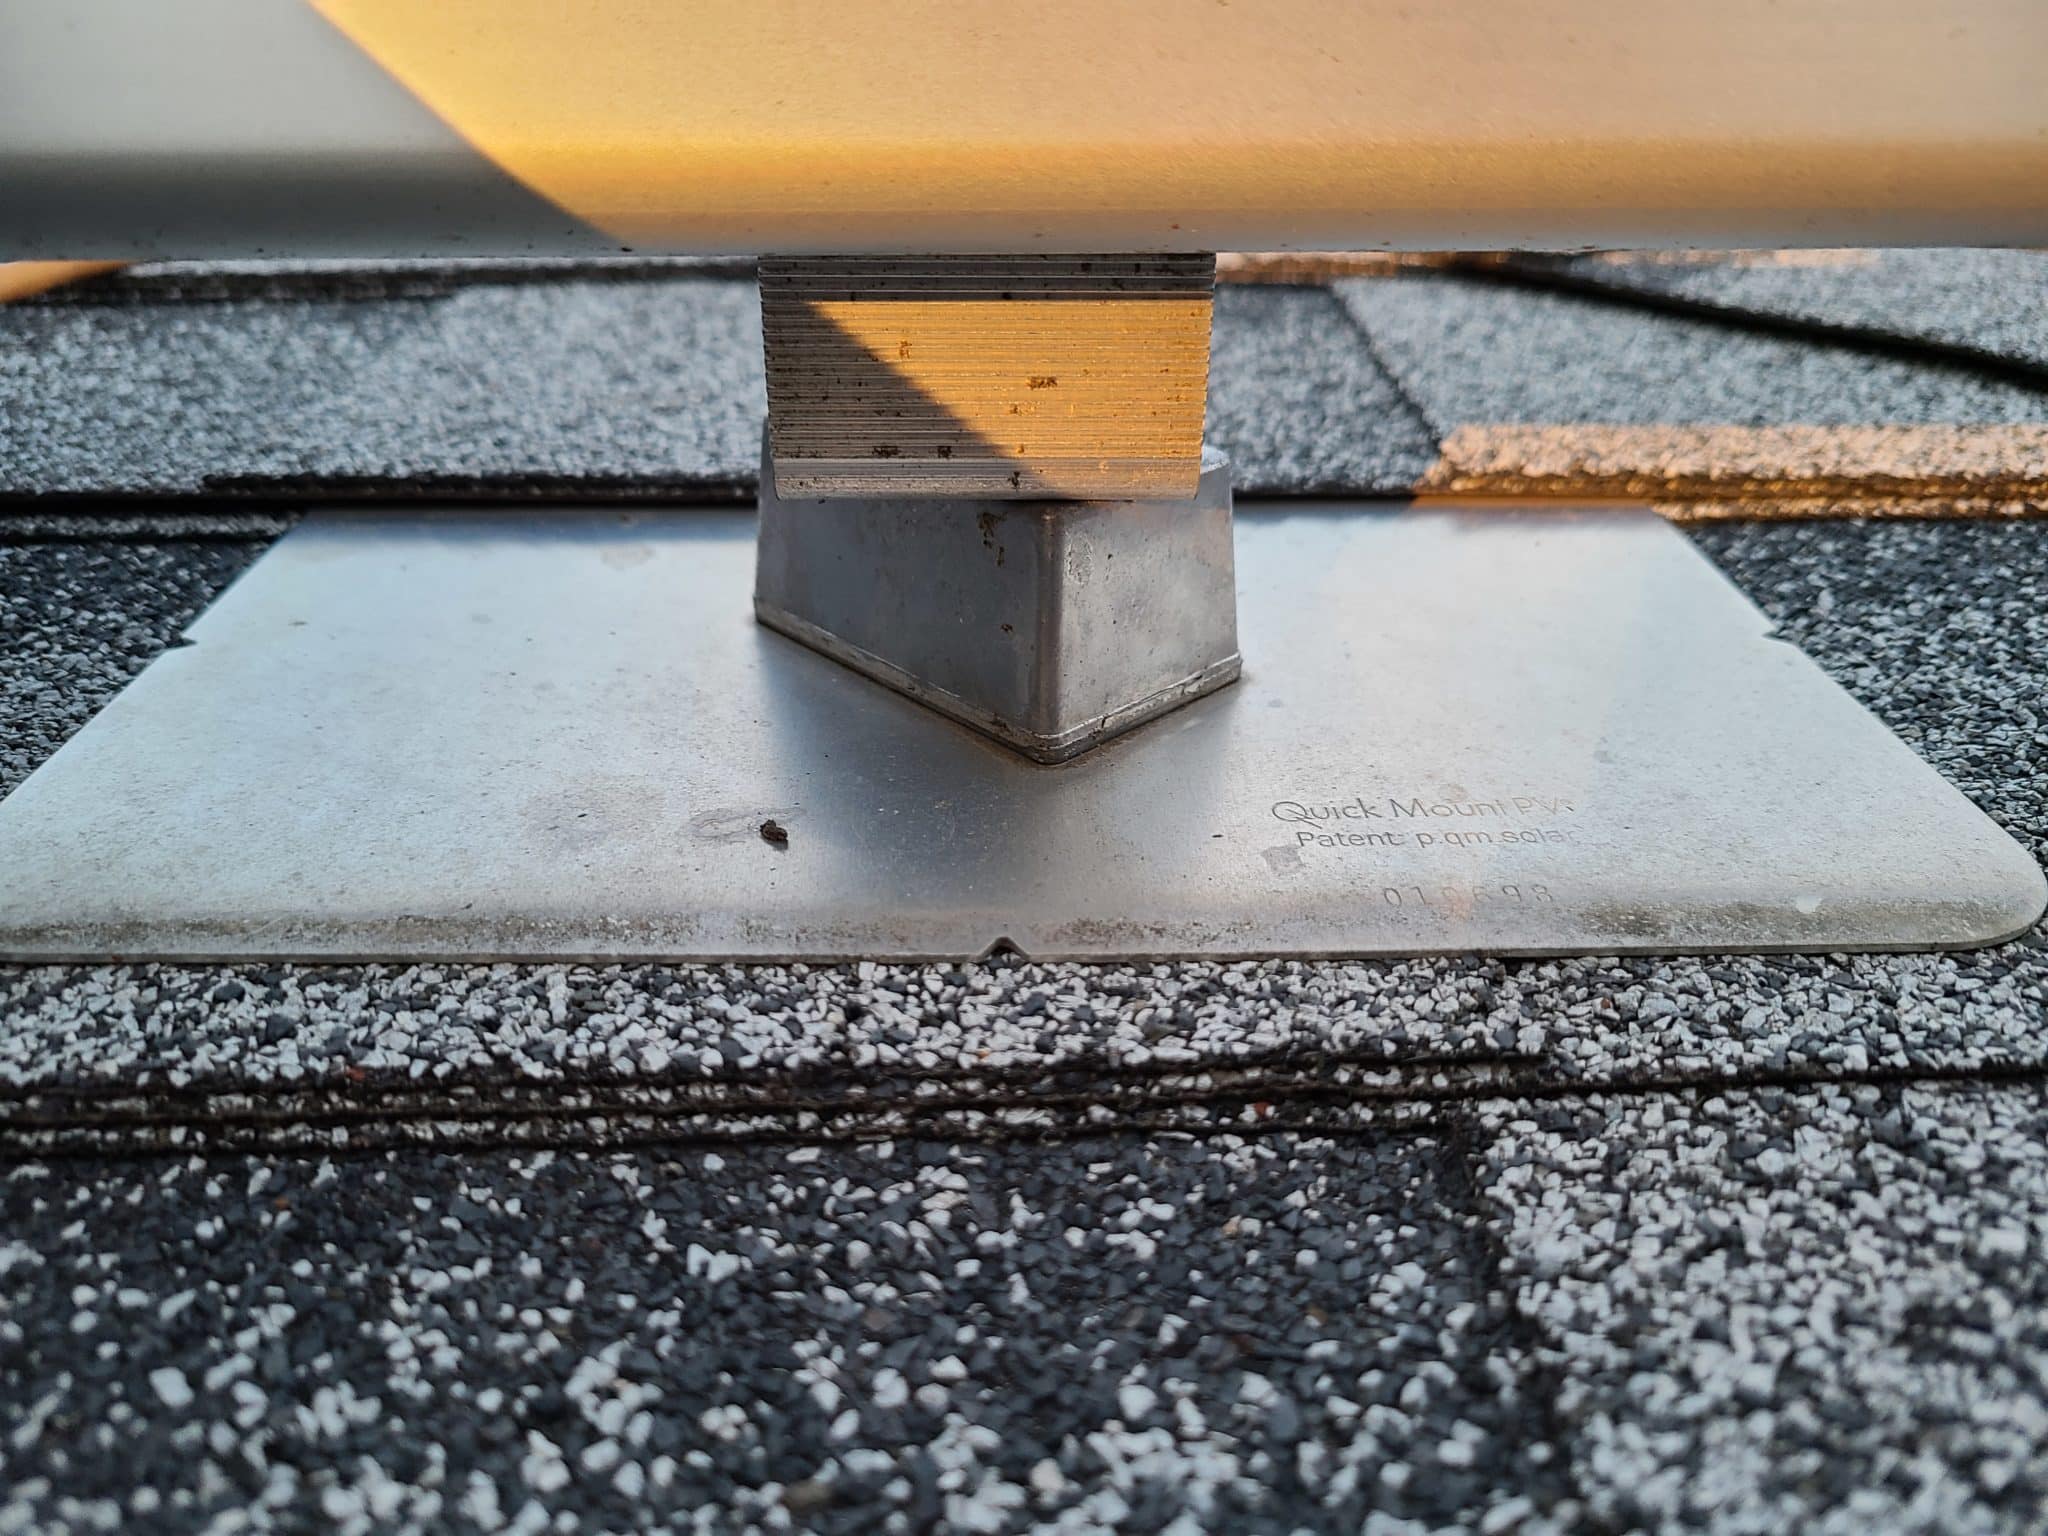
Each mounting boss is secured using a Lag screw with a rubber spacer to prevent water penetration. This Lag screw also screws down the L-bracket used to secure the rail. I recommend preparing this hardware stack up on the ground before you perform the caulking in step 5.
Once your bosses are caulked and positioned, take your hardware stack up and your impact driver with the appropriate socket up onto the roof. Go down the line and screw each boss down.
Tip 1: Don’t Over Torque the Bosses
The lag screw is properly torqued down when the boss can no longer rotate easily. Do not over torque this assembly or you risk damaging your flashing, or roof/rafter.
Tip 2: Angle the boss head
Lock the boss down at an angle so rain water hits an angled surface as it comes down your roof instead of hitting a flat wall head on. This will help prevent water, ice, and debris from backing up and possibly getting under your shingles.
Step 7: Install the Rails

Once you’ve gotten all of your bosses installed, it’s time to move on to the rails.
Your rails are made from extruded aluminum and are joined together with a smaller extruded piece. They can easily be cut by most power tools, so use whatever you are most comfortable. Just ensure you can get straight 90 degree cuts. Assemble your rail to the length specified by your plans. Then secure it loosely to your L-brackets using the provided hardware. Be sure to leave a few extra inches of rail sticking past where the panels end so that you have room to adjust or shift panels if needed. Also be sure to leave an 6”-12” of rail on the rail closest to your electrical panels so that you have room to mount a junction box.
Tip 1: Use a String to Ensure Alignment
As sturdy as the rail may seem, it can actually be flexed rather easily by a misaligned bracket. One of the quickest ways to ensure good results is to pull a string from one end of the rail to the other. Then make sure that your brackets are all in a straight line. If some of the brackets are off, shift them using the slot under the lag screw. Avoid loosening the lag screws as you don’t want to disturb your caulk by tapping on the L-brackets with a mallet to shift them into alignment. Repeat this with all of your rails to ensure they are all straight.
Tip 2: Use A String for consistent rail height
You can also use a string to ensure that your rail is set at a constant height so that you don’t have any hills or valleys in the middle.
Tip 3: Use A String to Ensure Equal Heights for Multiple Rows
If you are going to be installing multiple rows of panels, then run a string from the end of the bottom most rail to the end of the top most rail. Then adjust the height of the rails in the middle so they are just touching the string.
Doing all of this ensures that when you install your panels, you’ll have a flat continuous surface of panels. This is mostly aesthetic, so spend as much or as little time aligning things as you’d like. Having a panel off, would personally bother me for the next 20 years, so I spent the extra hour to two here to get as close to perfect as I could.
Step 8: Attach The Optimizers:
Each panel will have its own optimizer. These attach to the top rail in the middle of each panel. We install these and connect all of their wires before installing the panels so we aren’t fussing with wires later while trying to maneuver a heavy panel. These optimizers are attached to the rail using supplied hardware that simply screws down like any bolt, so grab your impact and get to work.
Tip 1: don’t forget to peel off the optimizers’ QR code stickers
Leave each bundle of wire coiled up until you have the optimizers all mounted. You’ll then want to go through and peel off the QR Code sticker on each optimizer and stick it onto your plans in its respective position. Once you send a picture of this sheet to your solar panel company, they’ll be able to layout your interface to show the panels in their actual position. This allows you to diagnose any problems later in case a panel isn’t performing as it should.

Once all of the panels are physically installed, you’ll want to connect all the wires as directed by your wiring diagram in order to create a wire daisy chain back to your junction box location.
Now use the supplied clips to secure and bundle the wires so none of them are drooping and touching the surface of the roof. If left loose, then the wires will slowly be worn down as they rub on the roof until they eventually cause a short. Obviously this isn’t ideal. I personally fussed with the wires until they were all perfectly tight and secure so I wouldn’t be able to see them when looking up at my panels from my deck.
Run the wires until they get back to where your junction box will be located, spool up the extra wire and zip tie it to the rails for now.
Tip 2: Run your Grounding Wire On the Rails Closest to the junction Box
You’ll also want to run your grounding wire between each of the rails and secure it with your grounding lugs. There is nothing special or difficult here, just ensure it won’t get in the way of the panels and is visible for the inspector. I recommend running it at the end of the rails closest to the junction box since it will need to terminate in the junction box. Be sure to leave yourself some extra material to maneuver if needed.
Step 9: Install The Junction Box:
Your solar panel company should provide you with instructions on how to construct the junction box along with the list of fittings and other materials needed. Purchase the specific fittings listed along with the other various hardware like the grounding bar.
You’ll likely need to drill a hole for the copper ground wire’s fitting, so I recommend purchasing a set of step bits from Amazon. They’ll make this much easier and come in handy on future projects as well.
Our solar company recommended an extension ring for the junction box. I was able to make mine work without it, but maneuvering the thick ground wires was a little difficult, so it is worth considering.
Once you have all of your components, drill your mounting bolt holes along with your weep holes. The weep holes will go in whichever corners will be the lowest when the junction box mounted on the rails. This will depend on how you decide to mount yours.

TIP 1: mount junction box on backside of rail
I chose to mount mine to the backside of the rail, parallel with the roof so it would be more hidden when looking up at the panels. This also puts the holes I am drilling for attachment bolts on the wall directly above the lowest two corners where the weep holes are located. This way, if any water gets in there, it weeps out before it can cause any damage.
Next, install the grounding bar to the furthest side away from the weep holes so it is uphill from any water penetration. You can install this bar by running a screw through the bar and into one of the threaded holes inside the junction box. This can be a tricky fit. So another option is drilling a hole in your junction box, running a bolt through and placing a locking nut on the other side.

Install your fittings on whichever side of the box your wires will be coming from along with your pipe fitting for your conduit (if you have already planned that far). If you haven’t, then just install the plugs that came with the junction box into any remaining open holes. You can then remove these plugs later when you’re ready to connect your conduit.
Finally, climb back up onto your roof and mount your junction box to your rail. Go ahead and close it up for now without pulling wire into it so it doesn’t get water logged in case it rains before you get your conduit done.
Step 10: Installing The Inverter
Ideally, install the inverter on an exterior wall between your solar panel’s junction box and the main circuit breaker panel to your house. Some code’s will require the inverter and your AC Disconnect switch to be within a certain distance of your electricity meter. This is because firefighters prefer to shut off your home’s power before they go hacking into any walls to save you and risk electrocuting themselves. Your plans should already mark an approximate location. You may have already discussed and picked out a space with one of your solar panel company’s team members.
Installing the panel is as easy as screwing the mounting bracket into a stud and then hanging the inverter onto the bracket. There’s a small retaining screw or two that needs to be tightened to keep the inverter secured to the mounting bracket once it’s tightened down. Be sure you don’t miss that step.
Once the inverter is secured to your wall, take your allen wrenches and open up the inverter to install the zigbee module and to connect the antenna to the module. This is no different from installing parts in a computer, so if you have ever done that you’ll be fine. If you haven’t, the three key things to remember are to:
Tip 1: Always Check the Power is off
First, always make sure there is no power to the system. In this case, we haven’t wired the inverter to anything so this isn’t an issue. In case you skipped around and you have, you must make sure to shut off both the AC Power with the AC Disconnect Switch and the DC Power using the Inverter’s DC Shut Off Switch.
Tip 2: Always ground yourself
Second, you must always ground yourself before you touch circuit boards. Simply touching a large piece of metal like the cooling fins on the back of the panel, or your grill or a doorknob can dissipate any static electricity you accumulated. That small spark of static electricity can destroy some sensitive electronic components.
Tip 3: Never touch board or pins
Third, never touch the components on the boards or the pins along the edges. Always touch the green sides of the boards when handling components. If you leave any oils from your skin on to the gold, silver, or copper pins on the boards it can affect how well they transmit signals.
So long as you obey those three rules you will be okay, and once you’ve done this once, you’ll see how easy it is.
Step 11: Installing The AC Disconnect

You must install an AC disconnect switch between your inverter and your main circuit breaker panel. This switch must be accessible to firefighters from the outside of your home and within arm’s reach of the inverter. This allows them to shut off AC and DC power at the same time. Codes are different in every region though, so if you aren’t sure, it is best to contact your local Codes and Ordinances Department to confirm. The proposed location on your plans may have already been reviewed and approved, but it doesn’t hurt check in case something seems strange about your set up.
For me, I had limited space on my wall. I opted for a smaller disconnect switch like the type used for our A/C unit. Our Inspector said the disconnect with a large red handle on the outside of the box is generally preferred, but the one used didn’t actually violate any codes. He also stated that our deck must have been built as a later addition because the electricity meter was supposed to be a minimum of 3 feet off the surface you would stand on. This same rule apparently didn’t apply to our A/C disconnect switch, but little things like that are why it is important to check with your City Hall or an inspector beforehand.
Assuming your codes are simple, just screw your disconnect switch to a stud in a location easy to run conduit from the inverter to it. Then install the requisite size breaker.
Easy as Pie
… is something I would say if I was able to actually bake a pie…
Sooo…. Easier than pie?
Step 12: Run The Conduit

After installing the mounting bosses, running conduit is probably the second most difficult part of this DIY installation process. Tied with aligning and straightening your rails. You’ve gotten this far, so I know you can do it.
When it comes to conduit, you have two real choices: metal or plastic.
It’s important to note here that some areas may not allow the use of PVC Conduit for solar applications. Be sure to check with your local inspector or city call to verify. Also, make sure to use the grey pvc conduit meant for electrical applications. Not the white pvc used for plumbing.
I went with plastic conduit. This way I didn’t have to worry about code requirements of grounding the metal conduit. Given the complex bends required by the geometry of my house, no prefabricated plastic conduit bends would work for it. I ended up having to bend all of my conduit with a heat gun. This complicated things quite a bit.
Bending metal conduit is pretty easy. Here’s a nice bending tool that allows good bends without buckling the inner wall of the pipe.
Bending plastic is a fair bit more complicated. You’ll need a heat gun to heat up the plastic and make it malleable. You can also use a torch, but you risk charring the outside of the pipe. You’ll want to heat up a large stretch of pipe. Then slowly bend it section by section to get a larger sweep.
If I were to do it over again, I probably would still gone with the plastic conduit because it was cheaper and didn’t require the same grounding precautions. I just would have spent a bit more time practicing my bending technique.
A few Plastic conduit tips
- Create a Jig – A good way to control the bending is by tracing your desired curve onto a piece of wood. Then put screws along the curve that you can pull the pipe against.
- Wear gloves to protect your hands from the hot pipe.
- Bend small sections – If you need to do a tight bend, you’ll want to bend a small section at a time allowing it to compress, relax and compress further to help keep the walls from buckling.
Another option is to put a malleable sleeve inside the pipe that can support the walls and then be removed once the bend is complete. Or alternatively, if you cap one end, blow into the pipe while it is still malleable to pressurize the pipe and reinflate the wall. - Heat all sides of the pipe and don’t let your heat gun linger in one spot too long or you can still end up burning the pipe.
- Buy a spare piece of pipe to practice on.
If you don’t want to try to bend the plastic or metal conduit, then buying preformed pieces can be a good alternative depending on the geometry of your house.
Make sure to consult your plans and custom instructions so that you know what size of conduit you need. There will be a conduit schedule on the wiring diagram page that specifies a size. This will likely be ¾” conduit. It is best to verify as the number of wires that can be in each size conduit is governed by National Electric Code.
Tip 6: Track the Number of bends
When running your conduit keep track of the number of bends in your conduit. You need to include a pull box every 360 degrees of bends you have. Most places required this by code, but it is also good practice. Pulling these wires through longer stretches without that additional box can be pretty difficult. It can actually snap your fish tape if you put too much tension on it.
Additionally, deburr all of your pipe at every cut so that they don’t tear up the coating of your wires.
With these tips in mind, pick the type of conduit you prefer. Then go ahead and run the conduit from the inverter to the AC disconnect switch, or its adjoining pull box. I recommend doing this run first. It is typically the shortest run, so if you mess up, it means less scrap to throw away.
testing & installing Plastic conduit
If you’re using plastic conduit, make sure to have the PVC cement and primer. Pre-install your fittings into the inverter and AC Disconnect switch or pull box. Test the conduit run fits and can be installed before applying any cement. Trim ends or adjust the bends of the conduit as necessary until it can be installed. Then remove your conduit run and prime the male and female ends of the runs before applying the cement.
Install your conduit run once the cement is applied. Flex it, if needed, to get it installed. Then adjust it so the male ends have good contact into your fittings. Once you install the piece, the cement sets up fast, which is why the dry fit previously was so important.
With that piece done, you either did really well and you’re ready to go tackle the rest of the line, or you messed up a step. If you did mess up, don’t worry. That’s why we did the short run first. You can easily undo the fittings and toss that piece in the recycling bin (assuming it is accepted in your area). You’ll have lost a few dollars, but you’ll have gained some good experience for your next try.
Now proceed with the rest of the runs from your junction box to the inverter. Then from the AC Disconnect to the Main Circuit Breaker panel.

Connect conduit to circuit breaker
If you’re lucky, your circuit breaker panel can be accessed by drilling a hole through your exterior wall and feeding cables into it. We had an existing hole in our foundation wall from the previous owner where they had run cable for a hot tub. So we utilized that as the conduit entrance into the main panel for our solar panels and car charger.
If that hole hadn’t already existed, I would have drilled a hole higher up in the wall and ran the wires down in the wall cavity instead of drilling through the concrete portion of the wall. This may have required me to open up the drywall on the inside of the house. Drywall work is something I loathe to do, but drywall can be repaired easier than I can drill a big hole in concrete.
In order to drill a hole, you’ll want to rent a Core Drill from your local home improvement store.
Remember, if you are drilling a hole into your panel:
- Shut off all power to the house
- Be 100% sure you are drilling in the right place
- Tape up the area to control debris
- Fully vacuum out your panel afterwards
You don’t want any small bits of metal shorting anything out later. When you are done, slowly restore power one breaker at a time to ensure nothing blows.
Another thing to remember is to seal around the conduit penetration. This can be done with flashing or some expanding foam. However, this is another instance where it is best to check with your local inspector or codes department to ensure they don’t have a specific requirement when it comes to exterior conduit penetrations and terminations.
Finally, install a pull box where you penetrate into your home to make fishing the wires a lot easier. Also, drill a small weep hole into the lowest corner or corners in that pull box so any condensation from your home, or potential water penetration from outside has somewhere it can drain.
If you made it through all that and you have your conduit in place, then I am pleased to inform you that everything else is fairly easy from here!
Step 13: Pulling Wires
With your conduit in, it’s time to pull your wires. Assuming you already bought the wire you need, all you need to do is run your fish tape up your conduit from your inverter or pull box to the junction box.
Tip 1: Create a hook end on the fish tape
Attach the wires to your fish tape by bending them to create a hook and then taping that hook onto the length of your tape. You’ll want tape under the hook end of the wire and then over it as well. This way the wire is hooked on your tape and then tape is holding the hook down. I usually add a little extra at the bend of the hook to form a smoother surface so it can’t catch on the lip of the conduit as I begin to pull.
Tip 2: Don’t overlap the hooks
Attach each wire like this to your fish tape. However, space the wires a few inches apart, so none of their hooks overlap and you end up with a fat section you’re trying to pull.
Tip 3: get someone to help pull wires
To prevent accidentally pulling the wires too far and having them end up in the conduit, I recommend having someone watch them to tell you when to stop. Or tie/tape the wires to the rail or conduit to physically stop them from being pulled too far.
Repeat this process until you have run all of the necessary wires per your plans.
Step 14: Connecting Wires
Your plans have the instructions for which wires go where and custom other instructions, but we’ll go ahead and break it down.
Junction Box
There is a positive and negative wire coming from each run of solar panels if you have more than one. Both of these wires will be black just to confuse things. You can trace the wires back to their inverters to determine their polarity.
Once you know which is which, you’ll want to mark the positive wire with red electrical tape to help you keep track. Cut the connector off of either wire if they still have it. Then fish them through the fittings and into your junction box. Leave a little slack outside the box to form a drip loop. This allows water to run away from your junction box instead of towards it. Then tighten down the fittings until the wires are secure.
Leaving about 3 inches of wire in the junction box, cut off the extra and remark your positive wires with red electrical tape inside the junction box. Now strip the ends off the black and red wires. Then connect black to black and “red” to red eith waterproof wire nuts.
Pull your solid copper grounding wire through its fitting and screw it into the bus bar. Be sure to leave a drip loop here as well and then tighten down your fitting. Strip the end off the green wire coming from your conduit and screw it into the bus bar as well.
Tug on all your wires to make sure everything is secure, then cram everything into the junction box and install the lid. Make sure the lid is properly seated and the seal is fully engaged. Then you’ll be good to go.
Inverter
The inverter is mildly more complicated since you have DC and AC cables entering into the same place. To simplify things, I recommend you watch Solar Edge’s wiring video on YouTube from about the 1:50 minute point to the 3:30 minutepoint in order to get a clearer picture of the wiring.
Your model might be slightly different, but the instructions will generally be the same. Since we haven’t installed our panels yet, they won’t be producing any voltage. However, utilize the video’s measurement process to check all the panels connections and no polarity accidentally got swapped. It’s good to check this before activating your system. It may make things easier if you leave the DC wires loose for now. Just trim them to length and then put a wire nut on them for safety.

AC Disconnect
Connect the red and black wires from the inverter to one side of the breaker. Then the red and black wires from your main breaker panel to the other side. This is just like wiring up a circuit breaker. Your disconnect should also have a grounding bar, so be sure to connect the ground wire as well. The white wire usually stays unbroken here. It will run straight from the terminal block at the inverter and down to your circuit breaker panel.
Grounding your conduit
If you decided to go with metal conduit, you need to ground the conduit at every termination using grounding bushings. To do this, strip off a small section of insulation on the ground wire and clamp it to the bushing. This creates a continuous ground all the way to the breaker panel. If that sounded confusing, you’re not alone. To help make sense of it, I recommend watching the following video:
Circuit Breaker Panel
The circuit breaker panel is the last thing to wire up in this chain. The first and most important thing to do is shut off power to the panel by flipping the main breaker. Cut, strip, and connect your red and black wires to the two pole breaker. Then cut, strip, and connect your white and ground wires to the grounding bar in your panel. Reinstall the cover on your panel and then slowly restore power.
Be Sure to Keep the Solar Panel Breaker in the OFF Position!
Step 15: Install The Panels
The hardest part about installing the panels is physically getting them into position. Have an extra pair of hands or two to help lift the panels and hold them in place as you screw them down. Starting at one end of your rails, use your chalk marks to position your panel. Lift up the end of the panel and connect its wires to the inverter. If there is enough slack the wires touch the roof, be sure to tuck the slack into your wire clips.


Adjusting & Connecting panels
Once the panels are in place, use your framing square to ensure your panel is square with your rails. Spend extra time on the first one. It will dictate how all of the rest of the panels will turn out. Fasten down the side of the panel closest to the end of the rail using the clamping bolts provided. Place the clamping bolts in place on the other side of the panel, but do not tighten them down yet.
Bring up the second panel and connect its wires. Press it up against the clamping bolt. This bolt acts as a consistent spacer, so if your first panel was square, your second one will be too. Align the top side and tighten down the clamping screws to fully secure the first panel and partially secure the second panel. Repeat this process down the rail for the rest of the panels.
If you have a second row of panels the process is the same. Spend extra time positioning the first panel. Utilize clamping bolts as a spacer between the first row and the second row to create uniform spacing. If you set your rail heights right, this should form a near continuous plane of panels. Tighten down the clamping bolts on one side of the rail, then remove the bolts that were acting as spacers between the first and second row and place them on the other side of the panel. Repeat this process down the rest of the second row and any subsequent rows.
Once you have the first one done, this process goes pretty quickly and the only fear is dropping the panels. If you have a steep or slick roof, it may be worth considering tying a rope around the panel and having someone on the ground hold onto the rope.
Checking the panel connections
It’s time to check all our connections are functioning and the panels work correctly. Take your multimeter and check the DC wires from your solar panels in your inverter. It should read 1v for every panel that is on the chain.
Example: If you have 15 panels on one chain, then it should read 15v. If it reads less than the 15v, then one of your panels is not properly connected, completely shaded, or malfunctioning.
Our solar panel system came with a monitoring application, which we can use to check the system. If you already set up an account in the app and have connected their zigbee hub, then you should be able to see what optimizer/panel is malfunctioning. Then go check all of its connections. Next, if all of the wires appear properly connected, then call the App company (i.e. Solar Edge) for help troubleshooting your panels. If you don’t have the app up and running yet, then it may be best to set up first. Or you’ll need to check every one of the panel connections.
Lastly, if you have a negative value reading, then you probably traced your wires incorrectly. Go back and swap the wires in your junction box.
Once the voltage on the DC lines checks out, go ahead and connect them to their terminals in the inverter.
Step 16: Safety Labels and Directory Placard
Now with everything wired up, add all the safety labels and install the directory placard prior to inspection. Our solar panel company already provided us with all of the labels needed. It was prepackage as sets that cover every label combination you should need. So you will have extras and it’s possible they are slightly different than what is listed in your plans. If you have any questions, contact the company for clarity. The hardest part is figuring out where to fit all of the labels.
There is also a directory placard required that you will need to order for your solar panel system. The image file is in your plans. We ordered ours from PV Labels and install it next to the Inverter and AC disconnect.


The need for this placard was not obvious to me when I was installing my panels. So it was the only thing I was missing when I installed my panels. I ordered one. But to have my system up and running faster, I quickly 3D printed a placard and installed it. My inspector accepted this printed placard and signed off on the system as is.
That’s it! You now know how to install solar panels on a roof!
Now just contact your permit department to get your inspection and approval completed. Then call your utility company to have them swap out your electric meter, if needed, before giving you approval to turn on the system. Expect something to come up during the inspection you’ll need to resolve. It may be frustrating, but it’ll give you peace of mind to know that the inspector was thorough.
Step 17: Turn On Your System
Once you have approval from the utility company, you’ll want to start turning power on up the stream. Turn on the circuit breaker in the main panels and then turn on the AC disconnect. This should now power up the inverter. Finally, turn on the DC disconnect at the inverter. Your system should now be fully functional.
Open up your monitoring app (i.e. Solar Edge) and go through the pairing instructions in the app to connect to the inverter. Once select the inverter, you can go into its settings and change it to connect to the zigbee port. Here are some screenshots of what those settings look like for me.
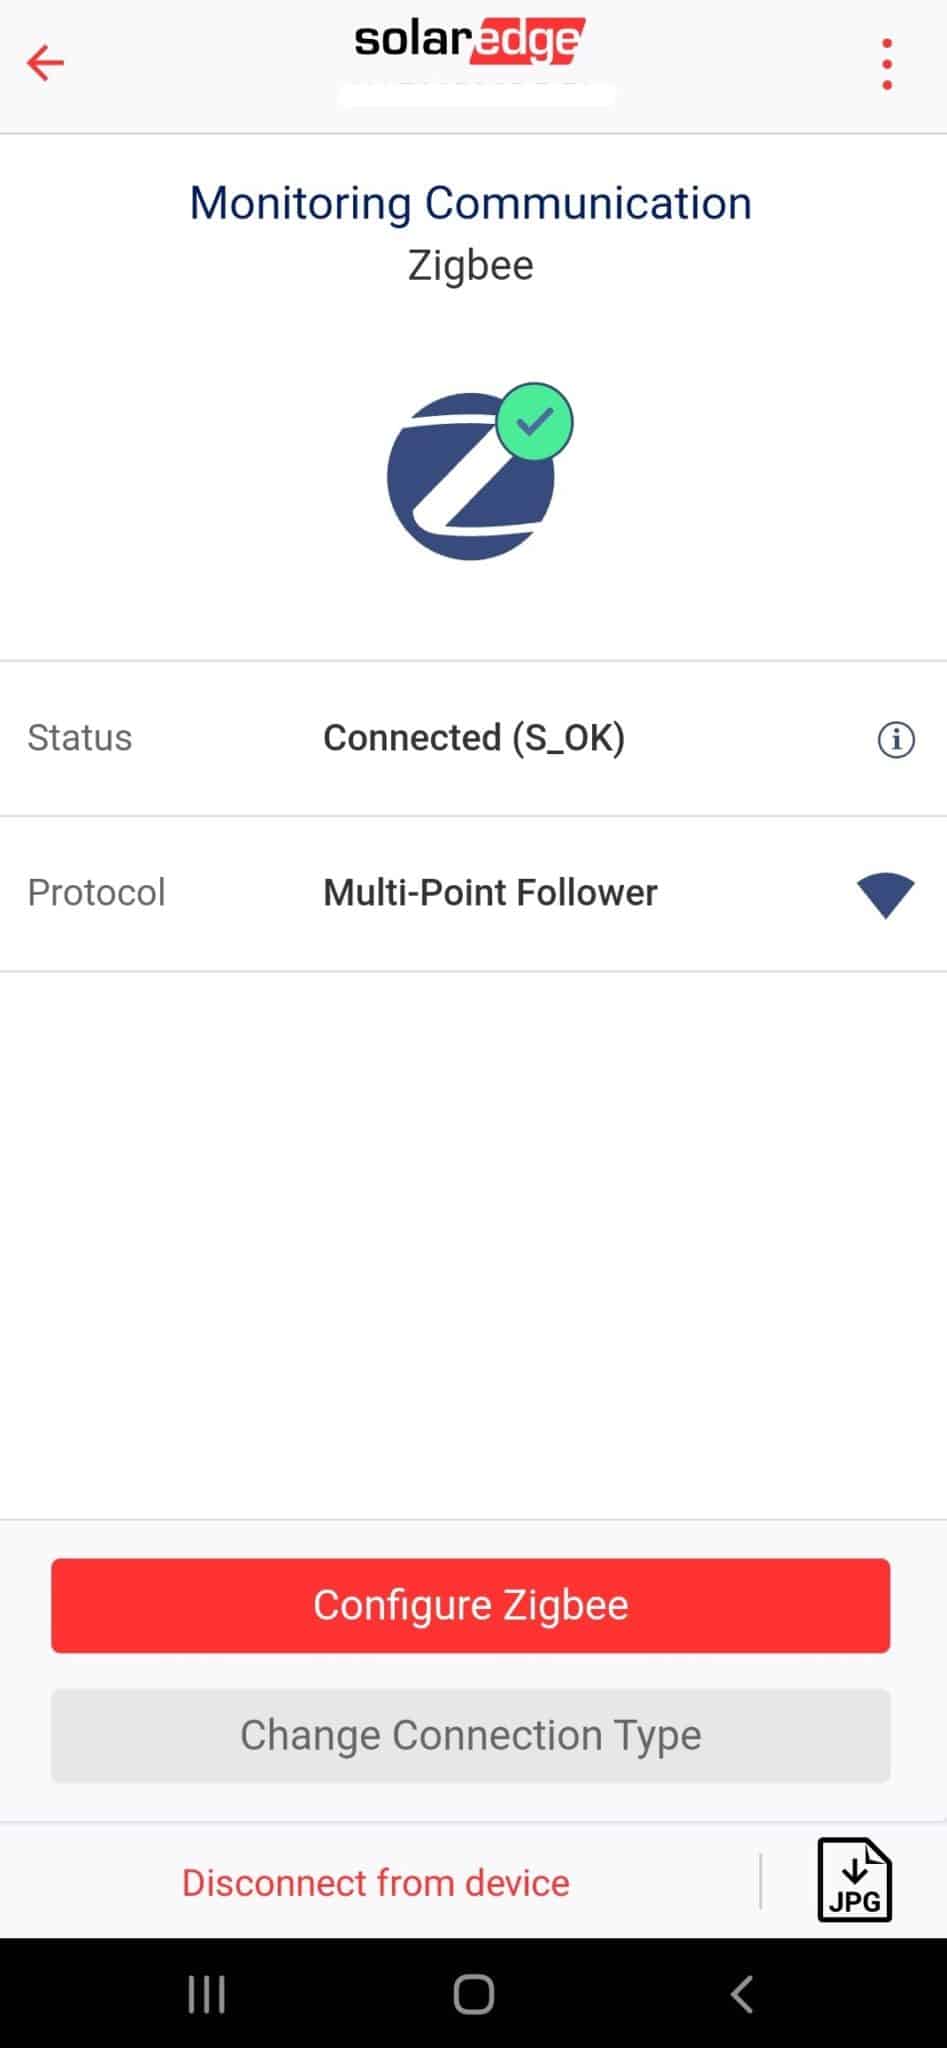
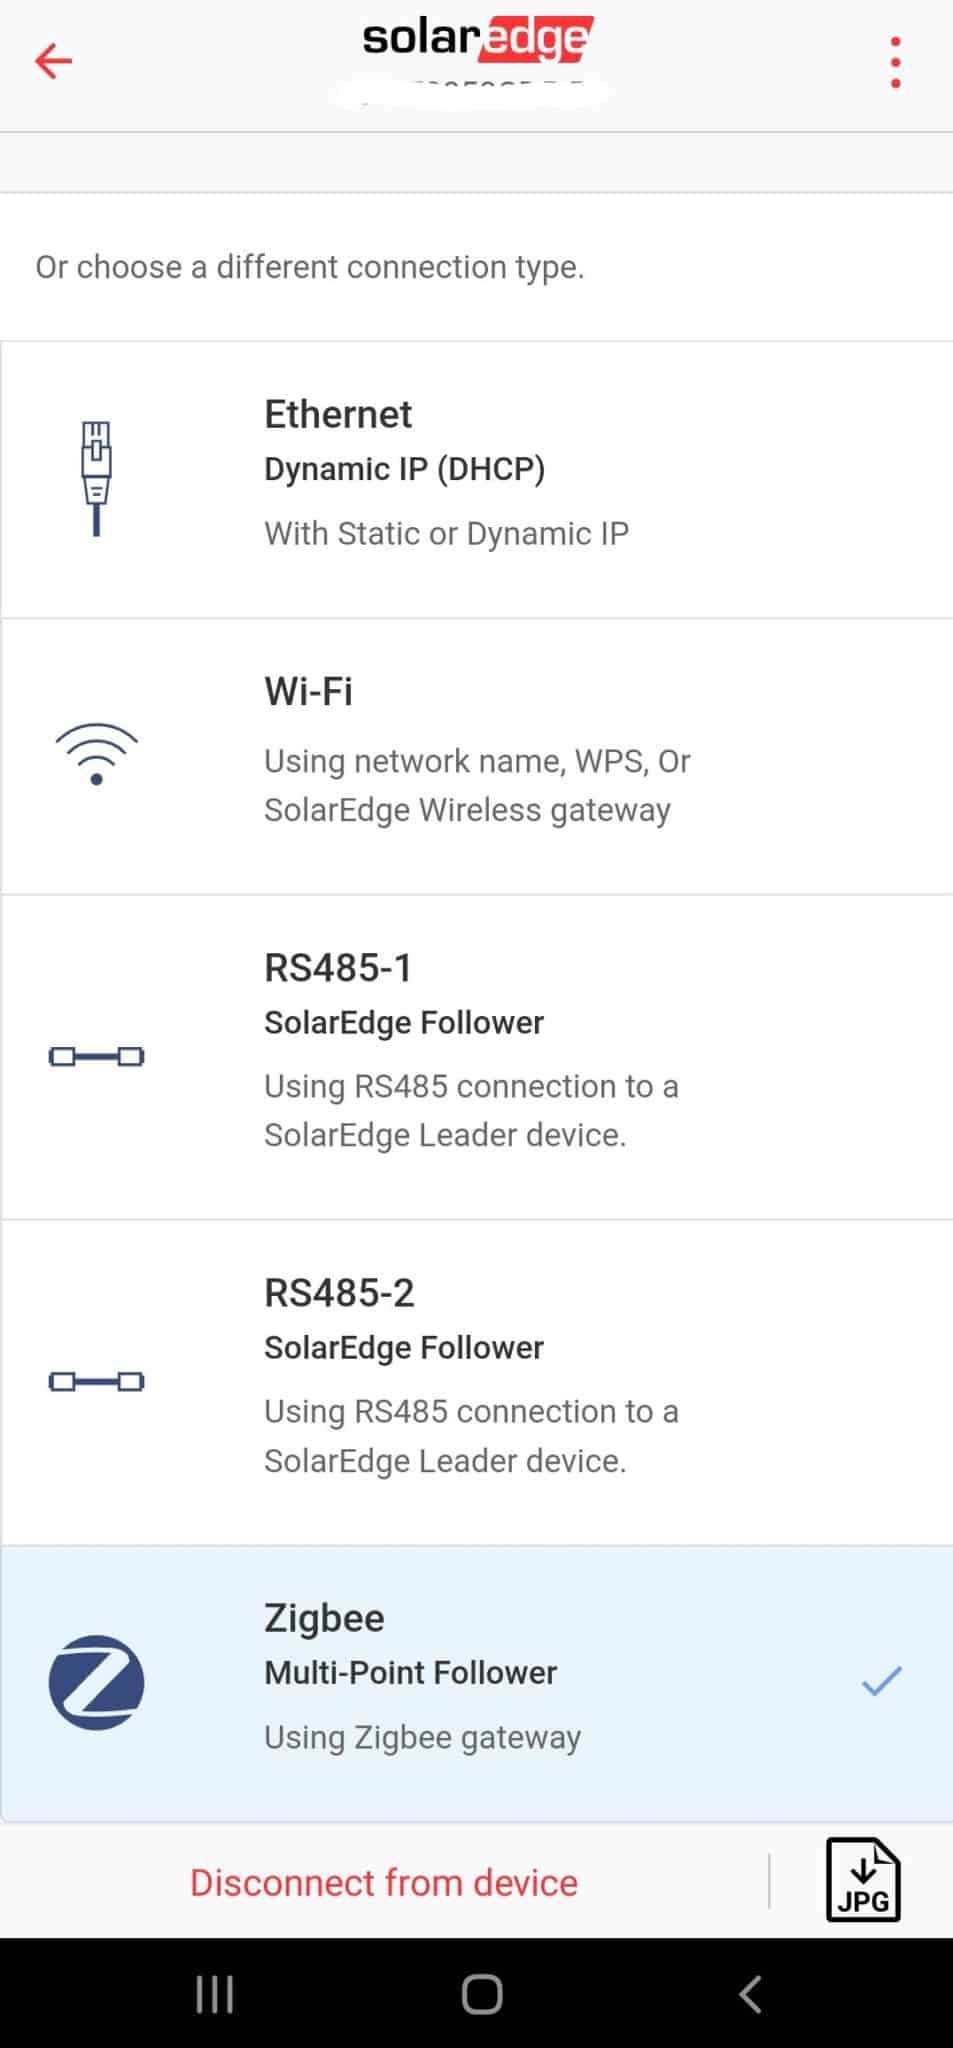
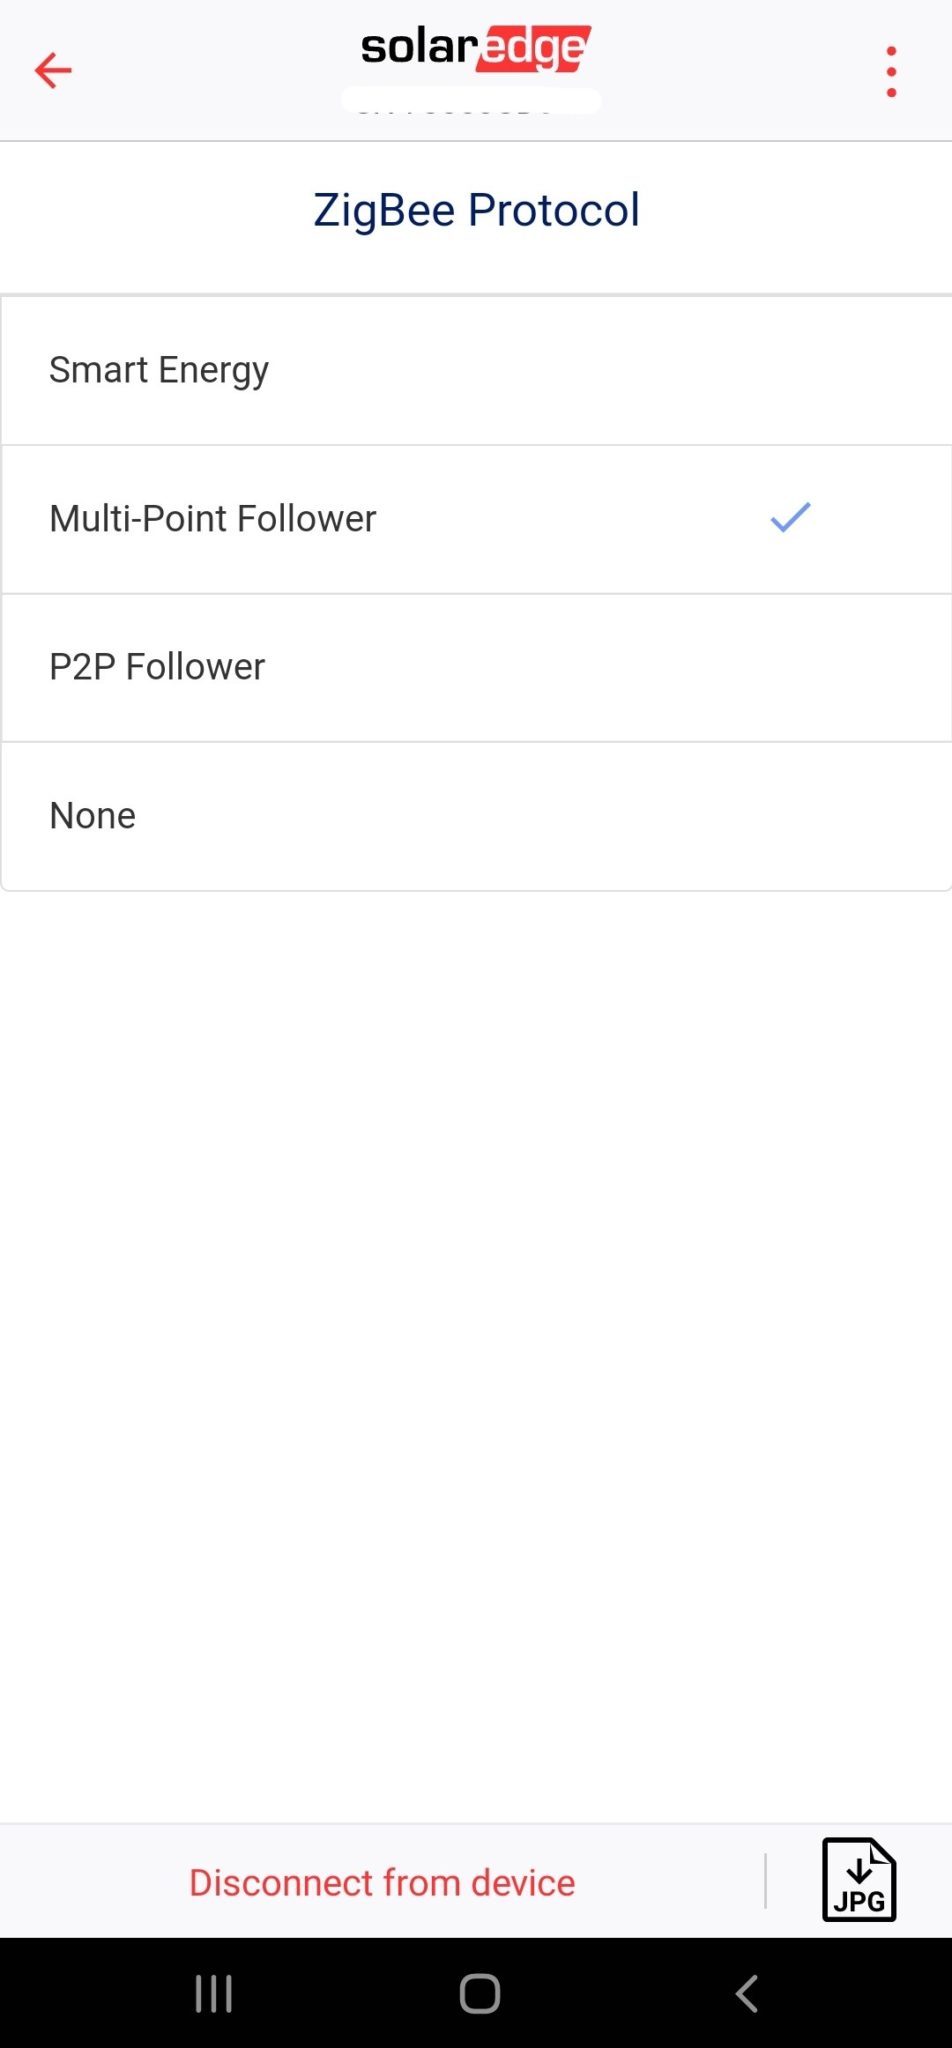
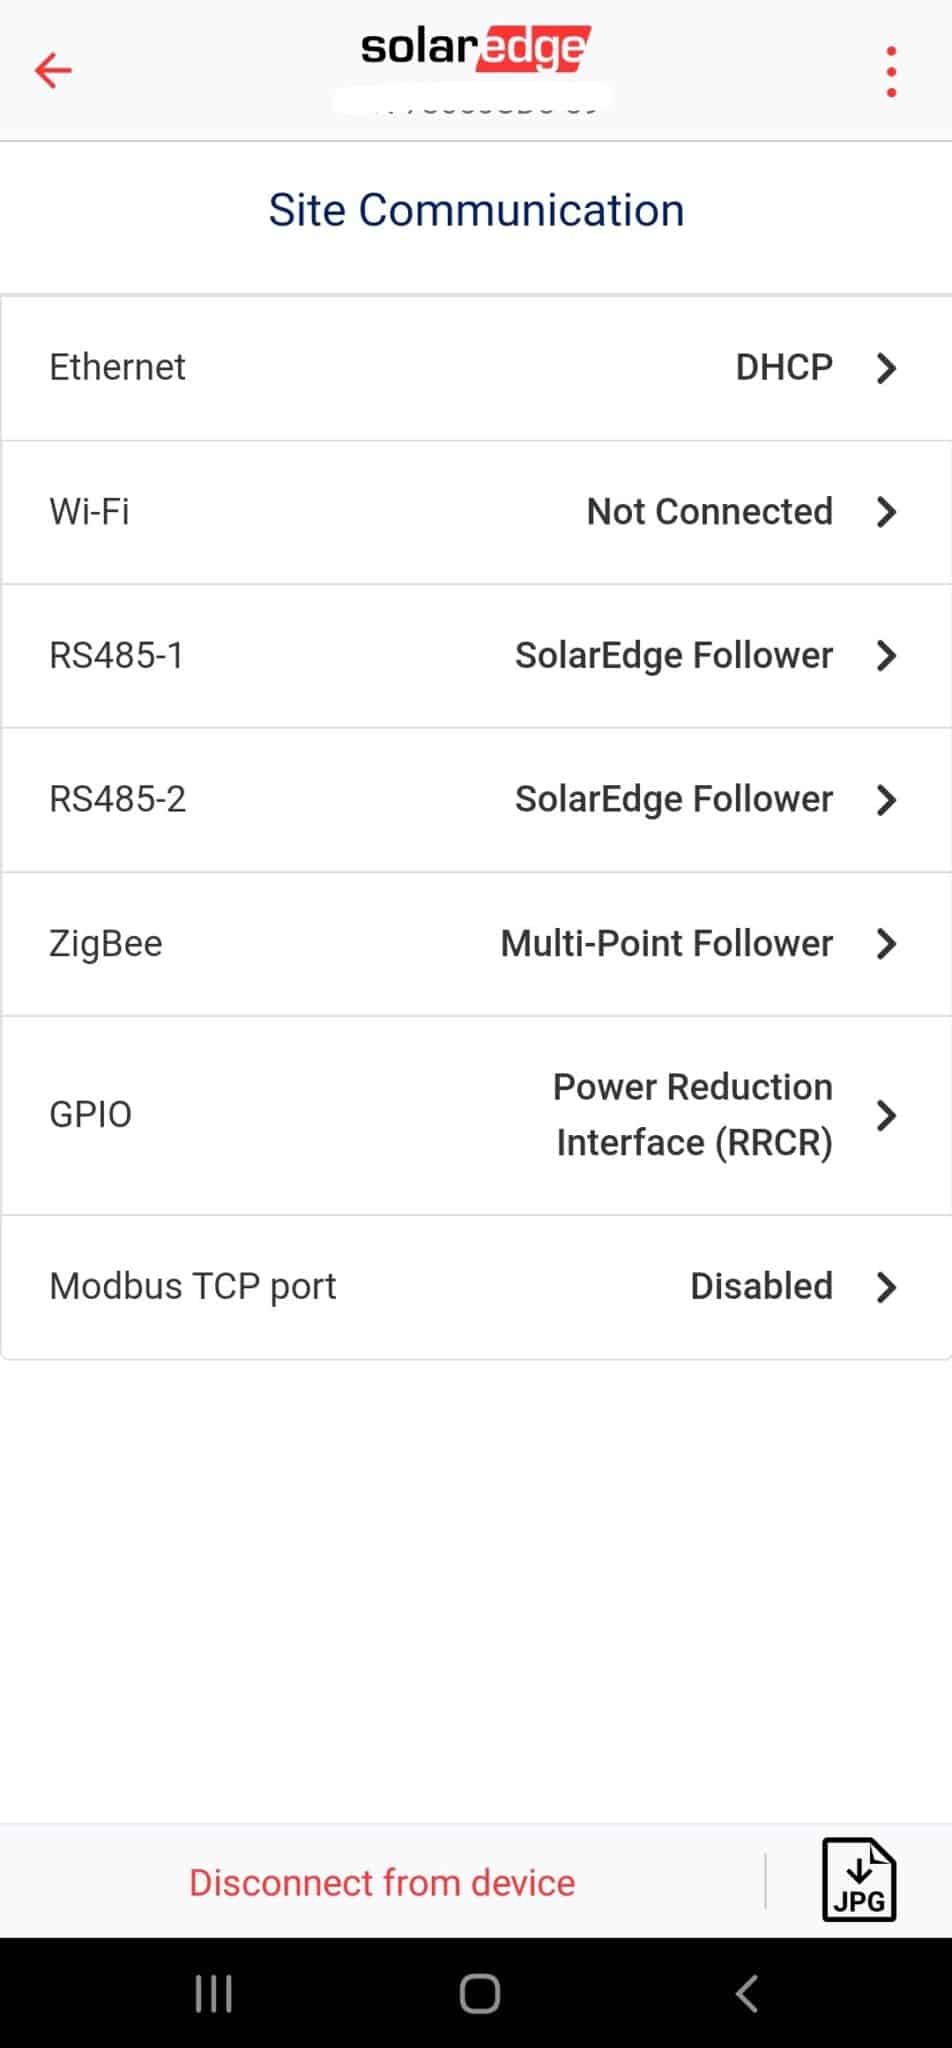
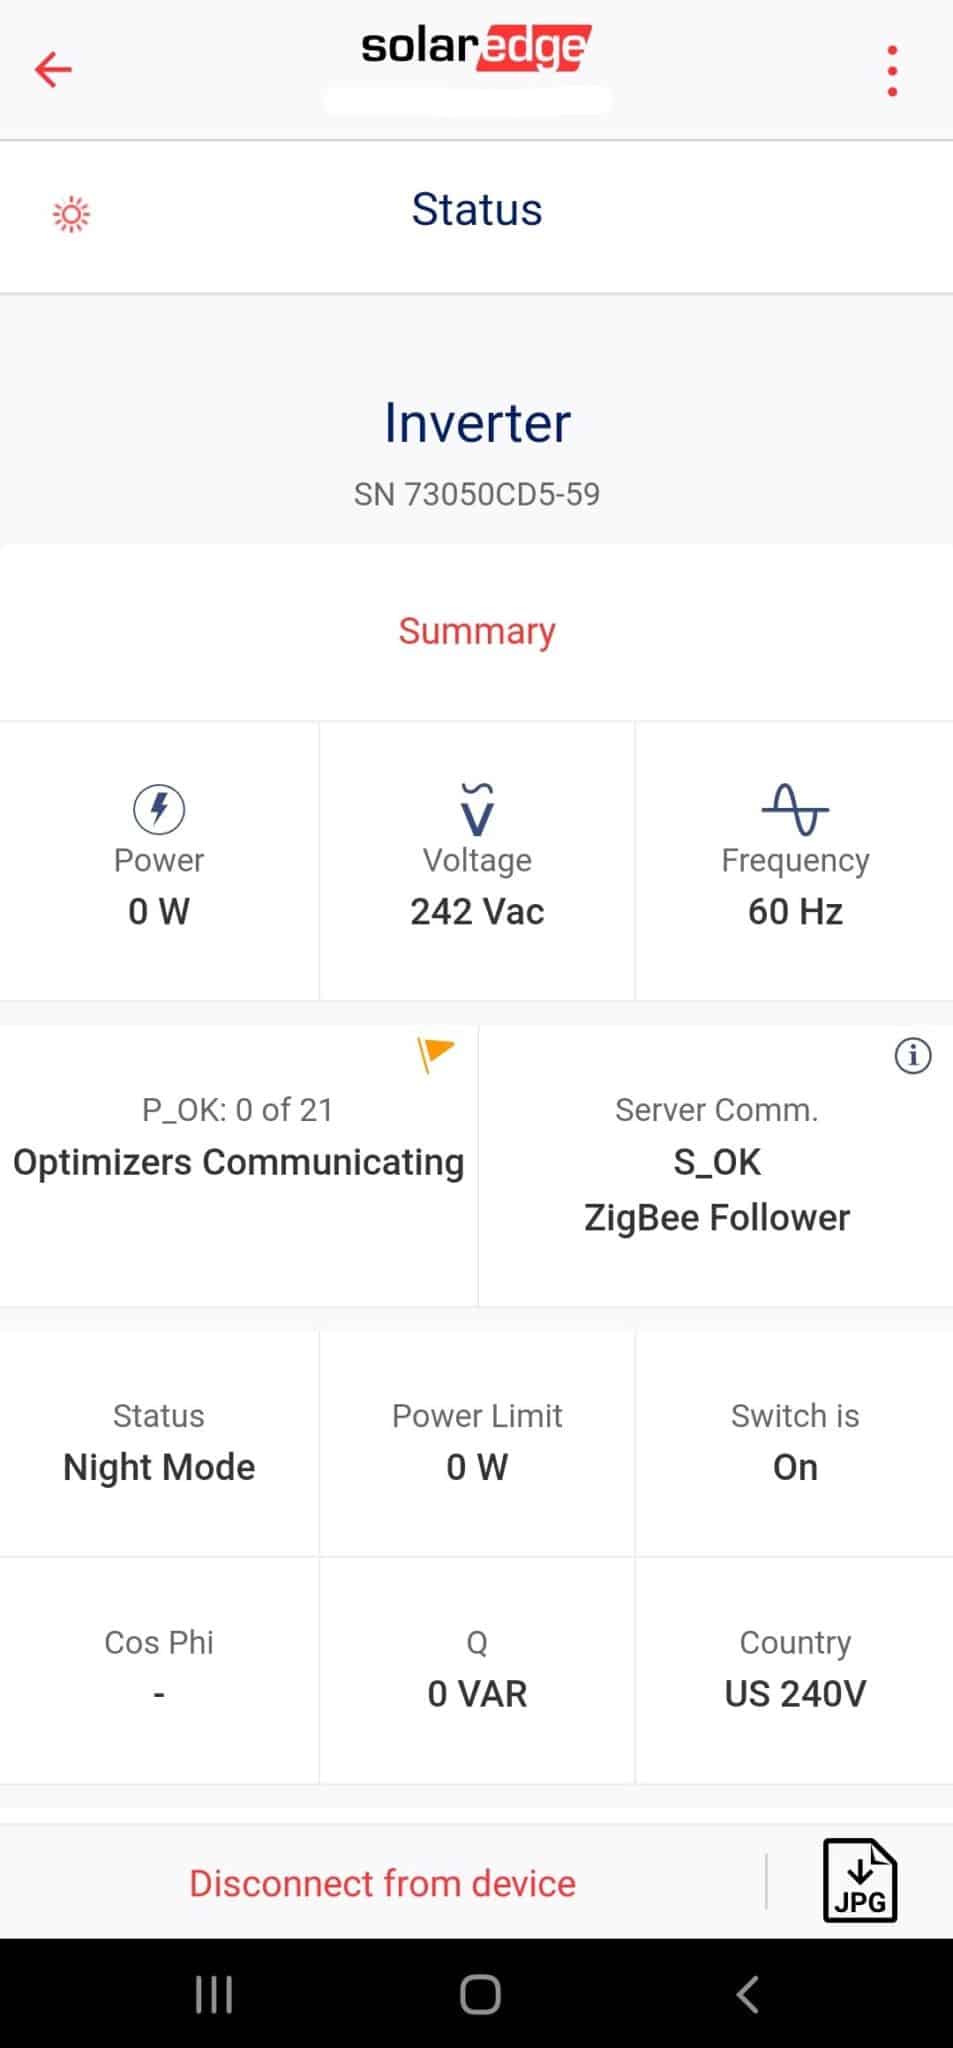
Your system may be configured differently, so follow any instructions and contact the app company if your system isn’t connecting properly.
Once the zigbee connection is set up, you will be able to monitor your system in the app and diagnose any problems you may be seeing with specific panels.
Now that’s how to install solar panels on a roof and connect them!
You did it! You have a functioning solar panel system installed on your house and you did it all by yourself! Pop open the champagne, cut the cake, and celebrate with whoever helped you along the way!


Congratulations on completing you DIY solar panel installation and truly beginning your Going Solar Journey. Share your achievement with us, please!
Also, let us know if you’ve decided to Go Solar or if you have questions on how to install solar panels on a roof. We’re happy to help in anyway we can to get solar panels for your home!
Disclaimer: We at Big Living Little Footprint have done our best to provide you with complete installation instructions and advice based on our experience. However, we are not responsible for any harm or damage caused by or to our readers or solar panel system as they work on this project.
Disclaimer: This post includes affiliate links, and I will earn a commission if you purchase through these links. Please note that I’ve linked to these products purely because I recommend them and they are from companies I trust. There is no additional cost to you.


Thanks for Sharing the guidelines about how to install solar panels on roof and helpful knowledge mostly readers need to know.
Of course, happy to help and thank you for the kind words! We love providing valuable information from a homeowner’s and DIYer’s point of view to help others.