DIY Indoor Seed Starting Setup: A Helpful Step-by-Step Guide
Want to successfully start seeds for a garden with your own DIY setup instead of buying one? We’ll cover a step-by-step indoor DIY seed starting setup as well as all the key components and tips to get started.
Updated 2/01/2024

Disclaimer: This post includes affiliate links, and I will earn a commission if you purchase through these links. Read about our privacy policy.
Starting seeds indoors is a great way to get a head start on the growing season, especially if you live in an area with a short growing season. DIY indoor seed starting setups are an affordable and effective way to grow your own vegetable seedlings at home. With the right equipment and knowledge, you can grow healthy and robust plants that will thrive in your garden.
To live more sustainably and reduce our footprint, we began gardening and creating a little suburban homestead. From our DIY planter boxes to our terraced garden in our front yard, we found we could grow a lot in a small space. Gardening is just another form of DIY for us, just like our projects and how improvements.
But to have a diverse and successful garden, we have to start seeds indoors during the colder months. Whether a seasoned gardener or a beginner, a DIY indoor seed starting setup can help you grow healthy and robust plants from seed.
In the following sections, we will explore some of the key components of an indoor seed starting setup and provide tips to help you get started. If you’re just looking for a step-by-step guide on how to create a DIY seed starting setup like ours, then skip ahead to that section!
Understanding the Basics of Seed Starting
Starting seeds indoors is a great way to get a head start on your gardening season. It allows you to control the growing environment and extend the growing season. Let’s cover the benefits of indoor seed starting and the essential components you need to get started.
Benefits of Indoor Seed Starting
There are several benefits to starting seeds indoors. Here are some of the most significant advantages:
- Control over the growing environment: By starting seeds indoors, you can control the temperature, humidity, and light levels to create the ideal growing conditions for your plants. This control allows you to get a head start on the growing season, which can be especially beneficial in areas with short growing seasons.
- Cost-effective: Starting seeds indoors is an affordable way to grow your own plants. You can save money by starting your own plants rather than buying expensive seedlings from a nursery. Seriously, you can spend $5 on a basil plant or less than $5 on a whole packet of 25 tomato or 100 carrot seeds.
- Variety: When you start seeds indoors, you have access to a wider variety of plant species and cultivars than you would find at a nursery or home improvement store.
- Satisfaction: I don’t know about others, but we always get a sense of satisfaction that comes from growing plants from seed. It’s a rewarding experience that can be enjoyed by gardeners of all skill levels. It’s also a great teaching moment and experience for our kid!
Seed Starting Tip – Use a planner or a list to know when to start each seed variety. We love using Seedtime, a FREE planner, that allows us to visually see a timeline!
Essential Components for Seed Starting
To get started with indoor seed starting, you will need a few essential components. Here’s what you’ll need:
- Containers: You will need containers to hold the seed starting mix and seeds. You can use plastic trays, seed starting pots, or even recycled containers like egg cartons or yogurt cups. We have a mixture that we bought or saved or collected from friends and family.
- Seed starting mix: Seed starting mix is a special type of soil that is designed to provide the ideal growing conditions for seeds. It is lightweight, sterile, and contains a blend of various elements like peat moss, vermiculite, coconut hair, and perlite.
- Light source: Seeds need light to germinate and grow. You can use natural light from a south-facing window or artificial light from grow lights.
- Water: Seeds need consistent moisture to germinate and grow. You can water your seeds with a spray bottle or watering can.
With these essential components, you can start your seeds indoors and enjoy the benefits of growing your plants from scratch.

Setting Up Your Seed Starting Area
When it comes to starting seeds indoors, setting up your seed starting area is crucial for the success of your plants. But how do you know the best way to set it up? The two most important factors to consider when setting up your seed starting area are choosing the right location and creating a suitable environment.
Choosing the Right Location
Choosing the right location for your seed starting area is the first big step. Ideally, you want a location that receives at least six hours of sunlight per day. Honestly, most people aren’t lucky enough to have a perfectly sunny spot in their home, so there’s an alternative option. If you don’t have a location that receives this much sunlight, you can use grow lights to supplement the natural light. We find using grow lights is better in our experience too as seedlings need more like 10-14 hours of sunlight to get robust and that’s hard to find that much sunlight in the colder months!
Another important consideration when choosing a location is the temperature. You want a location that is consistently between 65 and 75 degrees Fahrenheit. If the location is too cold, your seeds may not germinate. If it’s too warm, your seedlings may become leggy and weak.
Don’t be like us when we tried to start seeds one year in our cold basement hallway. Only a few seeds actually germinated and it was a waste of time and effort on our part. We now do our seed starting setup in the corner of our living room where it starts relatively warm. It also is a convenient location for us to remember to water the seedlings and check on them frequently. If you don’t actively go into a space often, you’re likely to forget about caring for your seedlings when you get busy. At least that’s our experience! That’s why our living room was the ideal location for us to start our seeds.

Creating a Suitable Environment
Once you have chosen the right location, the next step is to create a suitable environment. There are a few key factors to consider when creating a suitable environment for your seedlings:
- Soil: Use a high-quality seed starting mix that is sterile and lightweight. Avoid using garden soil, as it can contain weed seeds and pathogens that can harm your seedlings. (Hint: we love this seed starting mix block that’s super convenient!)
- Containers: Use containers that are at least 2-3 inches deep and have drainage holes. If you use recycled containers like yogurt cups or egg cartons, just remember to get them thoroughly cleaned first and poke some holes in the bottom. Also, have multiple sizes of containers as plants like tomatoes and peppers will likely need to be potted up into a bigger pot after a while before they are transplanted outside.
- Soil blocking is another option instead of containers. It’s a technique that relies on planting seeds in cubes of soil rather than cell trays or pots where the potting soil acts as both the container and growing medium. Soil blockers are metal tools that are used to create these soil blocks. Honestly, this is the way we would do it if I didn’t have so many saved containers already, and we had known about it our first year starting seeds.
- Watering: Keep the soil moist but not waterlogged is crucial. Water from the bottom by placing your containers in a tray of water and allowing the soil to soak up the water.
- Humidity: Seedlings need a humid environment to germinate. You can cover your containers with a humidity dome (aka a clear cover) to create a humid environment. We honestly only do this sometimes and it’s more dependent on the type of seed.
- Air circulation: Seedlings need good air circulation to prevent fungal diseases. You can use a fan to circulate the air around your seedlings. Or if you don’t have a fan, just ensure the seedlings have good exposure to air often. My kid loves to go and blow on the seedlings!
By choosing the right location and creating a suitable environment, you can give your seedlings the best possible start. With a little care and attention, you can grow healthy, robust plants from seed.
Selecting Equipment and Supplies
When it comes to starting seeds indoors, selecting the right equipment and supplies is key for the success of your plants. Here are the key things to consider when selecting equipment and supplies:
Seed Trays and Containers
Seed trays and containers come in a variety of sizes and materials. Some popular options include plastic trays and biodegradable pots. When selecting seed trays and containers, consider the size of your plants and the amount of space you have available.
Plastic trays are affordable and reusable, but they can be difficult to sterilize and may not be the most environmentally friendly option. Biodegradable pots are a great alternative for those looking to reduce their environmental impact. You also have the option of reusing items you already have from your recycling. A cleaned yogurt container with some holes drilled into the bottom is a great way to upcycle and reuse something you already purchased and keep it out of the landfill.
Soil and Fertilizer
Selecting the right soil and fertilizer is essential for healthy plant growth. When starting seeds indoors, it’s important to use a soil mix that is specifically designed for seed starting. These mixes are typically lighter and more porous than regular potting soil, which helps to promote healthy root growth.
We love reducing plastic packaging, but typical seed starting mixes come in lovely unrecyclable bags. So we found this seed starting mix block that is compressed soil that grows when you add water. Not only does it have minimal packaging, but it provides the same amount of soil as a bagged starter mix! It’s convenient to store too if you aren’t using it right away. It also uses coconut hairs instead of peat moss (peat moss is a fairly limited resource and requires a specific environment).
In addition to soil, you may also want to consider using a fertilizer to give your plants an extra boost. Organic fertilizers are a great option for those looking to avoid synthetic chemicals, like us. Look for a fertilizer that is high in phosphorus, which is essential for healthy root development.

Lighting Solutions
Lighting is another key consideration when starting seeds indoors. While natural light is ideal, it’s not always possible to provide enough light for your plants to thrive. In these cases, you will need to supplement with artificial lighting.
There are a variety of lighting solutions available, including fluorescent, LED, and high-intensity discharge (HID) lights. When selecting a lighting solution, consider the size of your growing space, the types of plants you are growing, and your budget.
A lot of brands and people will try to sell you on specific “grow lights” with a specific light spectrum. After our own research, we found that seeds don’t actually need a special light to germinate and grow. You can utilize basic shop lights from a home improvement store like we do. But you do you and can get specific lighting labeled grow lights.
In conclusion, selecting the right equipment and supplies is crucial for the success of your indoor seed starting setup. Consider the size of your plants, the amount of space you have available, and your budget when selecting seed trays and containers, soil and fertilizer, and lighting solutions.
DIY Seed Starting Setup Instructions
Now it’s time to create your DIY seed starting setup. Below is the list of materials we used and how we created our simple seed starting system in our living room.
Materials List
Here are the items we use for our DIY seed starting station. Check your home for some of these items or look to buy secondhand if you’re on a budget.
For Setup
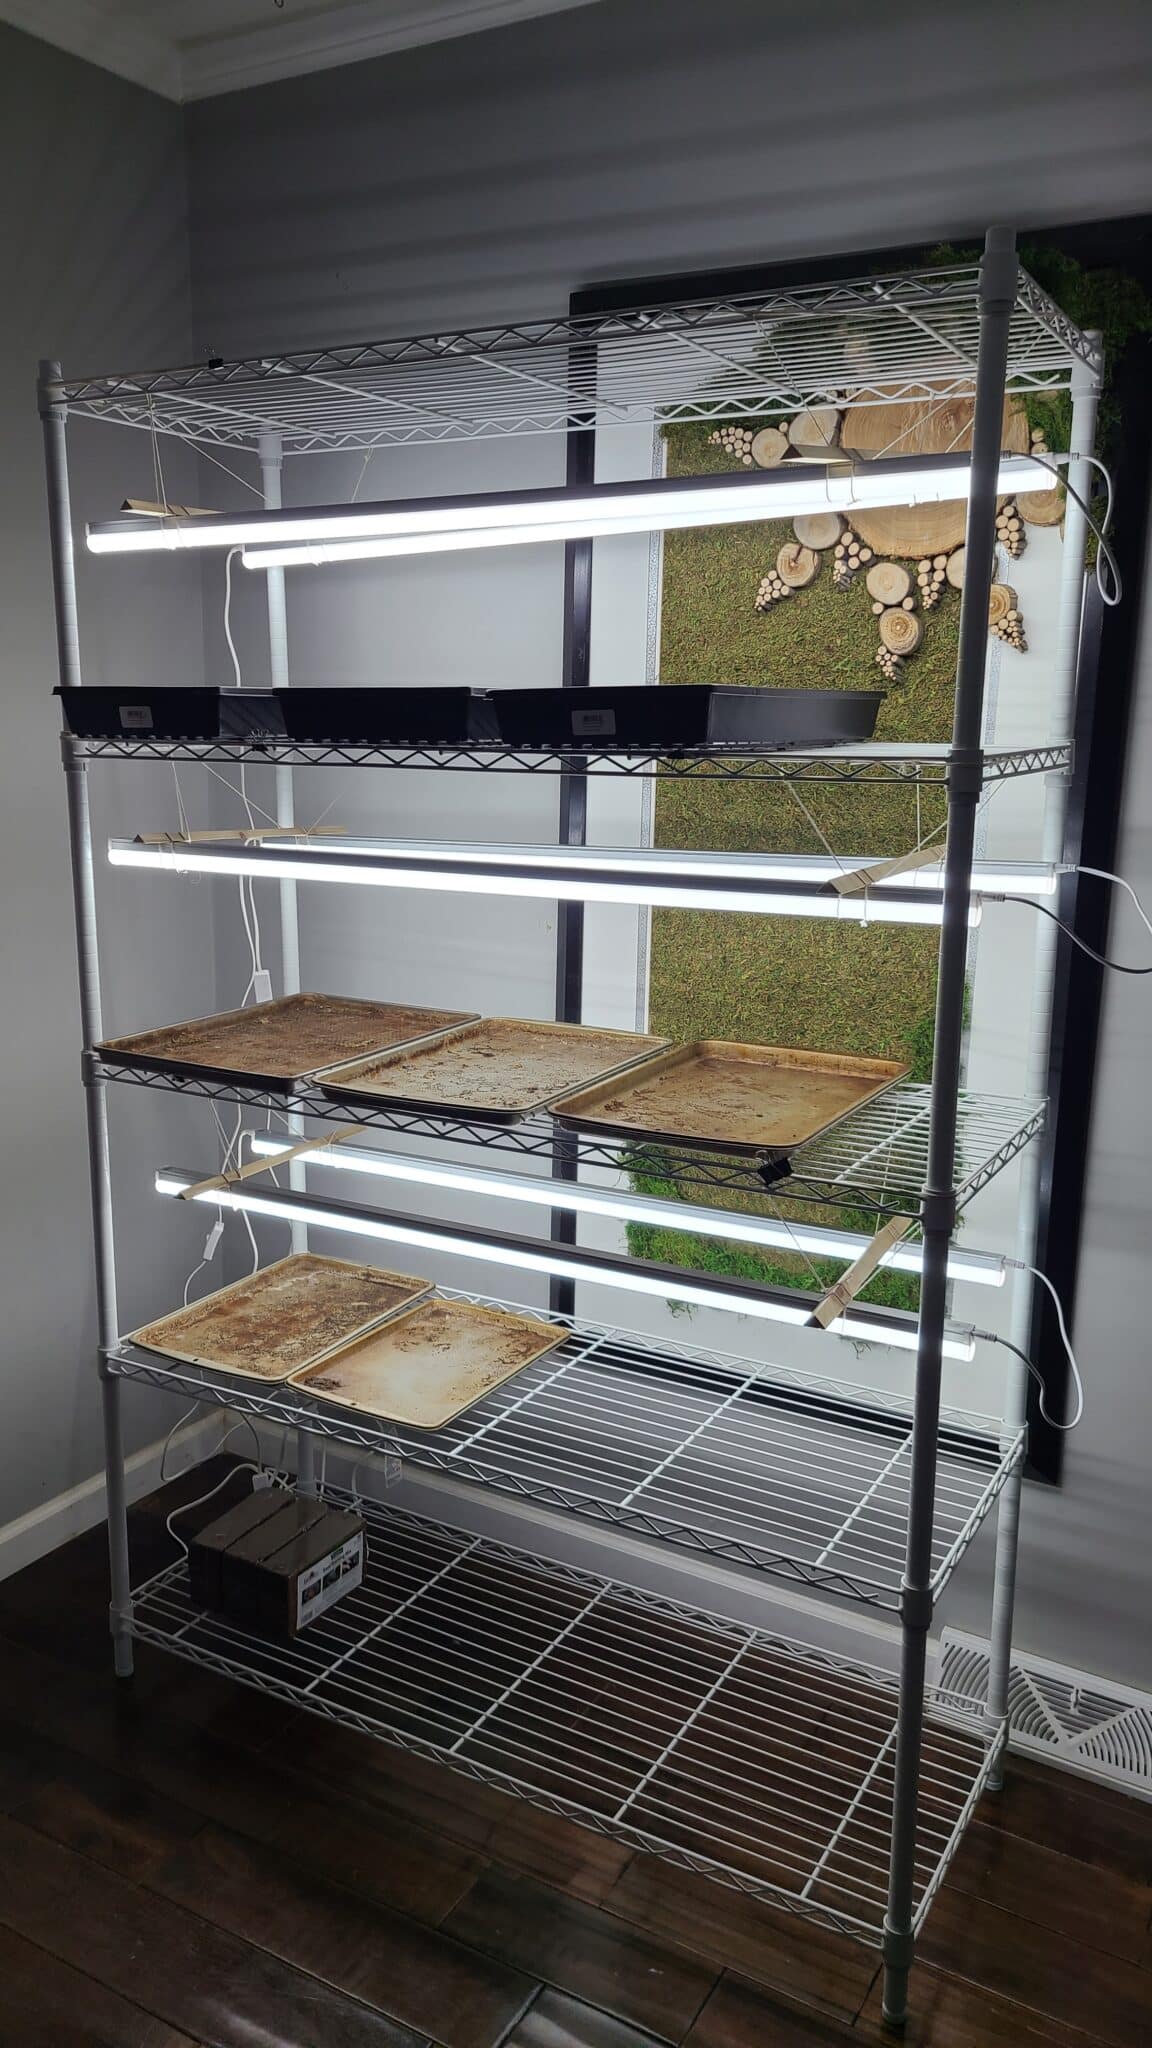
- Shelving – we have collapsible wire rack shelving (48” long by 18” wide with 5 shelves)
- LED Lighting – we used two 4’-0” T5 shop lights per shelf
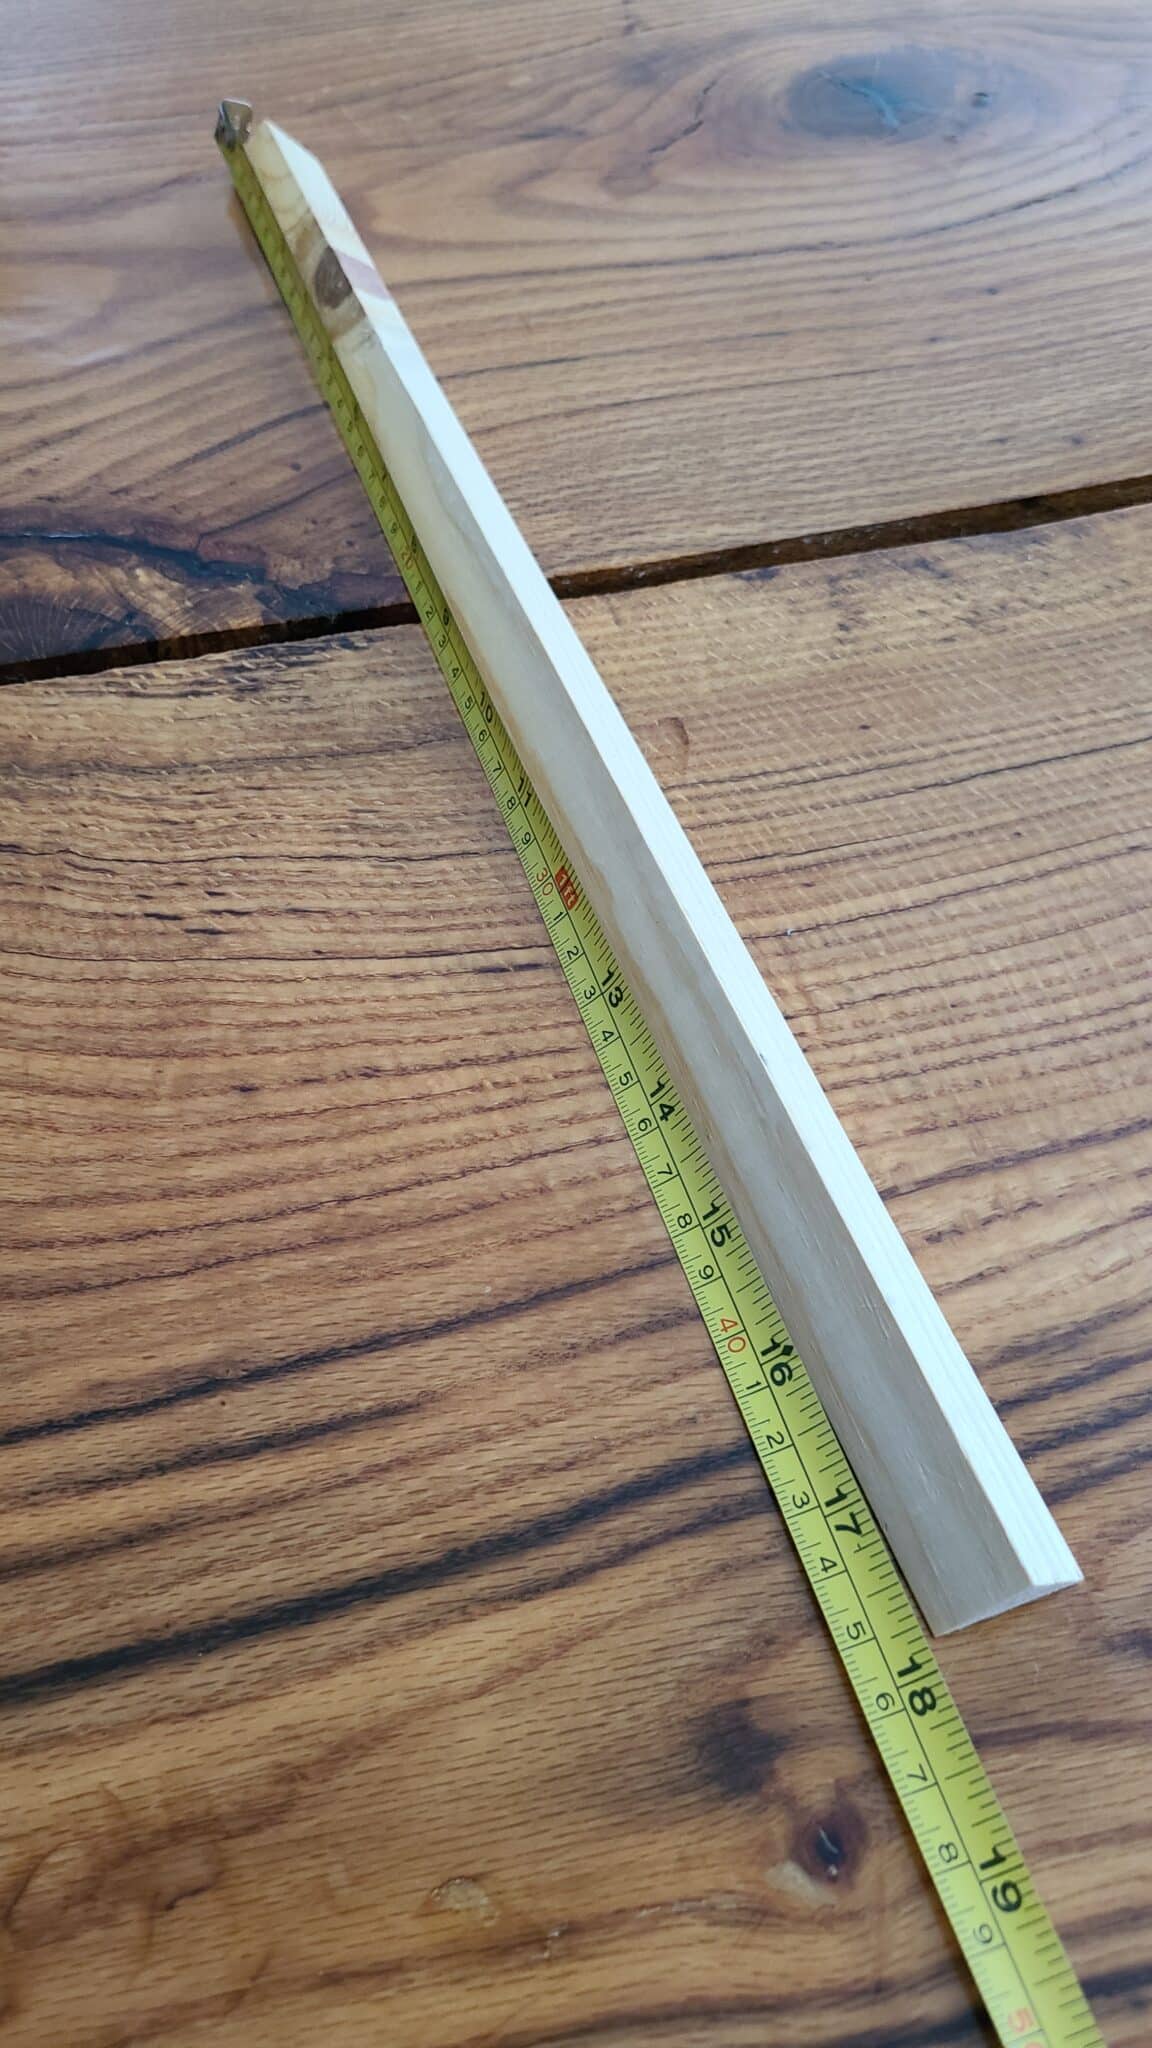
- Wood Scraps – need to equal length of chosen shelving
- Small Binder Clips – 2 per shelf; small enough to just fit around wire shelf
- Twine/String
- Extension cord, if needed. We use a 6ft to allow for adjusting lights
- Smart timer (optional) – great way to not have to remember to turn lights on and off
For Seeds
- Containers – There are a lot of options! We use a mix of multi-cell containers and upcycled items
- Trays – we use standard 1020 trays and old baking sheets with edges
- Seed Starting Mix – We use a concentrated block that you will need a bucket to mix this with water.
Tips for finding materials
Containers & Trays
- Standard multi-cell containers – you can find varying numbers from 4-cell to 128 cell containers (sometimes called “plugs”). Depending on how big your seedlings will get before transplant can help you choose what size to get. Most people will get a cell tray with 1”-2” big cells, but smaller and larger cells are available.
- Upcycled items like yogurt, fruit, and salad containers. Don’t forget to add drainage holes if needed.
- Trays are needed to place containers on and water seedlings from the bottom.
- Standard 1020 trays are 10”x20” and fit all the typical seed starting supplies you can buy online or in stores.
- Remember you can use upcycled items as trays, just make sure they hold water and don’t leak!

Shelving
- Consider the size of seed starting trays or what you containers you will be using. Standard seed starting trays are 10”x20”. This means every foot of width of a shelving unit will be able to hold one standard tray. It also means you will want a shelf at least 20” deep, otherwise trays might hang off, getting bumped or spilling water.
- Consider if the shelving will be a permanent or temporary setup. You can use storage shelving you already have. Or you can get shelving that’s easily able to be disassembled if you don’t plan to have them up all year.
Lighting
- Choose LED lighting over fluorescent – Fluorescent lights used to be more common for seed starting, but LEDs are more energy-efficient, brighter, and actually give off a larger spectrum of light.
- Specifically labeled grow lights aren’t required – seeds can get all the light spectrum needed from standard shop lights, which are a fraction of the cost of many grow light products.
- Shop light bulb size doesn’t matter as long as it’s the length needed.
- Shop lights can also be interconnected, so you don’t need to have multiple cords running from each shelf.
- You want at least around 2,000 lumens. Most LEDs average closer to 5,000.
- Need to be able to raise and lower lighting – You will need to slowly raise the lighting as they grow. If you start the lights too far away, the seedlings will become “leggy” (tall and weak stems) reaching for the light instead of focusing on growing strong foundations. Always try to keep the lighting 2-3 inches above your seedlings.
DIY Seed Starting Setup: Step-By-Step
1. Setup Shelving (If Necessary)
If you’re not utilizing a permanent set of shelves in your home, the first step is to step up your shelving. Our wire rack shelves are 48” long by 18” wide with 5 shelves.
We recommend using wire rack shelving as it’s easy to then rig a pulley system for hanging your lights in the next steps. It’s also more flexible for setting the distance between shelves. We set our shelves to be 17” apart. This leaves enough space for the seedlings as well as the lighting assembly to be raised and lowered.

2. Build Lighting Assembly
The next step is creating a lighting assembly to have two shop lights per shelf.
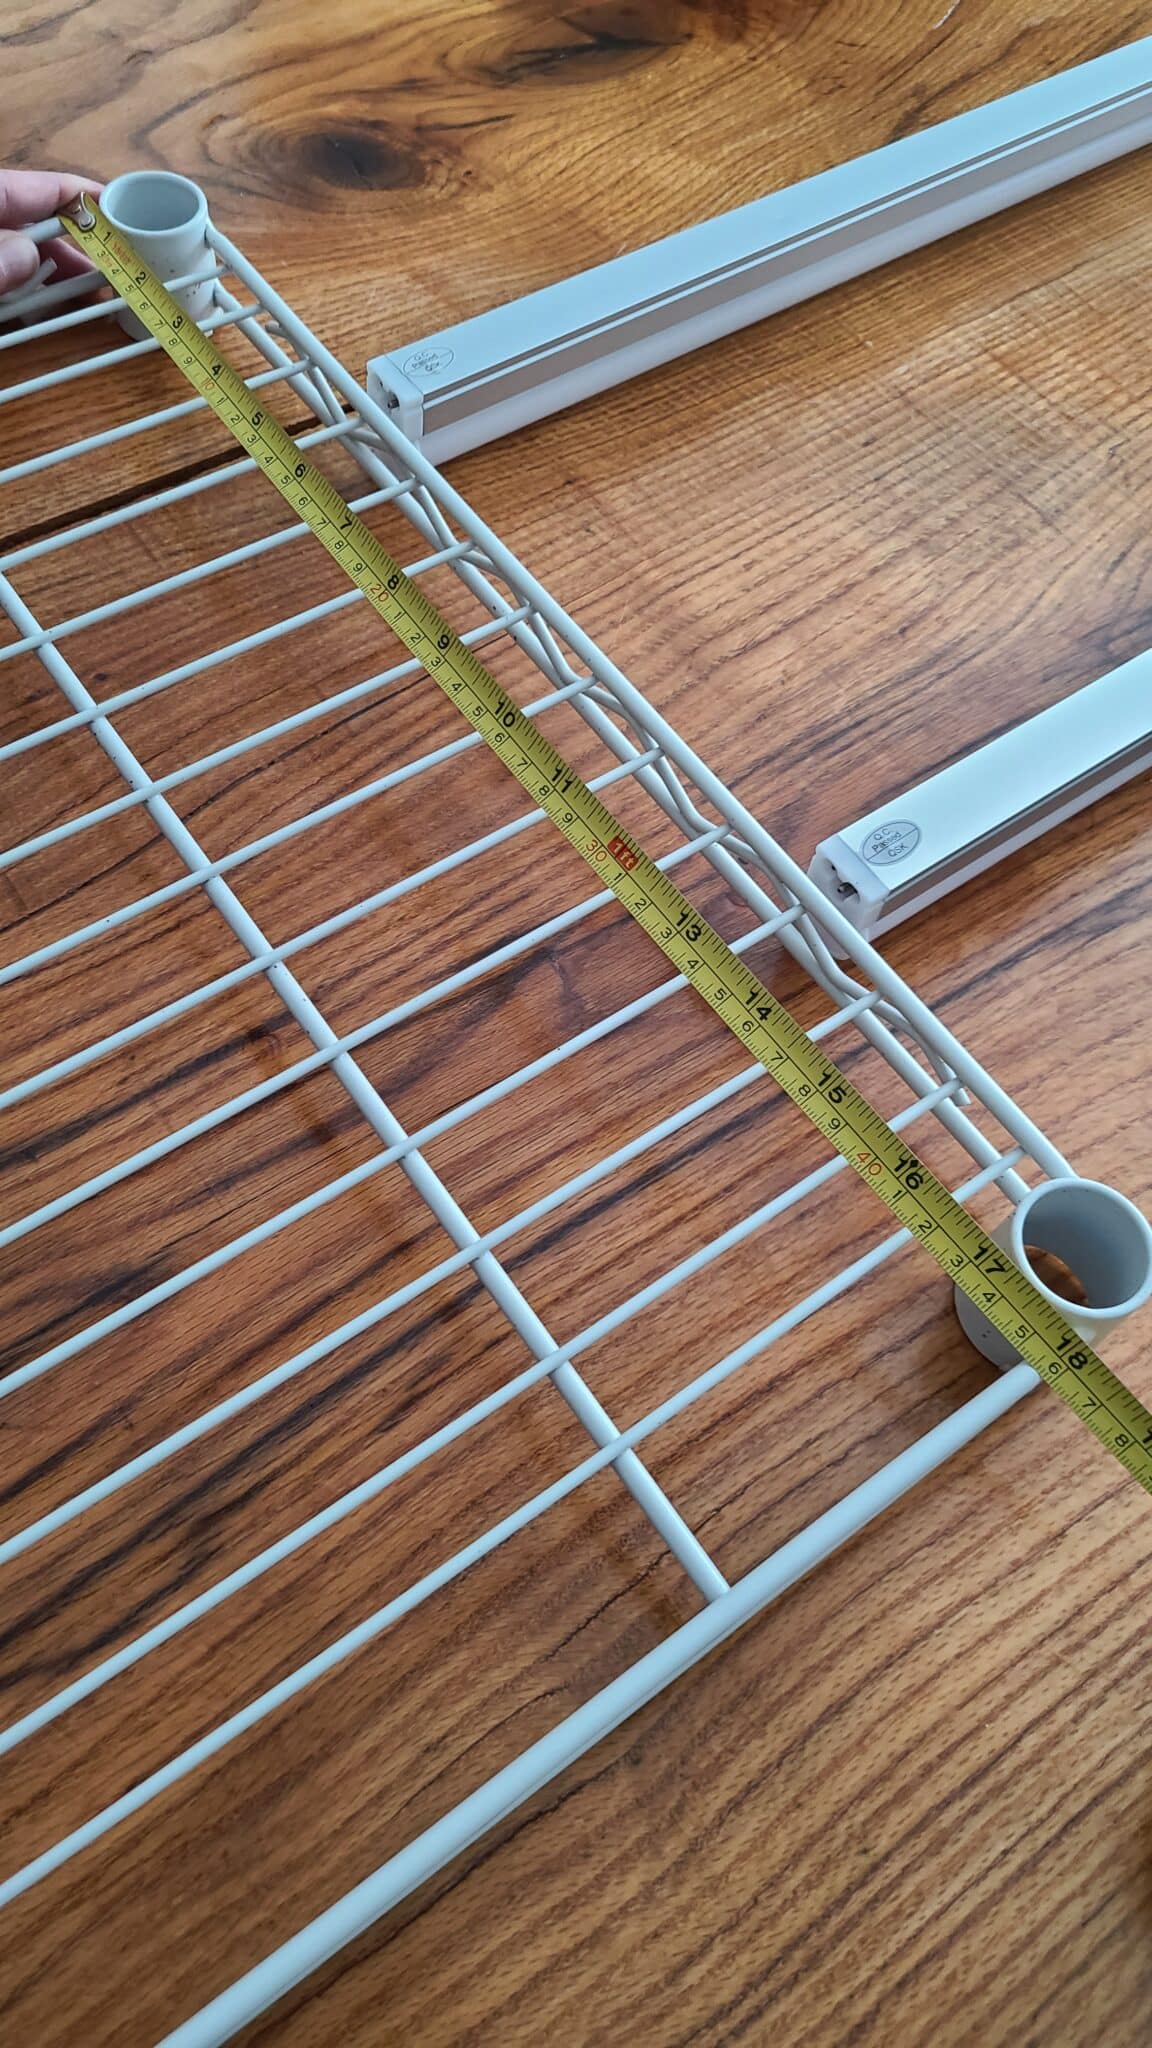
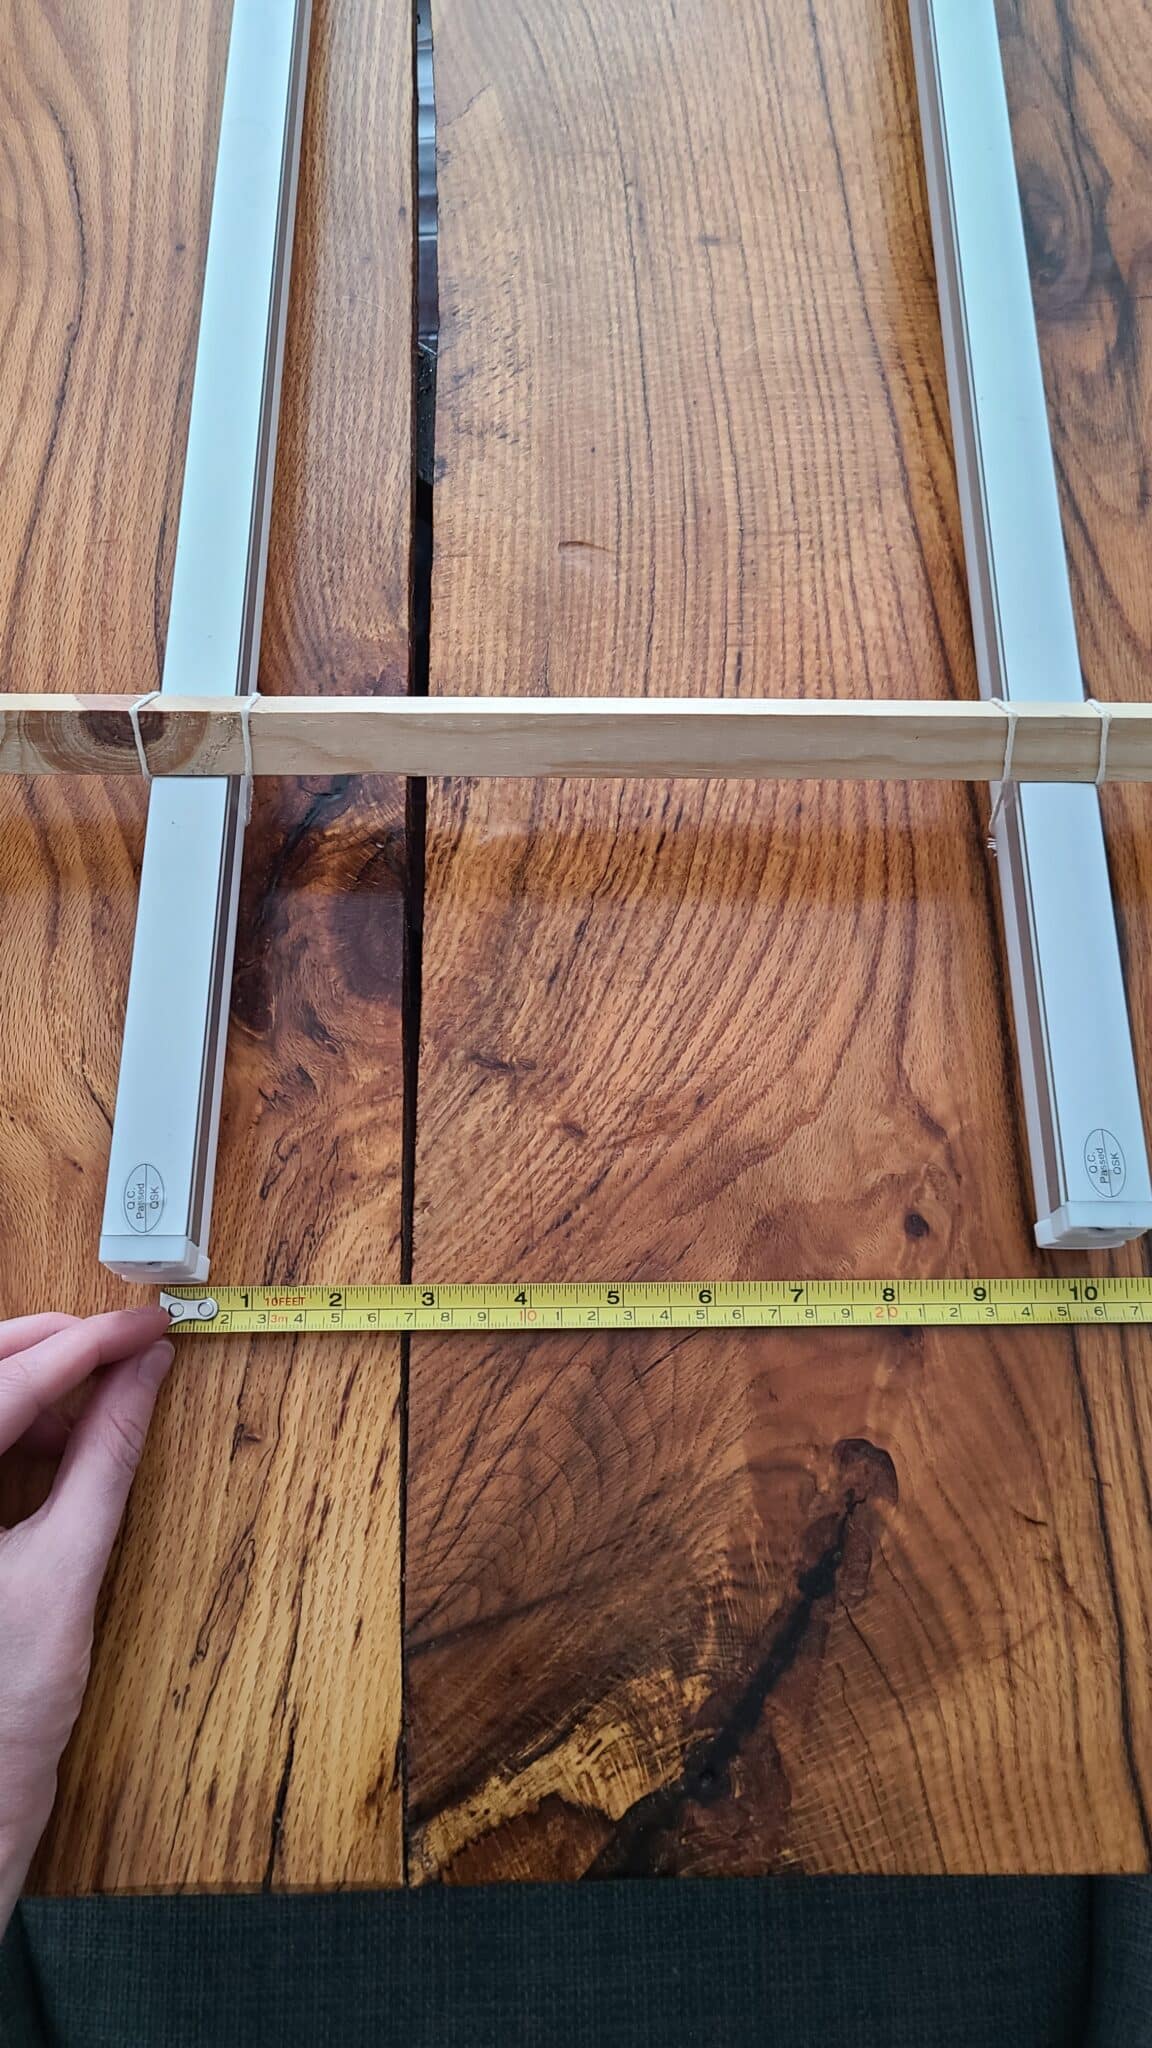
- Lay out the shop lights to have even distribution over the width of your shelf. For our 18” wide shelf we had the lights spaced 10” on center.
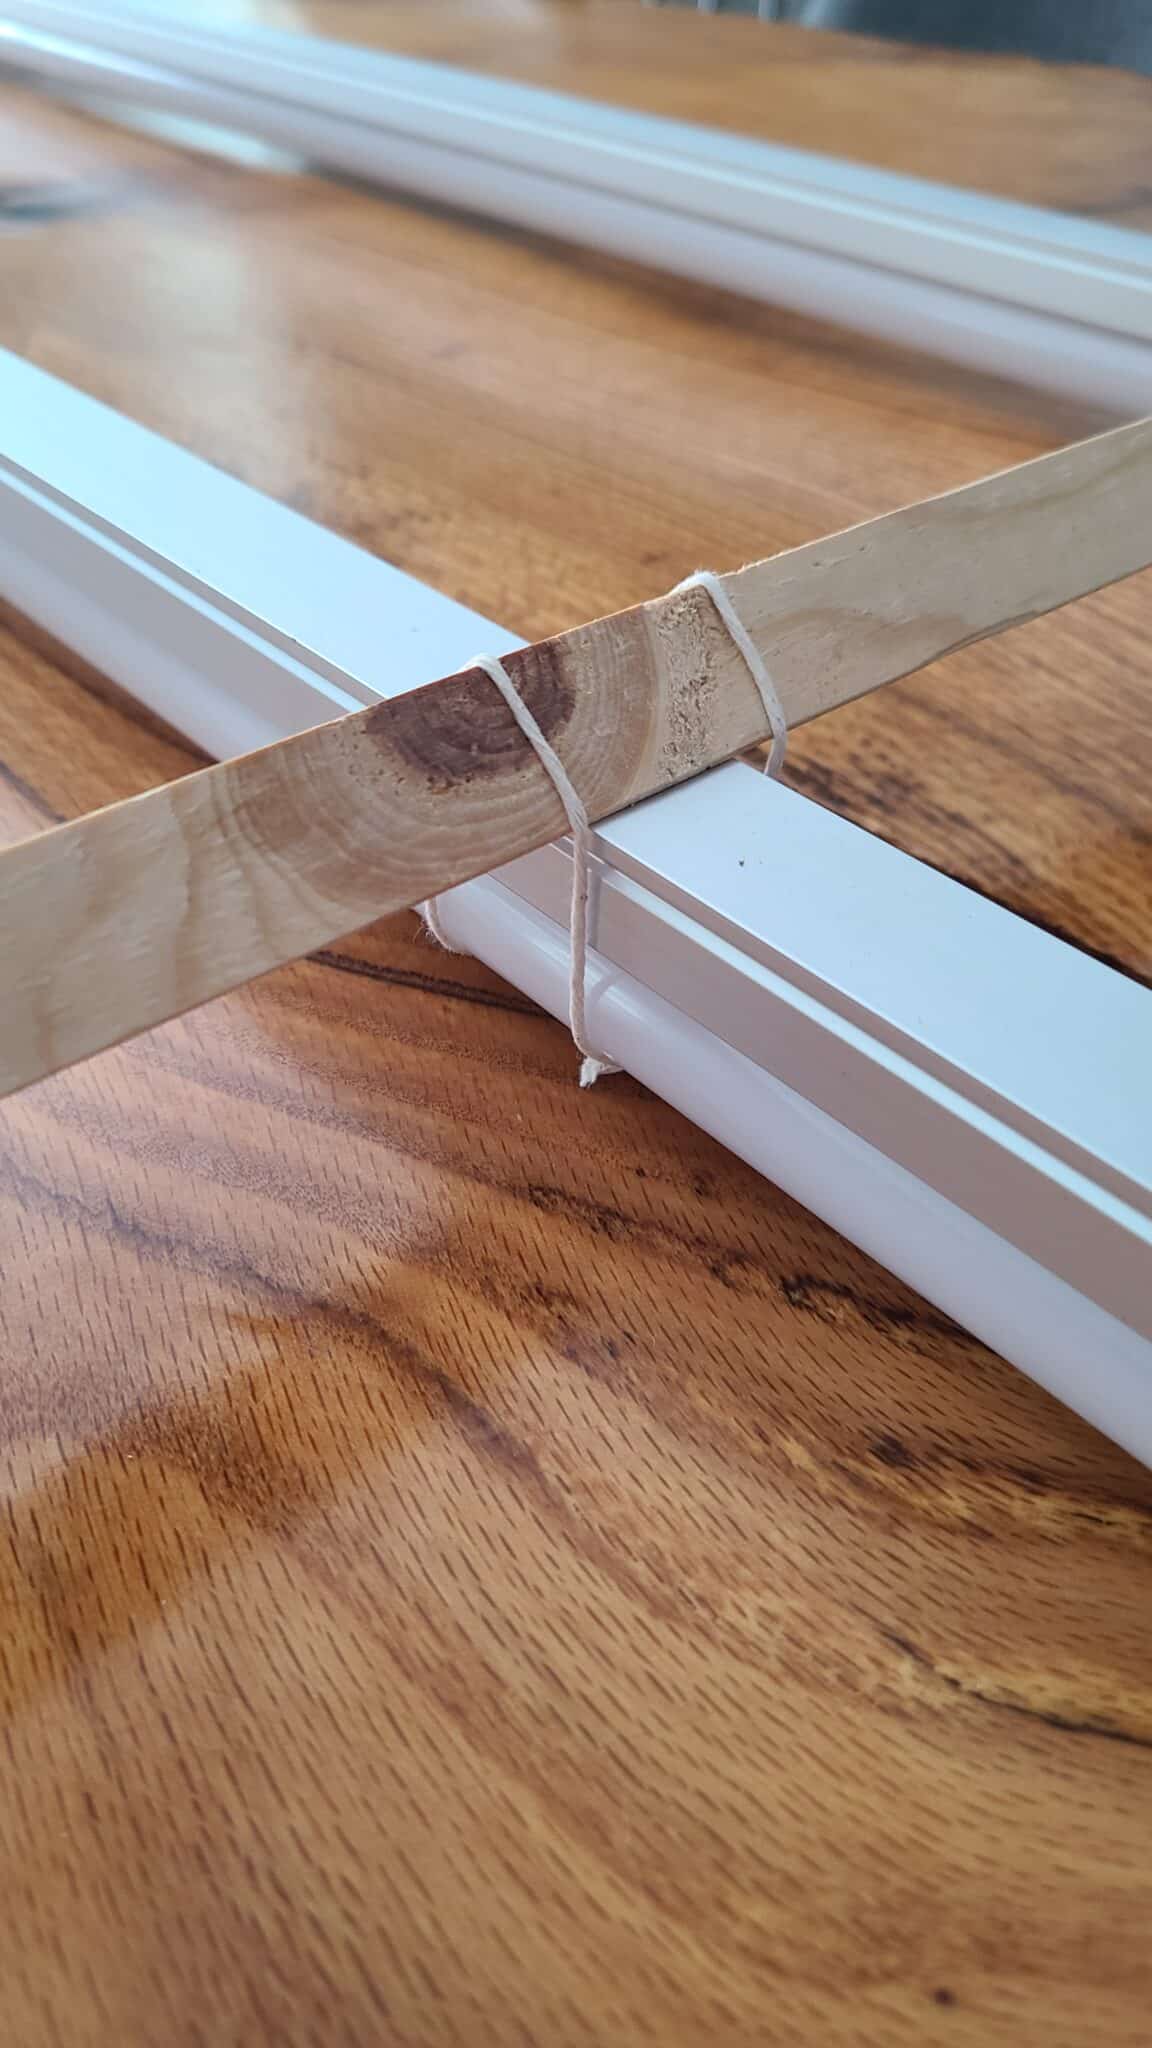
- Cut two strips of wood to span the width of the two shop lights allowing for some overhang for tying together.
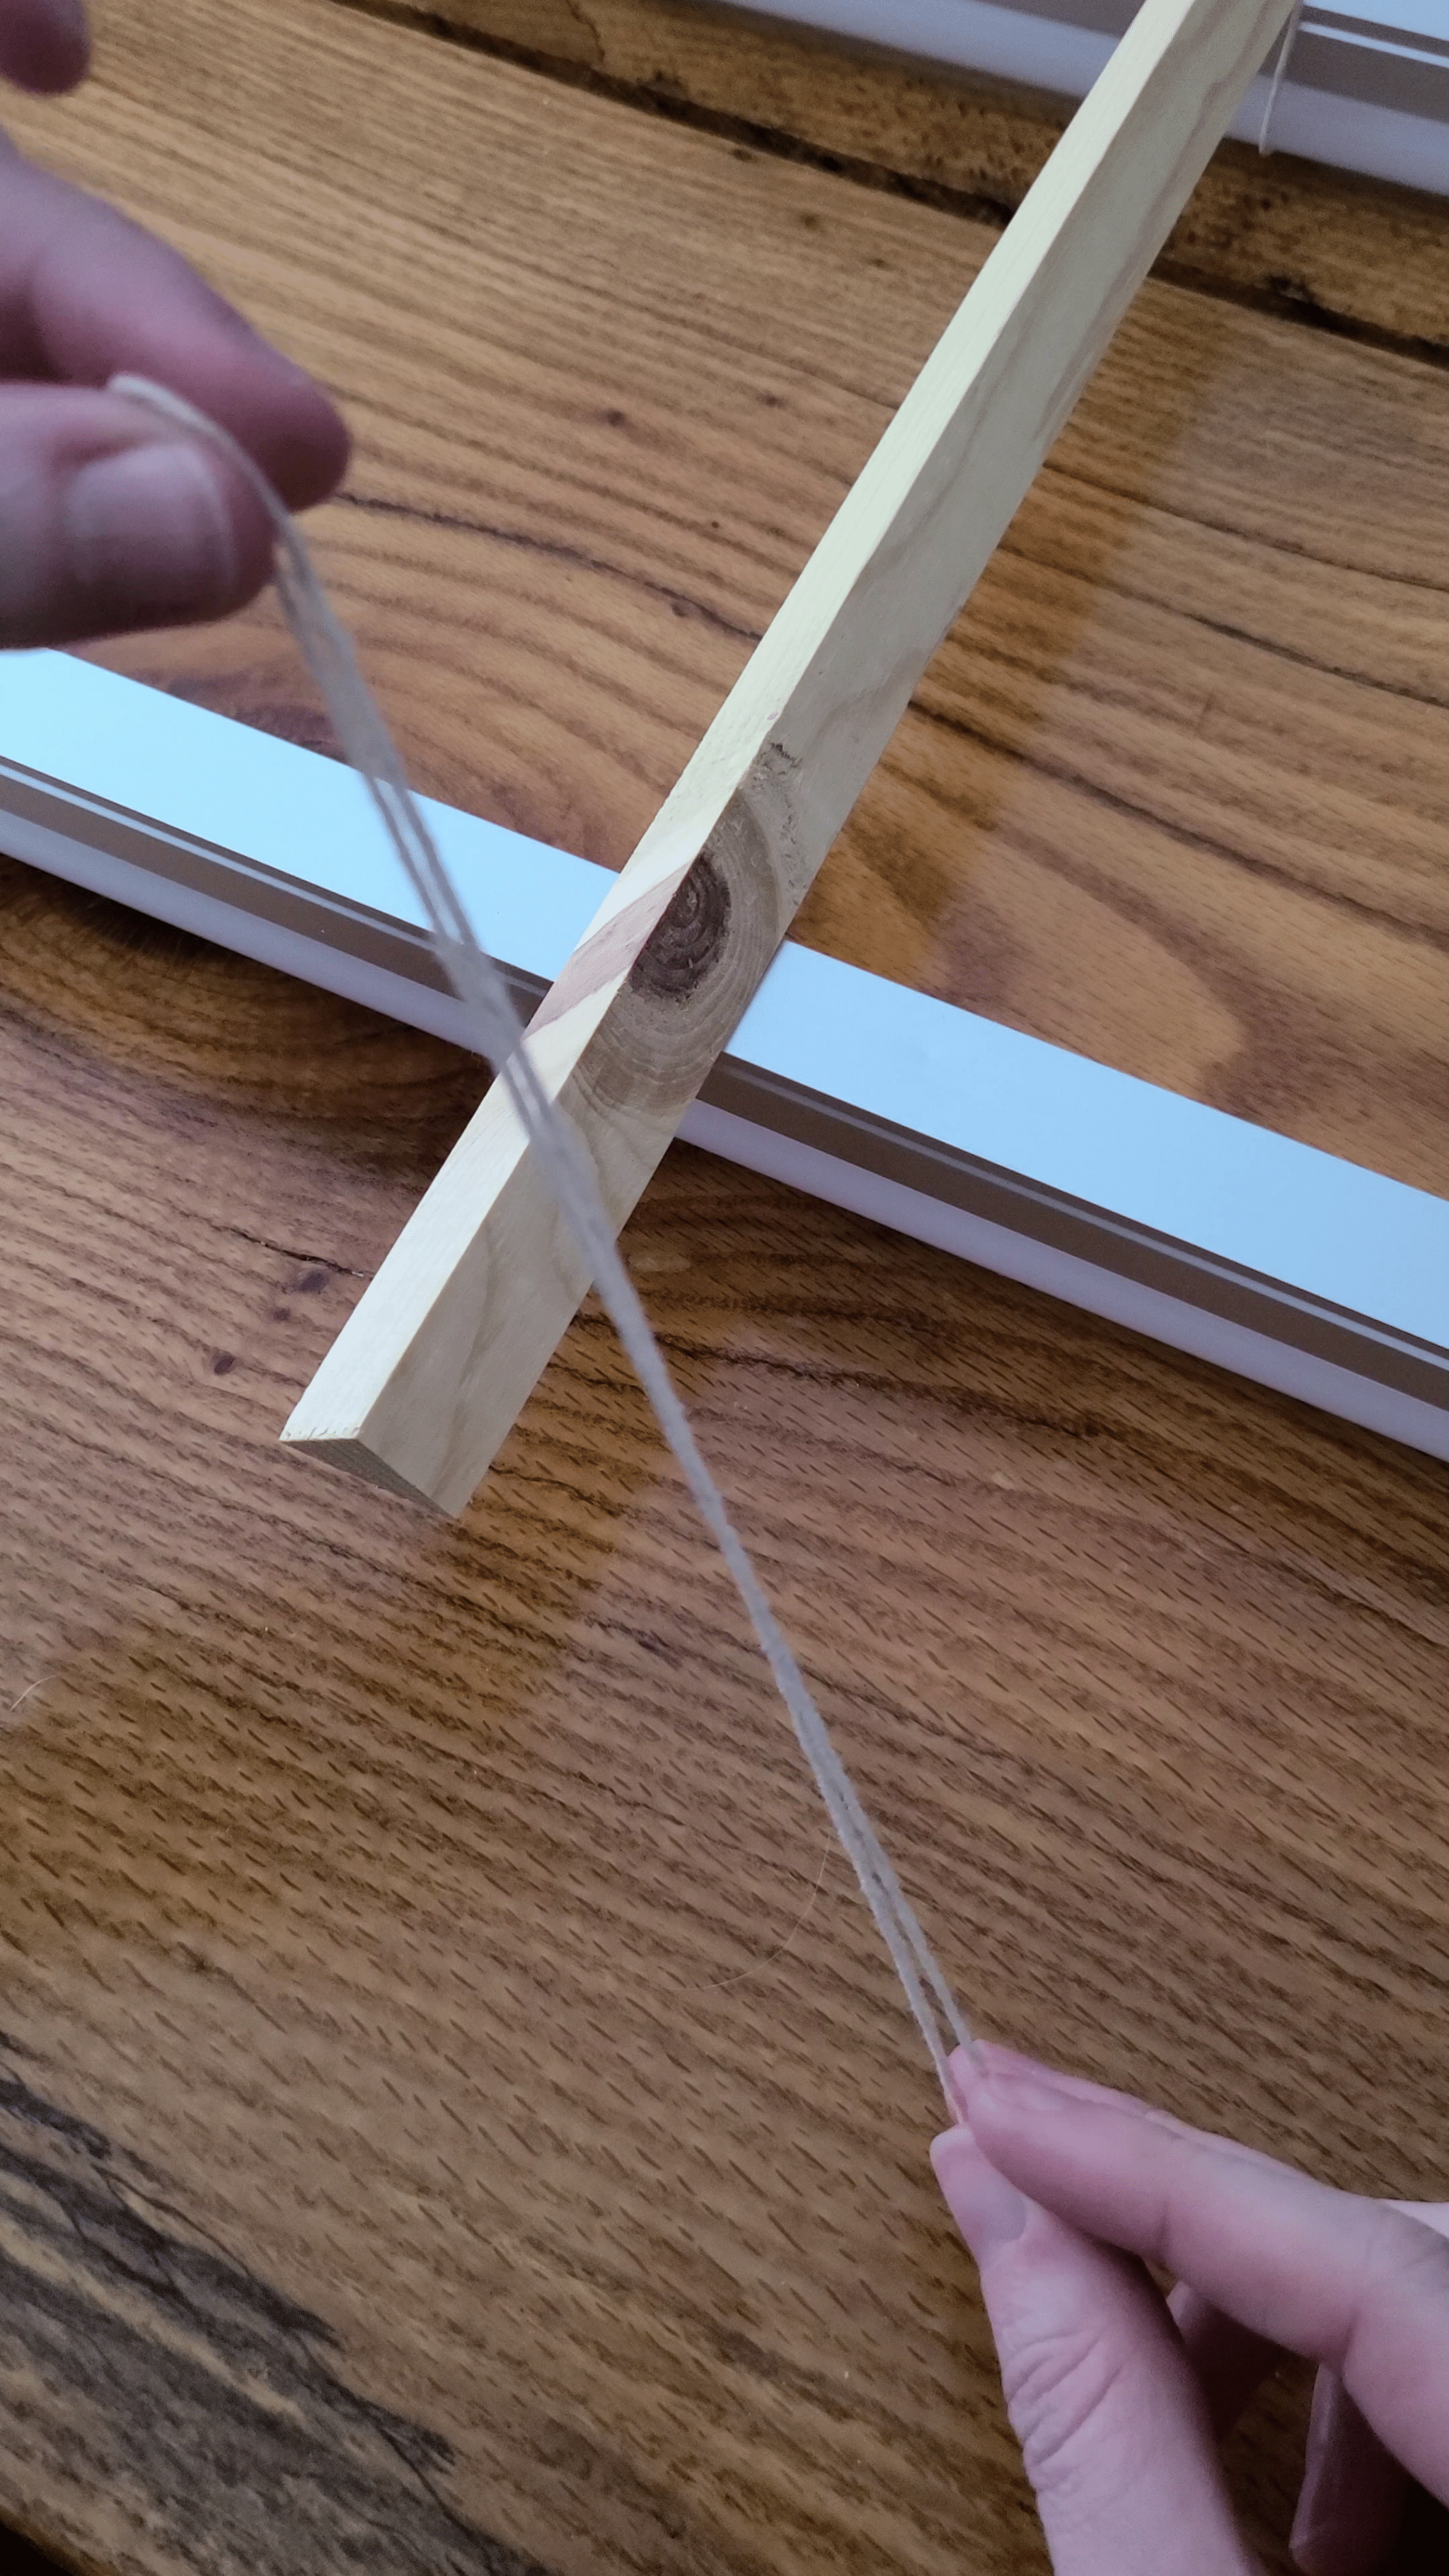
- Lash the wood to the shop lights using twine.
- Cut a piece of twine long enough to wrap around both pieces.
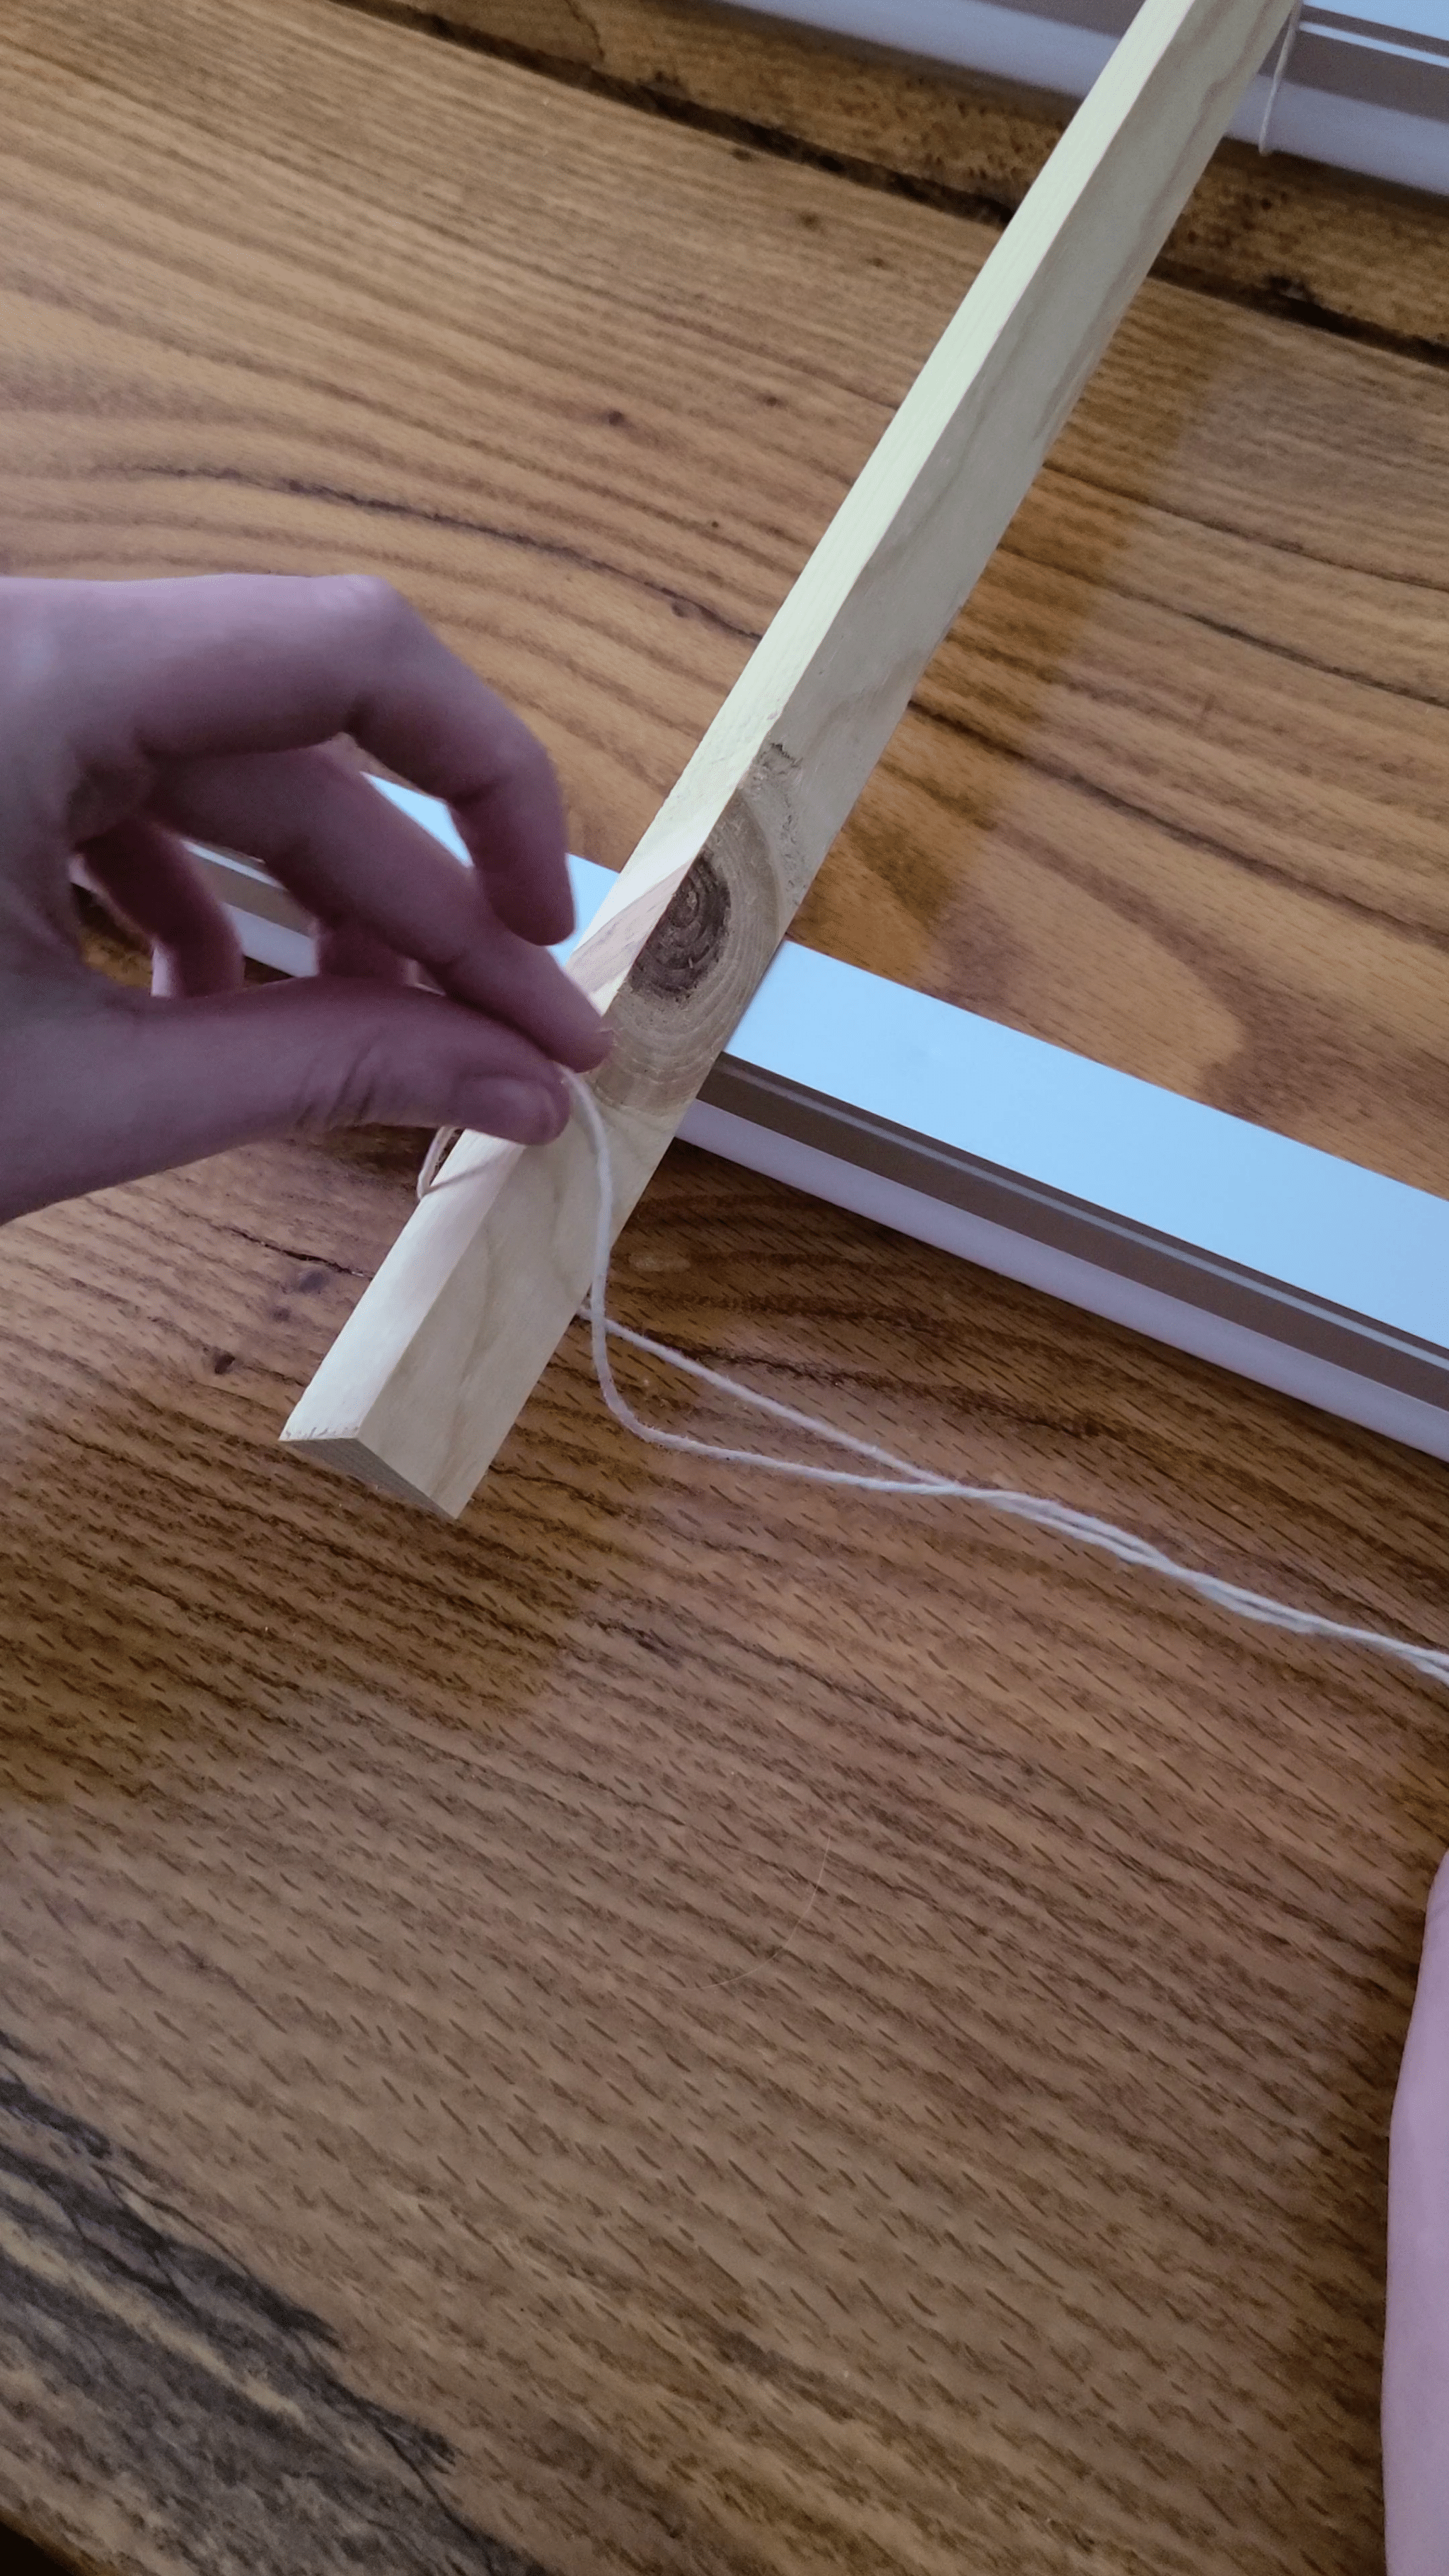
- Fold the twine in half and loop folded half over the outside edge of the wood strip.
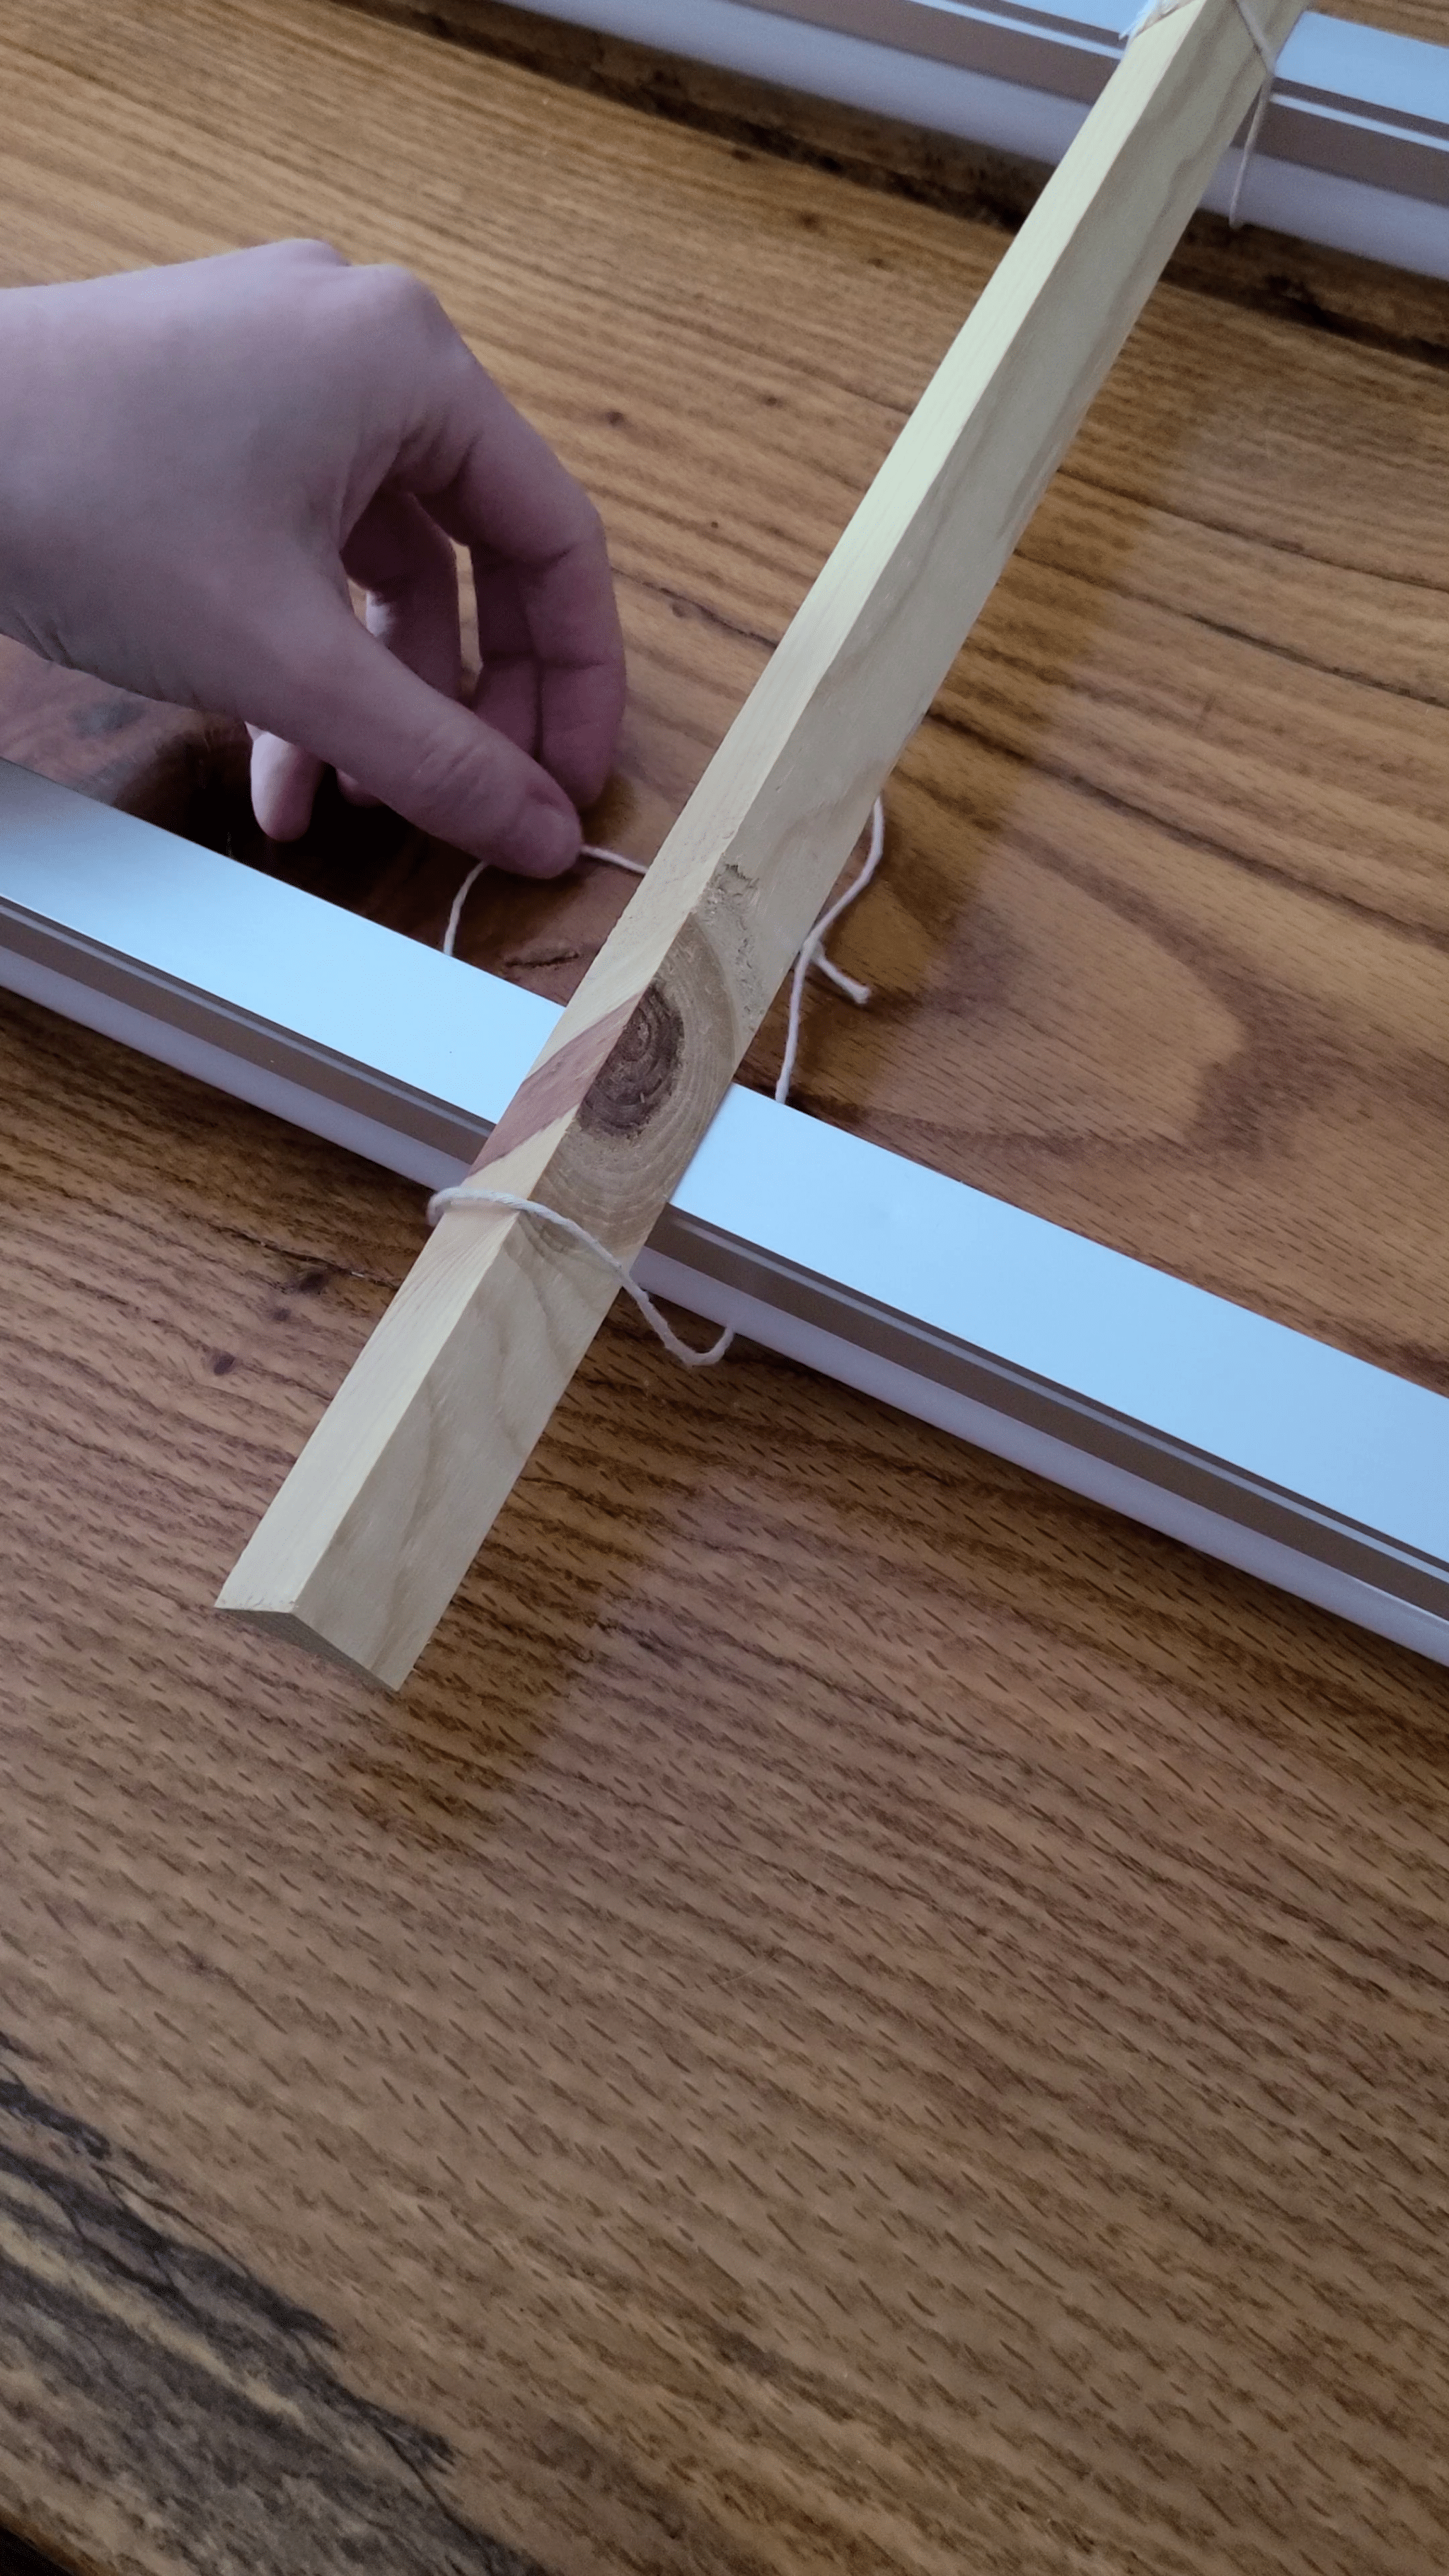
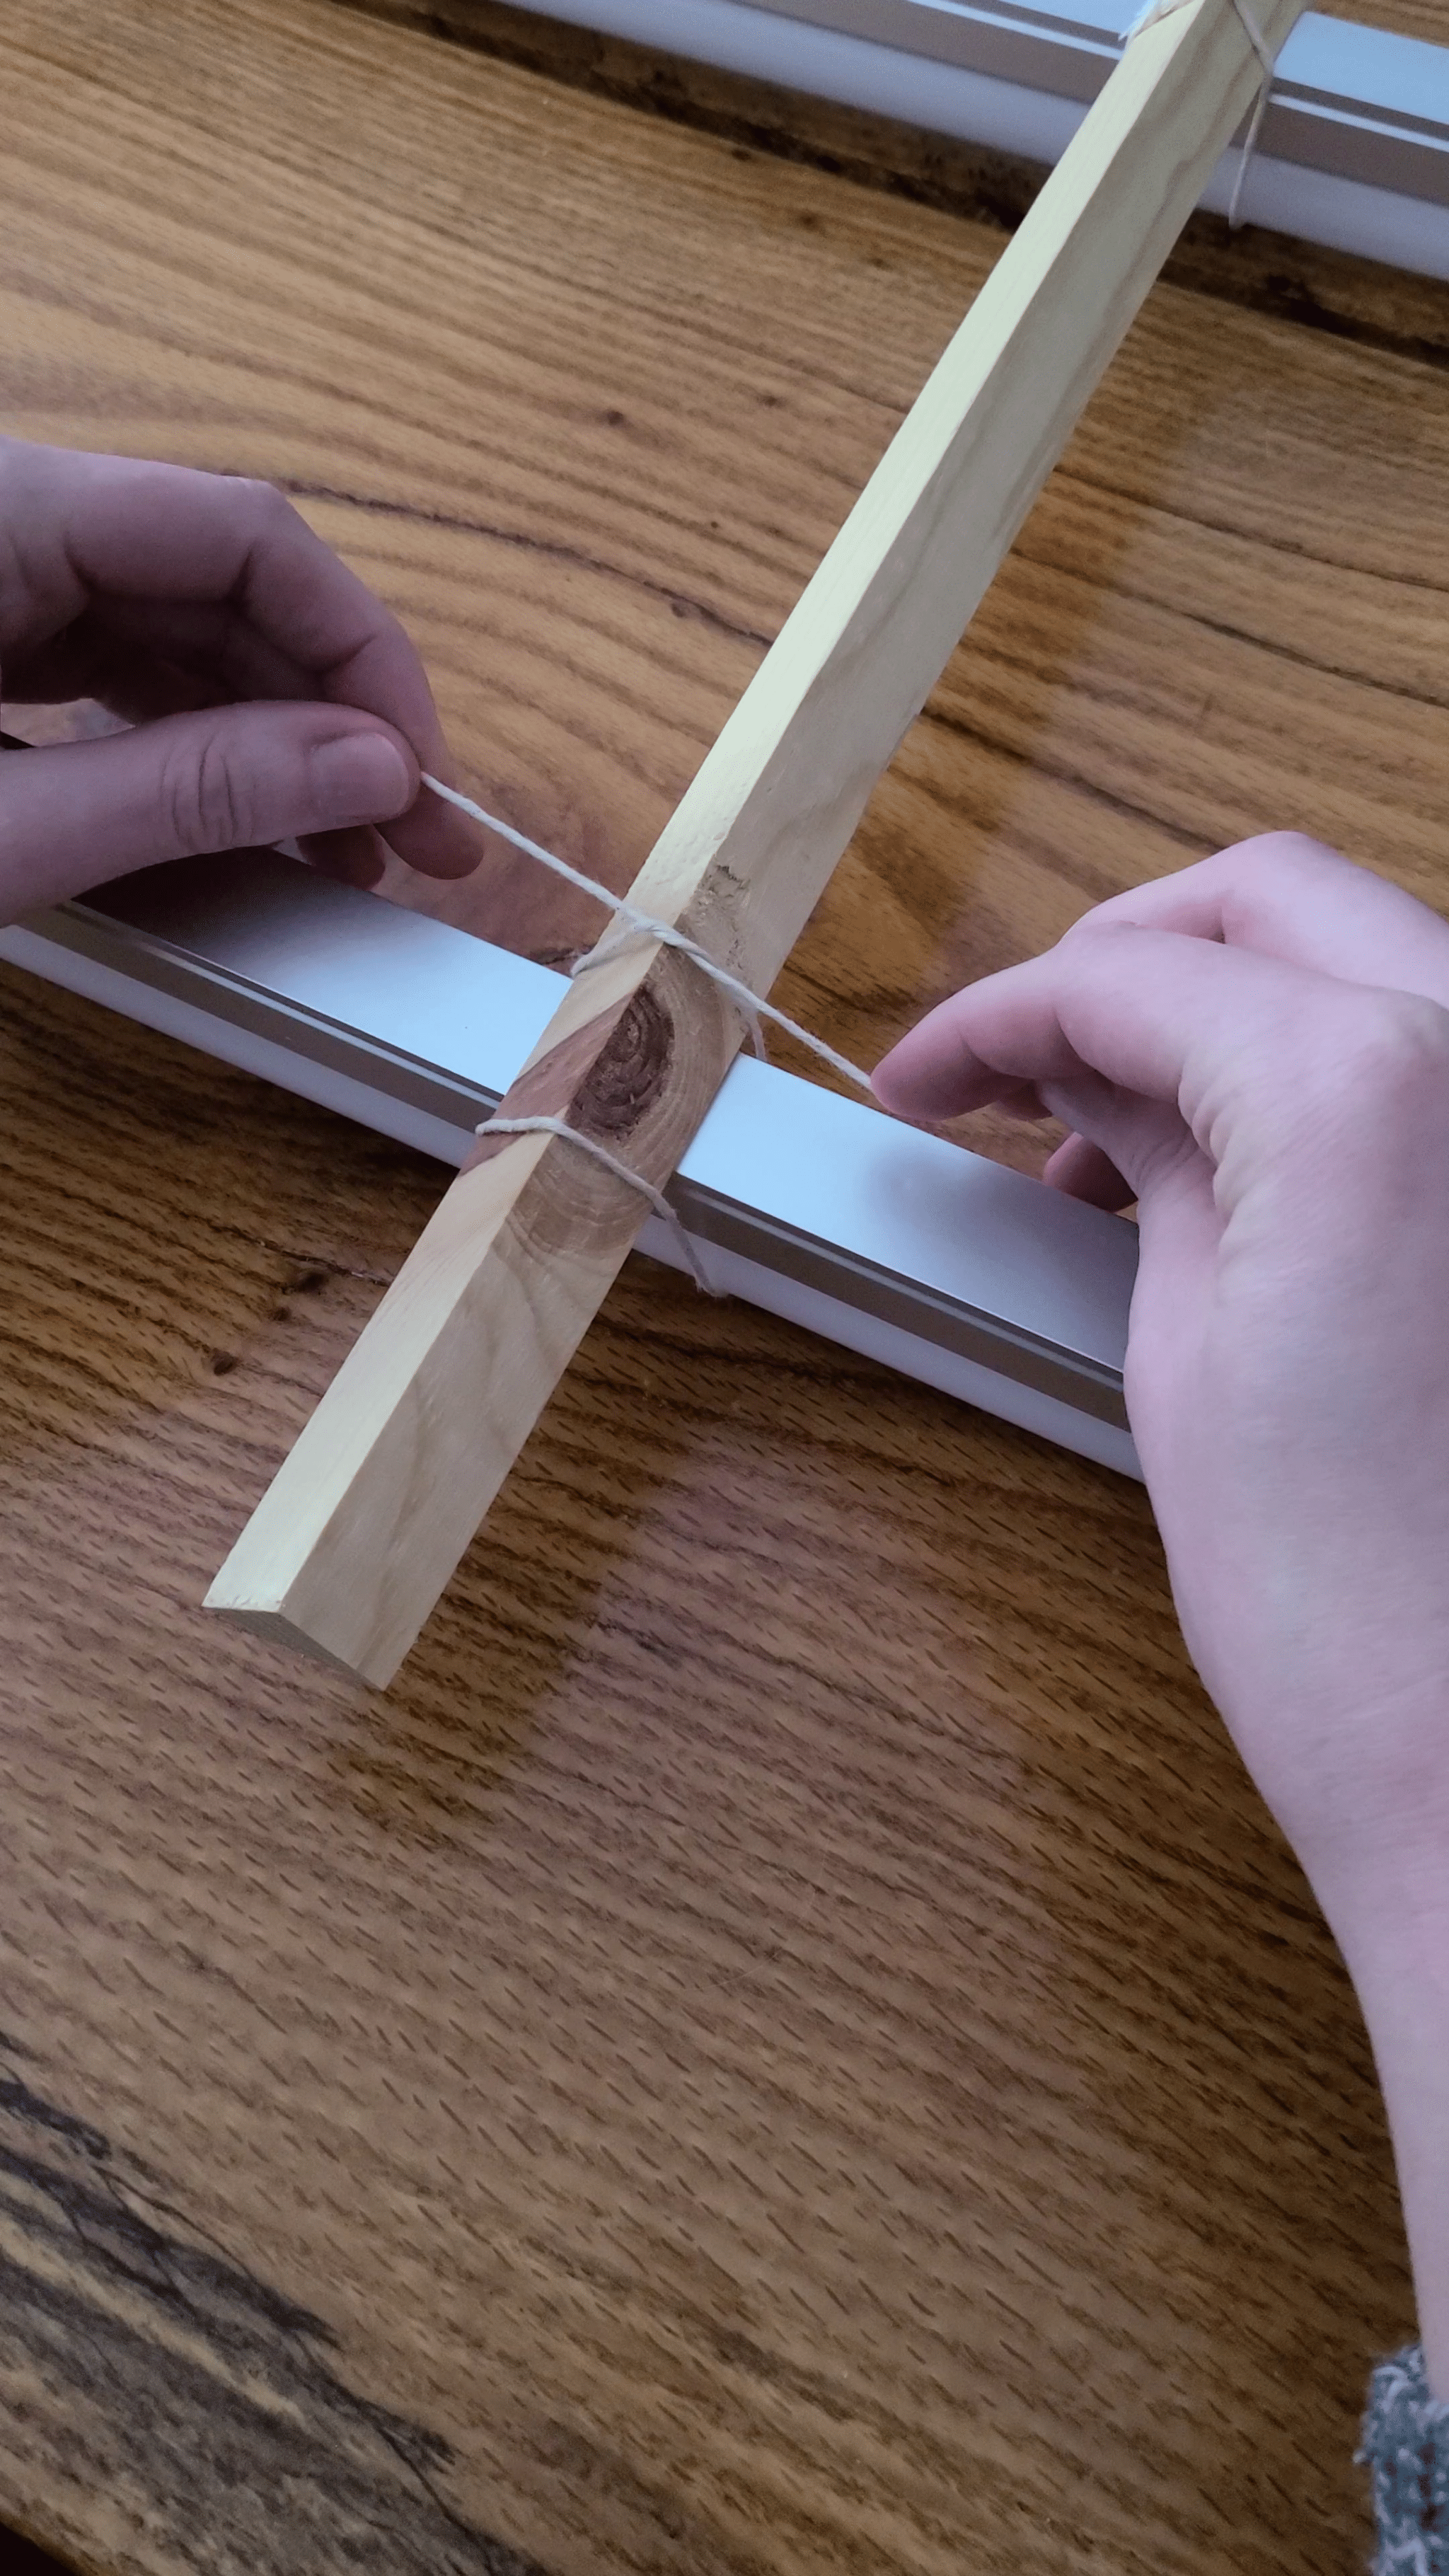
- Push ends underneath the shop light, wrap up, and tie securely.
- Repeat lashing and tying until lights are connected on all four corners.
- Repeat creating these lighting assemblies for the number of shelves you have.
Tips For Lighting Assembly & Number of Lights Per Shelf
The placement and distribution of the light over the seedlings matter. We utilized two shop lights per shelf as it allows the light to be evenly spread over all the seedlings on that shelf. You could use one shop light per shelf, but the distribution of light would be focused towards the middle. This means seedlings on the edge would grow inward towards the middle and possibly get leggy. Not going to be a deal breaker, but it could lead to some weaker seedlings.
As for the material for lashing together the lights, you can use what you have and/or have the budget for. Some people will use PVC pipes instead of wood scraps. But those can be expensive, and we personally would rather not buy unnecessary plastic when we can just utilize wood scraps. Honestly, you could use any long structural object to lash the lights together (maybe even twigs from outside).
3. Hang Lighting Assembly
Now with the lighting assemblies built, it’s time to hang and attach them to the shelving unit. I don’t suggest cutting the twine until the end once you know you have enough length. Here are the steps to hanging the lighting assembly.
- Start by laying the lighting assembly on the shelf below.
- Next, tie twine to one side of shelf above the lighting assembly. Then loop under first shop light.
- Bring the twine up to the center of the shelf and back down.
- Tuck the twine under the second shop light being careful to still keep the length of the twine up to the center of the shelf above.
- Then bring the twine up to the other side of the shelf and cut it leaving a little extra to tie it off.
- Before tying it off, go back and loop the twine over the middle of the shelf to secure it. Then tie off the end on the other side of the shelf.
- Repeat this process for each shelf and lighting assembly.


4. Adjust Height of Lighting
Now your lights are all sitting on the shelves and attached with twine. To raise them and make the height adjustable, you are going to use small binder clips on each side of the shelf.
- Pull the twine looping over the center up to raise the lights.
- Wrap it around the perimeter of the shelving and secure it with a small binder clip.
- Repeat this on all sides and all lighting assemblies
- Adjust each lighting assembly until at the desired height and level. Moving the binder clip allows the lights to easily be lowered and raised depending on the height needed for the seedlings.
Depending on the size of the binder clip or the shelving, the twine might not hold tightly if simply clipped. You can always tie it to the binder clip to keep the lights from slipping.


5. Plug In Lighting & Timer
Next, it’s time to hook up all the lights. The best part of using shop lights is they can interconnect allowing you to string the whole system together and simply utilize one outlet on your wall. Some grow light systems also have this capability.
Consider how best to connect the shop lights to allow you to easily raise and lower each lighting assembly independently. Here is the way we connected ours with our shelving setup.
- Start by using a connector cable to connect one side. Ideally, this is the side farthest from the outlet.
- Then, connect that cable to the light running in parallel with the first light.
- On the other end of these lights, connect the cable with an ON/OFF toggle switch. Ideally, this wire is closest to the wall and nearest to the outlet.
- Repeat this process for each shelf and lighting assembly.
- Then connect the ON/OFF cables to an extension cord or an outlet. We chose an extension cord, so we could add a smart timer to control the lighting schedule.
While you could interconnect all the lights and only have one ON/OFF cable, it meant less flexibility in moving each shelf’s lighting assembly independently. The length of the connector cables with our shop lights is only 20” and with our shelves set 17” apart, that makes the lighting need to basically stay the same distance apart and move together.
Then test to see your lights work before loading up the shelves with containers!


Using A Timer Is Beneficial
A timer is optional, but very useful to have as seedlings need 10-14 hours of light every day. If you forget to manually turn on the lights frequently enough, then your seedlings might not be as successful. Think of it like Christmas lights and you not wanting to remember to unplug them every night!
We use a smart plug timer that syncs to our phone app (the same one that controls our home’s smart light switches) which makes it really easy to set a daily schedule. It then automatically turns the lights on and off for us.

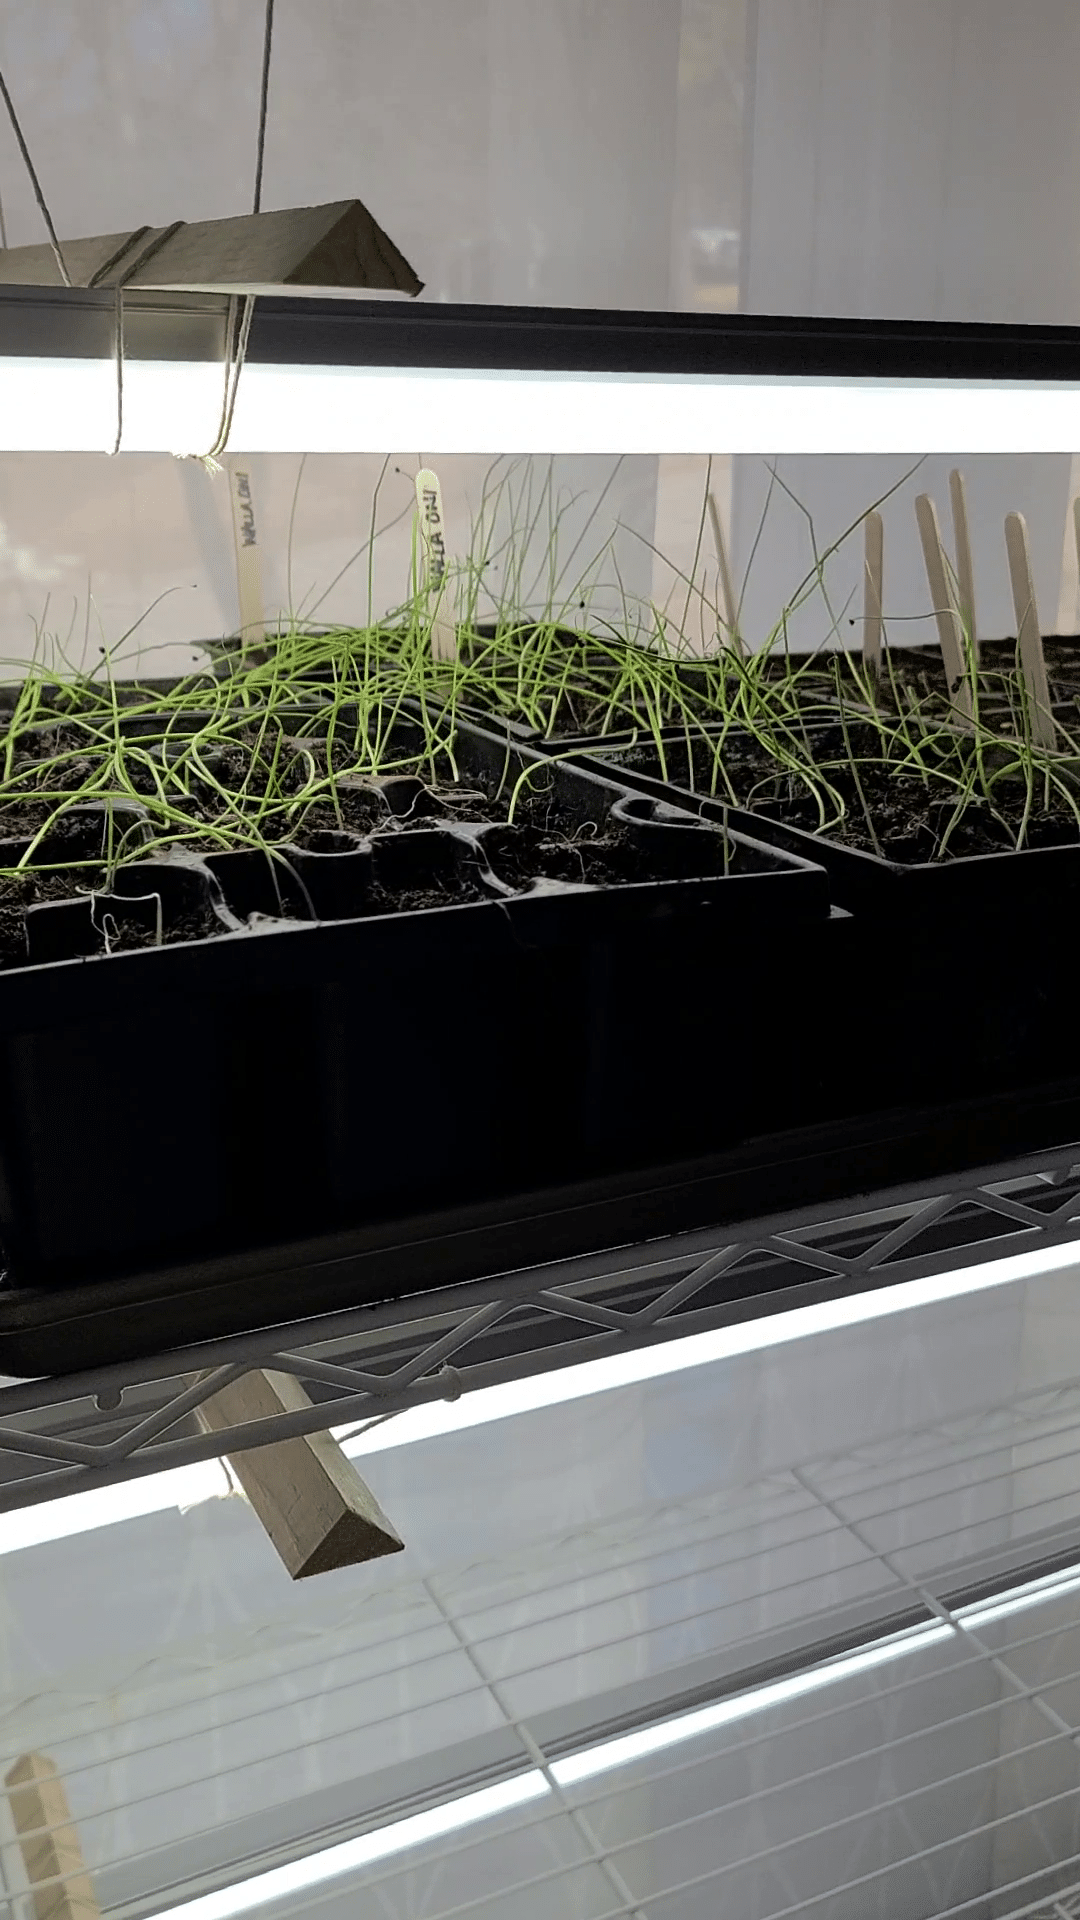
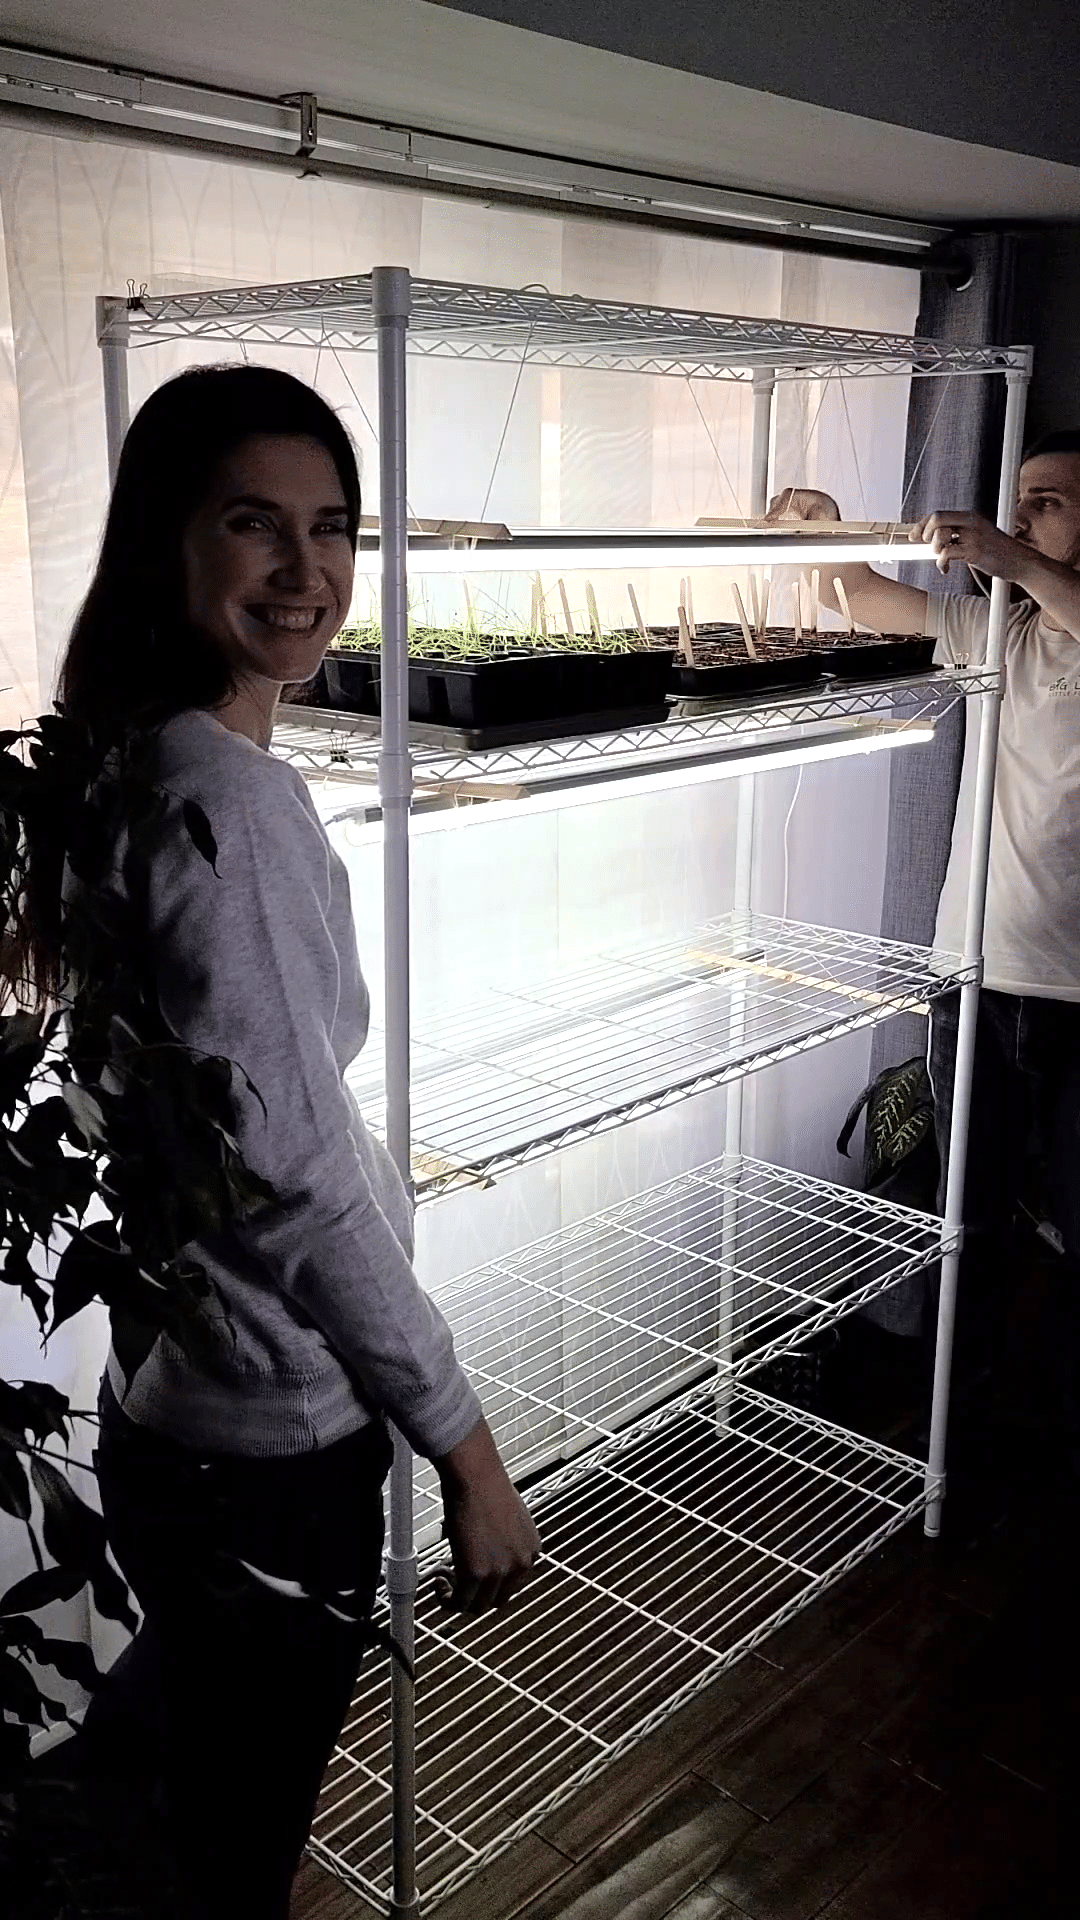
6. Start Seeds In DIY Setup
The last step is the fun part! It’s time to mix up your soil, add it to your containers, and start planting seeds. Don’t forget to put your watering trays under all the containers to make it easy to not only water them but also move them.
If you’re using a seed starting mix block like we do, then you will need to throw it in a bucket and add the recommended amount of water. It will then expand into a lot of soil to fill your seed containers with.
Next, place the trays onto the shelves and lower the lighting assemblies to be 2”-3” above your soil. Don’t forget to raise them as the seedlings grow, otherwise some of them might get crispy/die. Also, don’t forget to label your containers/cells with the variety of seed you planted. You might not be able to tell them apart as small seedlings.
Tada, your DIY seed starting setup is complete! Happy growing!


Storing DIY Setup After Seed Starting Season
If your DIY setup is only temporary like ours, then here are a few tips for storing them when the seed starting season is over.
Tip 1 – Label And Mark Where You Had The Shelves
Trust me on this. You will not remember in a year exactly how you had your shelves set up. So if the shelving unit is adjustable, mark the location where you had each shelf or put a note in the bag holding all the pieces. Such a mental timesaver in the future!

Tip 2 – Zip Tie the Shelves Together
Assuming you plan to store all the shelves together, I highly recommend zip-tying or using twine to bind all the shelves together. It just makes it easier to carry them all together and move around wherever you are storing them. Hopefully then prevents you from dropping any on your toes!
Tip 3 – Store Somewhere Safe
Storing the shelving and lighting somewhere safe for next year is important to make sure you can reuse them without damaging them. Unless you’re going to disassemble and put the shop lights back in a box, I suggest finding an out-of-the-way flat surface to store the lighting assemblies safely.
It may sound silly, but we store our seed starting setup and lighting assemblies on shelves. We keep most of our home supplies on our DIY custom storage shelves in a storage hallway by our garage. So yes, we slide the shelves onto a shelf and then stack the lighting assemblies carefully on top. Easily stored and safe until next year.
Seeds Companies We Love
To wrap up, I wanted to share a quick list our favorite places to get seeds.
- Baker Creek Seeds
- Johnnys Seeds
- Westcoast Seeds
- Ferry Morse Seed & Burpee – available at Home Depot & Lowe’s
We get a majority of our seeds from Baker Creek as the germination rate on their seeds has been 100%-90% compared to some other seeds. In our experience, seeds from home improvement stores tend to have a lower germination rate of around 70% or less.
Seed Starting & Garden Planner
If you’re growing more than like 5 seed varieties, it can be hard to keep track of when to start the seeds, when to transplant them, and all the tasks needed to have success. Some people use physical garden planners and write down lists. But we are highly visual individuals and love a good app to help make our lives easier.
We use Seedtime, which is a FREE garden planner that lays out the tasks and timeline for seed starting and garden work. But it does it in a digestible way by using a visual calendar. We love it and highly recommend to anyone who wants a simple plug-and-play way to garden plan.

Frequently Asked Questions
What are the essential components of a DIY indoor seed starting setup?
To create a successful indoor seed starting setup, you will need a few essential components. These include containers for your seeds, a growing medium, and a light source. You will also need a tray to hold your containers and a way to water your plants. Additionally, you may want to invest in a fan to help circulate air and prevent mold growth.
How can I create an effective seed starting rack with lights?
To create an effective seed starting rack with lights, you will need to choose the right type of light. LED grow lights are a popular choice because they are energy-efficient and emit very little heat. You can purchase a pre-made seed starting rack or build your own using PVC pipes and fittings or wood scraps. Be sure to position your lights so they are 2-3 inches above your seedlings.
What are some cost-effective materials I can use for DIY seed starting trays?
There are many cost-effective materials you can use for DIY seed starting trays and containers. Some options include egg cartons, yogurt cups, and plastic food containers. You can also make your own seed starting containers using newspaper or cardboard. Just be sure to poke holes in the bottom for drainage and add a tray below for watering.
How do I build a seed starting shelf with integrated lighting?
To build a seed starting shelf with integrated lighting, you will need to purchase or build a shelving unit. You can then attach LED grow lights to the underside of each shelf. Be sure to position the lights so they are 2-3 inches above your seedlings. You may also want to install a timer to automate your lighting schedule.
What are the best lighting options for a homemade seedling growth system?
The best lighting options for a homemade seedling growth system are LED shop lights. These lights are energy-efficient, emit very little heat, and provide the right spectrum of light for plant growth. They’re also typically cheaper than “grow lights”, and you can purchase LED shop lights online or at your local hardware store.
More DIY Projects & Gardening Ideas
Now you know the key components of an indoor seed starting setup as well as how to DIY your own setup. If you’re looking for more inspiration check out our DIY projects and Gardening/Homesteading articles!
- 18 Ways We Homestead In The Suburbs To Live More Sustainably
- How To Build A Wood Retaining Wall On A Slope
- How To Design & Create A Pollinator Garden
- Hubby How To: DIY Stacked Rain Barrel System
- This Is Why We Love Gardening – Spring 2023 Tour


Hope you are successful in starting your seeds this year! Let us know about your DIY seed starting station and what you’re trying to grow this year in the comments below!
Pin it!


Disclaimer: This post includes affiliate links, and I will earn a commission if you purchase through these links. Please note that I’ve linked to these products purely because I recommend them and they are from companies I trust. There is no additional cost to you.


