A Beginner’s Guide On How To Use A Router
Are you ready to up you’re woodworking and DIY game using a router? Check out this beginner’s guide on how to use a router. From installing bits to proper routing direction, we’ve got you covered!

Disclaimer: This post includes affiliate links, and I will earn a commission if you purchase through these links. No additional cost for you. Read about our privacy policy.
A router is one of those tools that many people have never used as it takes a little more learning compared to other power tools. Even as experienced DIYers, we didn’t touch a router that we owned for many years until recently. While there are always multiple ways to achieve a final outcome on a woodworking project, routers can truly be a game-changer making it perfect grooves, professional-looking edges, and beautiful joinery. So don’t be afraid to learn how to use a router!
If you know your bit types and have a router on hand, it’s time to dive into the intricacies of using this powerful woodworking tool. We will guide you through the essentials for how to use a router, from safety measures and installing bits to height adjustments and routing directions.
Our Recommended Routers
Below are the routers we have, love using, and will use as examples below with how to use a router. We have several routers, both secondhand and new.
- Dewalt Fixed & Plunge Router Set – Its great height adjustment rings are easier than other brands we’ve tried.
- Bosch Trim Router – The advantage is the micro-adjust wheel that makes it easier to dial in exactly the right height for corner profiles.
- Porter Cable Fixed Base Router – we have a very old secondhand one that honestly can be a little annoying to adjust. However, this is a long trusted brand and the newer models look more promising.
These are less pricey options than something like a Festool router and can be a more budget-friendly option for DIYers, hobbyists, or newer woodworkers. For more, check out our recommended tools and products on our resource page.
Router Safety First
Before we dive into the practicalities of using a router, let’s emphasize the importance of safety.
- Eye and Ear Protection: Always wear eye and hearing protection to shield yourself from debris and the noise generated by the router.
- Dust Mask: Routers produce chips and dust that can be hard to capture with a vacuum, so protect yourself by wearing a dust mask.
- Clothing and Hair: Like with all spinning blades, avoid wearing gloves or loose clothing while using the router. If you have long hair, pull it back to prevent entanglement with the bit.
Now, let’s get started on using a router safely.

How To Use A Router – The Basics
Let’s go over the basics of how to use a router. We’ll cover installing a bit, setting the height, correct routing direction, and using guides and bearings when routing.
Installing a Router Bit
To start, you have to install the router bit. But first and foremost, always unplug your router before changing the bit. Honestly, do this with any blade on any tool for that matter to prevent accidental injury.
The shank of the router bit is inserted into the router’s collet. As you tighten the nut, the slits in the collet compress, securing the router bit within the tool. To install a bit, you will likely need a wrench. If your router has a collet lock button, you can press this button and spin the collet until the button clicks in and locks the collet in place.


While holding that button in, you can grab the wrench and loosen the nut. You don’t want to fully remove the nut, just loosen it. Then you can slide the chosen router bit in and tighten the nut back down.
If your router doesn’t have a collet lock button, it will probably have two flat spots on the shaft next to the collet nut like our Porter-Cable router. You’ll need to put a second wrench on these flats to keep the collet from spinning while you tighten and loosen the nut.
Right Hand Rule For Loosening Nut
You will want to make sure you are going in the correct direction to loosen the nut, and you don’t over-tighten and strip it. A good trick to remembering the correct direction to loosen the nut is by using your right hand.
You want the nut to come off, so you point your thumb up in the direction the nut needs to go. Then look at the way your fingers are curled. The way your fingers curl is the direction you will have to spin the nut to get it off.


Reducing Sleeve
For routers with a larger opening, a reducing sleeve may be needed for smaller bits. Some routers can accept ½” router bits and you will need a reducing sleeve to use smaller size bits. Our router with a ½” opening came with a sleeve for ¼” bits. You just need to install the sleeve in the collet, then install a bit and it tightens up perfectly.
If you live where the metric system is used, then your bits might be 6, 8, 10, or 12 mm. You can likely find an adapter sleeve for any of these sizes, but make sure you get one with multiple slits in it to get better compression and a more secure hold on the bit.


Bit Removal
When it’s time to change a bit, just reverse the process from before. Lock the collet, loosen the nut, and remove the bit. If you find that your bit is a little stuck, it can help to give it a gentle tap to free it and then pull it out.
Related – The Ultimate Guide to Router Bits: Exploring Types and Applications
Tips for Router Cut Depth and Width
To achieve the desired outcome, it’s essential to adjust the router bit’s cutting depth and width according to the task at hand. As a general rule of thumb, you should never cut deeper than the diameter of your bit in a single pass.
For deeper cuts, consider making multiple passes rather than pushing the bit too hard in a single attempt. This not only ensures a cleaner finish but also prolongs the life of your router bit. If kickback is likely in an area, make multiple smaller passes to work up to your final depth.
Setting the Height For Fixed Routers
Adjusting the height of the router bit is crucial for achieving the desired cut depth. The process varies between router brands. Here are three examples using our three routers.
Porter Cable
Starting with our older router, the first thing you have to do is release the clamp holding it in place. This usually comes in the form of a latch. Once that is released, there is usually an adjustment screw somewhere. Ours has this plastic screw that turns a metal shaft inside it. This one has seen better days and the mechanism often gets jammed. So we work in the direction of gravity, and turn the knob until we get to the desired height, then lock it down.


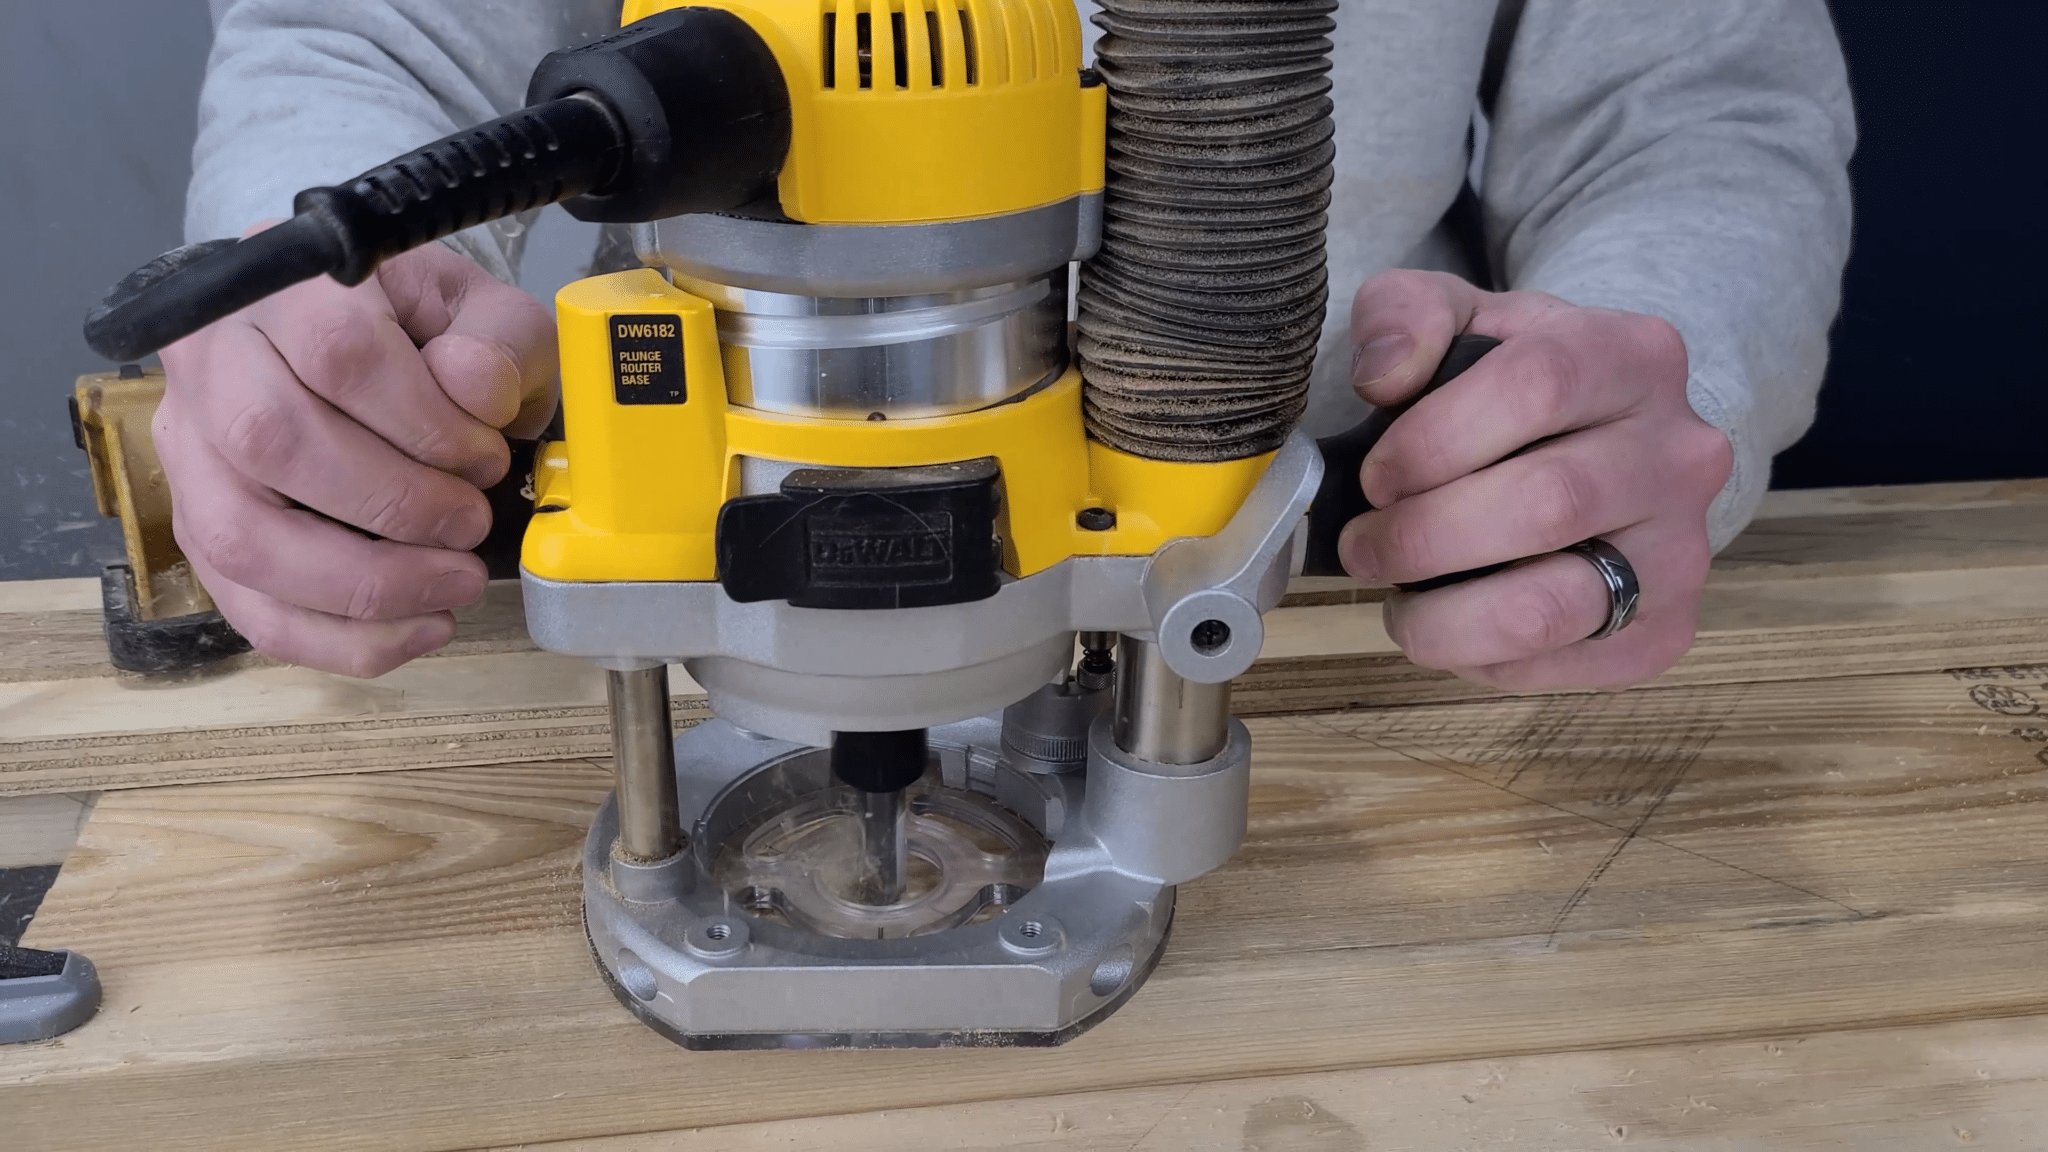
Dewalt
Our Dewalt fixed base router is much more convenient. You release the latch, then spin the ring to dial in the height up or down and lock it in. To get a more precise measurement, you can align the 0 on the yellow ring to the arrow on the router, then turn the adjustment ring to get the dimension you want and lock it down.


Trim Router
Our trim router is pretty unique. Bosch’s trim router has a three-position knob. In the top position, the base is completely loose and you can slide it up and down freely. In the second position, it engages with the thread inside the base. Then you turn the wheel to finely adjust the position height of the bit. Finally, you turn the knob to its third position to lock it in place.


Height & Depth Adjustments for Plunge Routers
We also have a plunge base for our Dewalt router. A plunge base operates completely differently from a fixed base router, but the operation of setting the height between brands is pretty similar.
In its simplest form, a plunge base allows you to push the router down to a specific depth and then lock it at that position. Ours has a lever on the backside that you can toggle. What is cool is where you go from here.
If you want to go to the same depth in multiple locations, you can drop the depth stop and lock it in place. Some routers will have a screw down here, or a dial up above to finely adjust the position of the depth stop in case the original setting was slightly off. Once this is set, it will limit the depth of the plunge and you can get uniform results in multiple locations.
Using Depth Stops To Make Deeper Cuts
Say you want to make a pocket that is ½” deep. You won’t want to take that in one deep plunge with the router. What you can do is plunge the bit down until it is touching your surface. Drop your depth stop so it is touching the highest incremented step, and lock it in place. Then you turn the stop one click. That’s the first pass and on most routers, it is probably ¼”. You make that pass, then you turn it again, and now you are at ½”.


Routing In the Correct Direction
Understanding the correct direction to move the router is crucial for safe and effective routing. Like anything else in the workshop, the key to safety is control.
You see, router bits cut wood by spinning blades. These blades have to exert force on the wood fibers to shear them. If you are routing a groove in the surface of a piece then both sides of the bit are touching wood and direction doesn’t matter as much. The problem comes when you are on the edge of a piece.
With edge routing, one side of the bit is touching the wood and exerting force while the other side isn’t. This imbalance makes the router want to pull itself along the piece. This can cause the router to run away from you, which can be dangerous. And in the case of a router table, it can quickly pull the piece along the blade which may catch an unsuspecting finger. To cut safely, it is better to resist this motion and move the router in the opposite direction that it wants to pull.


Right Hand Rule For Routing Direction
The easiest way to determine this direction is with another right hand rule. Use your right hand to determine the direction based on the position of your thumb and index finger relative to the edge of the workpiece.
On your right hand with your palm facing upwards, hold your thumb and index finger flat and middle finger out pointing upwards. Then turn your palm over and pretend your palm is the base of the router and your middle finger is the router bit. If you touch your thumb to the edge of the workpiece that you want to cut, then your index finger will point in the direction you need to go. This works regardless of whether you are on the outside of the piece, the inside of the piece, holding the router by hand, or using a router table.


When To Break The Direction Rule
Now let’s talk about when to break this routing direction rule. If you are routing along the edge of a piece, there is a possibility that the blade’s teeth will catch the wood fibers and split them instead of shearing them. This is especially true if you are taking larger passes, or working with wood that is prone to splitting like the Alder we used on our DIY headboard. And if the wood isn’t prone to splitting, the blade may catch and that energy will cause the router to kick back.
In certain situations, like edge routing, climb cutting can prevent tear-out and kickback. Climb cutting means allowing the router to go in the direction it wants to. Because you are now going the opposite direction, instead of cutting in the direction of the wood grain, the teeth are now cutting perpendicular to the wood grain. So they shear the wood grain and then scoop it out. You have to be careful doing this and have a firm grip on the router or piece. The router will want to pull, but you have to resist that. Climb cutting can save your piece so long as you do it carefully.


Related – Hubby How To – Modern DIY Platform Bed Frame
Using a Guide
A common use for a router is for routing slots and grooves. To do this, you need a guide to ensure you have a straight line. Some routers come with an edge guide accessory, but those aren’t really necessary. All you need is a straight edge. Even the factory edge on a sheet of plywood will do the trick.
To cut a groove with a guide, first start by placing the router where you want the groove to be located. Then bring a straight edge up until it’s touching the edge of the router’s round part on the base, and clamp it down. After that, use the router to check the other end of the groove, and then clamp that side of the straight edge down as well. Now if you route along this line, you will get a perfectly straight line.


Utilizing Router Base Concentricity
The trick here is that you are using the round part of the router base. This works because the router bit is concentric to the base plate. This means it is always the same distance from this circular edge. If you twist the router or bobble while making your cut, the line will stay straight. If you used the straight edge of the router base here instead, then every little bobble would show up in the finished cut.


Tip – Straight bits work great for cutting slots and grooves, but we’ve found that a nice downcut spiral bit enables us to do grooves in plywood that result in almost no tear-out. This means less cleanup and sanding work later and no ruined workpiece that’s hard to repair. It’s totally worth the little extra cost for the bit.
Using a Bearing
There are six different types of router bits and each has a specific purpose. Several bits use bearings to reference the edge of a piece. These bearings make it extremely easy to get consistent and perfect results from your bits. However, there are three things that you need to keep in mind when using these bearings.
Proper Positioning
First is proper positioning for flush trim and template bits. You want the bearings to ride perfectly along the template or other surfaces, but you don’t want to risk cutting into those surfaces. So only set the position of the bearing as close as possible to the surface you intend to cut. The last thing you want to do is shave off part of your template.


FAQ – Aren’t the bearing and blades exactly the same size, so why would it cut into my template? There are two possible reasons this could happen. The first is a manufacturing error. They may not be exactly the same size. However, this is more common when using cheap bits. The second possible reason is an incorrect technique.
Gentle Pressure
The second thing to keep in mind is to use gentle pressure. You want to hold the bearing against the side of the piece, but this should be a gentle motion. If you press too hard, you will cause deflection in the router bit’s shaft, and you’ll end up with a bad cut. Let the router bit do the work. You are just there to guide it.
Maintain A Flat Router Base
Lastly, you also want to be sure to keep the router base flat on the surface of the piece. You don’t want to let the router tip or it will mess up the cut. If you have two handles, it is good practice to keep one over the surface of the wood and pushing down, while you use the other to guide the router around.
Many trim routers have a place by the base for you to put your fingers. Then you can rest your hand on the piece and apply downward pressure to prevent tipping as you work your way around the piece.


Related – How To Use Router Guide Bushings For Inlays
More Router Guides & DIY Projects
We’ve covered the basics of how to use a router in this guide to help you enhance your woodworking skills and achieve professional results. You can learn more from our other router guides too. Now it’s time to get started on a DIY project!
So check out more of our DIY projects articles for inspiration or grab some DIY plans from our Site Shop or Etsy Shop!
- Hubby How To: DIY Flipping Workbench
- Hubby How To – Modern DIY Platform Bed Frame
- Hubby How To – DIY Modern Headboard With Floating Nightstands
- Hubby How To: DIY Hanging Daybed Swing Plans
- Hubby How To: DIY Stacked Rain Barrel System


Hope this guide helps you get started with using a router! Let us know what projects you are going to do with a router in the comments below!


Disclaimer: This post includes affiliate links, and I will earn a commission if you purchase through these links. Please note that I’ve linked to these products purely because I recommend them and they are from companies I trust. There is no additional cost to you.


