15 Tips On How to Use a Speed Square Like A Pro
Did you know a speed square can be used for more than making straight lines and checking right angles? Yup, it’s a multi-functional tool that’s cheap but can be incredibly handy in so many ways. Read on to learn how to use a speed square 15 different ways!

Disclaimer: This post includes affiliate links, and I will earn a commission if you purchase through these links. Read about our privacy policy.
Many times there are tools in a workshop and at home not being used to their full potential. Possibly because it’s on a shelf collecting dust or because you’re not aware that it has other helpful functions. A great example of this is a speed square (aka a rafter square). Even as serial DIYers, we honestly only used our speed square as a straight-edge and to check right angles for many years.
But as we continued to do DIY and woodworking projects, we found out that a speed square has many more uses that actually can help speed up our workflow!
In this post, we’ll cover the parts of a speed square, how to confirm it is actually square, and then 15 awesome ways on how it can be used. So check it out if you want to learn how to use a speed square like a pro!
What Is A Speed Square?
A speed square is a multi-purpose triangular tool utilized to quickly make markings and has many functional uses in woodworking and DIY projects.
Speed Square is technically a brand name a Rafter Square, but it’s become such a commonplace term that people use it to refer to the tool itself. Swanson Tool has the term “speed square” trademarked, so others technically have to call it by its other names. You could hear a speed square referred to as a quick square, triangle square, carpenter’s square, or even rafter angle square.
Although, you might also hear the word “Framing Square” or “Combination Square”, which are similar multi-purpose triangular tools, but different. They have different features and are not known for their ability to quickly be used. Some people, and even products, still sometimes use them interchangeably, so just be aware of what you’re looking for and using!
Parts of A Speed Square
Have you ever wondered what all those lines and numbers mean on a speed square? They each help with a different function and help make this tool so useful once you understand what each part does. Here are the individual features and parts of a speed square.
- Ruler – These are standard markings for measuring distance with the tool. Depending on the size it’ll range between 6”-12” for measuring.
- Pivot – On the corner of the speed square, there is a notch marked as “pivot”. This notch allows you to pivot at this point to quickly mark a desired angle without a protractor.
- Lip or Fence (Reference Edges) – This acts as a reference edge that allows you to brace the fence against a board to ensure you are marking a straight line.
- Scribe Lines – these are the lines that correspond with the ruler part and allows you to secure your pencil as you slide the square along “scribing” your material below.
- Angles (Protractor) – These markings act as a protractor to allow you to mark angles from 0 to 90 degrees.
- Hip – Val Marks & Common Pitch – Both of these rows of markings are for finding common angles for joists and rafters. You can utilize the pivot point to find these “common pitches” and measurements. We’ll get into more detail on how to utilize these parts towards the end of this post.

Special Marking – Diamond Hole
Some speed squares have a special cutout or line that occurs at the 3 ½” mark from the square’s edge. Sometimes it’s a diamond, but some brands use a triangle or a circle too.
This hole allows you to quickly measure and mark this distance as 3 ½” is the common stud width and the actual size width of a 2×4 piece of lumber. This cutout allows you to easily draw a line to the exact width of a 2×4.
Now that you know what all those markings mean, you can start putting them to use!

How To Tell If Your Speed Square Is Square
Did you know that all squares are not created equal? We’d had trouble getting square cuts for years and just thought our miter saw had too much play in it. Then we finally checked our square and realized we’d been using a bad square this whole time!
Now don’t worry, you can check your squares very easily, and here’s how you do it.
Check Inside Corners For Square
A Speed Square has two reference surfaces on it, and these allow it to check the inside corners and outside corners of the square. First, you want to start by checking the outer edge.
- To check this one, grab a straight edge that is at least twice as long as your square. A level works well for this.
- Then clamp it down to your work surface.
- Next, lay a sheet of material/scrap wood on your work surface that is at least as thick as the lip of your speed square and clamp it down as well.
- With the speed square held tight against your straight edge, mark a line on your material. You’ll want to be using the sharpest line you can.
- Then flip your speed square over and bring it up to the first line and mark a second line.
If these two lines overlap perfectly, then your square is square on the inside edge. If not, it’s time to return the square to the store or toss it in the scrap bin.


Check Outside Corners For Square
Checking the speed square’s inside edge is simpler.
- First, you need a board with a straight edge. The factory edge of plywood usually works well enough for this, but check it with a straight edge first.
- Now, place the speed square on the board.
- Then press the edge tight and mark a line.
- Once again, flip it over, line it up, and mark the second line.
Did the lines match up? If so, the outside edge of your square is square
Make sure you check both reference edges as one or both may be off. A reliable square is crucial for accurate cuts, so check your square is square if you haven’t before!
Our Speed Square Recommendations
While there’s an endless amount of brands out there selling a speed square or rafter square, here are the ones we have and would go with.
- Swanson Tools 12” Speed Square – a large square that is extremely helpful when working with large boards and checking square on tools. You can get a great speed square value pack that also comes with 7 inch square to complete you toolkit.
- Thorvald 7” Carpenter Square – a typical size speed square in black with white letters that we love as it’s easier to read. The higher contrast letters can be useful if you’re moving quickly! However, this one does not have common pitches, and replaces that with drill gauges. If you’re simply DIYing to make furniture and decor, then this probably won’t be an issue.
Just remember, not all squares are equal and might not be square as we noted. We experienced this with a basic Harbor Freight square that we had been making cuts with for years.
So no matter what brand you go with, always check that the speed square is square when you first purchase it!
15 Ways To Use A Speed Square
Once you’ve got a square square, it’s your go-to tool for checking that everything else is square. There are so many functions a speed square can do, and it can help speed up your workflow, too. Here is how to use a speed square in 15 different ways to help you with your DIY and woodworking projects.
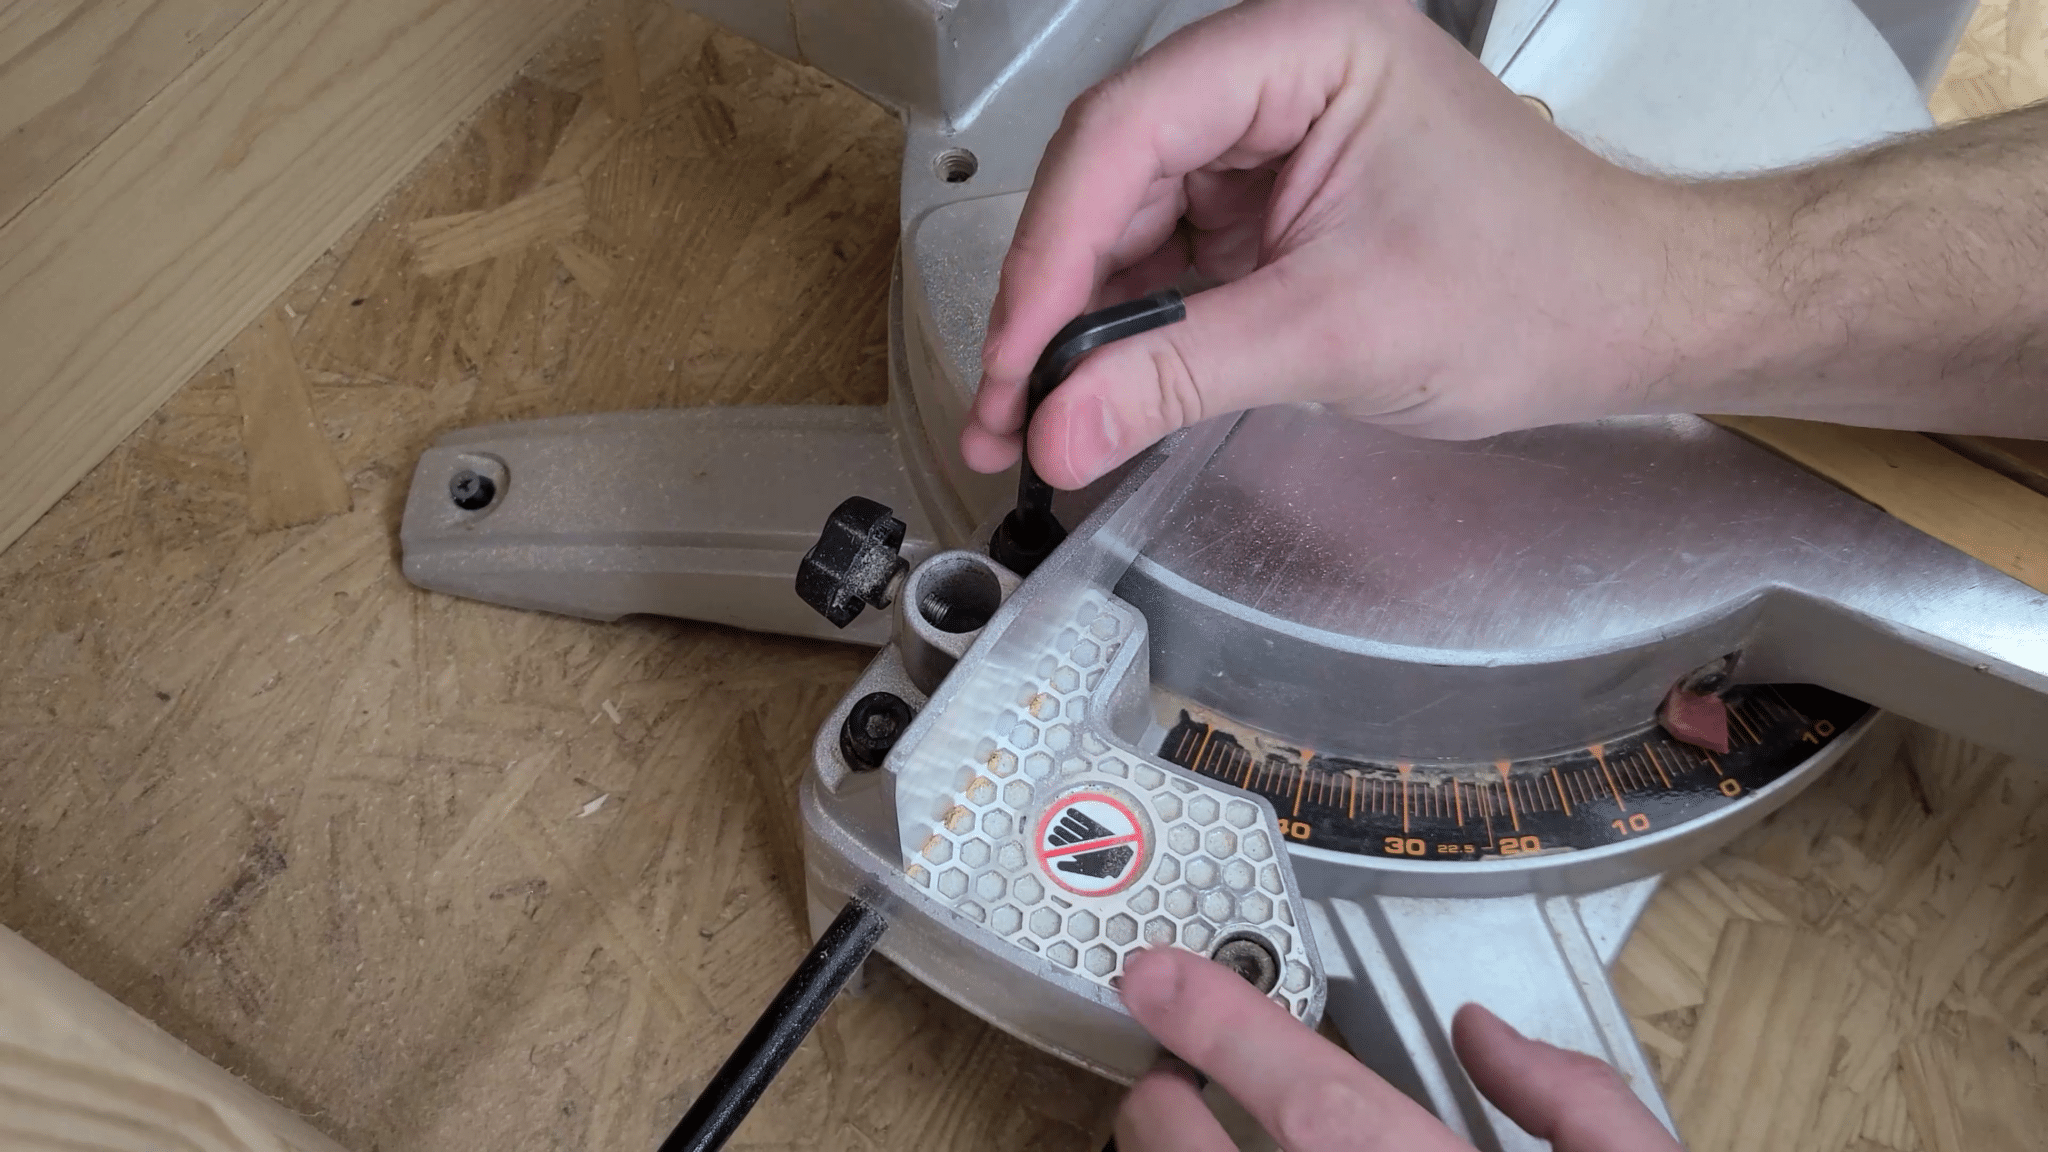
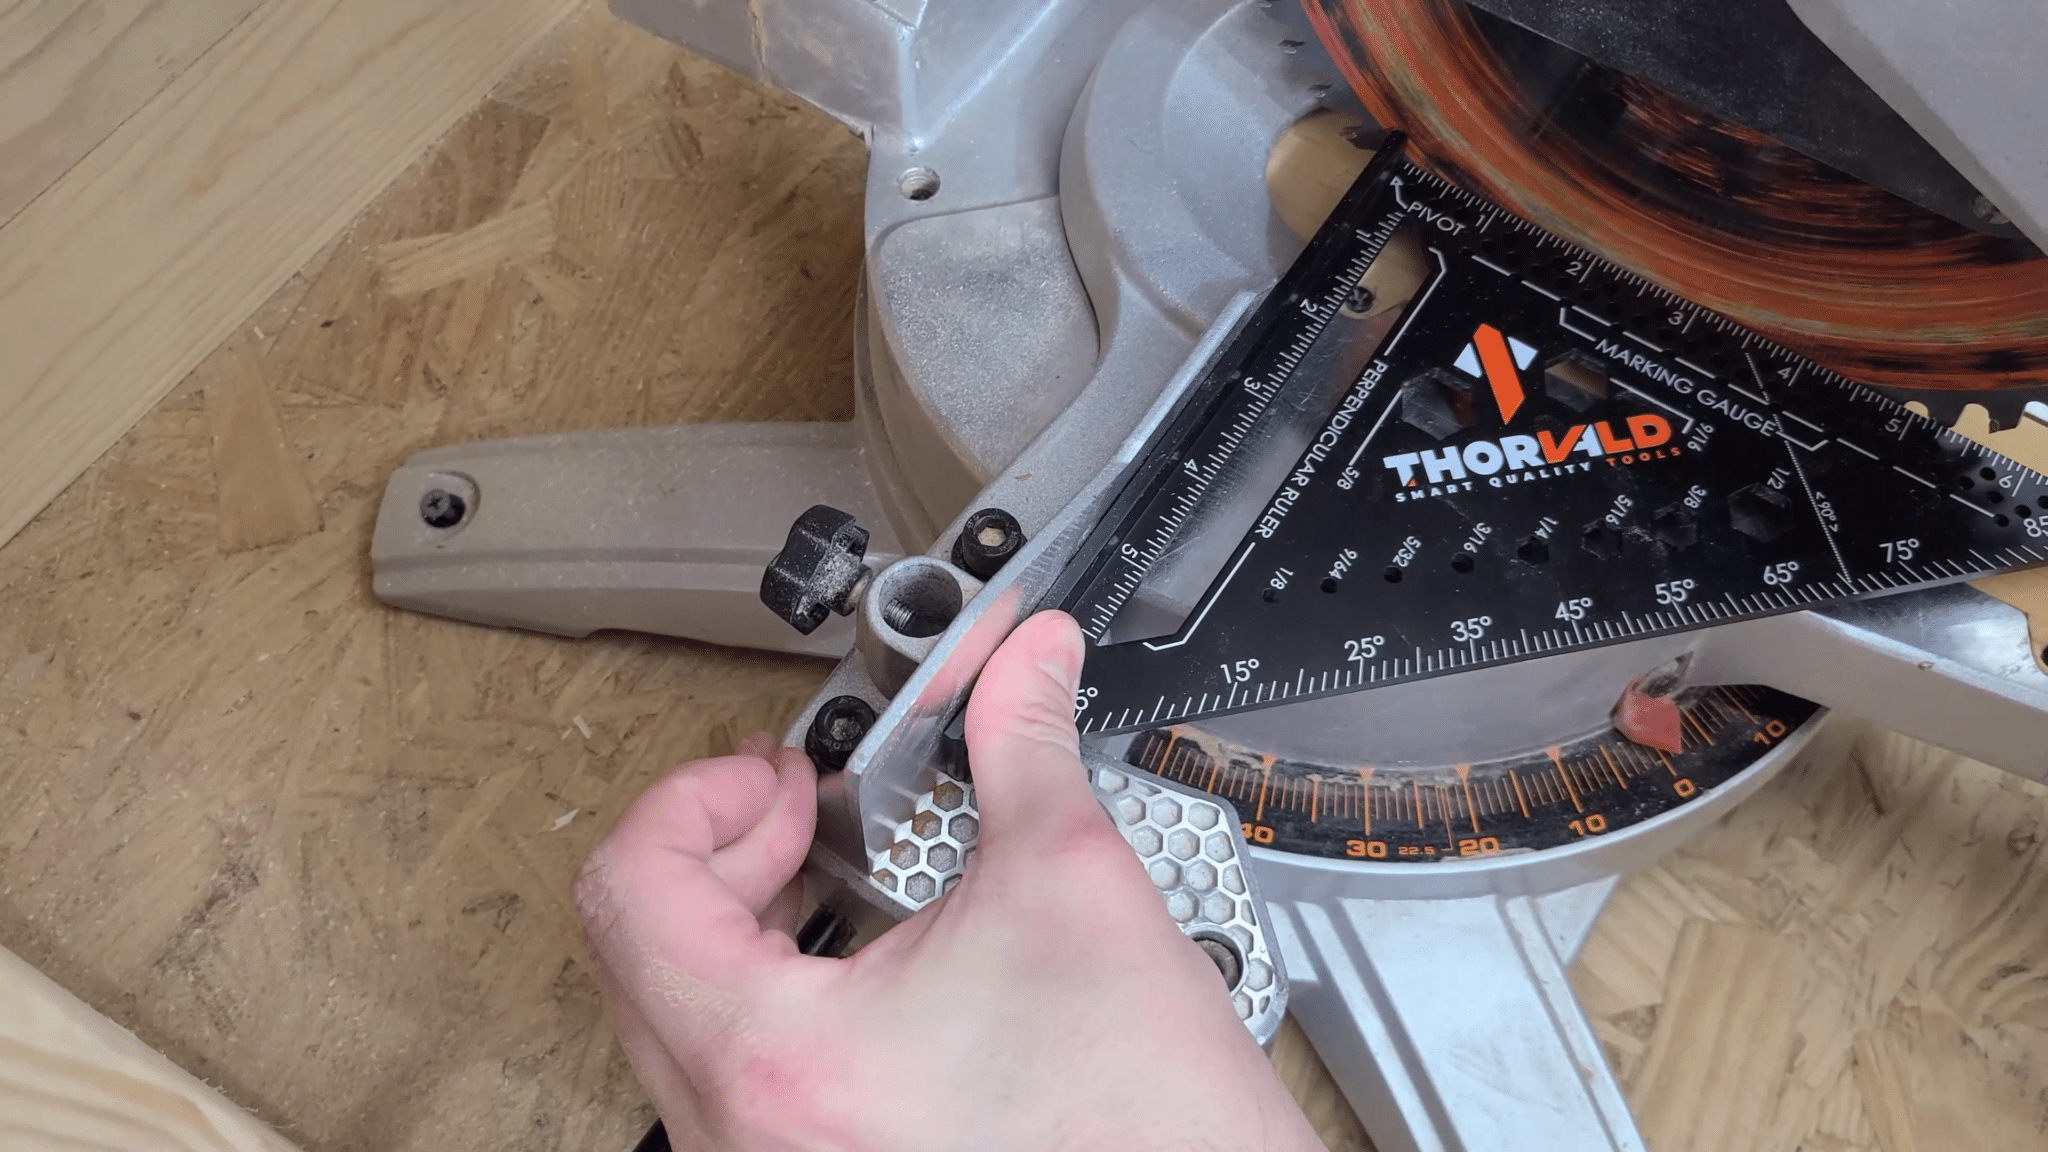
1. Squaring Up A Miter Saw
Start by checking your miter saw’s angle setting. This should be set to 90 and most saws have a positive locating feature here. With your saw is set to 90, then it’s time to adjust your fence. Depending on the saw brand, there are typically screws along the fence that you can loosen to shift it.
- Start by loosening these screws, then pull your blade down and lock it in place.
- Next, place your speed square against the fence and slide it up to your blade. Make sure you avoid the teeth of the saw blade.
- If you see a gap, then adjust your fence until it is flush with the square.
- Then cut a scrap piece of wood and use the square to confirm the blade is cutting a perfect perpendicular cut.
Tada, now you’ve confirmed your miter saw blade is square!

2. Squaring A Table Saw
Checking a blade is square doesn’t stop at a miter saw. You can also use the speed square to square up a table saw fence.
Every table saw is different. However, if your table is square to your miter slots, then you can use the edge of the table as the reference surface to check many different features of your table saw.
- Use a speed square (and a miter gauge, if desired) against the table surface to check that the saw’s blade is square.
- Use a larger 12” speed square to check the fence is perpendicular to the table when set. Some fences can be nudged just enough out of alignment to not be perfectly square, especially on older tools.


3. Use As A Saw Guide To Make Square Cuts
Maybe you don’t have these fancy larger tools to make square cuts. But don’t worry as your speed square also lends a hand with getting square cuts with a circular saw or a jig saw.
- First, use your square to make sure your blade is square.
- Then, place the saw where you want the cut to be.
- Move your square up against the side of the saw, and hold the square tight to the board.
- Then make the cut using the speed square as a saw guide. Make sure your fingers are far away from where the blade will be.
- Finally, use your square to check the cut is square. It’s always good to verify immediately so you don’t have issues assembling later.


4. To Mark Square Cuts Accurately
Perhaps the most obvious use for a speed square is to mark square cuts. However, there is a technique to getting the most accurate lines.
- First, you want to mark the measurement using a tape measure.
- Then place your pen, pencil, or marking knife on the mark on that point first.
- Next, bring the square over to the pencil and then mark your line.
By placing your pencil first, you help ensure you aren’t off slightly due to the placement of the tip of the tool.


5. Make Rip Cut Notches
Another great layout feature is the scribe line or notches along the ruler side of the square. Those notches or holes on your speed square are gold for marking rip cuts. Just place your marking tool into the notch and slide the speed square along a board.
We use this all the time when we are ripping wide boards for projects like our modern headboard with floating nightstands. It allows us to carefully layout the line and get our desired wood grain pattern from the wider boards and strategically cut out knots or defects.


6. & 7. Measuring & Drawing Layout Lines
There are also lines along the face of the speed square. These are the layout lines, and they’re your secret weapon for making precise offsets from the edge of the square.
Here’s a practical example on how to use them to measure and layout lines to join two boards together.
- First, holding the speed square against this board, you can see that it measures at 3½” wide. It’s a 2×4, as it should be, but always verify by using the square to measure.
- Next, it’s time to mark the cut lines on the primary board. Measure the distance you want on your primary board, say 10 inches, and mark that point using the speed square.
- With the square still at that point, you can use the layout lines to make a mark 3½” from that line.
- Then move the square to this second point at 3½” and mark the second vertical line.
- Next, determine the depth of your cutout, say 2 inches, and place the pencil in the 2” scribe line (aka line guide).
- Drag the pencil in this notch from one vertical line mark to the next vertical line.
Tada, perfectly laid out notch ready to be cut!


8. Use A Speed Square For Angles
Your square is also handy for marking angles. Now, we’ll admit that we had this speed square for a few years before we learned this trick for marking angles.
There are tick marks along the long edge (hypotenuse) of the speed square. These are the angle measurements from 0 to 90 degrees. Now here’s how to mark an angle using a speed square.


You first need to know where your angle is going to end on one side of a board. Place your speed square so the corner labeled “pivot” is on that point. You can see that the other end of the fence (T-Guide edge) is at the 0 angle position.
If you want a 20 degree angle, pivot the speed square until the 20 lines up with this edge of the board, and then mark the line on the ruler side (the side with the pivot). You now have a line that is 20 degrees off of square.


9. To Draw Arcs
A speed square can also be used to draw arcs, which comes in handy if you need to cut an arc on the end of a board or a semi-circular cutout. Just place a pencil against the edge or in the corresponding notch. Then use that pivot point to sweep an arc.
If you are doing a semi-circular cutout, mark the center line and hold a pencil against the ruler part at the desired measurement. Then, sweep an arc in one direction. Next, flip the square over and sweep the other direction.
Unfortunately, the line notches don’t line up with the edge of the square, so this trick does take a bit of practice to create a semi-circular cutout.


10. Measure & Mark Pitch
A speed square will typically have a series of marks along the long edge (hypotenuse) of the triangle labeled as common pitches and Hip-Val. They are used to measure and mark the pitch of a roof. This can be helpful if you’re building a shed or doing any roof framing. We don’t use them often as DIYers, but it’s helpful to understand how these features work.
Measuring Pitch
The pitch of a roof is usually measured as a ratio of Rise over Run. For example, your roof could rise 1 inch for every 2 inches of horizontal travel. To standardize these fractions, roofs are usually specified as a rise per 12 inches. So a 1:2 pitch would be the same as a 6 in 12 pitch.

If you look at a speed square, you can see there are markings here that probably range from 1 to 30. They are also marked as “Common”. These would be your rise per 12 inches. They are used exactly the same way as the angle markings.
So if you pivot the scale to the 12, and mark the line, you just marked a cut line that would result in 12 inches of rise per 12 inches of run. If you’re familiar with Geometry, you’d know this is a 45 degree angle.


Measuring Unknown Pitches
You can also use these marks to measure an unknown pitch. Using a level, you can place it on the top ofthe square, pivot the square until you find level. Then read off the slope (aka the pitch).
You can also do this using a plumb bob. Start by holding the string at the pivot point and align the level with the top or bottom edge of the board. Then where the string touches is the slope (pitch) of that board.
Since you now know the slope, you can use these same numbers to mark a new board and cut out the same angle, if needed.


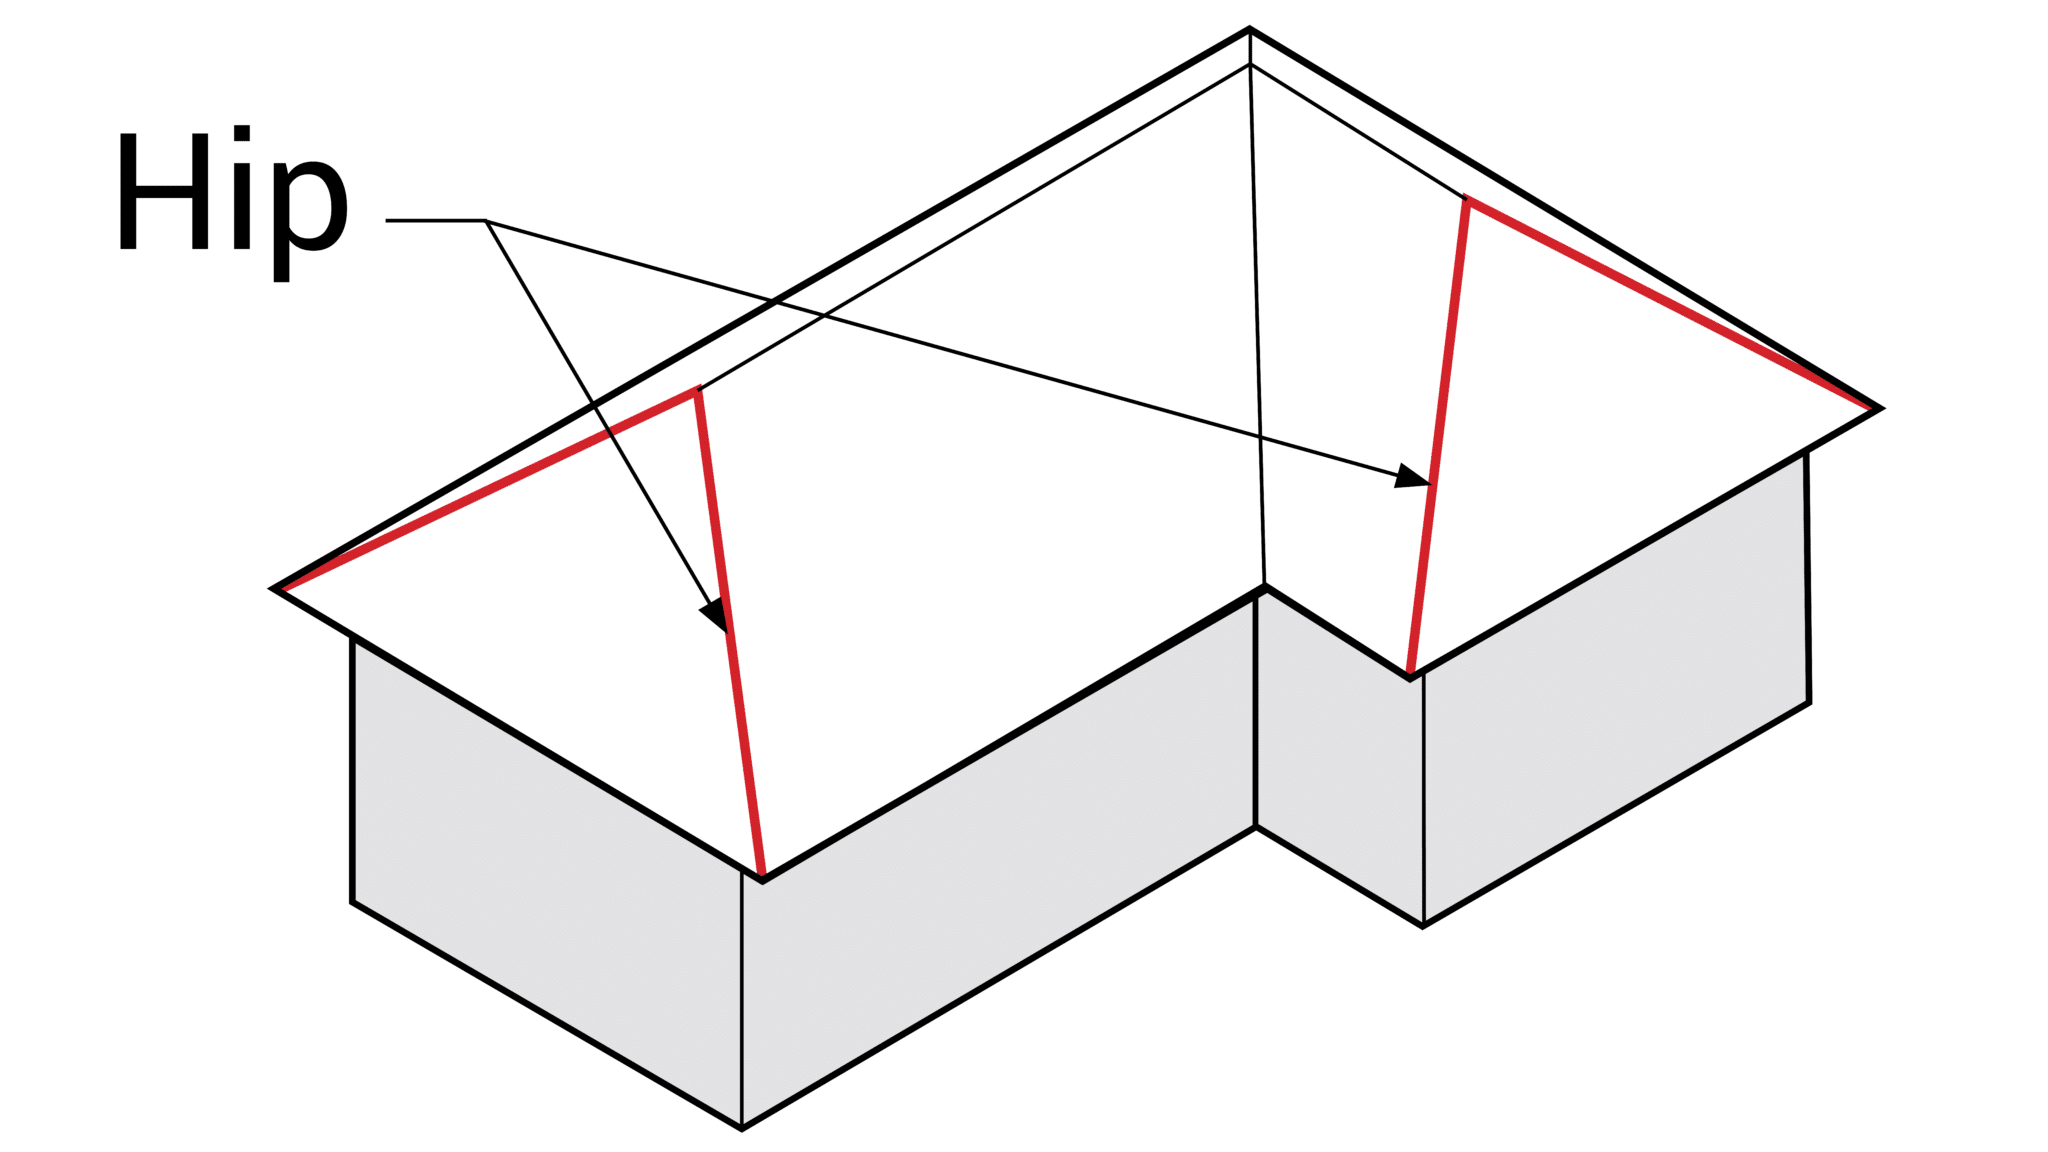
HIP-VAL Marks
On the other side of the Common Pitches, you’ll typically find marks here labeled HIP-VAL. If you are a roofer, you’ll understand when to use these instead of the Common measurements.
The diagrams below show a Hip and a Valley of a roof structure, which is what the marks are referencing. The boards used in these instances have slightly different angles than the rest of the rafters do, so you would use these markings on the speed square instead. Again, you might not use this function at all unless you’re building a shed or a roof.

11. Create A Seat Cut (aka A Bird’s Mouth Cut)
Some speed squares have a feature that’s a handy roofing trick, but it could also be used for cutting out stair risers, which is more likely if you’re DIYer like us. It’s called a seat cut, though it’s also commonly referred to as a bird’s mouth. A bird’s mouth cut is the notch where your rafter meets your walls like the diagram below.

Some squares have a line or marker at 3½” that makes marking a seat cut even easier. However, not all scales have a line at 3½ inches, but you can easily add one by using another square at the 3½” mark and then scoring a line across your scale.
To make a bird mouth cut, measure and locate the starting point. When you know where the bird mouth needs to go, you’ll first mark the vertical line or plumb line. Now you flip the square over and align this line that is at 3½ inches with a plumb line, and mark across. Now your notch is marked and ready to be cut out.


Create A Larger Seat Cut
But what if you don’t want your cut for a 3½” wide board? Say you need a larger seat cut, or you are cutting stair risers. Instead, you can use the line running across the face of the speed square.
- After marking a plumb line, you’ll use the ruler to put a mark at the depth of your cut.
- Then, flip the square over and align the seat cut line to your plumb line. This line is perpendicular to the 45 degree edge.
So if you mark a line along the 45 degree edge, then you’ll have both sides of your seat cut marked.


12. Aligning Boards
You can use a speed square to help make sure that your boards are aligned before you nail or screw them together. Just hook a speed square onto the edge of one board, then slide it until the square presses flush against your second board. Then nail it or screw it into place. Tada, perfectly flush!


13. Use It As A Level
You can also use a speed square and plumb bob to tell if a board is level. Just place your square on its long edge and hold the string at your pivot point. If your string crosses the 45 degree mark, then you know that the board is level.


14. Keep Track Of Measurements
If you tend to forget your measurements as you are walking to your cutting station, you can use the speed square to keep track of them. Depending on the type of material your square is, you can simply write down measurements on the square’s surface using a pencil. Then cut your board(s) and wipe the measurement off afterwards.
However, we personally like to write our measurements on the side of our Fast Cap tape measure that has a spot on the side specifically designed for it.


15. Turn A Crappy Square Into A Useful Tool
If you find that you have a not square square and can’t return it, you can either recycle it or repurpose it. We took our crappy square to the grinder to sharpen the edge, and now we use it as a scraper to get glue off our work surfaces!
Not as multi-functional as a truly square speed square would be, but it’s useful now and we like to minimize our waste and reuse items if possible.
More Recommended Tools & DIY Project Ideas
Now you know a ton of tricks on how to use a speed square that I hope help you get a project done quicker with fewer tools. Check out our entire list of recommended tools, and click below to get inspired for your next DIY or woodworking project!
- 15 Amazing Woodworking & DIY Projects With Plans And How-To Instructions
- Hubby How To: DIY Hanging Daybed Swing Plans
- How To Make DIY Floating Shelves – Live Edge Wood Shelves For Kitchen
- Hubby How To: DIY Flipping Workbench
- The Ultimate Wood Finish – Rubio Monocoat Review & Color Test


Hope this guide taught you a few new ways to utilize the speed square fully. Let us know if you knew all these tricks and if you know any others in the comments below! And don’t forget to save a pin for later or share this post with others!


Disclaimer: This post includes affiliate links, and I will earn a commission if you purchase through these links. Please note that I’ve linked to these products purely because I recommend them and they are from companies I trust. There is no additional cost to you.


