Hubby How To: DIY Adjustable Kid’s Workbench
Does a kid you know love to build and make things? Do they need a dedicated work area? Well, we built a kid’s workbench that has adjustable heights for our child and created DIY plans to share with anyone who wants one too! This post covers the tools, materials, and how-to for your own adjustable kid’s workbench.

Disclaimer: This post includes affiliate links, and I will earn a commission if you purchase through these links. No additional cost for you. Read about our privacy policy.
The best part of making something yourself is you can make it to last. This is especially important with kids and making items that will grow with them. Most kid’s workbenches are made at one height with no adjustability (even other DIY ones!), which means the workbench will be outgrown within a year or so.
We said that’s silly, and we’re going to design and build one to grow with our child for years to come. Making something that will last longer is not only smart but sustainable.
These DIY adjustable kid workbench plans we made are a beginner-friendly project that can be completed with no tools other than a jigsaw and a drill (though other tools do make it easier!). It’s a great project to involve kids in and build together with them. Honestly, it’s going to be a core memory for our little family!
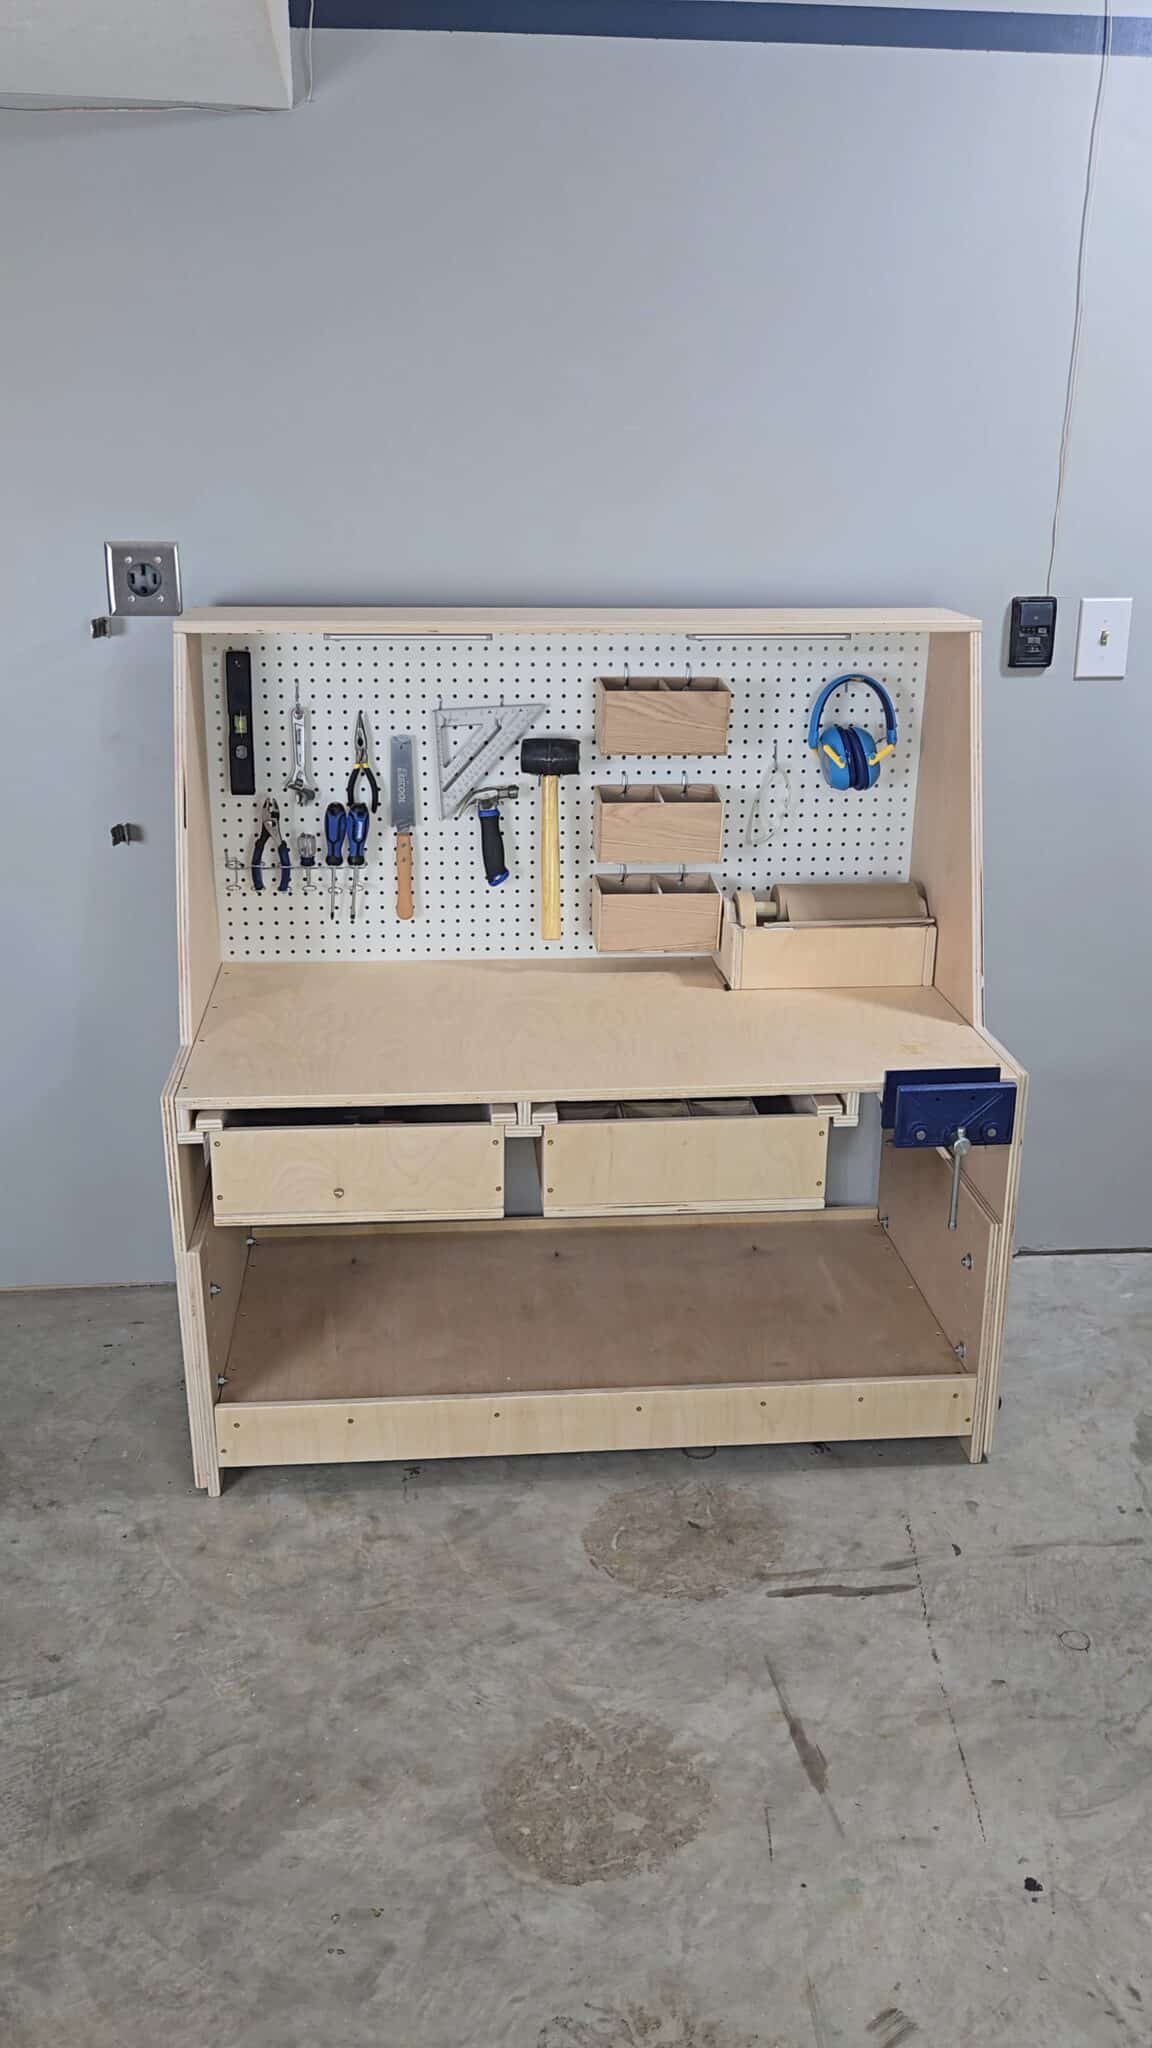
So let’s cover how to build this adjustable kid workbench and give a kid a practical workbench that is full of convenient features and will grow with them!
Tools & Materials For DIY Kid Workbench

DIY Plan
Tools
- Drill, Drill Bits & Drill Block
- Forstner Bits (Recommended)
- Tape Measure
- Speed Square
- Jig Saw (Minimum Needed for Cutting)
- Track Saw (Recommended)
- Random Orbital Sander with 3M Xtract Cubitron II Sandpaper
- Paste Wax – the only finish we used
Safety Equipment
Optional Tools*
- Table Saw
- Trim Router
- 1/8″ Round Over Bit
- Plunge Router
- Router Bushing Set
- 1/4″ Compression Bit Or 1/2″ Down Cut Bit
- 1/4″ Compression Flush Trim Bit
- Automatic Center Punch
*Can build without these tools, but can make it easier/provide nicer finished edges
Materials
- Wood Glue
- (2) Sheets ¾” x 48” x 96” Plywood
- (1) Sheet ¼” x 24” x 48” Plywood
- (1) 1” Diameter x 48” Dowel Rod
- (1) Sheet 3/16” x 24” x 48” Pegboard
- 1lb of 1.25″ Screws (1-1/4″)
- (4) 1.625″ Screws (1-5/8″)
- (6) 2″ Screws
- (8) ⅜” x 2” Bolt
- (8) ⅜” Nut
- (16) ⅜” Washer
- (1) Bench Vise
- Peg Board Hangers
- (2) 2” Fixed Wheels (Optional)
- 2” x 4” Wood Scrap (Optional)
- 12” Hacksaw Blade (Optional)
- Rechargeable Lighting (Optional)
Misc. Tools for Kids
- Kids Headphones
- Kids Safety Glasses
- Small Pull Saw
- Drill
- Drill Bits
- Quick Flip Drill and Driver
- Kid’s Beginner Tool Set
- Rubber Mallet
- Hand Sanding Block
- Paper Roll
- Paper Tape
- Assorted Nails
- Assorted Nuts and Bolts
Kid’s Workbench Build Process
If you’re new here, check out our DIY Resource Hub to help find any answers to questions about our plans and give you guidance on getting started on a project! Now let’s jump into the build process for this DIY adjustable kid’s workbench.
Step 1: Get Workbench Plans & Materials
The first thing that you need is a plan. We have a plan set available in our Shop or on our Etsy Shop for this build.
-

-
DIY Wood Train Set Plans$9.00
-

With the plans downloaded, you’ll next need to get all the materials. The kid workbench plans have a shopping list that makes it easy to get only exactly what you need. Some of the materials and tools are easier to order from Amazon, so you’ll find those items linked above.
We recommend you use a sanded plywood for this workbench. Most big box stores carry these sheets at a pretty reasonable price. Just make sure that you choose something with a “veneer core” as that will glue and screw together better than an MDF core would.


Related – How To Read Engineering Drawings & General Project Workflow For DIY Plans
Step 2: Layout Your Cut Pattern
Once you have your materials back at your shop, the first step is to inspect the sheets of plywood for flaws. There are bound to be some blemishes in cheaper plywood, so make sure you identify and circle those. This will help you lay out the cuts. Ideally, you want your major surfaces like the Side Panels to be free of flaws since they are the most visible pieces.
After you’ve identified any flaws, you can reference the plywood layout sheet that is included in the plan set to plan out your cuts. The layout pattern optimizes your nesting to minimize scrap. It even takes into account the loss of material due to saw kerf (aka the width of the saw blade).
When planning out the cuts, be sure to plan for this additional ⅛” of loss. We like to make two marks with an x between them so we always know where to cut. This helps us avoid the frustration of accidentally cutting on the wrong side of the line.


Tip – You will need to reference the part drawing sheets for each part to determine the dimension you need to cut. If we had put everything on the layout sheet, it would have made that page too cluttered and hard to read.
Step 3: Breakdown Your Plywood Sheets
With the cuts laid out, now you need to break down the plywood into more manageable pieces. Our plywood cut list has a recommended cut sequence in order to make this breakdown a lot simpler. We highly recommend using a track saw for this breakdown and it makes things go a lot faster and gives you a straighter and cleaner cut.
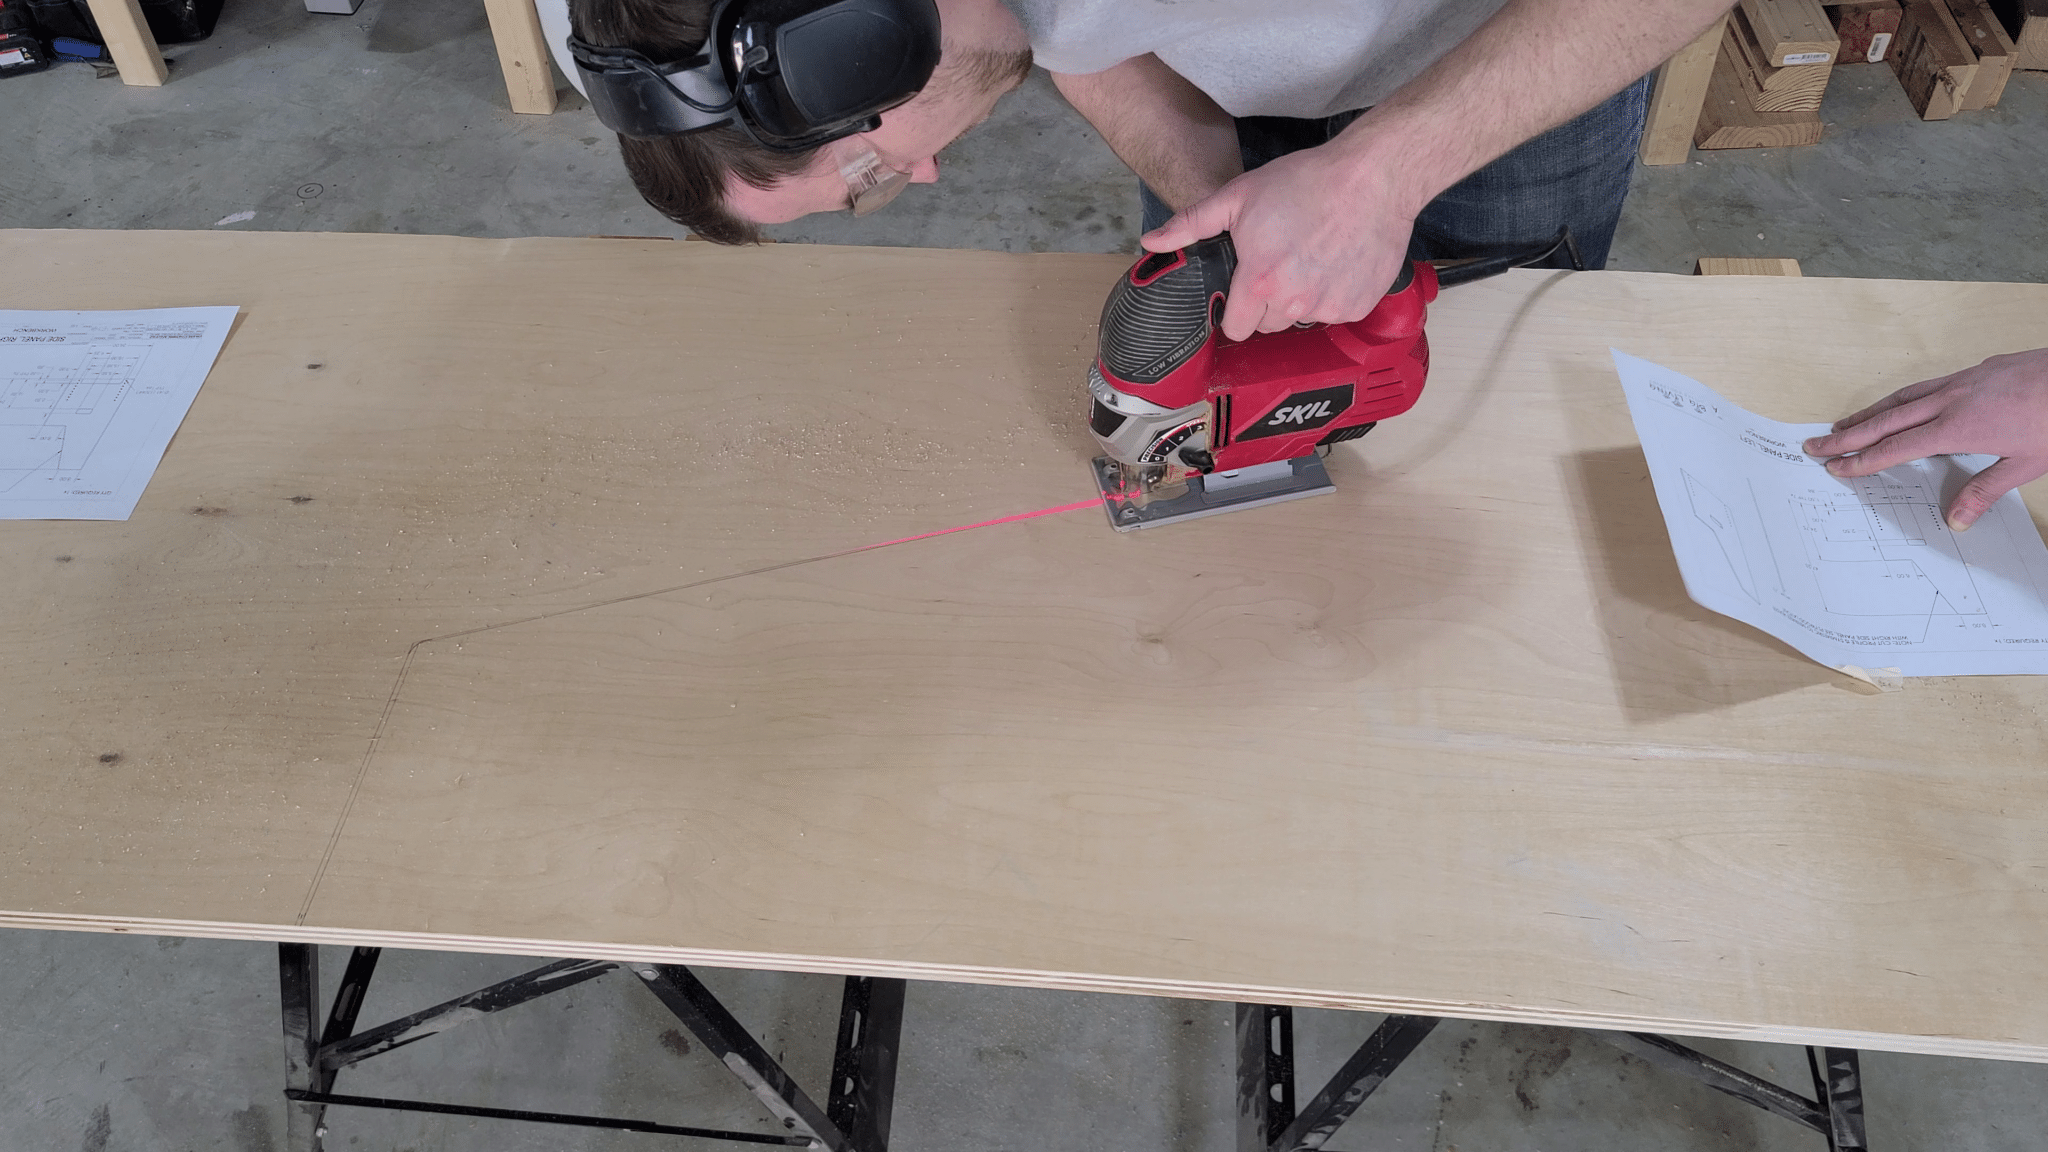
If you don’t have a track saw, you can get a similar result by using a regular circular saw with a straight edge or a homemade track. Or, you can simply draw each line and follow them with a jigsaw. It may not be the most accurate method, but it is the easiest way for beginners to get into woodworking. That’s why we designed this entire project so you can build it with nothing more than a jigsaw and a drill!
Just make sure to put the individual part drawings with each panel as you cut them out. Or label each piece of wood with the name of the part so you can keep track of it. To make this easier for you, we labeled each piece on our plywood cut sheet so you can just reference that sheet.


Step 4: Breakdown Parts Into Individual Shapes
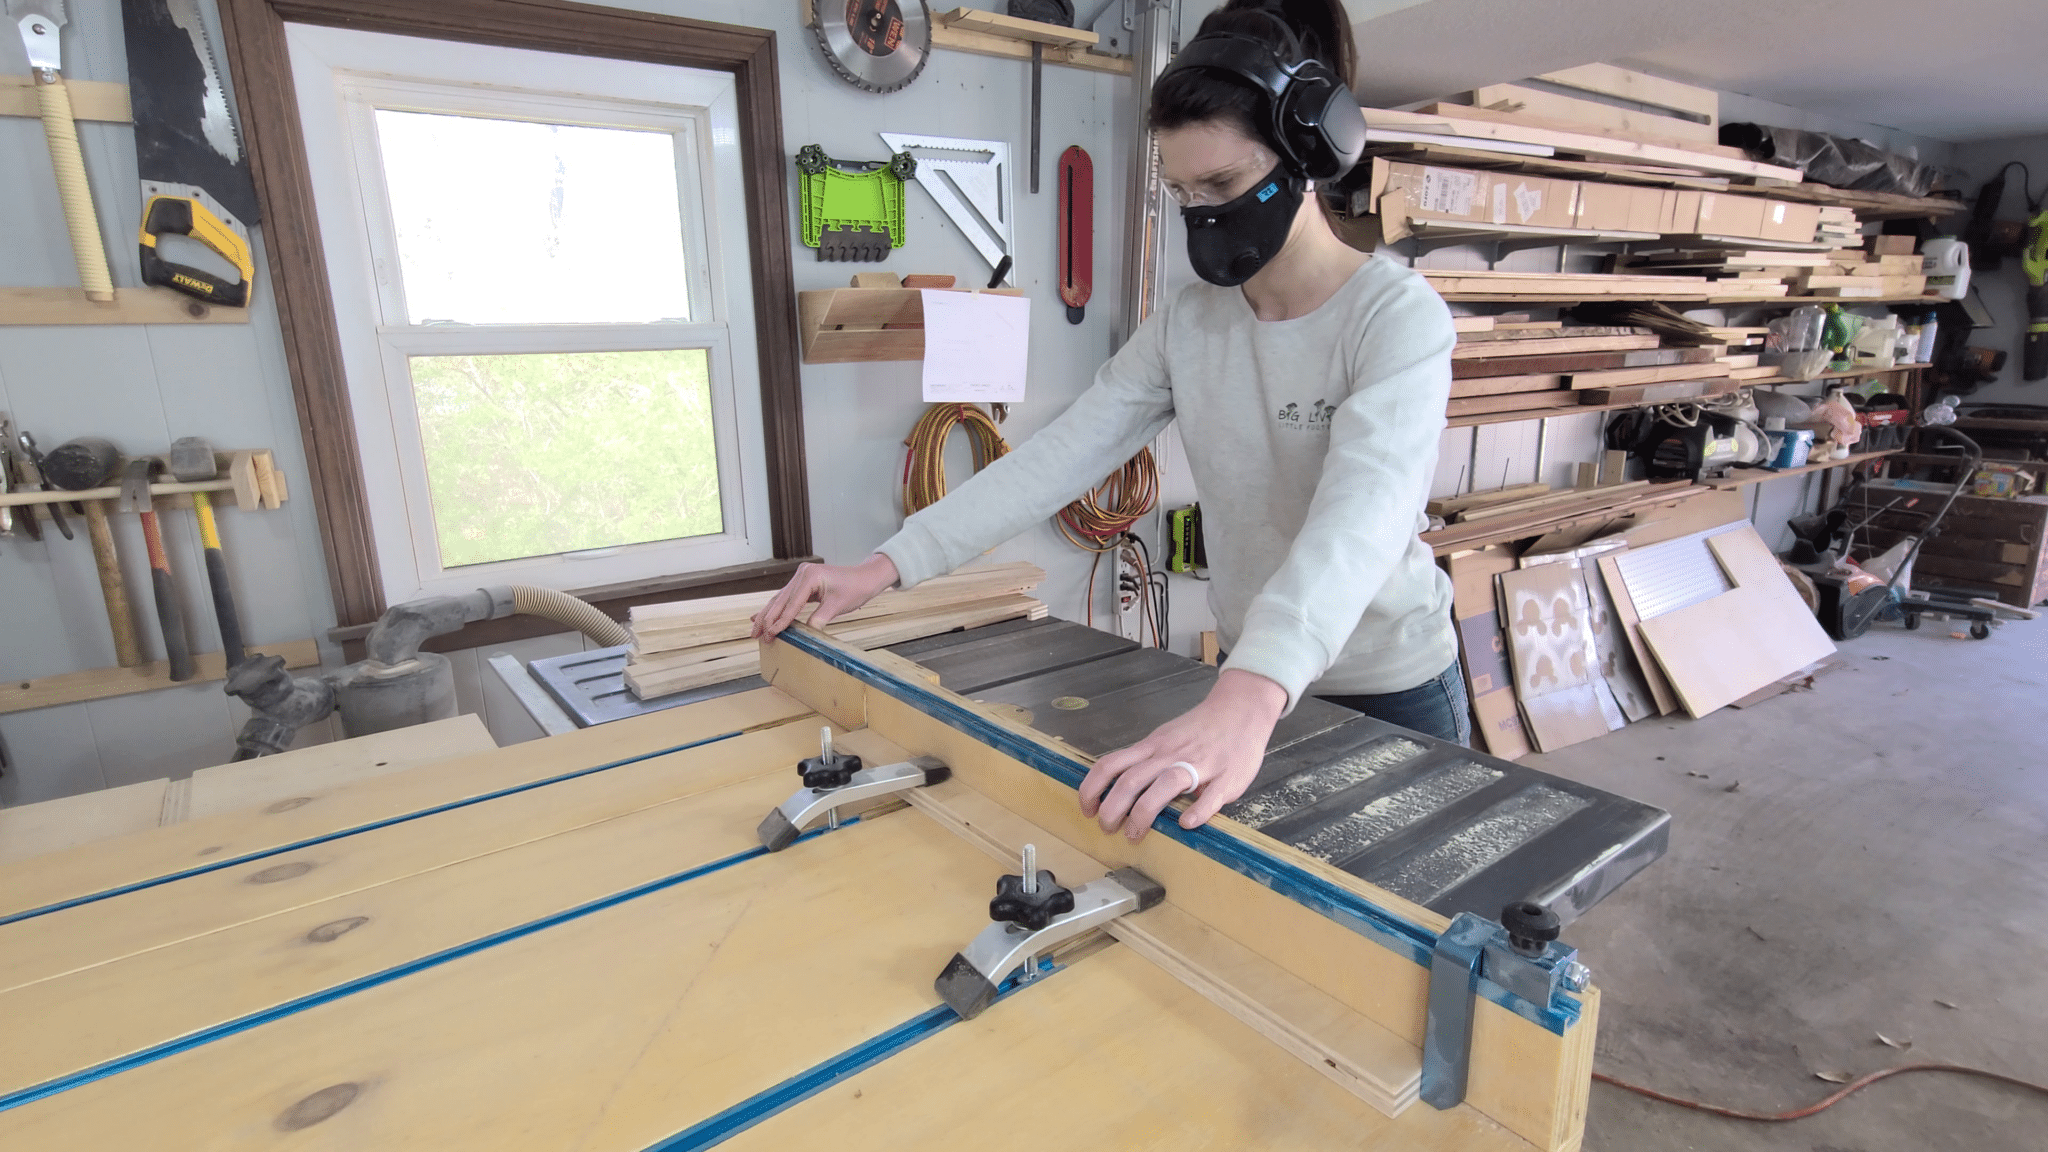
With the plywood broken down into more manageable panels, you can now begin getting pieces to their final dimensions. Many of these panels will just need to be ripped or cross-cut to break out the individual parts. This is best done on the table saw, but it can also be done with a track saw or jigsaw if a table saw isn’t available. If you are doing this on the table saw, we highly recommend making a crosscut sled to make this more accurate and get better results.
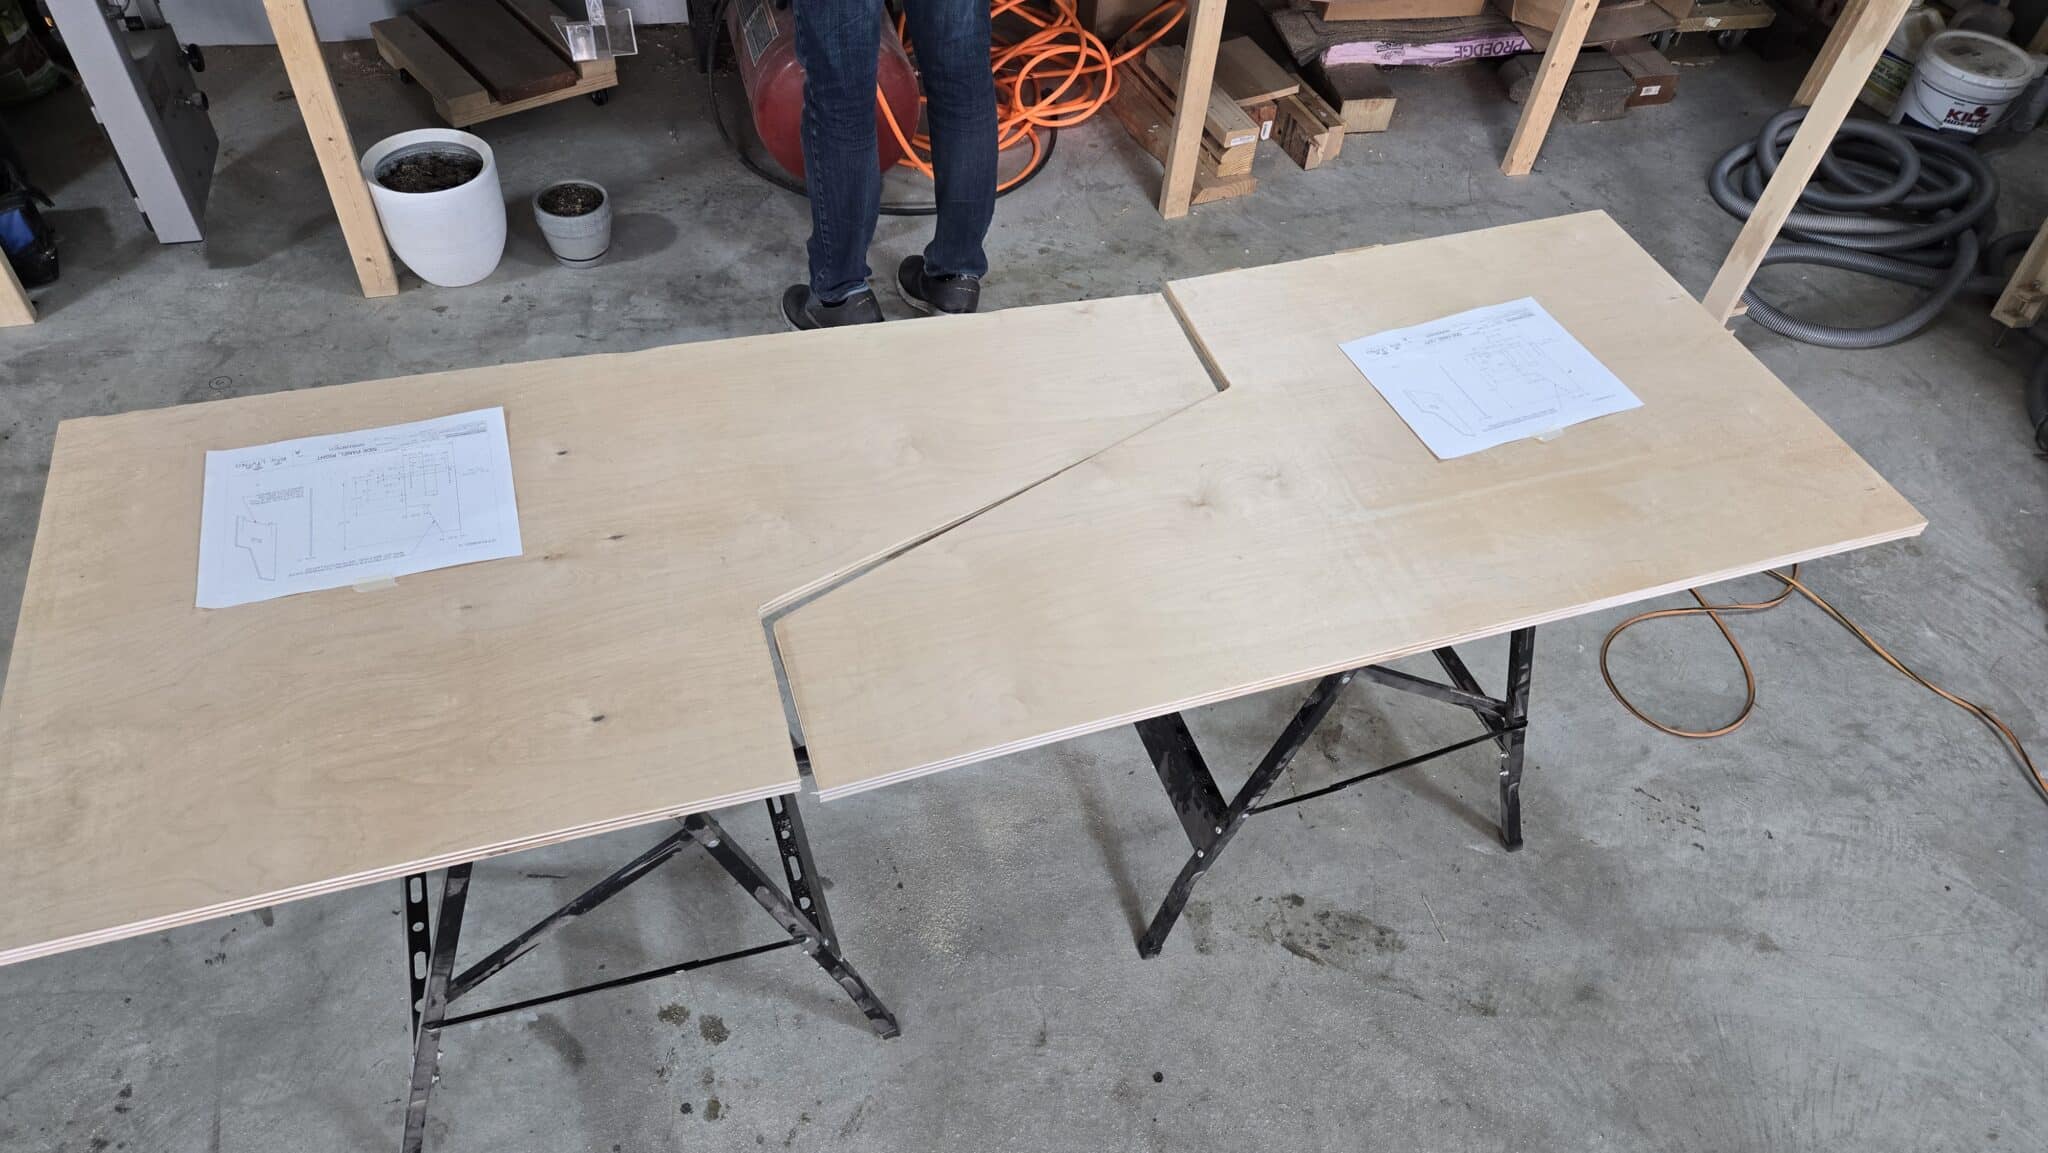
The side panels nest together to minimize plywood scraps. To separate them, measure and trace out the pattern, then use the jigsaw to cut along these lines and separate the pieces. You can then use a router or sander to clean up these cut lines later if they end up a little rough.
Step 5: Cut Handholds & Wheel Openings
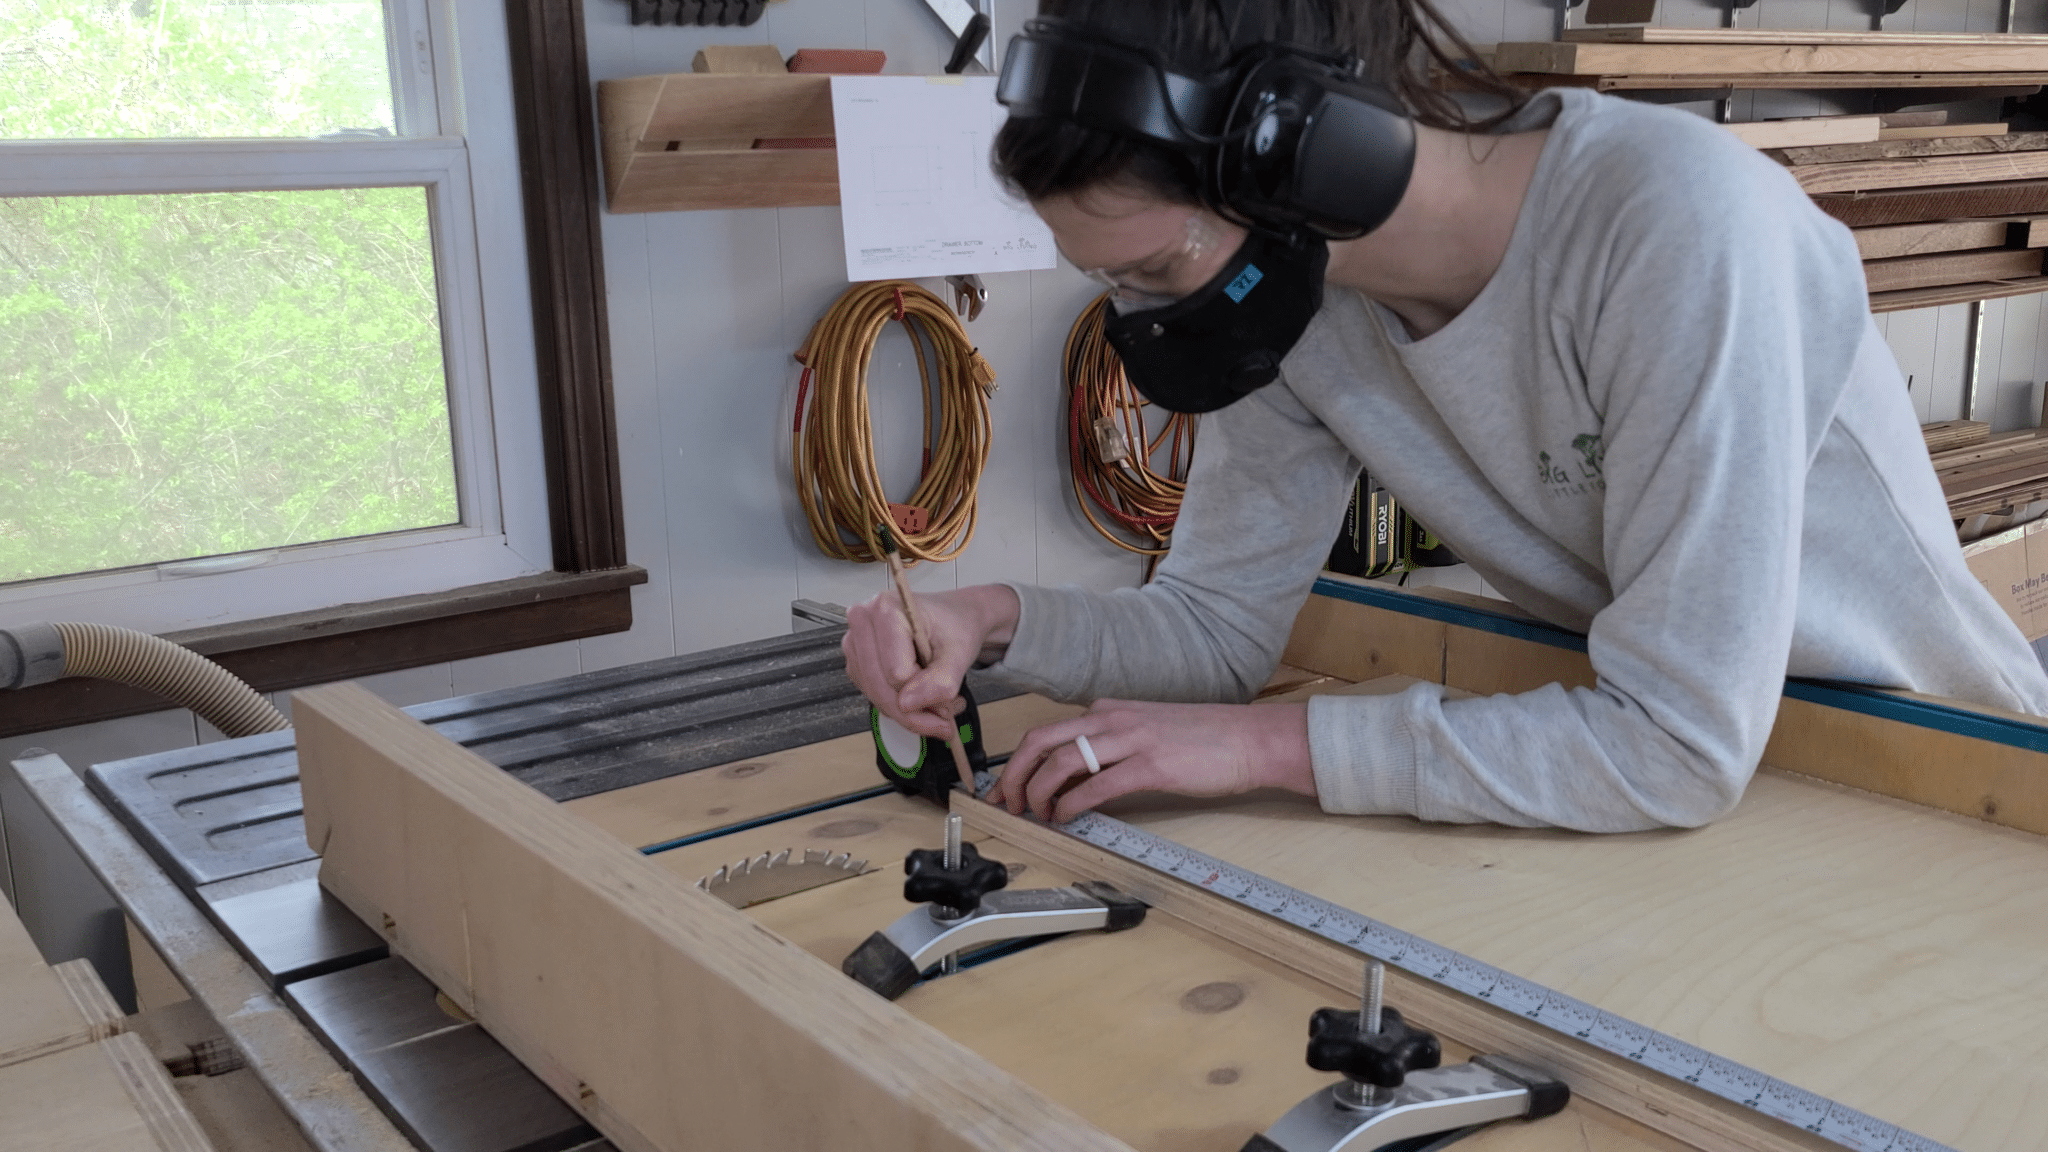
Start by marking the dimensions of the handholds and wheel openings.
To cut out the handholds on the side and the opening for the wheels in the side panels, we recommend using a router with a spiral bit. You can use a few pieces of scrap to make a quick template. If you have a plunge router, then you can clamp the two side panels together and route them out together to have them match perfectly. Just remember to plunge cut in increments. Utilize a similar method by creating a scrap wood template and routing out the wheel opening on one of the side panels.


Related – Check out our router resources for how to use a router, router bits, and bushing sets if you need help to get started.
Or, once again you can use a jigsaw to cut these openings if you don’t own a router. To make the cutout for the handholds, drill a hole in each corner of the cutout and then run your jigsaw from hole to hole. This helps you to turn your jigsaw and get cleaner corners.
Step 6: Drill Holes in Panels & Bins
To drill all of the holes in the side panels and extension pieces, we recommend using a piece of scrap to create a temple. Mark each hole location and then use a center punch or a hammer and nail to indent each mark. This will keep your drill bit from walking. Then use a drill block to ensure that the drill bit is perpendicular to the piece and drill through. Work your way up the sizes until you have reached your final size.


Now you can clamp this template to each piece and drill the series of holes. By using this template, you can ensure that these holes will all be consistently spaced and will line up later. And if your positioning got off and holes don’t line up perfectly later, you can always drill them a hair bigger to give yourself more allowance for misalignment.
Finally, there are also some holes in the bins, drawers, and paper/tape dispenser. We recommend using a Forstner bit for these holes as it produces the best results in plywood and gives you a truly circular hole compared to spade bits. We like to use the bit with a portable drill press.


Step 7: Roundover Edges To Prevent Splinters
When cutting plywood, you will inevitably get some tearout. There are plenty of things that you can do to prevent most of this, but this is a kid’s workbench. It’s meant to get a little beat up, so you don’t need to stress over perfection (unless you want to). What it does need to be is splinter-free.
To achieve this, we recommend softening all of the edges. Our preferred method to do this is with an ⅛” roundover bit in a trim router. Set the height on the router bit and go over every side.


If you don’t have either one of those, then the next best option is to just hit all of the edges with a sander. Even going over them with a sheet of sandpaper will help significantly. Just be careful of the veneer as you sand away.
Step 8: Sand Lightly With 180 Grit
Depending on the quality of the plywood and the amount of tearout during cutting, the rest of the surfaces may need to be sanded as well. We find that most “sanded” plywood can still benefit significantly from a quick pass with 180-grit sandpaper on a random orbital sander. If you don’t have a random orbit sander, then feel free to skip this step as other types of sanders are likely to leave swirl patterns or accidentally sand through the veneer.
If you do have a random orbit sander, then use a pencil to scribble on the surface of every part. Then come back with the sander and lightly sand every surface just until the scribble mark is gone. Don’t press down. Let the sander do the work, and be careful not to linger at the edges. It is very easy to tip slightly and wear through the veneer.
If you do, then don’t worry about it too much. Remember, this is a kid’s workbench. It will get beat up and it doesn’t have to be perfect.
Step 9: Assembly Drawers
With everything cut, softened, and sanded, the assembly can begin with the drawers. The drawers are pretty simple. Start by gluing and screwing each joint together for the drawers together. After the drawer is assembled, test fit a dowel and then cut your dowels to match the drawers’ final dimensions.
If you used a Forstner bit, the dowel should fit reasonably well, and you can use a little glue to secure it. If it is loose, you can drill a pilot hole into the dowel and then drive a screw into it to secure it.
It’s important to assemble the drawers first so that you can properly space the drawer slides to fit the exact drawer boxes you built.


Step 10: Glue and Screw Together Upper Workbench Assembly
Now it’s time to start the workbench assembly steps. You’ll find a drawing sheet for each step of the assembly in the DIY plan set.
First, some key elements to take into consideration. You want to strengthen each of the joints on this kid workbench to keep it from rocking or shaking when it’s being used. To do this, we highly recommend spreading glue onto each joint and then driving screws in. The screws will act as a clamp while glue sets up and you’ll end up with a really strong joint when you are done.
The only joints we don’t recommend gluing are the work surface and the pegboard. You may want these surfaces to be removable so that they can be replaced as they get beat up, drilled into, glued on, etc.
Assembly Frame & Work Surface
To begin assembling, start by grabbing the side panels, support strips, and work surface pieces. It helps to have two people to assemble, but you can lean it against a wall if you’re doing this solo. Now do the following:
- Glue the support strip onto each side panel and secure with screws.
- Stand up the side panels and set the work surface on the edges of the support strips
- Once square, screw the work surface into the support strips (reminder: don’t glue this!)
- Next, glue and screw the top shelf face into the side panels.


Attach Pegboard & Stretcher
After the basic upper frame is assembled, align and attach the pegboard on the backside of the workbench with screws. It’s better to screw through the board itself instead of through one of the pegboard pre-drilled holes. This way you ensure it’s not going to slide around.
Next, glue and screw the stretcher into the edges of the side panels on the backside. This stretcher piece helps add rigidity to the frame helping it stay square and strengthening it. It is not mounted to be flush on purpose. The stretcher creates a little gap between the wall and the back of the pegboard to allow for space to insert the pegboard hooks without hitting the wall.


Drawer Attachment & Spacing
Next, you’ll need to flip over the workbench to add the drawer hangers. You’ll need to support one side as the workbench won’t all balance on the top shelf. We simply used a clamp attached to the worksurface to act as a temporary leg support while the workbench was upside down.
Start by using the assembled drawers to lay out the spacing for the first 3 hanger strips, and mark the locations with a pencil. Then attach the hangers using glue and screws from the bottom face of the workbench. Double-check the screw length you are using to ensure you don’t drill through to the top of the work surface.
After that, attach the single hanger and the double hanger strips to the hangers you just attached. Be careful to offset your screws so that they don’t hit the screws below. These become part of the drawer slide for the drawers.


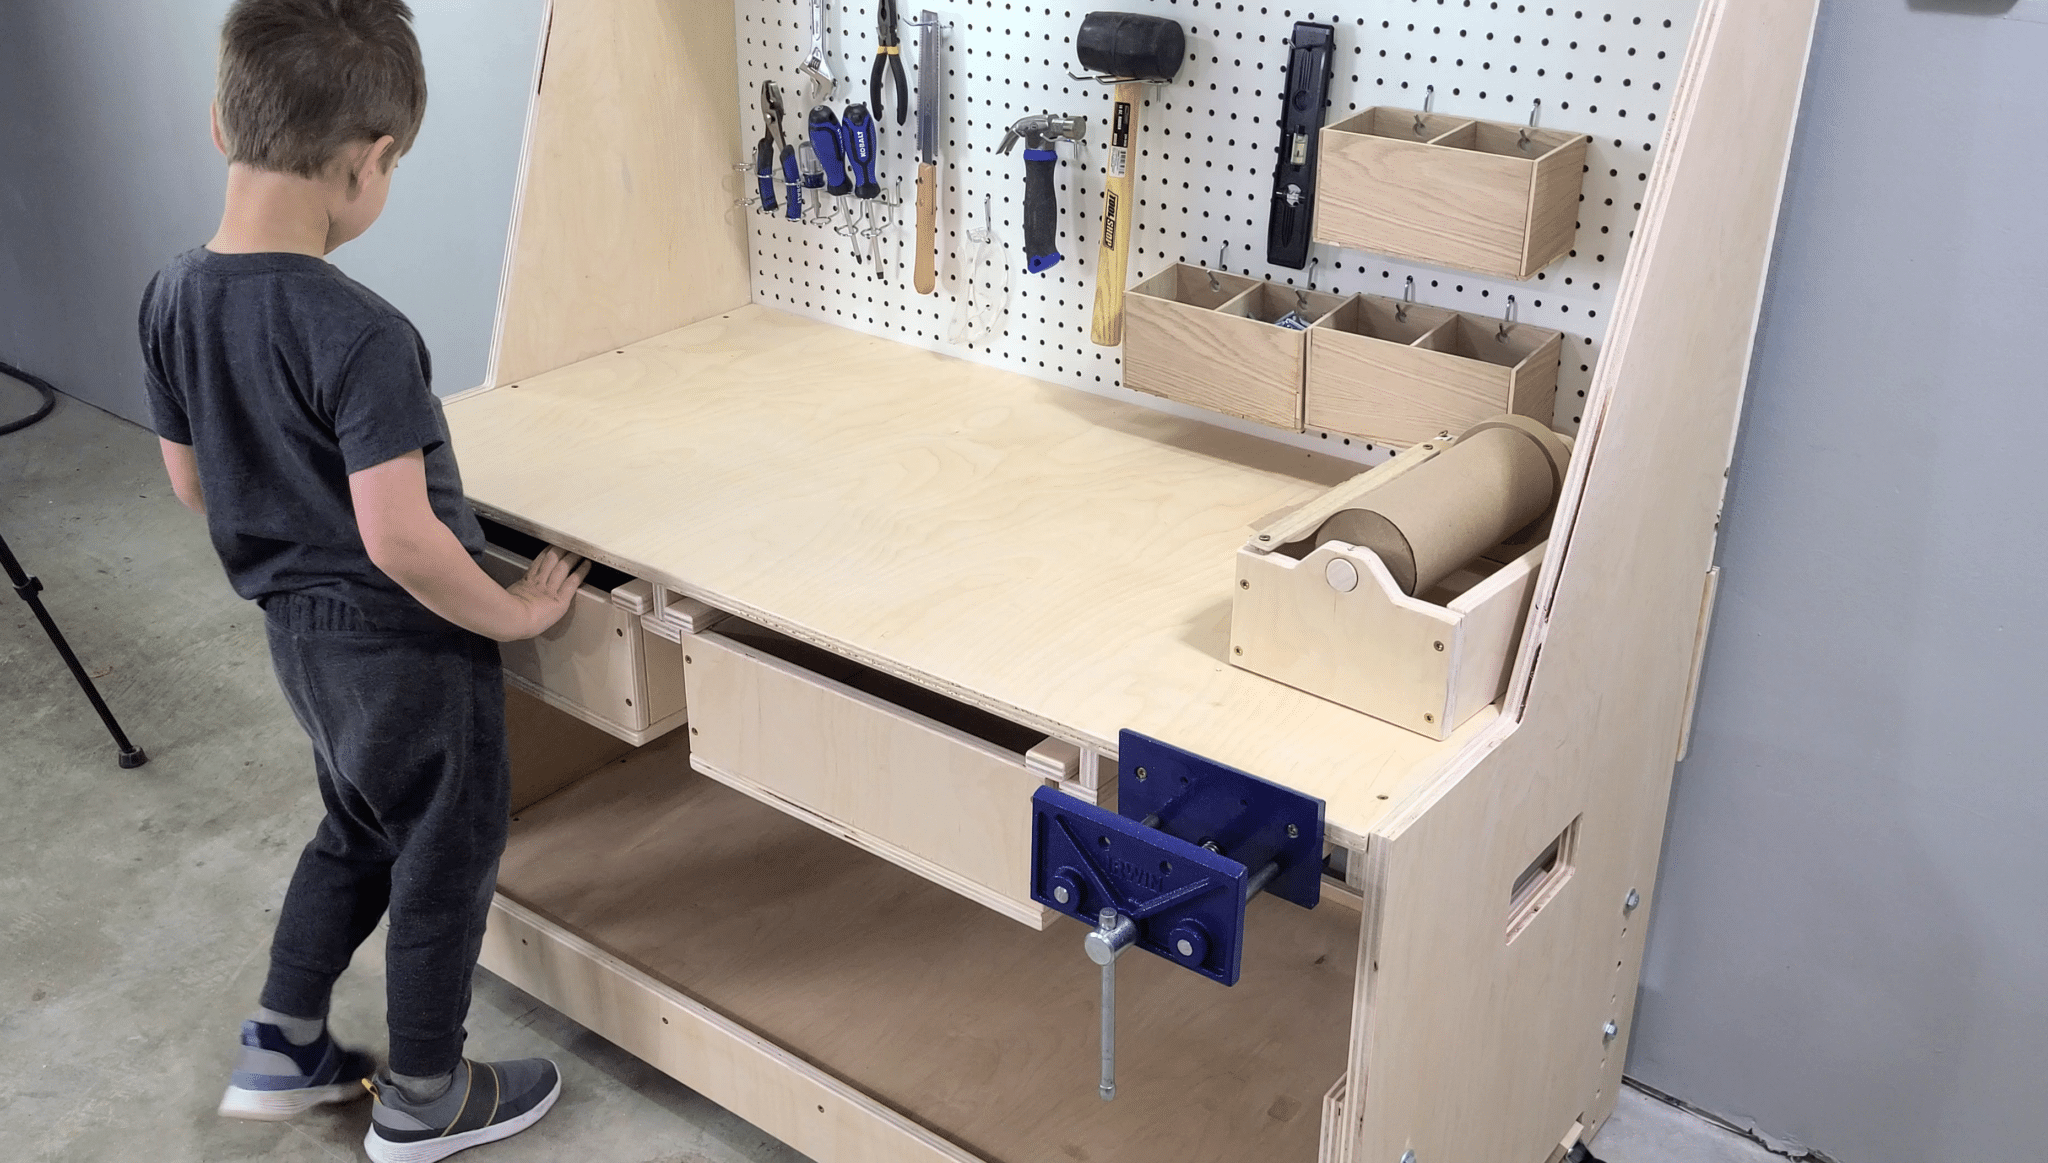
Vise Attachment
The last step of the upper workbench assembly is attaching the vise block. Depending on the vise you have, you may need to adjust the location of this slightly. Place the vise block against the far right work surface’s support strip. Then apply glue and screw into the face of the vise block below. Again, ensure you are using the appropriate length screws to not go up through the face of the work surface.


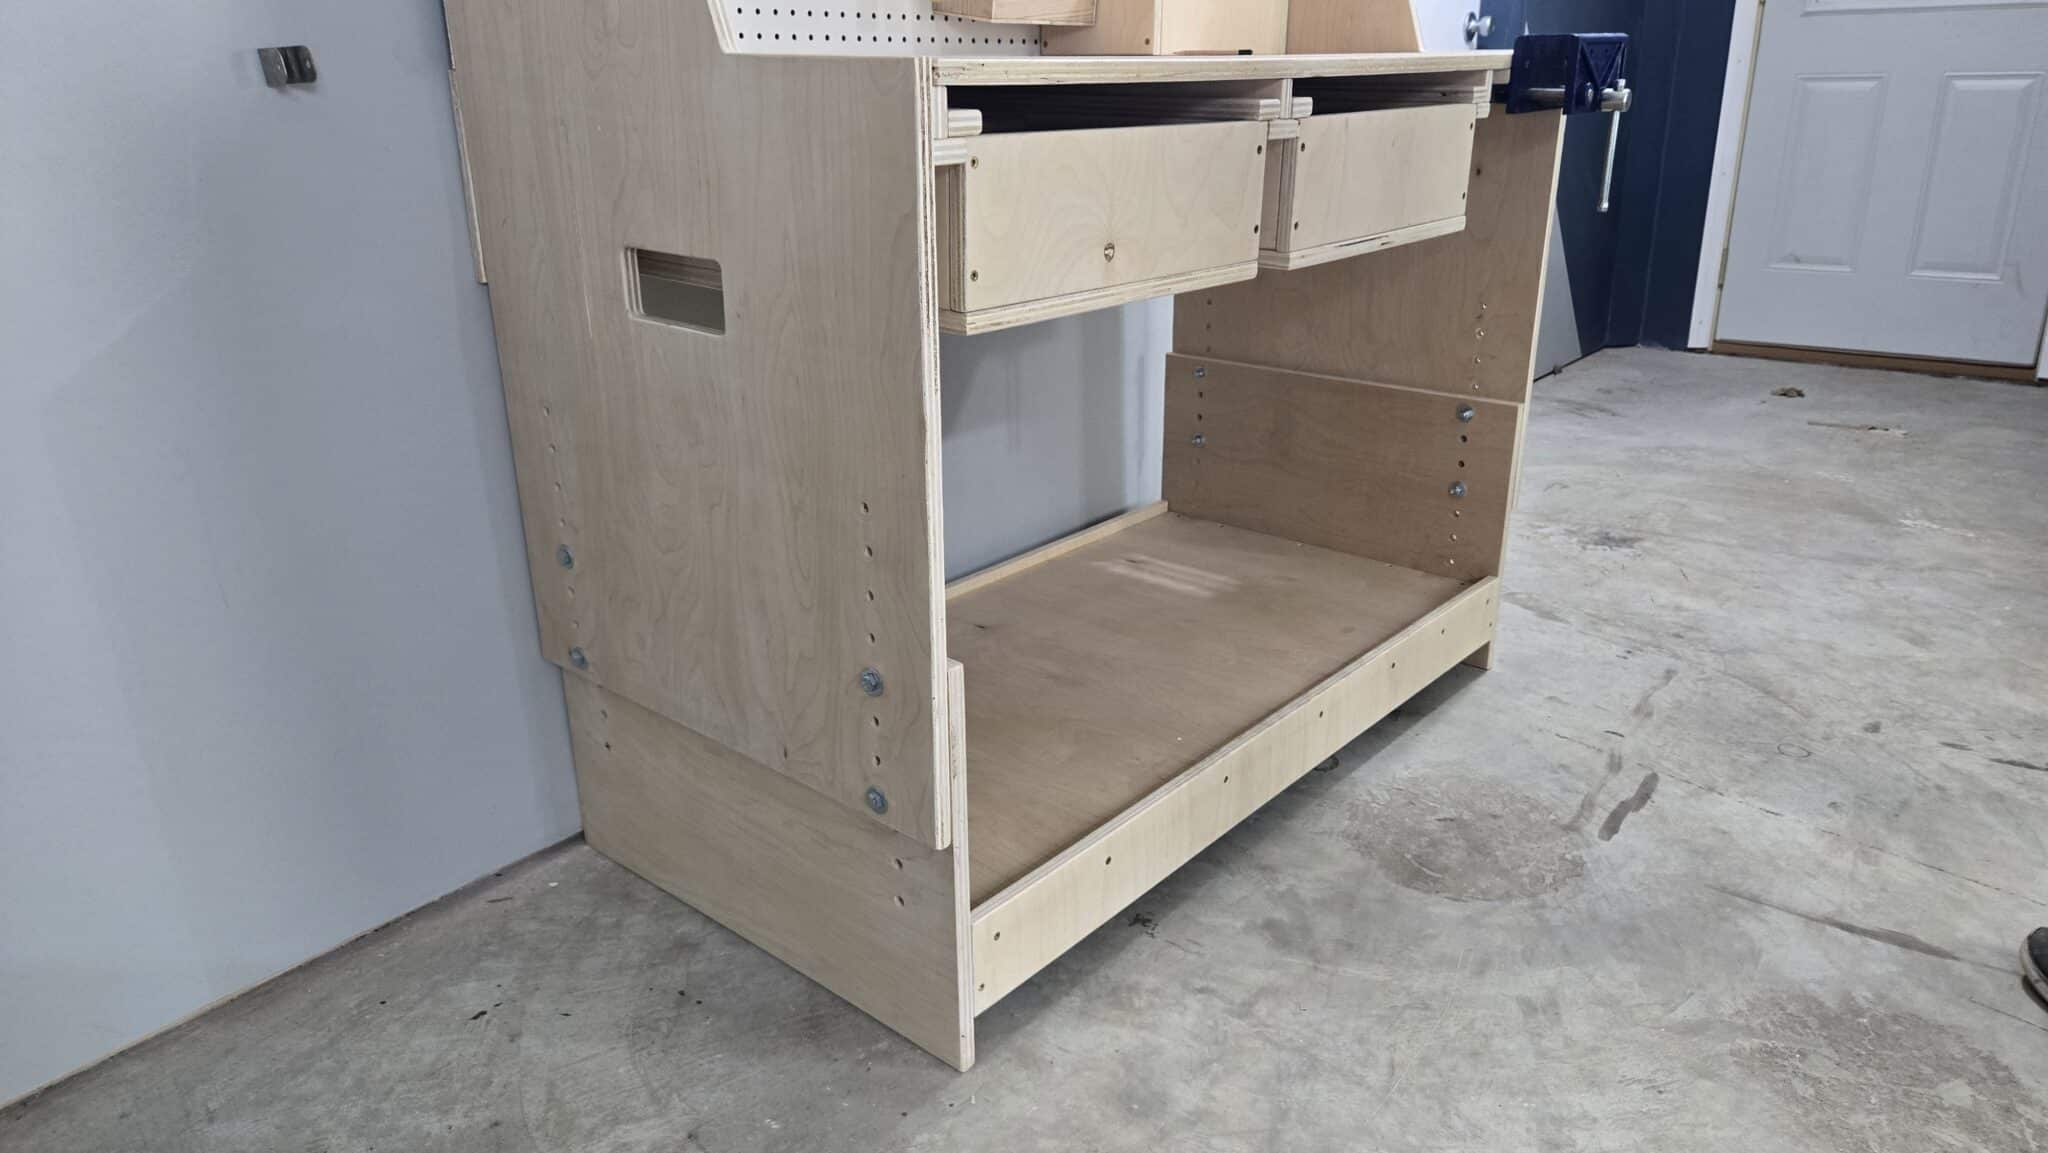
Step 11: Glue and Screw Together Lower Workbench Assembly
Next, the lower workbench assembly follows a similar process.
All of the pieces in this lower section are symmetric so you can’t get them mixed up. The only thing to keep in mind is the position of the shelf and the orientation of the holes in the extension pieces. Make sure the holes are orientated at the top of each extension piece so the shelf isn’t covering any of them. Also, try to get the shelf support set to the same height on each extension piece so your shelf is level. Or at least, as level as your floor is.
- Start by laying the side extensions flat and marking the location for the shelf supports.
- Then glue and screw the shelf supports into the faces of the side extensions.
- Next, set the extension pieces upright and place the lower shelf on the shelf supports. Keep in mind the orientation of the extension pieces.
- Glue and screw the lower shelf into the shelf supports.
- Lastly, align, glue, and screw the shelf lips to the edges of the lower shelf. This acts as a stiffener to strengthen the shelf and a lip to keep items from sliding off.


Install Wheels (Optional)
If you’ve opted to add wheels to make this kid’s workbench easier to move around, then follow these next steps.
- First, mark out the location of the wheels on the panel as well as on the wheel mount blocks.
- Pre-drill the holes for the wheels into the wheel mount block.
- Then glue the wheel mount block to the side panel.
- Finally, screw the wheels into the wheel mount block.


The wheels are only on one side intentionally. This allows for the workbench to be moved, but have it sit solidly on the ground. It also means you don’t have to lock and unlock the wheels to move it.
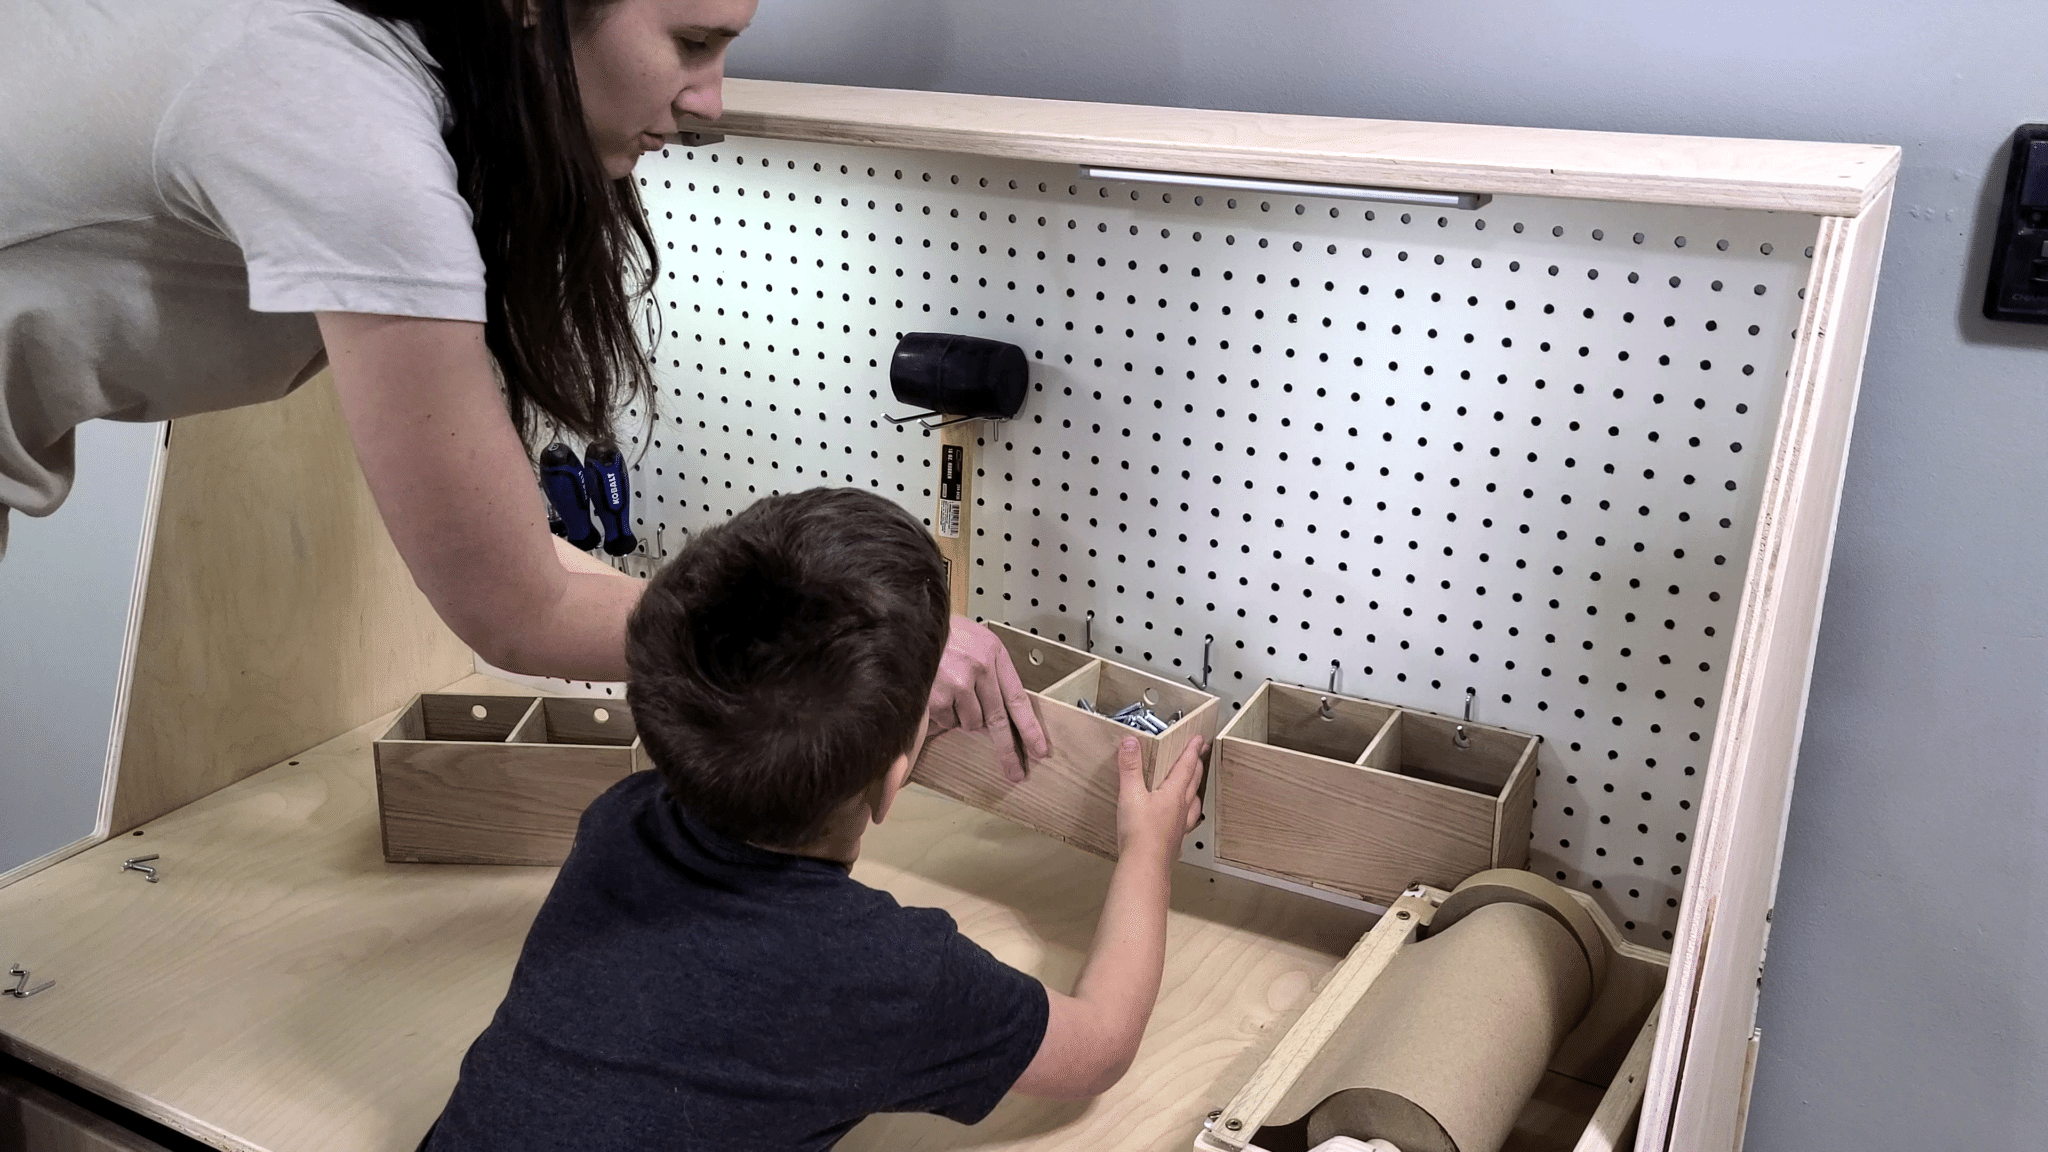
Step 12: Glue and Screw Together Bins and Accessories
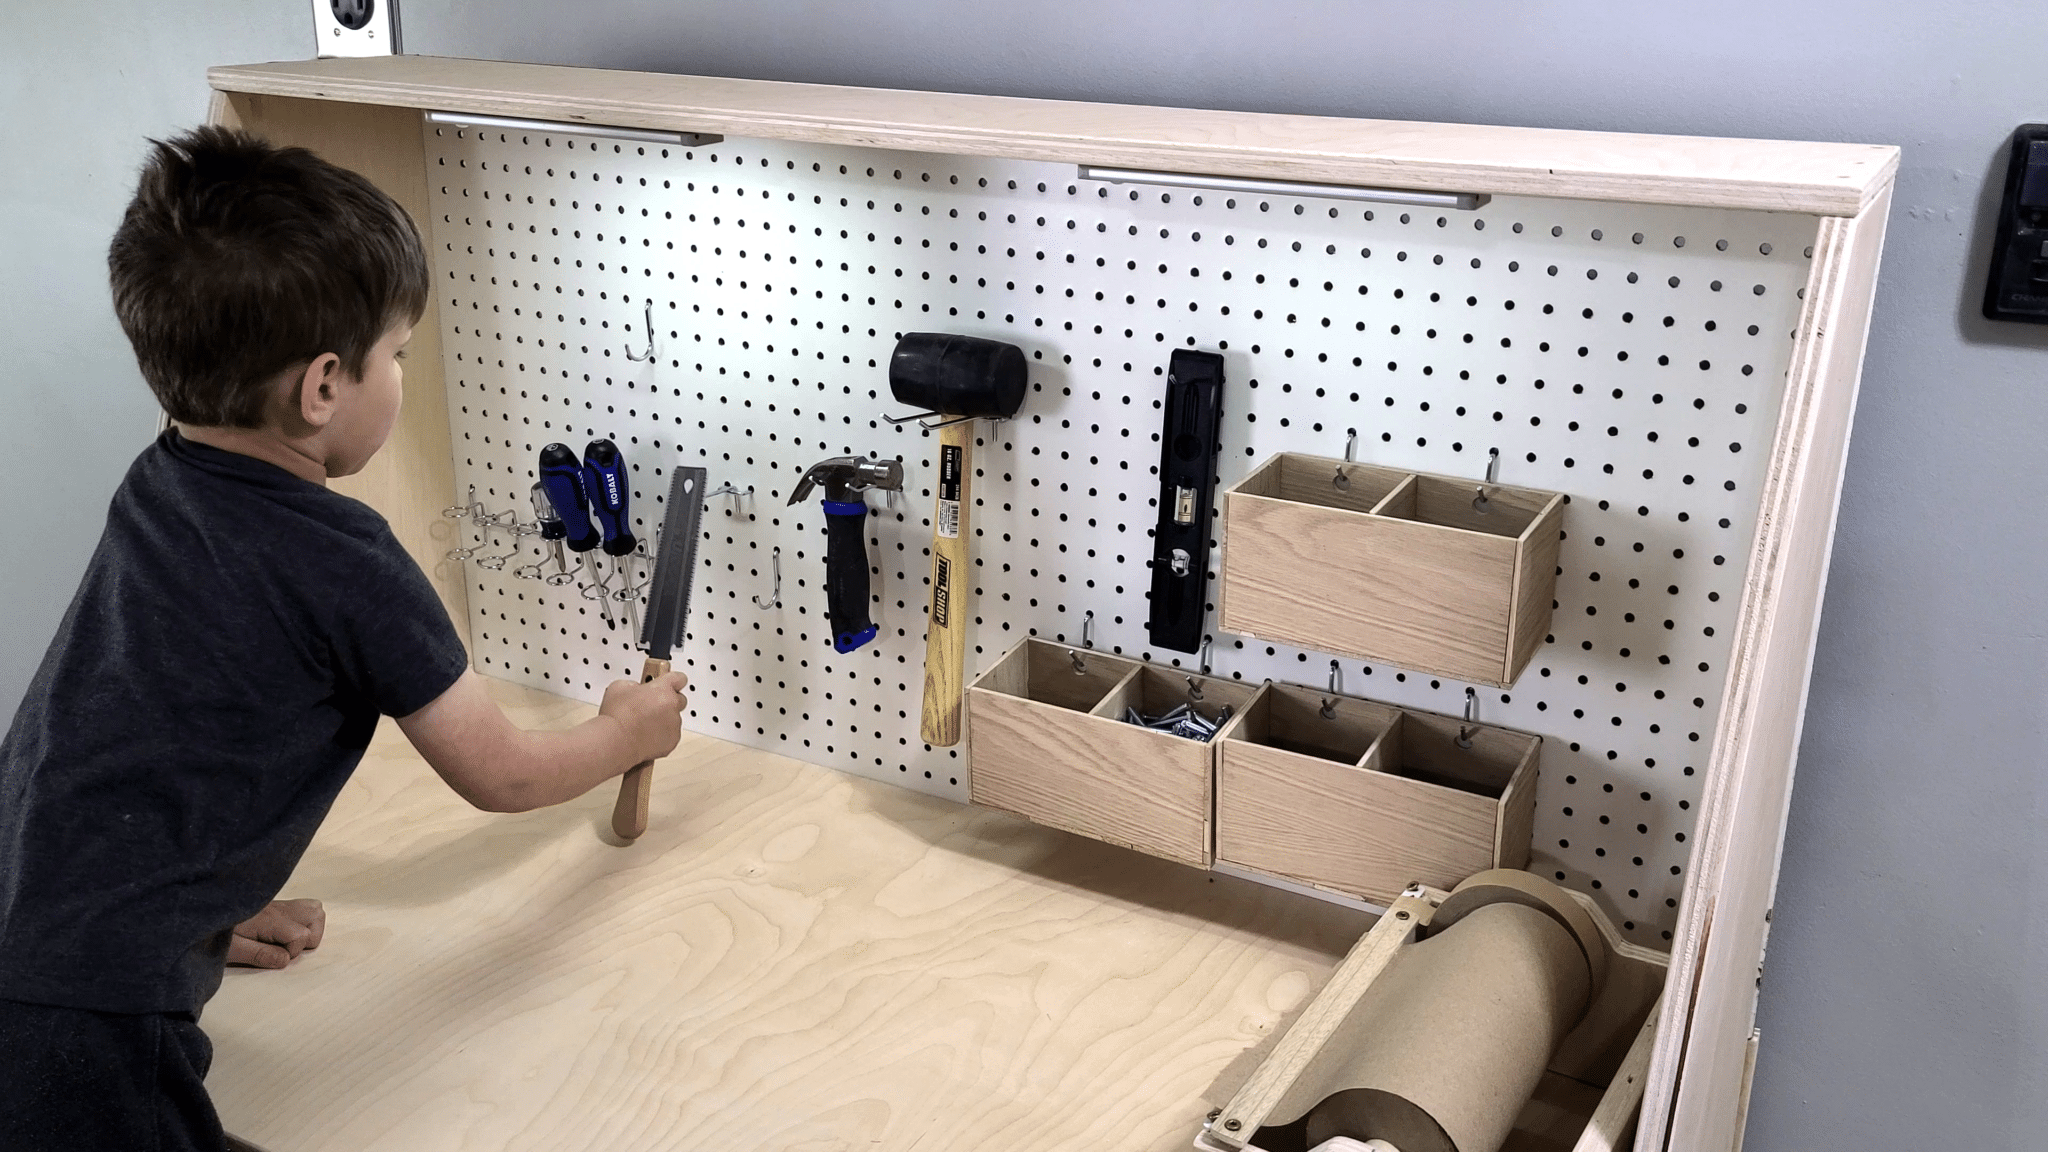
Next up are putting together the pegboard bins and the paper/tape dispenser.
Pegboard Bins
The pegboard bins may be a little more tricky. They aren’t thick enough to be held together with screws, and will only be held together with glue. A good tip is to use a few pieces of tape to temporarily hold everything together, then use a few clamps to apply pressure until the glue sets. We recommend doing the bodies first and then gluing on the bottoms after the bodies have dried. Remember these will be able to hang on the pegboard using pegboard hooks, so consider what wood grain/color is facing outwards on the bins.


Paper/Tape Dispenser
The paper/tape dispenser goes together very similarly to the drawers. The difference is that the dowel needs to be removable to replace supplies. To make this easier, you should sand one of the holes larger so the dowel can slip through easily. Then leave the other hole as a snug fit to keep it from walking. This way you can easily replace the paper and tape as they get used up. Once the dispenser is glued and screwed together, cut the dowel to match its final dimension and install it.
To help rip the tape and paper, we added a standard hacksaw blade. You just need a few screws in the holes in the end to hold it in place. The tape will naturally stick to this blade, but the paper will want to curl back onto the roll every time you let go. To help keep it in place, you can add the plywood strip just behind the hacksaw blade. You don’t want to tighten this down all the way. Just tighten it enough that it holds the paper, but not so much that it becomes difficult to pull the paper through.


Step 13: Apply Finish To Kid Workbench
To help keep the wood panels from warping and to help drops of glue pop off, we highly recommend that you wipe the workbench down with a little bit of finish. For something like this, we recommend a simple paste wax (also known as a finishing wax). This wax gives the wood a little life and sheen while providing a little protection to the surface. It is also super easy to apply. Use a rag to get some paste out of the can and then just rub it over the pieces. Couldn’t be simpler.
Hubby Tip: Paste Wax is also just an all-around must-have for every workshop. If you have any carbon steel or cast iron tools, you should treat them with a little paste wax every once in a while to protect them from rust. This is especially true with the cast iron surface of a table saw. You’ll also notice that wood and cross-cut sleds will slide along your table saw significantly easier after it has been treated with a bit of wax. Give it a shot!
Step 14: Combine Workbench Assembly
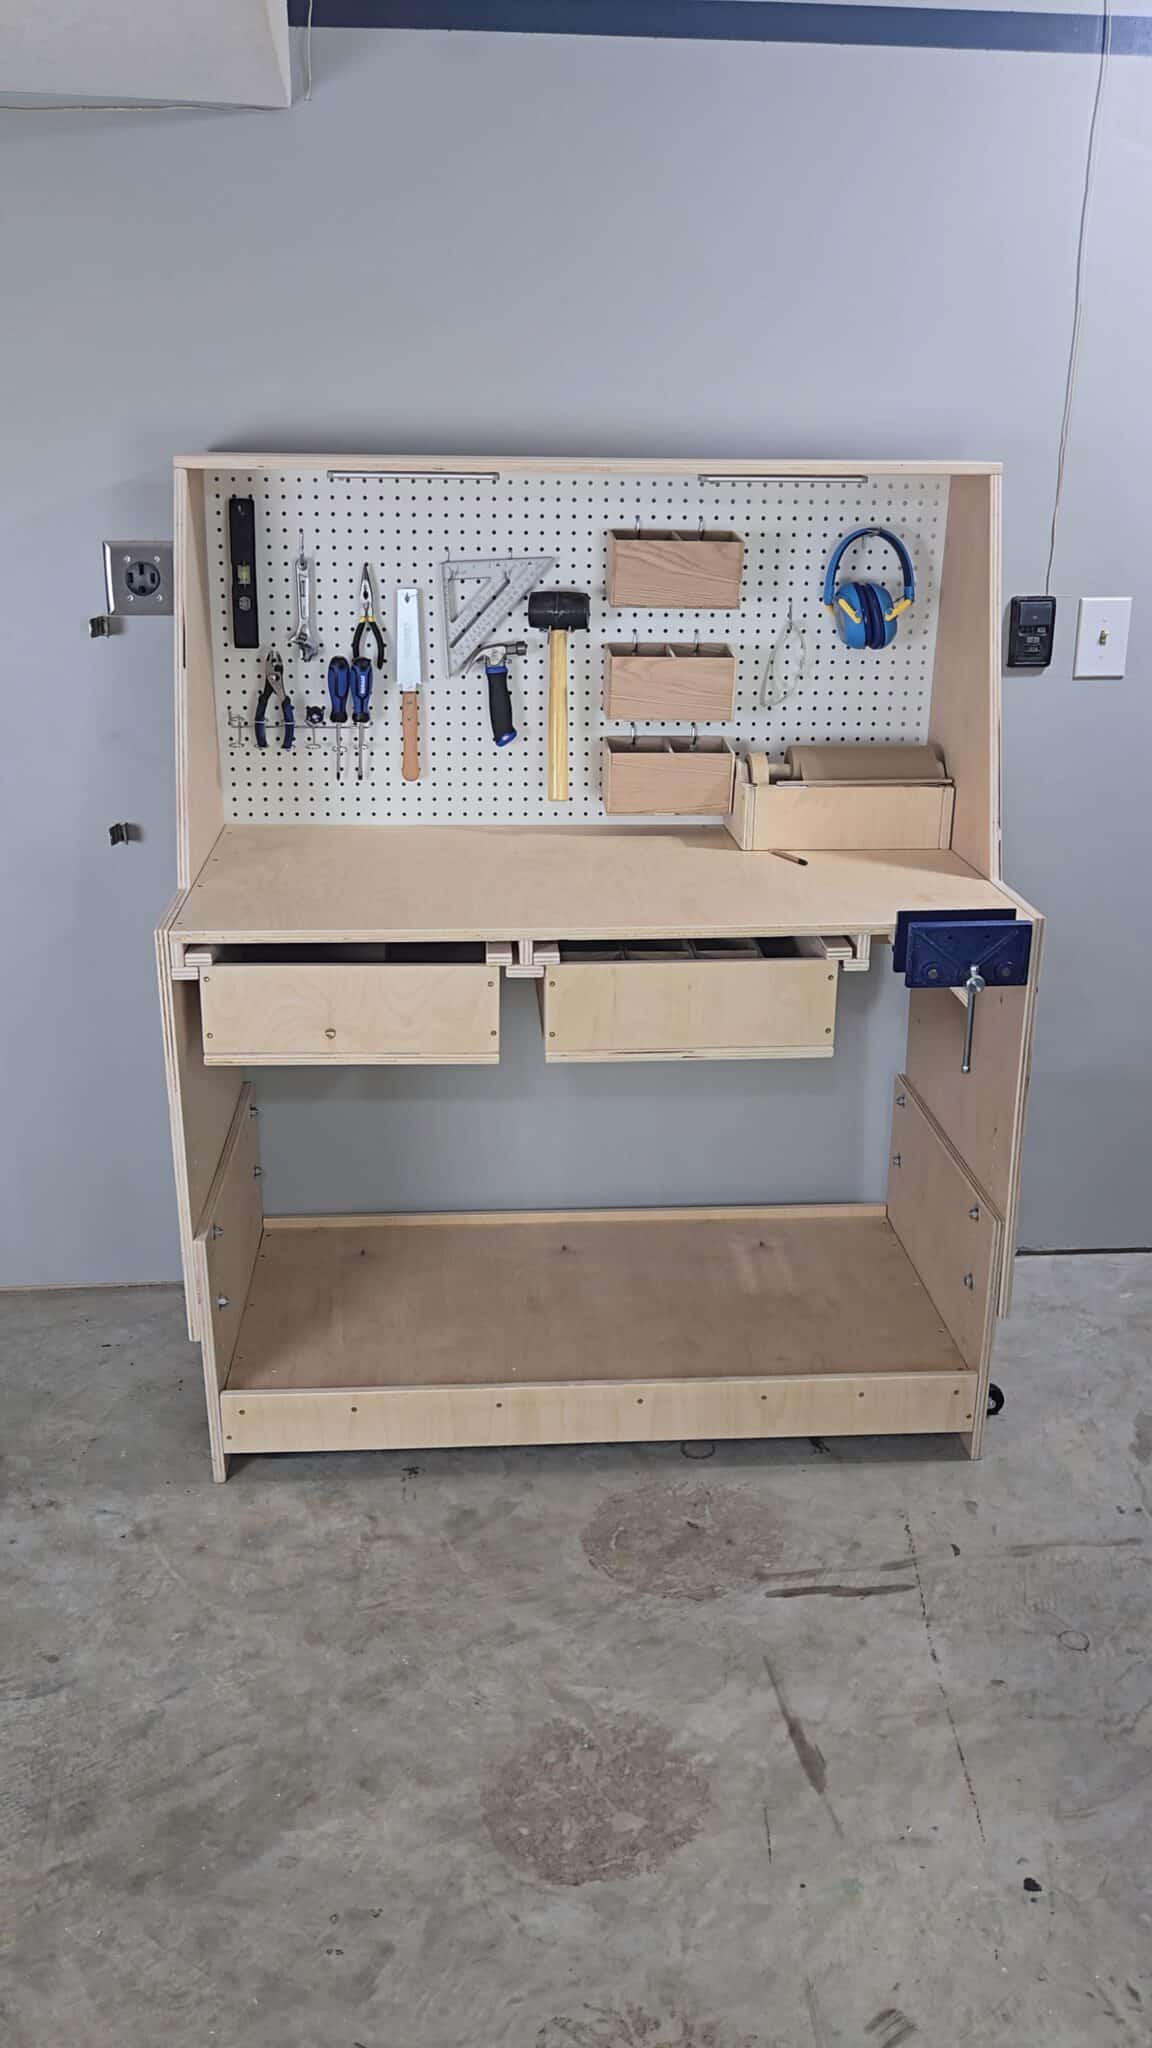
Once all of the parts have been assembled and finished, you are ready to put the entire kid’s workbench together. The easiest way to join the top and bottom halves is to lay the workbench down on its back. Then you can align the holes and install the bolts to lock them at your desired height. Lastly, stand the workbench back up and check that it is a good height for your kid.


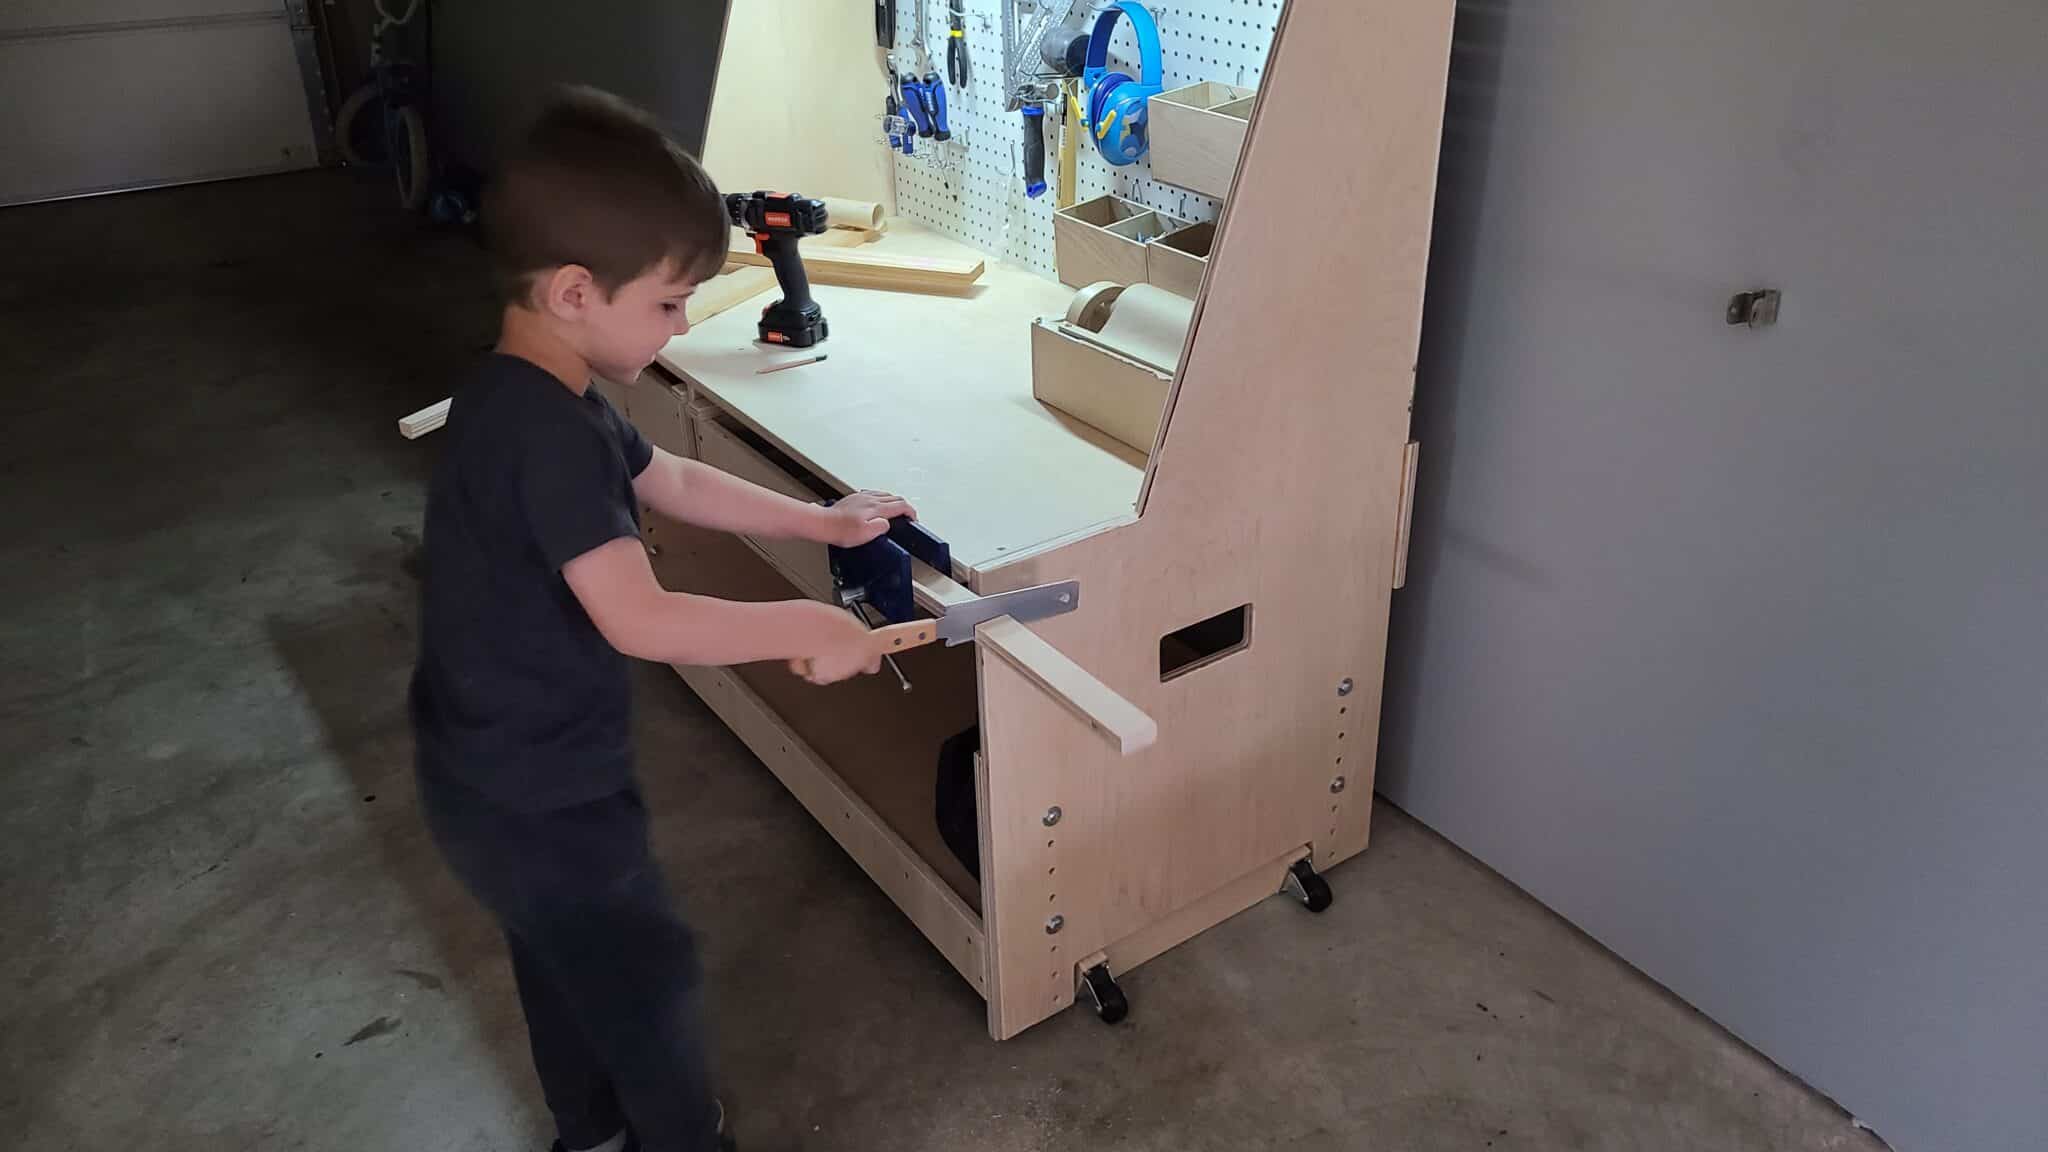
Adjustability & Mobility Features
If you need to adjust the height afterward as they grow, you can do this one side at a time if you get a second person to help you, or if you use a pair of clamps to hold the pieces in alignment while you insert and secure the bolts. We love being able to adjust the height as kids grow fast and we want them to be able to use the workbench for a long time.
We designed this piece with handholds to make it easier to move, but you can also add wheels on the side. Just cut a scrap piece of 2×4 into a wedge and attach the wheels to it. Then attach the wedge to the side of the piece so the wheels are just touching the ground.
Now to move the workbench, you just have to lift one side to pop up on the wheels and then you can drag it around. This design gives you a large lever arm when moving to make it as easy as possible for kids. But it also puts the sides directly on the ground to ensure you are as sturdy as possible when the workbench is being used and don’t need to mess with locking wheels.
Step 15: Stock with Tools, Nuts & Bolts, Paper, and Tape
Now that you have a completed adjustable workbench for your kid, it’s time to add in all the fun items for tinkering! Here are the tools and materials we added to bring our little maker’s dreams to life.
- Pegboard Hooks – You can customize and get pegboard hooks to fit whatever tools you use. If you plan to utilize all six bins, then remember you will need at least 12 single hooks (2 per bin).
- Small Vise – easy to use and great for clamping wood down so our kid can drill into wood without it twisting.
- Kid Tool Kit – these are real kid-size tools that work and were a perfect gift for our little one during the holiday.
- Power Drill – A small 12V drill is great for younger builders (our kid has used it since 3 years old). Otherwise, you can grab a more powerful one.
- Quick Flip Drill & Driver Bit – This is a game-changer as it makes switching between a drill bit and a driver bit so easy for kids. You simply have to slide it open and flip it instead of loosening and tightening the chuck while holding the bit (which can be difficult for kids!)
- Pull Saw – A small pull saw is great for them to easily cut through wood without needing a power tool. It’s perfect to use with the vise to clamp the wood down.
- Eye & Hearing Protection – It is important to have to protect eyes and ears, especially if the kid is working in a workspace with other power tools being operated.
- Assortment of Hardware – Kids need ways to attach pieces of their projects too, so grab an assortment of hardware to fill the bins with.
- Nails, Washers, Nuts, Bolts
- Screws – recommend torx head screws as they’re easier to line up for kids and the bit will stay aligned easier.
- Tape – Kids will use a surprising amount of tape to help hold projects together. We put kraft tape and packing tape in the DIY tape dispenser on the workbench.
- Paper Roll – Sketching out ideas is part of the fun, so we added a recycled paper roll to a DIY jig to sit on the workbench. (This one came at 17.5” and we just cut it in half on the table saw. Doubled the amount!)
- Rechargeable Lighting – Depending on the lighting where the workbench is a few rechargeable light strips attached to the underside of the top shelf can be helpful!
- Wood Scraps – Offcuts and scraps are perfect for a little maker to build with and can be stored on the workbench shelf.


There are some awesome little maker kits out there like KiwiCo Activity Kits (love the Kiwi set currently for our kid), NextMaker STEM Boxes, and MakeBlock box that gives your kid projects to work on with everything they need. Their new workbench would be the perfect place to start making with one of these kits. Our kid sure loves them!
Related – 10 Practical Gift Ideas For Little Makers & DIYers
Consider Secondhand Items
Kids aren’t always the gentlest with items they’re using, especially tools. Instead. It’s always great to reduce overconsumption by searching for secondhand items. Honestly, we have quite a few secondhand tools for our workshop!
Quick searches on Facebook Marketplace or a Buy Nothing Group. Garage and estate sale season is also a great time to find some cheap secondhand tools that would be a perfect addition to your kid’s workbench. You can also find scrap wood this way, too!
If you can’t find secondhand items, don’t stress it too much. Most tools should last a long time, so it’s not like you’re discarding them quickly. It’s all a balance!
Step 16: Help Your Kid Get To Building
With the adjustable kid workbench complete and fully equipped, it’s time to start tinkering with your kid!
Don’t forget to tag us on IG (@biglivinglittlefootprint) or send us a picture via email to show off your DIY kid workbench and what your little maker is building!
More DIY Projects
Over the years, we’ve done a lot of DIY projects and Sustainable Home Improvements. So check out more of our articles for inspiration!
- Hubby How To: DIY Flipping Workbench
- Hubby How To – DIY Wood Train Set
- Hubby How To: DIY Full Trundle Bed
- How To Build Your Own DIY Playroom Storage Shelves


Hope you and your kid build some amazing things using this DIY adjustable workbench! Let us know what projects you’ve used it for in the comments below!
Pin It!


Disclaimer: This post includes affiliate links, and I will earn a commission if you purchase through these links. Please note that I’ve linked to these products purely because I recommend them and they are from companies I trust. There is no additional cost to you.


